Gigamaxx
Moderator
- Joined
- May 15, 2016
- Messages
- 6,532
- Motherboard
- GIGABYTE X470 Arous Gaming 7 WiFi
- CPU
- Ryzen R9 3900X
- Graphics
- RX 480
- Mac
macOS versions tested and working with this EFi configuration: Yosemite, El Capitan, Sierra, High Sierra, Mojave and Catalina up to 10.15 beta 4.
I Picked up a Lenovo M93p Tiny PC for a TV box/PC Hackintosh project and it was real easy to get up and running.
It took all of ten minutes to install a new wifi card and put an existing SSD (HP HackBook Pro) with Catalina in to get it to boot into Catalina. This is one of the easiest Hacks I've done. I bought it second hand and it came without a disk drive but that was not important to me. I noticed it was a bit sluggish after running a few benches so I checked the box and it was getting pretty hot near the exhaust port.
After initial success I decided to pull its apart and clean it up good on the inside and out. I removed the CPU fan and HeatSink assembly and found lots of dusty lint that was covering up about 70% of the exhaust fins. I used some canned air to blow it out and then I cleaned the old thermal post off the CPU and Heatsink and reapplied new paste and reassembled the whole thing. It was rather easy as the fan and heatsink only need a small and medium sized Phillips head screwdriver to remove and replace. After the cleaning and after creating a power management CPU ssd.aml it runs very well and just get a little warm, I also ran it with the cover off to feel the Cooper heat pipe on top of the CPU and it is much cooler than before. Cleaning made a huge difference in performance and stability.
Heres a link to a video for Breakdown/disassmbly and rebuild of the Tiny.
Lenovo ThinkCentre M93 Tiny | Disassembly | Assembly | Upgrade | Mini PC | Tiny PC
Note: there is no need to remove the CPU from its socket for cleaning I just used a lint free rag with some rubbing alcohol on it to clean it in place. Removing the CPU will expose all those delicate and tiny pins to damage so if your not careful you could kill the motherboard. IF you have the i5 4570t then don't remove it unless you're felling bold and or confident.
Technical Specs:
Lenovo ThinkCentre M93p Tiny Desktop | Lenovo UShttps://www.lenovo.com › thinkcentre › m-series-tiny › m93-m93p v
Where to Buy:
Lenovo ThinkCentre M93P Tiny Mini Business Desktop ...https://www.amazon.com › Lenovo-ThinkCentre-Dual-Core-Processor-Ref...
Refurbished: Lenovo ThinkCentre M93p Tiny Desktop - 4th Gen Intel Core i5-4570T (Up to 3.60GHz), 8GB RAM, NEW 240GB SSD, DisplayPort, HDMI, VGA, LAN, Wi-Fi, Windows 10 Pro, Keyboard & Mouse - Grade A
Installation: Note: ***Do not use the VGA port for video output to monitor, Apple does not support this you must use the Displayport to properly install MacOS (see here #284).
1. To start installation begin with this thread to create a bootable USB.
UniBeast: Install macOS Catalina on Any Supported Intel-based PC
2. After it is complete use these files to replace the ones in the Clover/EFi folder on the USB. Use EFIMounter or Clover Configurator to mount the EFI of the USB and replace the entire EFi folder with this one below. Download the Video and watch it to mount the EFi of the installer and use Clover Configurator app to add the serial #, SMUUID, and ROM values so you have a unique setup before installing your system. Below are 2 options for the EFI files one for the i5 and one for the i7 model. Don't use the wrong one for your system because the power management could cause issues. The Tools zip contains some items for after the install and this folder should be placed in your USB where the Install MacOS "Catalina" or other version dmg file is located. This will allow you to make your fresh install bootable by transferring the EFI to your main drive. After instal is complete you may also want to add this folder to your desktop for future use, especially before updates.
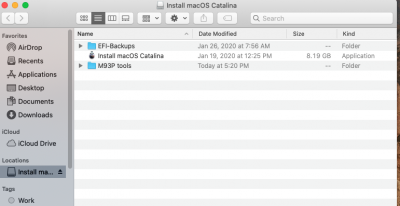

You will want to add: Serial Number, SMUUID, and ROM to the EFI config.plist see video below.
Unibeast EFI Serail Number change.zip
3. Turn on the M93p and use the FN and F12 buttons to enter bios. Depending on which version of bios you have it may need to be done by tapping rapidly or rocking the keys back and forth to enter the bios. Once in bios set the Graphics DVMT or Dedicated Memory to 64mb. Disable CSM and set boot priority to PMAP UEFI for the USB to boot first option. Also follow the Unibeast guide bios setting as much as possible given the limited options available.
***Check your bios version, anything with a date past 2016 may not be compatible. I updated the bios on one of my units and it was kernel panic attack. It took several hours of research and meddling to get it back to the 2016 version. See post #3 below if you have incompatible bios version. To check turn on the PC and hit the Fn key and F12 keys and toggle between them. Check your bios date as long as its 2016 or earlier you should be ready to carry on with the install. Update: It was anAutoUpdate from the Lenovo site and it Autodetected the drivers for updating. Since it was Windows 10 it left the top box Windows 7, 8 update "compatible with Other OS" unchecked. I repeated the update and checked this box and now it is compatible. So if you do the update using windows10 make sure to check this box on the top of the options list. See Post 3 for Picture of the Windows 7,8 option.
4. The install process will take several reboots, the first part will be selecting the USB Install option, after that it will require 2-3 more reboots and then you want to select "Install from (enter disk name here)". If you don the install a few times and it leads to "cannot install this device after a couple of successful reboots then go to the "boot from (your disk name here) option". The config.plist provided for this step should show all the boot option available so it is a good Idea to name your disk something other than Catalina because this is the name the UNIBEAST USB drive will be named. You can always change the drive name after the install.
5. After you have completed the install go to this post for post install instructions. Post Install
Front view: (2) USB 3.0/2.0 ports, Mic and Headphone 1/8" ports and Power Button.

Rear View: Power port, Displayport, (3) USB 3.0/2.0 ports, VGA port (not useable for Catalina), RJ45 Lan and Antenna connector.

LAN Ethernet RJ45 LAN is solved by using IntelMausiEthernetkext.
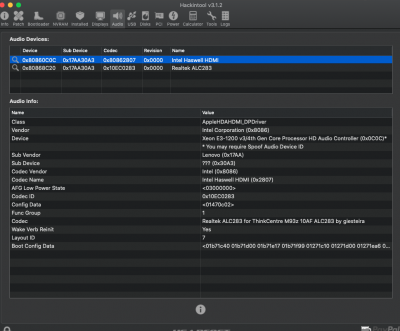
DISPLAYPORT & AUDIO I only have tested 1080p resolutions as I don't have any 4k monitors at this time. Audio is solved by either using VooDooHDAkext or AppleALCkext. AppleALCKext enables Mic and Headphones as well as Displayport audio using audio injection #66 in clover.
USB Configuration
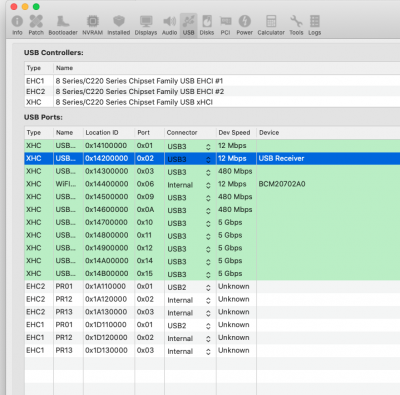
I used this thread to create a USBkext for this build. USB for Beginners
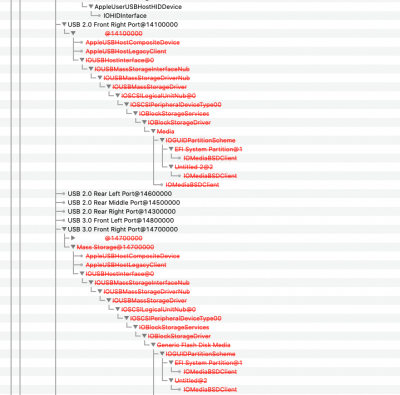
It has (2) USB 3.0/2.0 ports on the front of the case and (3) USB 3.0/2.0 ports on the back. The provided kext lists all the ports by location as well in IOReg and Hackintool. Check out this thread as well @itwas and @UtterDisbelief really came through to figure out how to customize the USB port naming. Hats off to both, scroll down the posts to see the progress/solution. USB Port Naming
There are more Internal USB hubs inside the case for added modifications like a DVD drive, etc.. I may delve into that later to see what is available and how to connect and configure.
WiFi & Bluetooth
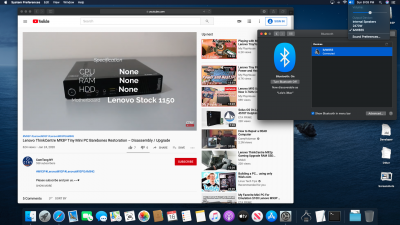
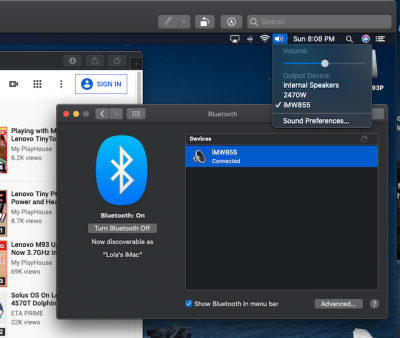
Wifi is connected via a Half Mini pic slot inside the case it has two connectors one for external and the other attached to the inner case on the hard drive bracket. I used a BCM94352HMB half mini card to get wifi working. I picked mine up for around $23US they are readily available and the BCM94360HMB half mini should also work. I tested bluetooth Audio earbuds and a speaker system it works great, so far no drop off.

WiFi Speed Test with BCM94352HMB

Benchmarks:
The first benchmarks are using the Activity monitor as well as a video capture (screenshots) mode to show power consumption/management of the CPU/Graphics.
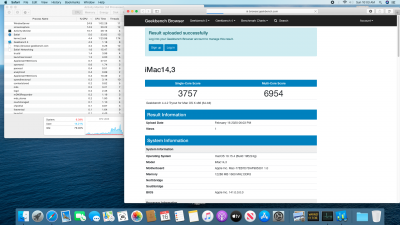
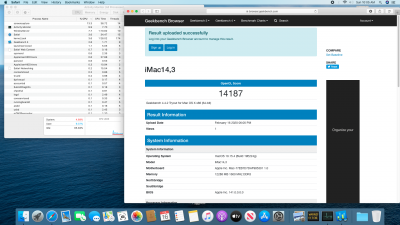
Without any other apps running


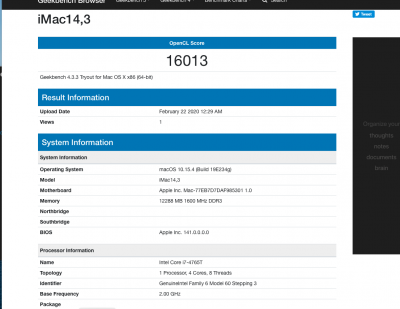
i7 4765t Geekbench results without any other apps running.

What Works: It Boots, Power Management, Integrated Graphics, internal WIFI, RJ45 LAN, USB ports 3.0/2.0, Audio, Shutdown, Sleep, Wake From Sleep, and Bluetooth.
What Doesn't Work: Internal Speaker/Mic (works in El Capitan, but real faint).
Credits: TonyMacx86 for starting this site, the Installation/Unibeast guide, Rehabman (years of support to the community), UtterDisbelief (USB Guide), itwas for the USB naming tips, Acidanthera (all those useful kexts too many to name), The CLOVER Team, All the moderators that help out others, all the members that also help others, and good ole Stork for helping me to set up this guide.
Note: if not using this exact same model and CPU i5 4570t remove the SSDT.aml from the Clover/Acpi/Patched folder. You will want to run your own SSDT.aml using either macAISL or PikerA-PRGen method. If your system isn't M93P tiny then this guide may work somewhat but do not expect 100% results.
I Picked up a Lenovo M93p Tiny PC for a TV box/PC Hackintosh project and it was real easy to get up and running.
It took all of ten minutes to install a new wifi card and put an existing SSD (HP HackBook Pro) with Catalina in to get it to boot into Catalina. This is one of the easiest Hacks I've done. I bought it second hand and it came without a disk drive but that was not important to me. I noticed it was a bit sluggish after running a few benches so I checked the box and it was getting pretty hot near the exhaust port.
After initial success I decided to pull its apart and clean it up good on the inside and out. I removed the CPU fan and HeatSink assembly and found lots of dusty lint that was covering up about 70% of the exhaust fins. I used some canned air to blow it out and then I cleaned the old thermal post off the CPU and Heatsink and reapplied new paste and reassembled the whole thing. It was rather easy as the fan and heatsink only need a small and medium sized Phillips head screwdriver to remove and replace. After the cleaning and after creating a power management CPU ssd.aml it runs very well and just get a little warm, I also ran it with the cover off to feel the Cooper heat pipe on top of the CPU and it is much cooler than before. Cleaning made a huge difference in performance and stability.
Heres a link to a video for Breakdown/disassmbly and rebuild of the Tiny.
Lenovo ThinkCentre M93 Tiny | Disassembly | Assembly | Upgrade | Mini PC | Tiny PC
Note: there is no need to remove the CPU from its socket for cleaning I just used a lint free rag with some rubbing alcohol on it to clean it in place. Removing the CPU will expose all those delicate and tiny pins to damage so if your not careful you could kill the motherboard. IF you have the i5 4570t then don't remove it unless you're felling bold and or confident.
Technical Specs:
Lenovo ThinkCentre M93p Tiny Desktop | Lenovo UShttps://www.lenovo.com › thinkcentre › m-series-tiny › m93-m93p v
Where to Buy:
Lenovo ThinkCentre M93P Tiny Mini Business Desktop ...https://www.amazon.com › Lenovo-ThinkCentre-Dual-Core-Processor-Ref...
Refurbished: Lenovo ThinkCentre M93p Tiny Desktop - 4th Gen Intel Core i5-4570T (Up to 3.60GHz), 8GB RAM, NEW 240GB SSD, DisplayPort, HDMI, VGA, LAN, Wi-Fi, Windows 10 Pro, Keyboard & Mouse - Grade A
Installation: Note: ***Do not use the VGA port for video output to monitor, Apple does not support this you must use the Displayport to properly install MacOS (see here #284).
1. To start installation begin with this thread to create a bootable USB.
UniBeast: Install macOS Catalina on Any Supported Intel-based PC
2. After it is complete use these files to replace the ones in the Clover/EFi folder on the USB. Use EFIMounter or Clover Configurator to mount the EFI of the USB and replace the entire EFi folder with this one below. Download the Video and watch it to mount the EFi of the installer and use Clover Configurator app to add the serial #, SMUUID, and ROM values so you have a unique setup before installing your system. Below are 2 options for the EFI files one for the i5 and one for the i7 model. Don't use the wrong one for your system because the power management could cause issues. The Tools zip contains some items for after the install and this folder should be placed in your USB where the Install MacOS "Catalina" or other version dmg file is located. This will allow you to make your fresh install bootable by transferring the EFI to your main drive. After instal is complete you may also want to add this folder to your desktop for future use, especially before updates.
M93P Tiny i5 4570t EFI. Lenovo M93P i5 Tiny EFI.zip
M93P Tiny i7 4795t EFI. Lenovo M93P i7 Tiny EFI.zip
M93P Tools. M93P tools.zip
Tools for the Installer location
M93P Tiny i7 4795t EFI. Lenovo M93P i7 Tiny EFI.zip
M93P Tools. M93P tools.zip
Tools for the Installer location


You will want to add: Serial Number, SMUUID, and ROM to the EFI config.plist see video below.
Unibeast EFI Serail Number change.zip
3. Turn on the M93p and use the FN and F12 buttons to enter bios. Depending on which version of bios you have it may need to be done by tapping rapidly or rocking the keys back and forth to enter the bios. Once in bios set the Graphics DVMT or Dedicated Memory to 64mb. Disable CSM and set boot priority to PMAP UEFI for the USB to boot first option. Also follow the Unibeast guide bios setting as much as possible given the limited options available.
***Check your bios version, anything with a date past 2016 may not be compatible. I updated the bios on one of my units and it was kernel panic attack. It took several hours of research and meddling to get it back to the 2016 version. See post #3 below if you have incompatible bios version. To check turn on the PC and hit the Fn key and F12 keys and toggle between them. Check your bios date as long as its 2016 or earlier you should be ready to carry on with the install. Update: It was anAutoUpdate from the Lenovo site and it Autodetected the drivers for updating. Since it was Windows 10 it left the top box Windows 7, 8 update "compatible with Other OS" unchecked. I repeated the update and checked this box and now it is compatible. So if you do the update using windows10 make sure to check this box on the top of the options list. See Post 3 for Picture of the Windows 7,8 option.
4. The install process will take several reboots, the first part will be selecting the USB Install option, after that it will require 2-3 more reboots and then you want to select "Install from (enter disk name here)". If you don the install a few times and it leads to "cannot install this device after a couple of successful reboots then go to the "boot from (your disk name here) option". The config.plist provided for this step should show all the boot option available so it is a good Idea to name your disk something other than Catalina because this is the name the UNIBEAST USB drive will be named. You can always change the drive name after the install.
5. After you have completed the install go to this post for post install instructions. Post Install
Front view: (2) USB 3.0/2.0 ports, Mic and Headphone 1/8" ports and Power Button.
Rear View: Power port, Displayport, (3) USB 3.0/2.0 ports, VGA port (not useable for Catalina), RJ45 Lan and Antenna connector.
LAN Ethernet RJ45 LAN is solved by using IntelMausiEthernetkext.
DISPLAYPORT & AUDIO I only have tested 1080p resolutions as I don't have any 4k monitors at this time. Audio is solved by either using VooDooHDAkext or AppleALCkext. AppleALCKext enables Mic and Headphones as well as Displayport audio using audio injection #66 in clover.


USB Configuration
I used this thread to create a USBkext for this build. USB for Beginners
It has (2) USB 3.0/2.0 ports on the front of the case and (3) USB 3.0/2.0 ports on the back. The provided kext lists all the ports by location as well in IOReg and Hackintool. Check out this thread as well @itwas and @UtterDisbelief really came through to figure out how to customize the USB port naming. Hats off to both, scroll down the posts to see the progress/solution. USB Port Naming
There are more Internal USB hubs inside the case for added modifications like a DVD drive, etc.. I may delve into that later to see what is available and how to connect and configure.


WiFi & Bluetooth
Wifi is connected via a Half Mini pic slot inside the case it has two connectors one for external and the other attached to the inner case on the hard drive bracket. I used a BCM94352HMB half mini card to get wifi working. I picked mine up for around $23US they are readily available and the BCM94360HMB half mini should also work. I tested bluetooth Audio earbuds and a speaker system it works great, so far no drop off.


WiFi Speed Test with BCM94352HMB
Benchmarks:
The first benchmarks are using the Activity monitor as well as a video capture (screenshots) mode to show power consumption/management of the CPU/Graphics.


Without any other apps running


i7 4765t Geekbench results without any other apps running.


What Works: It Boots, Power Management, Integrated Graphics, internal WIFI, RJ45 LAN, USB ports 3.0/2.0, Audio, Shutdown, Sleep, Wake From Sleep, and Bluetooth.
What Doesn't Work: Internal Speaker/Mic (works in El Capitan, but real faint).
Credits: TonyMacx86 for starting this site, the Installation/Unibeast guide, Rehabman (years of support to the community), UtterDisbelief (USB Guide), itwas for the USB naming tips, Acidanthera (all those useful kexts too many to name), The CLOVER Team, All the moderators that help out others, all the members that also help others, and good ole Stork for helping me to set up this guide.
Note: if not using this exact same model and CPU i5 4570t remove the SSDT.aml from the Clover/Acpi/Patched folder. You will want to run your own SSDT.aml using either macAISL or PikerA-PRGen method. If your system isn't M93P tiny then this guide may work somewhat but do not expect 100% results.
Attachments
Last edited:

