Contribute
Register

[SUCCESS] Gigabyte Designare Z390 (Thunderbolt 3) + i7-9700K + AMD RX 580

Oh, you need to modify your config.plist.

ACPI->Quirks->EnableForAll to NO

for your stretched console try
Misc->Boot->ConsoleMode to Max
Misc->Boot->Resolution to Max


Thanks, that fixed the Apple logo.... picker still looks a bit crappy. Also, midway through the apple logo screen goes dark/flickers, then finishes the Apple bar and into macOS. Clover was clean almost like my real Mac. Is yours doing that too? Just putting it on the to do list for this weekend.
 
Just an update for UAD users.

If you use your UA devices on the same Thunderbolt input you are fine, I have 4 UAD devices chained together you will be fine, I really recommend doing a hardware reset if you have use the devices on another mac or windows.

This is the issue, you cannot say have 3 devices on one TB3 input and one device on the other, this crashes the operating system. This is not happening under windows on the same hardware, so we need to look for a fix for the TB drivers.
 
How difficult is it to add a bootable Windows drive to an existing Hack?

Fairly straight forward, create Windows Install media and then there is tips included in Spoiler on Post #1

Spoiler: Tips for Installing Windows 10 Microsoft releases Feature Updates to Windows on a periodic basis. These are different from security and bug fix releases, and contain new and updated functionality. Unfortunately, Windows will interfere with the EFI partition of other drives in the system, and may prevent Clover from starting.

It’s been suggested by some users that Windows should be installed in the M2M slot (closest to CPU) so that it updates/modifies its own EFI partition. Just as Linux enumerates all disks as /dev/sda, /dev/sdb, /dev/sdc, etc. based on an internal hardware order, Windows does a similar thing. It enumerates disks as disk1, disk2, disk3, etc. and will update/modify the EFI partition on the first disk that contains an EFI partition. M2M is disk1. M2P is disk2, and the SATA ports take it from there. Therefore, moving the Windows NVMe SSD to the M2M slot will attach it to disk1 and Windows should no longer interfere with any other EFI partitions on other disks. Note that I have not tested this myself. Update 17 May 2019: This has been confirmed to work. More details located here.

When actually installing Windows, all other NVMe and SATA drives should be physically removed from the system. Failure to do so may result in a number of installation errors. In BIOS, it may be wise to change Windows 8/10 Features to Windows 8/10 or Windows 8/10 WHQL. After installation is completed, this should be changed back to Other OS.

If you wish to use WiFi and Bluetooth with Windows, please follow this Mini-Guide:
https://www.tonymacx86.com/threads/...olt-3-i7-9700k-amd-rx-580.267551/post-1970358

Make sure to create backups prior, and remove/Disabled all SATA drives from build when installing.
 
Fairly straight forward, create Windows Install media and then there is tips included in Spoiler on Post #1


Make sure to create backups prior, and remove/Disabled all SATA drives from build when installing.
Is moving an existing windows drive doable?
 
Is moving an existing windows drive doable?

If the drive was from another motherboard and CPU (a different machine) you would have to add a new license or deactivate Windows on your current machine, then update all drivers. Better with a clean install.
 
Thanks, that fixed the Apple logo.... picker still looks a bit crappy. Also, midway through the apple logo screen goes dark/flickers, then finishes the Apple bar and into macOS. Clover was clean almost like my real Mac. Is yours doing that too? Just putting it on the to do list for this weekend.

Yes, but mine did that with Clover as well.
 
Hey @pitt1717 , Since using the new version of OpenCore are you seeing it change your boot device in BIOS when you reboot?
I can set mine to boot from my macOS (into OpenCore), and it works fine, but then when I reboot the device has changed and it bypasses openCore and boots straight into windows. Not sure if its just me, or if its an issue with the new OC release.
 
Quick Update:
  • I've ordered a cheap non-working Designare Z390 in order to take apart the VRM shroud and extract the Thunderbolt ROM. My working system is too critical to be taken out of service at this time!
  • The non-working board should arrive in a few days, so perhaps by next weekend I'll have another update.
Update:
  • Received a used Designare Z390 today and easily removed the VRM shroud.
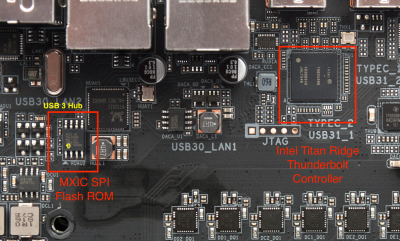
  • The MXIC (Macronix) Flash ROM located under the VRM shroud turns out to contain firmware for the 4-port USB 3 hub at HS07/SS07. The firmware dump for this is attached (but it's useless).
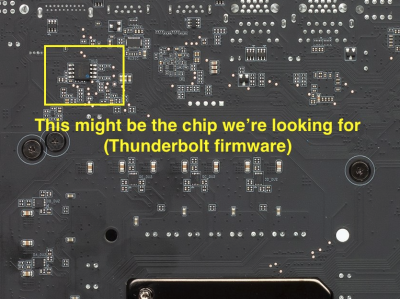
  • However, there is a Winbond Flash ROM (W25Q80..) on the back side of the motherboard, located even closer to the Titan Ridge controller than the MXIC chip. This is most likely the correct Thunderbolt firmware chip.
  • Unfortunately, my CH341A reader is unable to detect and therefore read from or write to this chip.
  • Will try reading this chip from my primary Z390 Designare in about a day or two. Because this chip is on the back side, it might be easily accessible from the back of the PC case.
Screen Shot 2020-01-16 at 7.42.58 PM.png Screen Shot 2020-01-10 at 3.07.46 AM.png

(In yellow is the Winbond 25Q80... Flash ROM that most likely contains Thunderbolt firmware.)

Update: After a little help from Google, it seems the Winbond W25Q80-series SPI chip (Serial Peripheral Interface) is a low-voltage device. My CH341A programmer may only support 3.3V devices so I've ordered a different USB programmer that is explicitly compatible with the Winbond W25Q80. Next update pending...
 

Attachments

  • Gigabyte Designare Z390 - MXIC USB3 Hub.zip
    19.9 KB · Views: 87
Last edited:
Back
Top