Contribute
Register

[SUCCESS] Gigabyte Designare Z390 (Thunderbolt 3) + i7-9700K + AMD RX 580

Because the Catalina Mini-Guide has many tiny little devilish details, please print it out on paper (if you have not done so already) and follow it carefully. Mark each completed step with a pen or pencil. The devil is in the details. One wrong click or one missed keystroke can ruin the installation.

Installing Windows is easy. Download and run Microsoft's Media Creation Tool (simply Google for it). Then physically remove all macOS NVMe and SATA SSDs before starting the Windows installation. Also change BIOS --> Windows 8/10 Features --> Windows 8/10.

When Windows installation is completed, you may change BIOS --> Windows 8/10 Features back to Other OS.


Could I also test with Linux? If so would I use similar BIOS settings to that of the hackintosh build? Or do you recommend windows to test instead?
 
Wanted to pop in and say a big thank you to CaseySJ for the guide and Hylkepylke for the DSDT.

I built my first hack in 10 years a couple of weeks ago. Managed to get Catalina 10.15.2 installed (first by installing 10.15.1 and updating, without problem) using an EFI folder from forum and iMac19,1. But every time I installed a new kext or something else that rebuilt the kernel cache it would get stuck with "couldn't allocate" at boot. Tried calculating slide value (twice, reset CMOS and cleared the memory map in between) but it just didn't have enough space. Switched to OpenCore while trying and got that running fine at first too, but same thing.

So I gave up and turned off the iGPU and went for iMacPro1,1 instead. That made it stable but a few things missing. Most importantly NVRAM. I just couldn't get the emulation to work and of course it didn't work natively. Thanks to Hylkepylke's DSDT it's now working! That also fixed the PCI device list in System Info (which previously only showed the Titan Ridge).
It's a bit surprising that OcQuirks in combination with FwRuntimeServices allows Clover to boot this system with iGPU enabled. The same "quirks" we specify in OcQuirks to configure FwRuntimeServices will fail when they are specified in OpenCore's config.plist. Because FwRuntimeServices does work with Clover (with iGPU enabled), I'm hopeful that it will eventually work with OpenCore as well.
 
Could I also test with Linux? If so would I use similar BIOS settings to that of the hackintosh build? Or do you recommend windows to test instead?
Yes you may install Linux. Just use default BIOS parameters (Load Optimized Defaults) for Linux.
 
Hey guys, been extremely busy with work for the last few weeks, so virtually no hacking for me :( but now have some time to get back to it... As some of you have noticed, the "LastBootedVolume" in Clover's Boot option isn't working. (Iit just sits at the boot screen and you have to manually choose.) I had been doing some testing on this before work interrupted, and it (from Clover's debug logs) seems to be a problem with NVRAM. Mainly, if I remove emuvariable, Clover will boot the last booted volume, but of course, since emuvariable is required for the mem fix drivers, this presents a problem...

Before I tweak and test further, has enabling RC scripts fixed this issue for you guys? I remember having it installed the first time around, and it made no difference, but that was an earlier Clover version... Or does anyone have any other possible workarounds for this? As I've got multiple OS installed, using LastBootedVolume was a convenience. lol
 
I think it's working! Cinebench 20 = 4919. Ah! Now it's freezing running a GB5 score...

The machine will not restart. I have to press the reset button. I've installed PProblem Report Generating tools but I haven't been able to find any documentation to run the command and get a report other than "press F4/press F2 during Clover boot..."

I'll post my EFI. Maybe I've done something silly...

BTW, I'm running Mojave.
 
Last edited:
hi @CaseySJ
(OcQuirks.efi Fw RuntimeServices.efi) Is there a conflict with AptioMemoryFix.efi

:crazy::crazy::crazy:I found that the previous method to solve the black screen failed in the case of (Shut down-Unplug power-Plug in power-Turn on)
 
Last edited:
*** OpenCore 0.5.7 / 0.5.8 / 0.5.9 Mini-Guide for Designare Z390 ***
(Please do not quote this guide in its entirety. Post a link instead.)

3 Aug 2020: OpenCore 0.6.0 EFI is available here
7 Sep 2020: OpenCore 0.6.1 EFI
is also available here


THIS GUIDE IS OUTDATED
PLEASE SEE OpenCore 0.6.3 Mini-Guide


With special thanks to @hylkepylke and @MuffinCrumbs we have created an OpenCore EFI that you may experiment with. Please note the following before proceeding:
  • Avoid this if you're new to Hackintoshing.
  • This procedure is for Designare Z390 with Firmware versions F6 through F9b only.
  • If you're switching from CLOVER, make a full bootable backup of your current macOS SSD.
  • This procedure sets up the computer with the same SMBIOS name that you're currently using. If you're using iMac19,1 or iMacPro1,1 there is no need to change the SMBIOS name or even your existing serial numbers.
  • IMPORTANT:
    • The ZIP files attached below also set NVRAM --> LegacyEnable to false and Booter --> Quirks --> DisableVariableWrite to false. In combination with SSDT-NVRAM.aml, these two changes enable native NVRAM.
    • You must unlock the MSR 0xE2 register by following the procedure described here.
NOTES:
  • OpenCore is in active development and subject to regular and substantial revision.
  • When installation is completed, Thunderbolt status can be checked by looking at System Information --> PCI instead of System Information --> Thunderbolt. The Thunderbolt section will say No drivers are loaded, but Thunderbolt will still be operational.
  • If using a Samsung EVO 970 Plus NVMe SSD, please ensure it has the latest Samsung firmware. Please see NOTE 5a at the top of Post #1.
  • Review all 7 NOTES at the top of Post #1.
  • USB 2.0 devices will not work when connected to any of the USB-C ports. This includes the two Thunderbolt ports on the rear IO panel and a USB-C port on the computer case if your case supports it. USB 3.x devices, however, will function properly. This was done intentionally in order to avoid exceeding the macOS limit of 15 USB ports per controller.
  • USB-C devices will work when both of these criteria are met:
    • USB-C device natively supports USB 3.x.
    • USB-C cable itself explicitly supports USB 3.x. Most USB-C cables do not support USB 3.x so please check carefully. Here's an example from Amazon.
Two Versions to Choose From:
  • OpenCore standard version.
    • This includes the official 0.5.7, 0.5.8, 0.5.9 releases of acidanthera's OpenCore package.
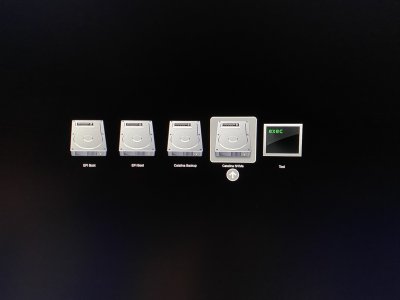
    • OC 0.5.7 uses Builtin text mode picker.
      • To use this version, download the file OpenCore-STANDARD-0.5.7 for Designare Z390 - NVRAM.zip
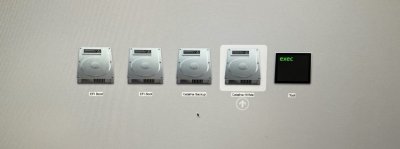
    • OC 0.5.8 and 0.5.9 use graphical OpenCanopy picker.
      • To use 0.5.8, download the file OpenCore-STANDARD-0.5.8 for Designare Z390 - NVRAM.zip
      • To use 0.5.9, download the file OpenCore-STANDARD-0.5.9 for Designare Z390 - NVRAM.zip
        OpenCanopy-Example.jpg
      • This version includes the following new items:
        • UsbWakeFixup.kext and SSDT-USBW.aml for one-key wake from sleep
        • NVMeFix.kext for improved power management of third-party NVMe SSDs
        • Boot argument igfxfw=2 for improved utilization of iGPU in compute tasks
  • OpenCore NDK Fork.
    • The N-D-K fork of OpenCore is based on the latest ongoing releases of the standard OpenCore stream (acidanthera stream), but adds additional functionality.
    • This includes the 0.5.7 and 0.5.8 versions of N-D-K fork.
      • To use 0.5.7, download NDK-OpenCore-0.5.7 for Designare Z390 - NVRAM.zip
      • To use 0.5.8, download NDK-OpenCore-0.5.8 for Designare Z390 - NVRAM.zip
    • If you have a dual boot Mac and Windows system, this fork may be a better choice. It provides enhanced support for booting Windows without injecting macOS-related parameters.
    • Both 0.5.7 and 0.5.8 use the graphical picker. However, the 0.5.8 version has these extra features:
      • UsbWakeFixup.kext and SSDT-USBW.aml for one-key wake from sleep
      • NVMeFix.kext for improved power management of third-party NVMe SSDs
      • Boot argument igfxfw=2 for improved utilization of iGPU in compute tasks

    • IMG_1222_resize.jpg
    • Some of the additional features of N-D-K fork:
      • Hotkey W to boot directly to first available Windows boot entry.
      • Auto default boot to last booted macOs or Windows.
      • ACPI patches are now optional for non macOS.
      • Booter Quirks only apply to macOS.
      • SMBIOS and Device Properties patches are now only applied to macOS.
      • See this post for more information.
Preparation:
  • Make sure your Gigabyte Designare Z390 is running firmware F8.
  • Prepare a new USB flash disk.
    • Use a new or erasable USB flash disk that is less than or equal to 32GB.
      • USB 3 flash disk is preferred.
      • We'll only consume 200MB, so no need to waste a large flash disk.
    • Run Disk Utility and format the USB flash disk with:
      • Name = (anything suitable such as OpenCore Test)
      • Format = macOS Extended (Journaled)
      • Scheme = GUID Partition Map
    • There are 2 versions of OpenCore to choose from. Inside both ZIP files is an EFI folder. Copy only the EFI folder in its entirety to the EFI partition of the USB flash disk.
  • BIOS Parameters.
    • Set Windows 8/10 Features to Windows 8/10.
    • Enable Above 4G Decoding.
    • Disable CSM Support.
    • It's advisable to save these settings in BIOS as a new Profile (in the Save & Exit section).
  • To modify the OpenCore config.plist we can use either ProperTree or OpenCore Configurator.
  • Option 1: ProperTree
    • Download ProperTree by CorpNewt. We'll use this to edit the config.plist.
      • Click here to visit the CorpNewt Github site.
      • Click Download ZIP as shown.
        Screen Shot 2019-12-21 at 4.49.27 PM.png
      • The ZIP file should be saved to your Downloads folder. Unzip the file if it's not automatically unzipped.
      • ProperTree is a Python app. It should run on Python 2.7 that ships with every copy of macOS. If it asks for Python 3, go ahead and install it.
  • Option 2: OpenCore Configurator
    • Download OpenCore Configurator 2.1.0.0 or newer by clicking here.
    • Install it into the Applications folder and double-click to run. A security warning will appear the first time it is launched. Simply go to System Preferences --> Security & Privacy --> General and allow the application to run (see bottom of the General pane).
Modifying OpenCore config.plist:
  • Option 1: Modify using ProperTree
    • Open config.plist with ProperTree (double-click ProperTree.command).
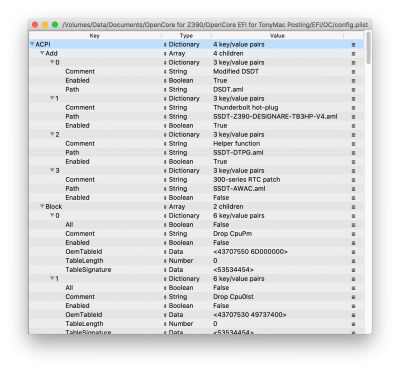
      • config.plist will be in the EFI partition of the USB flash disk, in the EFI --> OC folder.
    • You will see a big mess like this!
      Screen Shot 2019-12-21 at 4.56.56 PM.png
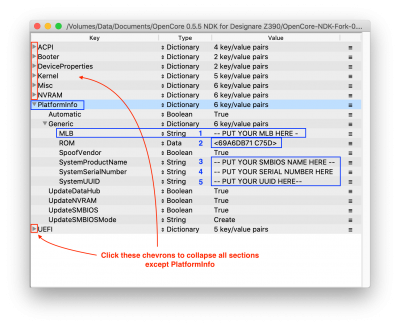
    • Now collapse all of the sections except Platform Info by clicking the little chevron next to each section title.
      Screen Shot 2020-01-19 at 8.26.24 AM.png
    • Now we need to modify the 5 parameters shown in blue above. We'll obtain these values from Clover Configurator.
    • From Clover Configurator, select Board Serial Number and copy it to clipboard (CMD-C).
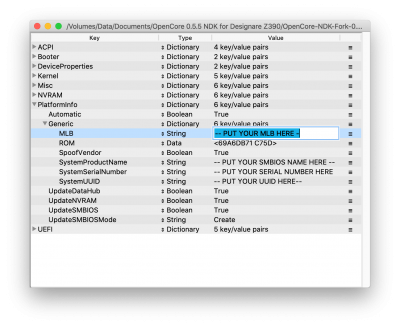
    • Double-click the MLB --> Value field in ProperTree as shown:
      Screen Shot 2020-01-19 at 8.31.35 AM.png
    • Now paste the clipboard here (CMD-V).
    • Then copy or enter SystemProductName. This is your current SMBIOS name such as:
      • iMac19,1
      • iMacPro1,1
    • Then copy Serial Number from Clover Configurator and paste it into SystemSerialNumber field in ProperTree.
    • Then copy SmUUID from Clover Configurator and paste it into SystemUUID field in ProperTree.
    • If you already have an explicit ROM value in Clover, then copy your existing RtVariables --> ROM value into the ROM field in ProperTree.
    • If you do not have a ROM value, select RtVariables in Clover Configurator and click Generate in the ROM field, as shown:
      Screen Shot 2019-12-21 at 5.13.10 PM.png
    • Then copy the newly generated ROM value in Clover Configurator and paste it into the ROM field in ProperTree.
    • Save the file in ProperTree (File --> Save).
  • Option 2: Modify using OpenCore Configurator
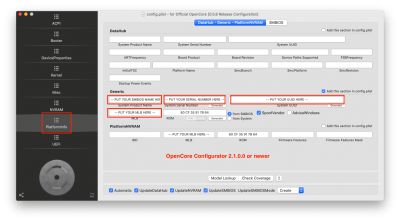
    • Open config.plist in OpenCore Configurator and select the PlatformInfo pane as shown. Then select the DataHub - Generic - PlatformNVRAM tab.
      OC-Configurator-PlatformInfo.png
    • Open your existing CLOVER config.plist in Clover Configurator and select the SMBIOS pane. Then copy the following items from Clover Configurator to OpenCore Configurator:
      • Copy Product Name from Clover Configurator to System Product Name in OpenCore Configurator.
      • Copy Serial Number from Clover Configurator to System Serial Number in OpenCore Configurator.
      • Copy SmUUID from Clover Configurator to System UUID in OpenCore Configurator.
      • Copy Board Serial Number from Clover Configurator to MLB in OpenCore Configurator.
    • Now select the RtVariables pane in Clover Configurator.
      • If you already have an explicit ROM value in Clover, then copy your existing RtVariables --> ROM value into the ROM field in OpenCore Configurator.
      • If you do not have a ROM value, click Generate in the Clover Configurator ROM field, as shown:
        Screen Shot 2019-12-21 at 5.13.10 PM.png
      • Then copy the newly generated ROM value in Clover Configurator into the ROM field in OpenCore Configurator.
      • Save the file.
Testing:

Double-check all previous steps. When ready, test the new boot loader as follows:
  • Insert USB flash disk in a USB 3 port.
  • Reboot the system and press F12 to invoke the BIOS Boot Menu.
  • Select the USB flash disk.
  • The simple OpenCore text menu will appear.
  • Press any arrow key to stop the automatic countdown.
  • From the list, select the number corresponding to your macOS disk.
Miscellaneous:
  • For latest information about DRM content playback and shikigva values, please see this post by @jaymonkey.
  • If you experience sleep/wake issues, please see this Sleep Aid for Designare Z390.
  • To change the background color to gray in OpenCore 0.5.8 / 0.5.9, simply do this:
    OpenCore-Gray-Background.png
    OpenCanopy-Gray.jpg
Open Core Sanity Checker:
  • The OpenCore config.plist can be validated against any specific version of OpenCore by visiting the website below and following the instructions therein. This can be extremely useful when facing configuration, boot, or other problems. It can also be useful when updating to a newer version of OpenCore because config.plist entries are often rearranged, removed, or added. Thanks to @NorthAmTransAm for informing us about this. https://opencore.slowgeek.com
    Screen Shot 2020-05-09 at 8.08.25 PM.png

Edits / Updates:
  • 11 Jan 2020: Changed AppleALC layout ID from 16 to 11 (for on-board audio).
  • 16 Jan 2020: Changed DisableVariableWrite to False for native NVRAM support in config.plist.
  • 18 Jan 2020: Updated to latest version of OpenCore and provided both standard acidanthera version and the n-d-k fork version.
  • 19 Jan 2020: Updated both zip files and added OpenCore Configurator as an option for configuring config.plist.
  • 20 Jan 2020: Added link to a post about DRM content playback.
  • 21 Jan 2020: Removed modified DSDT and replaced with individual SSDTs, including new SSDT-NVRAM.aml.
  • 11 Mar 2020: Updated to OpenCore 0.5.6.
  • 07 Apr 2020: Updated to OpenCore 0.5.7. Uploaded OpenCore-STANDARD-0.5.7 for Designare Z390-NVRAM.zip but did not remove previous ZIP
  • 08 Apr 2020: Restored support for NDK Fork. Uploaded NDK-OpenCore-0.5.7 for Designare Z390-NVRAM.zip, but did not remove previous ZIP.
  • 03 Aug 2020: OpenCore 0.6.0 EFI now available here.
  • 04 May 2020: Updated to OpenCore 0.5.8 for standard version only.
  • 08 May 2020: Added N-D-K Fork of 0.5.8
  • 01 Jun 2020: Added standard OC 0.5.9
 

Attachments

  • OpenCore-NDK-Fork-0.5.4-Master for Designare Z390 - NVRAM.zip
    3.1 MB · Views: 432
  • OpenCore-STANDARD-0.5.6 for Designare Z390 - NVRAM.zip
    1.9 MB · Views: 356
  • OpenCore-STANDARD-0.5.7 for Designare Z390 - NVRAM.zip
    5.2 MB · Views: 399
  • NDK-OpenCore-0.5.7 for Designare Z390 - NVRAM.zip
    4.8 MB · Views: 380
  • OpenCore-STANDARD-0.5.8 for Designare Z390 - NVRAM.zip
    5 MB · Views: 377
  • NDK-OpenCore-0.5.8 for Designare Z390 - NVRAM.zip
    4.6 MB · Views: 476
  • OpenCore-STANDARD-0.5.9 for Designare Z390 - NVRAM.zip
    3.8 MB · Views: 766
Last edited:
hi @CaseySJ
(OcQuirks.efi Fw RuntimeServices.efi) Is there a conflict with AptioMemoryFix.efi

:crazy::crazy::crazy:I found that the previous method to solve the black screen failed in the case of (Shut down-Unplug power-Plug in power-Turn on)
Yes, they are mutually exclusive. OcQuirks-4/FwRuntimeServices are preferred. AptioMemoryFix cannot be used at the same time.
 
*** OpenCore 0.5.4 (pre-release) Experimental Setup for Designare Z390 ***
Thanks @CaseySJ. I assume this is 0.5.4 compiled by yourself?
Just wanted to add that I am running really smoothly 0.5.3 with DSDT from @hylkepylke with iMacPro1,1 SMBIOS and everything works great with exception of booting Win10 from OC boot menu.
So far it's been a superior experience to the CLOVER method for me. I do not use a sidecar - I don't own an iPad.
 
Last edited:
Back
Top