Contribute
Register

The New Beginner's Guide to USB Port Configuration

UtterDisbelief

Moderator
Joined
Feb 13, 2012
Messages
9,544
Motherboard
Gigabyte B760 Gaming X AX
CPU
i5-14600K
Graphics
RX 560
Mac
  1. iMac
  2. Mac mini
Classic Mac
  1. eMac
  2. iBook
Mobile Phone
  1. iOS
Important Update: June 2023
From Big Sur 11.3 on the built-in OpenCore XhciPortLimit quirk no-longer worked as described. This became a known "bug", though in reality it was Apple changing their internal code, making a simple "peek and poke" to keep it operating, a difficult task. However, with the release of OpenCore 0.9.3 the XhciPortLimit Quirk has now been fixed.

I have tested it on the limited hardware at my disposal and all seems fine. Glad to get any feedback from other builders to confirm on their hardware.

Important: January 2023 Update

It's been a while since this guide was written and Apple has changed their USB sub-system in several significant ways. So please bear in mind:

1) From Big Sur 11.3 onwards the OpenCore XhciPortLimit Quirk stopped working. It hasn't been fixed yet. So generally we recommend using Catalina to perform your first USB configuration before upgrading your system.

EDIT: Since OpenCore v0.9.3 we should now be able to use Monterey and Ventura to configure our ports. See note above.

2) The USBPorts.kext you create will work for all subsequent macOS versions.

3) If you change your System-Definition at any time the USBPorts.kext will stop working.

4) Be aware that the original USBInjectAll.kext version 0.7.1 was written in 2018 and since then new system-defintions have appeared. I recommend using the updated Kext by our Moderator @CaseySJ here :

https://github.com/CaseySJ/OS-X-USB-Inject-All/releases

A New Guide is in-coming but no release date yet ...


Pre-amble

When I originally wrote the Beginner's Guide to Creating a Custom USB SSDT the idea was to demystify and simplify the process of configuring all those USB ports our PC motherboards come with, so that they worked properly under macOS. The main sticking-point for many builders was the arbitrary 15-port limit Apple has imposed. We have to accept this, but still make best use of the ports we have which often involves 'losing' a few from the ones that are present, to keep within these confines. What's more, not all ports are the same and we have to take this into account when we configure them.

A very talented software-engineer, and member here, called @headkaze has come up with a very useful tool to help us with a lot of the tedious chores and mental gymnastics we have to perform to get our builds running sweetly, and this is called Hackintool. One part of this superb app is dedicated to USB port configuration.

Now that macOS Catalina is here, Apple is signalling a new way forward. No-longer can we use 32-bit applications, and, from here on in, 3rd-party kexts or drivers have strict limitiations imposed on where they can go and what they can do.

What I realised is that if we combine my earlier guide with @headkaze 's excellent Hackintool, we could utilise an even simpler method for configuring our USB ports, and one that should not give the new, more security-focussed macOS, any red-flag moments.

New Guide

Let's dive in then. Set aside around 30-minutes, depending on your confidence, to get this done.

Your PC motherboard likely has more USB ports than any Apple Mac so far produced. Even a basic Mini-ITX motherboard. So we need to whittle down the number we do have until it matches what Apple's macOS expects, and ensure the ones we keep run at the correct speed, supply the correct power and mount and unmount safely when required, to keep data safe.

The first job is to assemble all the 'tools' you will need:

Disk Utility
Terminal

Clover Configurator or OpenCore Configurator or PlistEdit Pro
USBInjectAll.kext - Edit August 2020 - Recommend v 0.7.3 not 0.7.5.
Hackintool
IORegistryExplorer.app

A USB2.0 flash-drive
A USB3.0 flash-drive

In this guide we will be directly editing our config.plist file. For illustrative purposes we demonstrate our edits using each of the three of the editor options in the list above, so you can make your choice. You only need to use one. See Appendix #1


Step 1 - Install the USBInjectAll.kext and a Port-Limit Removal Patch


We need to make all the ports our PC motherboard has available for us to work with.

To mount your hidden EFI partition you first need to check what it's disk designation is. Run the Disk Utility app. and check what you see here:

DU.jpg

On all GUID/GPT partitioned disks the EFI folder will come before any APFS 'containers' and even before the main disk. The image above is actually from High Sierra to make things simpler and even though we can't yet see the EFI partition it will actually be located before the main partition. Because in this case the main area of the disk is "disk0s2" the EFI partition will be at "disk0s1". (The other disk you can see in the screengrab is my separate 500GB data drive. We're ignoring that).

Now we know what the disk designation is we can mount that hidden EFI partition using the magic of Terminal commands:

Code:
sudo mkdir /Volumes/EFI

sudo mount -t msdos /dev/disk0s1 /Volumes/EFI

What you find in your EFI partition will depend on which bootloader you are using - Clover or OpenCore. Either is fine.

For Clover - copy the USBInjectAll.kext into the EFI/CLOVER/kexts/Other

For OpenCore - copy USBInjectAll.kext into OC/Kexts - AND - add a new kext section to your config.plist. If you are an early adopter of OpenCore you will know that you have to declare each kext with the path to it's executable etc. (See screengrab below).


Port_limit Removal Patch:

EDIT 2023:


We now recommend using the XhciPortLimit Quirk again for macOS versions Monterey and Ventura, if using OpenCore version 0.9.3 or later as previous problems have now been fixed. Instead of adding a patch, as shown below, you only need to change the quirk setting to activate it. Keep reading to see how to do this.

The original , old-school, PLR Patches (as we will call them from now on for brevity) are explained in each macOS support section - High Sierra, Mojave and Catalina. - and also shown below.

See Appendix #2


For Clover
- enter the PLRP in your config.plist . Here is the Catalina one viewed in Clover Configurator.

PLRP-1.png

Here is the same patch inserted using PlistEdit Pro instead (see Appendix #1) As you can see there are five Kexts to Patch, with our two Catalina PLR-Patches at the top of the list.

PLPRo2.jpg


For OpenCore - set Quirk "XhciPortLimit" as "/true". Here is what it looks like in OpenCore Configurator. See below for what it looks like in PlistEdit Pro.

H7s.jpg


Here is the same "Quirk" being edited-in using PlistEdit Pro. Pretty simple:

PLRP-OC.jpg


Save and Reboot


Step 2) Check what USB ports you have.


Run Hackintool and select the USB icon in the menu bar:

H1.png


Different chipsets have different numbers of ports, but the above is fairly typical. You can see my Z370 chipset in the blue highlighted bar.

See Appendix #3


Step 3) Port Discovery


To identify which port on your motherboard you are going to keep and configure, you need to test each one with a USB flash-drive to see where it appears in the output of Hackintool.

Here is a test of the same port using first a USB2.0 drive and second a USB3.0/3.1 drive:

H2.jpg
H3.jpg


The physical port is the same, but how it is enumerated is different depending on what type of device is plugged-in - USB2.0 is an HS** port and USB3.0/3.1 is an SS** port. So as you can see, a single, physical USB3 port counts as 2x ports towards our 15-limit because either type of device can be plugged in to it.

Repeat this process for each port on your motherboard and make a record somewhere.

Here are the two plans I made for my Z370M-D3H motherboard:

BP-3.jpg

MB-4.png
With this to hand we can now remove ports from the Hackintool list that we do not need so that we can get down to the magic number of 15 as stipulated by Apple. To do this we highlight each port we do not need, using the cmd+mouse method:

H4.jpg

Once we have done this we mouse-click on the Delete icon I've circled in red in the above screengrab. This removes ports we do not wish to use or configure.

The final list is as follows:

H5.jpg


Step 4) Export our configuration File

Select the icon I've circled in red in the screengrab above to export all your work:

H6.jpg

That final USBPorts.kext is the file we want. The other two are useful for other configuration methods but we don't need them today.


Step 5) Installing our configuration and Clean-up

If you still have your EFI partition mounted then you can:

For Clover -

1) Delete USBInjectAll.kext and replace it with USBPorts.kext in EFI/CLOVER/kexts/Other. Remove the PLR-Patches from your config.plist either by editing, or ticking the "Disable" boxes using Clover Configurator.

For OpenCore -

1) Delete USBInjectAll.kext and replace it with USBPorts.kext in OC/Kexts - AND - don't forget to amend the kext name in your config.plist, removing the reference to its executable path:

Path.jpg


2) To remove the PLR-Patches either edit them to "/false", or de-activate the "XhciPortLimit" quirk.


Save and Reboot


Step 6) Job Done - Check your work


Either run Hackintool and select that USB icon to see your ports, or run IORegistryExplorer and scroll the left-pane down to the XHC section.

IOR2.jpg


That's it. Well done on completing your USB Port configuration!


Appendix #1


Your config.plist is in a plain-text format called xml and you need a text-editor to modify it. Which you choose is down to what you feel comfortable with. Many people recommend PlistEdit Pro while others like Apple's Xcode editor. Personally I like Clover Configurator and OpenCore Configurator, though some unfairly criticise them. They are being actively updated and I have built PCs using them without any problems. Whichever you choose has to be able to edit in plain-text, not just in rich-text or a proprietary format. Even macOS's TextEdit will do the job if you know how to set it up.

Remember though, it is always wise to double-check your work and make back-ups, before committing any changes to your PC.:thumbup:


Appendix #2

Please bear in mind Port-Limit Removal Patches are not designed for permanent use because they overwrite and go beyond areas of memory set aside for the job by Apple. Think of your USB ports like a box of a dozen eggs, two rows of six. When full the lid closes and all is safe. If you put another five eggs in down the centre, they appear to fit perfectly - but now you can't close the lid. Things can fall out and break.

In short, long-term use of the patch means data loss and system crashes are only a whisker away.


Appendix #3

This guide concentrates on the XHCI controller all modern Intel chipsets have. Some older motherboards feature chipsets with both the previous EHCI standard and the newer XHCI. Even older still might have just two EHCI. If you see three lines in the top panel of Hackintool with two EHC and one XHC controller then prioritise the XHC because this is where USB3.0 comes from. If you only see two EHC controllers then your system is stuck at USB2.0. You can use these ports though, as you move to the next stage. For more information on these see my original guide as you will need to put some renames in place in your config.plist.


Final Technical Note: Because Apple is reigning-in on what 3rd-party kexts can be installed, it was initially worrying that using any form of kext installation to modify the ACPI/USB ports could get blocked in future. However by putting our USBPorts.kext in the EFI/ or OC/ folder macOS doesn't 'see' it. What's more, if you run kextstat from Terminal you will notice that although other kexts are visible to macOS, USBPorts.kext is not. My take on this is because there is no 'executable' within it's container.


The Credits -

Thank you to @headkaze for working so diligently to make Hackintool the splendid tool-box of useful utilities for Hackintosh builders that it is. In this guide we only touch on one part of what it can do.

Thanks also to to @Sniki for taking up the baton and forking USBInjectAll.kext for the latest motherboard chipsets. We were working on a kext-less ACPI patch until realisation dawned that this method might be simpler.

Thanks, as always, to the owners of the site and my colleagues here at Tonymacx86, for support and encouragement along the way.

:)
 
Last edited:
Hi @UtterDisbelief - thanks for your work on this!

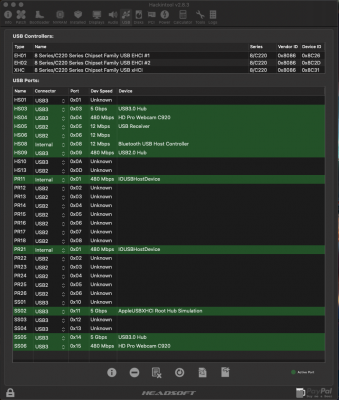
Wonder if you can help? I have some understanding of what to do but deeper knowledge is not always there. From previous help I got from rehabman, I think I need the EHC rename patches which I am using. I then installed USB injectall and the PL patch. I see all the ports and I have mapped them. This is what I see in Hackintool thus far:

Screenshot 2019-11-17 at 14.04.50.png

I know I have to be 15 ports or under, and I know how to generate the kext and install. My questions are:

1. I see two ports, PR11 and PR21. Hackintool shows them as green meaning they are being used I guess? If I remove these for my final kext, after rebooting I still see two "PR" ports, just with different numbers, what am I doing wrong here and how should I handle these?
2. Port SS02 did not show up at all when I was mapping my ports, but it is shown above as active, AppleUSBXHCI Root Hub Simulation, do I delete this one?

Many thanks for help, reporting files attached
 

Attachments

  • debug_29644.zip
    2.2 MB · Views: 674
Hi @UtterDisbelief - thanks for your work on this!

Wonder if you can help? I have some understanding of what to do but deeper knowledge is not always there. From previous help I got from rehabman, I think I need the EHC rename patches which I am using. I then installed USB injectall and the PL patch. I see all the ports and I have mapped them. This is what I see in Hackintool thus far:

View attachment 436348

I know I have to be 15 ports or under, and I know how to generate the kext and install. My questions are:

1. I see two ports, PR11 and PR21. Hackintool shows them as green meaning they are being used I guess? If I remove these for my final kext, after rebooting I still see two "PR" ports, just with different numbers, what am I doing wrong here and how should I handle these?
2. Port SS02 did not show up at all when I was mapping my ports, but it is shown above as active, AppleUSBXHCI Root Hub Simulation, do I delete this one?

Many thanks for help, reporting files attached

Hello there.

Okay...

Yes, your Z87 chipset has both EHC and XHC controllers, so using both is fine. The renames need to be in place so that macOS recognises them as something it can work with.


1) PR11 and PR21 are actually the EH01 controller port PR01 and EH02 controller port PR01. They are probably being redirected.

2) As far as I can see from IOReg, SS02 has not been mapped. You don't have an SSDT in ACPI/patched but have installed USBPorts.kext in L/E. That implies you've done some sort of configuration already. Perhaps SS02 appears in that?

Notes:

For a port to appear it either has to be redirected from elsewhere or specifically configured in a kext or SSDT.

Remember with Hackintool you can select each controller individually rather than see all ports at once.

IORegistryExplorer is a great way to see operational ports running. Select Root right at the top of the left panel then in the search field type, for example: "SS0". You then see all active USB3 ports. "HS" will show USB2 ports.

So, in this case, it is showing you have a total of 14-ports configured.

A Z87 chipset - and your motherboard - features 6x USB3 ports and 8x USB2 ports. Double-up the USB3 ports because each can either be USB 3 or USB2 in operation and you have a total of 20x possible ports to play with.

:)
 
Last edited:
Going to try this tomorrow and will update here on how it goes. Thank you for writing this guide.
 
Hello there.

Okay...

Yes, your Z87 chipset has both EHC and XHC controllers, so using both is fine. The renames need to be in place so that macOS recognises them as something it can work with.


1) PR11 and PR21 are actually the EH01 controller port PR01 and EH02 controller port PR01. They are probably being redirected.

2) As far as I can see from IOReg, SS02 has not been mapped. You don't have an SSDT in ACPI/patched but have installed USBPorts.kext in L/E. That implies you've done some sort of configuration already. Perhaps SS02 appears in that?

Notes:

For a port to appear it either has to be redirected from elsewhere or specifically configured in a kext or SSDT.

Remember with Hackintool you can select each controller individually rather than see all ports at once.

IORegistryExplorer is a great way to see operational ports running. Select Root right at the top of the left panel then in the search field type, for example: "SS0". You then see all active USB3 ports. "HS" will show USB2 ports.

So, in this case, it is showing you have a total of 14-ports configured.

A Z87 chipset - and your motherboard - features 6x USB3 ports and 8x USB2 ports. Double-up the USB3 ports because each can either be USB 3 or USB2 in operation and you have a total of 20x possible ports to play with.

:)
Hi again @UtterDisbelief

So, I think maybe I made the debug report with USBports kext installed by mistake. I've attached a new one. The kexts I have installed in l/e are shown here:

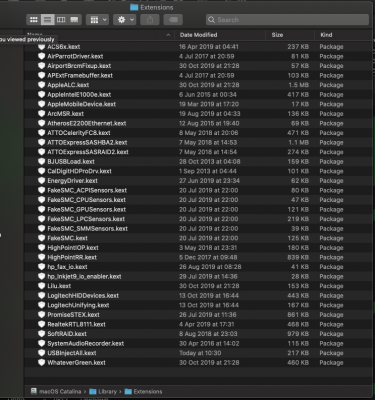
Screenshot 2019-11-18 at 10.51.14.png
As you can see, USBInjectALL installed, and I have the PL patch in Clover. I dont have any additional kexts in Clover apart from FakeSMC is also in "Other" - I don't install to s/l/e either, I'm fairly certain there is no rubbish in there

Sorry, more questions:

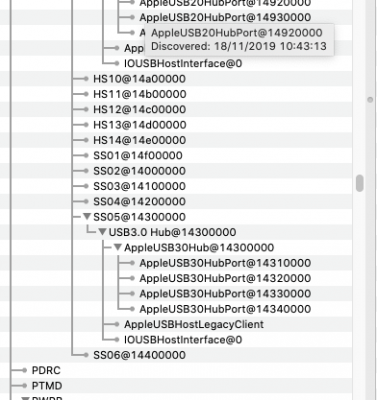
1. If I look in IORegistryExplorer, I see this for SS02

Screenshot 2019-11-18 at 10.58.11.png

What's confusing me is IOREG shows nothing connected to SS02 (as expected, not used?) but in Hackintool, I see this:

Screenshot 2019-11-18 at 10.50.37.png

And this shows the green line with APPLUSBXHCI Root Hub Simulation connected. Can I just delete SS02 in Hackintool when preparing my Kext because AFAIK I dont see anything on SS02 when I map my ports

2. Next question, referring to image above, I can delete all the un used PR ports shown above, but what do I do with PR11 and PR21 which show green and with IOUSBHost device connected? When I have experimented, If I delete those ports then create the USB ports.kext and install, what happens is if I check with Hackintool, I will just see two new PR ports in Hackintool. I know that IOREG looks correct, but how do I handle these when creating the kext. Do I leave them in, counting them as 2 of my 15 ports or do I ignore them? I hope this makes sense!
 

Attachments

  • debug_30453.zip
    1.9 MB · Views: 458
Hi again @UtterDisbelief

So, I think maybe I made the debug report with USBports kext installed by mistake. I've attached a new one. The kexts I have installed in l/e are shown here:

View attachment 436438
As you can see, USBInjectALL installed, and I have the PL patch in Clover. I dont have any additional kexts in Clover apart from FakeSMC is also in "Other" - I don't install to s/l/e either, I'm fairly certain there is no rubbish in there

Sorry, more questions:

1. If I look in IORegistryExplorer, I see this for SS02

View attachment 436439

What's confusing me is IOREG shows nothing connected to SS02 (as expected, not used?) but in Hackintool, I see this:

View attachment 436440

And this shows the green line with APPLUSBXHCI Root Hub Simulation connected. Can I just delete SS02 in Hackintool when preparing my Kext because AFAIK I dont see anything on SS02 when I map my ports

2. Next question, referring to image above, I can delete all the un used PR ports shown above, but what do I do with PR11 and PR21 which show green and with IOUSBHost device connected? When I have experimented, If I delete those ports then create the USB ports.kext and install, what happens is if I check with Hackintool, I will just see two new PR ports in Hackintool. I know that IOREG looks correct, but how do I handle these when creating the kext. Do I leave them in, counting them as 2 of my 15 ports or do I ignore them? I hope this makes sense!

Hello.

Well, take a a look at the EHC controllers individually (Highlight EH01 and then EH02). You'll see what those PR** ports are. :thumbup:

Taking a look at XHC almost feels like I'm being tested here. There is a noticeable mistake/error but spotting where it is occurring is difficult at a distance, but ...

The reason SS02 is showing as a hub is clear - it has the same locationID as the XHC node - @14000000. Looking at the other ports you will see that SS03 - SS06 have the same locationID as HS01 - HS04. Way out of line. How can the system know which port is what?

SS01 is showing an error.

As to why the above has occurred ...

Well two tests can be done

1) Disable the EHC renames and see how your ports look just running XHC.

2) With IOReg OR Hackintool open on the XHC section, plug in USB2.0 devices and see what happens ...

As I say, it's difficult hands-off to dig deeper, so the above are jiust a couple of ideas to see what changes ,

:)

I suspect it is
I disabled the EHC rename and attach the debug

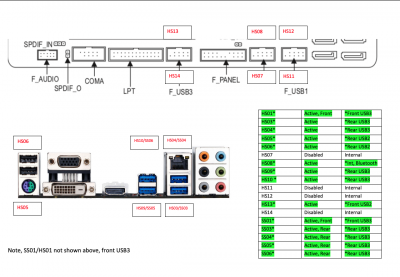
When I plug devices in, they show up on the ports that I have mapped previously in Hackintool and previously using IOREG. I have mapped the ports on El Cap, Sierra, HS, Mojave, they always are the same as below:

Screenshot 2019-11-18 at 18.28.10.png

With the EHC rename disabled, SS02 still shows active in Hackintool but nothing shows on SS02 in IOREG

I am completely stuck
 

Attachments

  • debug_6058.zip
    2 MB · Views: 475
I disabled the EHC rename and attach the debug

When I plug devices in, they show up on the ports that I have mapped previously in Hackintool and previously using IOREG. I have mapped the ports on El Cap, Sierra, HS, Mojave, they always are the same as below:

View attachment 436519

With the EHC rename disabled, SS02 still shows active in Hackintool but nothing shows on SS02 in IOREG

I am completely stuck

Okay. The plot thickens, as they say.

Disabling the EHC renames didn't do much besides keeping the old names and reduce port numbers. Did those port work though?

Clearly there is another header on the motherboard for the front panel - F_USB30 - with 2x SS ports, perhaps going on your diagram they will be SS01 and SS02 ?

While there's logic to ports being paired - HS03/SS03 and HS04/SS04 for example - there is no logic at all to HS09/SS05 and HS10/SS06. That looks like mis-identification, but I repect what you tell me, even though that is hard to explain :)

As I said previously the "locationIDs" of those SS ports is just plain wrong. locationID is not what it sounds, it's just an enumeration. You don't have two ports with the same one, in the same way you don't have two "port-addresses" the same either.

Insights:

Why all this is going on is difficult to fathom. Looking through the kexts installed, the only thing I can see that might have any impact on the USB set-up is Karabiner. And the Logitech USB Unified receiver.

One other thing to try is without SSDT-EC.aml in the "patched" folder. Some motherboards do need this. Mine does not for example.

Check S/L/E again just in case something has slipped though.

Note:

Remember you can disable EHC Hand-off in BIOS.

Something is causing the error on SS01 and that may be putting those locationIDs out for subsequent ports, but I don't yet see the cause ...
 
Okay. The plot thickens, as they say.

Disabling the EHC renames didn't do much besides keeping the old names and reduce port numbers. Did those port work though?

Clearly there is another header on the motherboard for the front panel - F_USB30 - with 2x SS ports, perhaps going on your diagram they will be SS01 and SS02 ?

Yes, F-USB30 is the front USB3 on my case, my case only has one front USB3 port though

there's logic to ports being paired - HS03/SS03 and HS04/SS04 for example - there is no logic at all to HS09/SS05 and HS10/SS06. That looks like mis-identification, but I repect what you tell me, even though that is hard to explain :)

Checked and double quadruple checked, these are what light up

all this is going on is difficult to fathom. Looking through the kexts installed, the only thing I can see that might have any impact on the USB set-up is Karabiner. And the Logitech USB Unified receiver.

Uninstalled both, same behaviour

other thing to try is without SSDT-EC.aml in the "patched" folder. Some motherboards do need this. Mine does not for example.

Check S/L/E again just in case something has slipped though.

Done, again same behaviour. Can't see anything in s/l/e untoward

you can disable EHC Hand-off in BIOS.
I disabled this in BIOS and no change

I wish I had a better understanding of what is wrong, so frustrating
 

Attachments

  • debug_20456.zip
    1.4 MB · Views: 478
Back
Top