Contribute
Register

[SUCCESS] Gigabyte Designare Z390 (Thunderbolt 3) + i7-9700K + AMD RX 580

I finished a Designare Z390 build a few days ago and I gotta say this is an awesome guide and thread. I'll post my build this weekend with a couple of very small comments on the guide. Only thing I think is not working is Bluetooth, per guide used the Fenvi card, Fractal R6 case so used the USB SSDT for that, but I think that is supposed to enable the F_USB header the Fenvi is plugged into. WiFi is fine, but can't see any Bluetooth stuff (mainly interested in mouse for now) from the Hackintosh, nor can I see the Hackintosh from my iPhone.

Also haven't checked optical output yet, I like to use that for (KEF LSX) speakers, hopefully that is working, or I can figure out how to make it work …
 
Good components! I know @pastrychef is a staunch proponent of the Z370 -- and for good reasons. So hopefully your build will go smoothly.

Enabling hot plug on GC-Titan Ridge should be pretty easy. Once you have installed the card then do the following:
  • At the Clover Boot Menu, press F4 to dump the original ACPI tables. They will be in the CLOVER/ACPI/origin folder.
  • Boot into macOS.
  • Download and run IORegistryExplorer and select File --> Save As... then upload that file.
  • Mount EFI partition of macOS SSD, navigate to the EFI/CLOVER/ACPI/origin folder and upload the DSDT.aml.
Then I can either modify the hot plug SSDT for you or give you instructions for doing it yourself.
Hello @CaseySJ. I've finally build my Hack today!

I'm running Catalina 10.15.1 on iMacPro1,1 using the new Radeon 5700. The motherboard is the Asus Prime Z370-A II Bios 1001 together with the Titan Ridge.

I haven't installed Windows and "enable" the Titan Ridge card because I wanted to see if it's required. I'm attaching the files you requested.

I also wanted to ask you if you have experience with the Titan Ridge card, because once I enabled Thunderbolt 3 Support on BIOS I got a HUGE list of options. I only changed the ones that are in your guide, but this is a bit different because I'm running Titan ridge as a card on another motherboard.

Lastly, I would love to know how to perform this tweaks to create the Hot plug fix, so I'm able to replicate it if I change boards and also potentially help other users with it.

Thanks a lot!
 

Attachments

  • DSDT.aml
    187.4 KB · Views: 88
  • hackpro.ioreg
    5 MB · Views: 88
I finished a Designare Z390 build a few days ago and I gotta say this is an awesome guide and thread. I'll post my build this weekend with a couple of very small comments on the guide. Only thing I think is not working is Bluetooth, per guide used the Fenvi card, Fractal R6 case so used the USB SSDT for that, but I think that is supposed to enable the F_USB header the Fenvi is plugged into. WiFi is fine, but can't see any Bluetooth stuff (mainly interested in mouse for now) from the Hackintosh, nor can I see the Hackintosh from my iPhone.

Also haven't checked optical output yet, I like to use that for (KEF LSX) speakers, hopefully that is working, or I can figure out how to make it work …
Have you tried resetting the Bluetooth module as explained here? If this does not help, please run IORegistryExplorer and select File --> Save As... then post the saved file. This will let us see whether the Bluetooth device itself is connected properly.
 
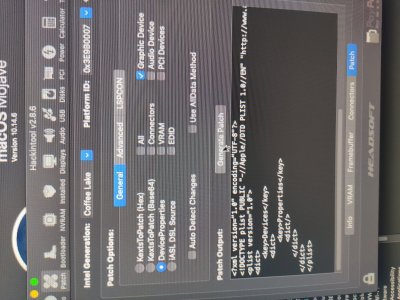
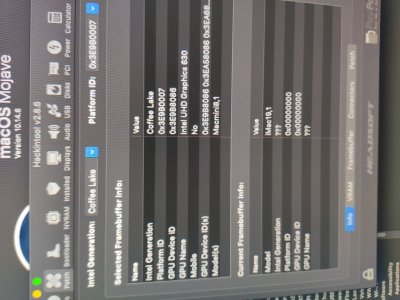
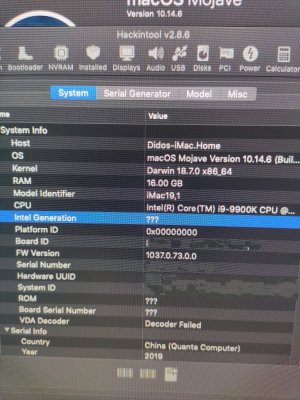
Hi, @casey! I install Mojave 10.14.6 and followed your guide. I have some problems with my Intel 630. Please take a look.
 

Attachments

  • IMG_20191106_235431.jpg
    IMG_20191106_235431.jpg
    7.7 MB · Views: 87
  • IMG_20191106_235545.jpg
    IMG_20191106_235545.jpg
    8 MB · Views: 81
  • IMG_20191106_235453.jpg
    IMG_20191106_235453.jpg
    5.9 MB · Views: 85
Hello @CaseySJ. I've finally build my Hack today!

I'm running Catalina 10.15.1 on iMacPro1,1 using the new Radeon 5700. The motherboard is the Asus Prime Z370-A II Bios 1001 together with the Titan Ridge.

I haven't installed Windows and "enable" the Titan Ridge card because I wanted to see if it's required. I'm attaching the files you requested.

I also wanted to ask you if you have experience with the Titan Ridge card, because once I enabled Thunderbolt 3 Support on BIOS I got a HUGE list of options. I only changed the ones that are in your guide, but this is a bit different because I'm running Titan ridge as a card on another motherboard.

Lastly, I would love to know how to perform this tweaks to create the Hot plug fix, so I'm able to replicate it if I change boards and also potentially help other users with it.

Thanks a lot!
Awesome!
  • Do not install Windows 10 at this time. It's not necessary for initializing the GC-Titan Ridge.
  • Connect the Thunderbolt header cable to the motherboard.
Here's your homework assignment! After you make the changes I can check everything for you.
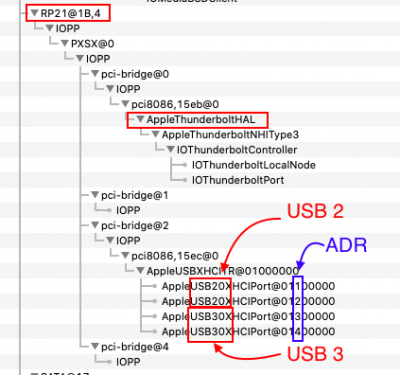
  1. IOReg shows that Thunderbolt is attached to RP21.
    Screen Shot 2019-11-06 at 2.04.21 PM.png
    • Because this is a Thunderbolt 3 card with two USB-C connectors, it means you also get two USB ports that support both USB 2 and USB 3 protocols. Hence, notice the lower part of the above screenshot where I've marked the two USB 2 and two USB 3 ports.
      • Notice in BLUE that each port has an address (ADR) from 1 to 4. This will be needed shortly.
        • ADR 1 and ADR 2 are for USB 2 as shown
        • ADR 3 and ADR 4 are for USB 3 as shown
  2. Now let's look at the original DSDT.aml. Let's find RP21 in that file, using MaciASL:
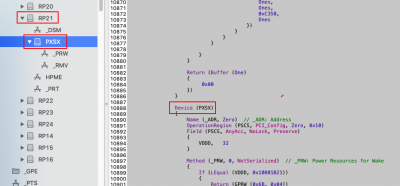
    • When we expand the RP21 section we see this:
      Screen Shot 2019-11-06 at 2.08.57 PM.png
    • Now we must check if there are any pre-defined DEVICEs under RP21. We can see above that yes indeed there is already a device here named PXSX.
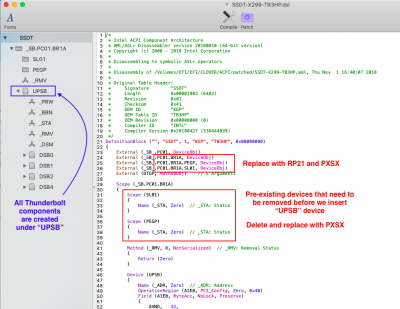
    • By convention, Apple's Thunderbolt SSDT names the first device as UPSB and creates all sub-devices under this all-important top-level UPSB device.
    • But the right now PXSX is taking up that space, so in a moment we will get rid of PXSX.
  3. Now we're ready to modify the Thunderbolt hot-plug SSDT. We start by downloading KGP's SSDT from the X299 repository on GitHub. The file name is SSDT-X299-TB3HP.dsl. And we edit it with MaciASL.
    • Don't worry about the name of the file. You can change it later.
    • We also need to download SSDT-DTPG.aml. No changes will be made to this file, but we will need to open it in MaciASL and save it in .aml format.
    • Note that .dsl files are disassembled files, which means they cannot be used. They must be compiled into ACPI Machine Language (.aml) format. This is done in MaciASL by simply doing File --> Save As... and choosing the ACPI Machine Language Binary output file format.
  4. Let's have a look at the standard KGP Thunderbolt hot plug SSDT:
    • Notice that for the X299 system, the Thunderbolt root path is _SB_.PC01.BR1A. But on your board, it is _SB_.PCI0.RP21.
    • Also notice that on KGP's X299 system, there happen to be 2 default devices in BR1A called SL01 and PEGP. This is why the two red boxes are (a) referencing those devices, and (b) setting their ADR to 0, which in effect disables them. Only when those device have been disabled are we ready to create our own UPSB device.
      Screen Shot 2019-11-06 at 2.11.46 PM.png
    • So you will need to modify the two red boxes to (a) reference _SB_.PCI0.RP21 and _SB_.PCI0.RP21.PXSX.
    • And then you'll need to modify the second red box to change the address of PXSX to 0.
  5. We're nearly done. We must now adjust our USB ports. We do that by expanding the XHC5 (XHC is the USB Controller) section as shown here:
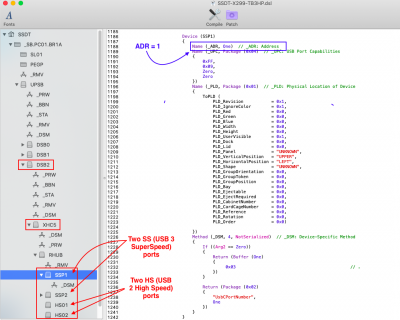
    • Notice on the left side that the hot plug SSDT defines 4 USB ports SSP1, SSP2, HS01, HS02. And if we click on SSP1 we will see on the right side in blue that its ADR is set to One.
      Screen Shot 2019-11-06 at 2.15.30 PM.png
    • But this is not quite right. Because if you go back to the first screenshot above, you'll see that the two USB 2 ports have address 1 and 2. And the two USB 3 ports actually have addresses 3 and 4.
    • So we must change the address of SSP1 to 3, and SSP2 to 4.
    • And we must change the address of HS01 to 1 and HS02 to 2.
  6. Now we should save the .dsl file and then save it as a compiled ACPI binary file by selecting File --> Save As... --> ACPI Machine Language Binary.
  7. Finally, we can test hot plug by copying both the hot-plug SSDT (.aml file) and the SSDT-DTPG (.aml file) to the CLOVER/ACPI/patched folder and rebooting. It would be good to examine the IORegistryExplorer output.
 
Hi, @casey! I install Mojave 10.14.6 and followed your guide. I have some problems with my Intel 630. Please take a look.
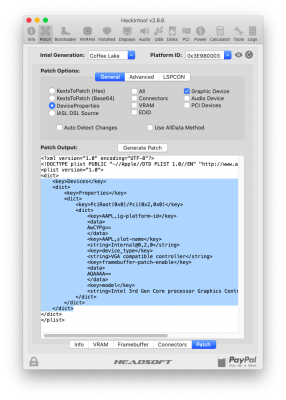
Yes, I've seen this problem myself. It tends to happen if we run Hackintool on a system that does not contain an active iGPU. Hackintool should have generated this patch:
Screen Shot 2019-11-06 at 2.48.43 PM.png
Code:
    <key>Devices</key>
    <dict>
        <key>Properties</key>
        <dict>
            <key>PciRoot(0x0)/Pci(0x2,0x0)</key>
            <dict>
                <key>AAPL,ig-platform-id</key>
                <data>
                AwCYPg==
                </data>
                <key>AAPL,slot-name</key>
                <string>Internal@0,2,0</string>
                <key>device_type</key>
                <string>VGA compatible controller</string>
                <key>framebuffer-patch-enable</key>
                <data>
                AQAAAA==
                </data>
                <key>model</key>
                <string>Intel 3rd Gen Core processor Graphics Controller</string>
            </dict>
        </dict>
    </dict>
If you know how to insert the above patch into your config.plist, please do so. Otherwise you may post your config.plist here and I'll insert this.
 
I've been running Mojave for months with no problems and then Catalina 10.15 fine until I ran the beta 10.15.1 and then things got a little strange. I reinstalled 10.15 and everything was good again. Waited for the official 10.15.1 and everything installed fine but now for some reason, my system restarts every couple of hours for absolutely no reason. Is there some config parameter or boot argument that needed to change/be added in Catalina 10.15.1 that would cause random restarts? All extra kexts are the latest (AppleALC, Lulu, and whatevergreen).
  1. Is there any method to the madness? Does it happen in Safari, in Chrome, during YouTube, during Netflix, etc.? Does it happen even if the system is left idle (with sleep disabled)?
  2. When you updated Lilu, WhateverGreen, and AppleALC, did you only copy the kext files (not the dSYM or anything else)?
  3. Are you using FakeSMC or VirtualSMC?
  4. Are you running Clover 5xxx or 4xxx?
  5. Do you have more than one memory fix driver in CLOVER/drivers/UEFI?
 
Have you tried resetting the Bluetooth module as explained here? If this does not help, please run IORegistryExplorer and select File --> Save As... then post the saved file. This will let us see whether the Bluetooth device itself is connected properly.
Reset per those instructions didn't work.

I see Bluetooth stuff in the registry, but I think I would need to go back to school for a couple of years to learn how to interpret all of it.
 

Attachments

  • Marshall’s iMac (3).ioreg
    18.3 MB · Views: 104
It happens no matter what is going on and seems to be random. Sometimes an hour, sometimes 2, sometimes 45 minutes after a restart. I never have my system go to sleep, only the display and I usually cut it off when I walk away from it. (my display is a 50" LG TV though)

2. Only the kexts, yes.
3. FakeSMC
4. Clover 5098
5. Have been using AptioMemoryFix.efi for months now, with no issue. Now switched back to OsxAptioFix2Drv-free2000.efi and same thing.

I'm starting to think it might be related to the clover update, but maybe something else.
 
Yes, I've seen this problem myself. It tends to happen if we run Hackintool on a system that does not contain an active iGPU. Hackintool should have generated this patch:
View attachment 434781
Code:
    <key>Devices</key>
    <dict>
        <key>Properties</key>
        <dict>
            <key>PciRoot(0x0)/Pci(0x2,0x0)</key>
            <dict>
                <key>AAPL,ig-platform-id</key>
                <data>
                AwCYPg==
                </data>
                <key>AAPL,slot-name</key>
                <string>Internal@0,2,0</string>
                <key>device_type</key>
                <string>VGA compatible controller</string>
                <key>framebuffer-patch-enable</key>
                <data>
                AQAAAA==
                </data>
                <key>model</key>
                <string>Intel 3rd Gen Core processor Graphics Controller</string>
            </dict>
        </dict>
    </dict>
If you know how to insert the above patch into your config.plist, please do so. Otherwise you may post your config.plist here and I'll insert this.
Here is my Config
 
Last edited:
Back
Top