Contribute
Register

[SUCCESS] Gigabyte Designare Z390 (Thunderbolt 3) + i7-9700K + AMD RX 580

Hi All--

I followed the instructions before attempting to update to 10.15.1 (as well as copying over the latest versions of VirtualSMC, AppleALC, and Lilu). After which, I have attempted running the the upgrade multiple times. Each time, the system does a reboot, and after I log back in, the 10.15.1 upgrade notification reappears and prompts me to update.

Any thoughts?

Cheers!

Check this message by @kwalter, from a few pages back: he had a similar experience when upgrading to Catalina:

"Phew!! I got there in the end - I was booting from the wrong volumes each time.
I was starting off with 'Install from Mojave' and it should have been 'Preebooter from Preeboot', then 'Filevault Preeboot' then final install. Do it right and it goes extremely smoothly :cool:"

IF you haven't already, try using the steps suggest abote, this may help.

HTH! :)
 
I've hackintoshed for a decent amount of years. I've used S/L/E and L/E long before with other hack. But noe I only use injection for Clover it is in Clover/Kext/Other for OpenCore it is in OC/Kexts.

I have my reasons to why I only inject. Reasons I probably won't discuss, because it'll take time and it might overtake other important topics in the thread. But all works fine, over many years now. In specific to the rig with Gigabyte Z390 Designare, everything works fine even after updating using this method.

That said, I certainly hope I don't need to rely on L/E or S/L/E, Specially with unsigned kexts. The way I've researched and talked to other developers, gotten knowledge, I do not feel there is a need to install to L/E and S/L/E. :)

Well I want to know for sure :).
 
Last edited:
Okay, we're getting there!

iGPU will likely not appear in System Information --> Graphics/Displays, but it should appear in System Information --> PCI. It should also appear in IORegistryExplorer under the device IGPU@2.

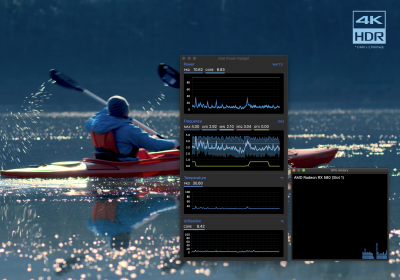
Are you using SMBIOS iMac19,1? This is the best one to use on this system when iGPU is enabled. Also try downloading and playing the 4K Sony Camp video. Keep the Intel Power Gadget running and see if the iGPU shows a heartbeat!
Hi @CaseySJ . Thanks for this. As you can see from the attachment there is a blip in the GFX. I assume this is an indication it is working. Thanks for all your help - amazing! Now to backup my system!!
 

Attachments

  • Screenshot 2019-11-06 at 08.59.14.png
    Screenshot 2019-11-06 at 08.59.14.png
    6.7 MB · Views: 96
Hi
I have updated to 10.15.1 MAC OS
1. Now Igpu does not work anymore ( It seems I have to change anything)


2. I checked in your discription for updates. I have Fractal R6 and I am using all ports on top

Screenshot 2019-11-06 at 10.05.54.png

  • SSDT-DESIGNARE-Z390-NO-CNVW.aml
  • I do not find for download!
  • Is the way I have it correct?

Thanks for the help
 
I did as you said, but I got an error message. As a result, I started a reinstallation of Mojave, not without difficulty because the installer was defective and I had to download the one from the US Appstore. Finally, it worked, by doing the EFI again in the process. For the moment, it's working again, I can mount the EFI partition again! I hope that Bluetooth will never be talked about again.
In the meantime, I'm trying to install Windows 10 to access the EFI in case of a problem but it's impossible for me to boot on the installation key, the system doesn't see it. I checked my Windows installation key when I started my PC and it was working. I dropped the last Rufus who didn't give me any option to take version 2.15, trying in MBR, GPT, still in FAT32, without result. Whatever the option chosen, the key is not seen at boot via F12, the only thing that appears is my main SSD in UEFI (all other disks are unplugged). If I go beyond the boot screen and get to Clover's, the key is always called "boot Windows from legacy HD1", again regardless of the key creation option, and nothing happens if I choose the key. I would like to point out that I use Windows 10 ìso 1903 in 64-bit version. Secure boot is disabled by default in bios.
 
Hi Casey. I appreciate the effort so far. I am still puzzled, though, by your instructions above, and I want to be 100% sure we're on the same page. I have 10.14.4 installed and running (for 8 months or so?) just fine. I am trying to move to 10.14.6 (and then the supplimental update). I feel like launching the full installer will REINSTALL my OS, which I do not want to do.

So, I want to be sure of 2 things:
Of course -- glad you're asking.
1, your instructions above are to have the full installer of Mojave in the applications folder (NOT the combo updater or anything like that...)
Apple's full installers are actually not segmented into (a) updaters and (b) fresh installers. Apple does release true updaters, but here I'm referring only to full installers. A full installer can be used to update an existing installation or to create a brand new installation.
2, you want me to launch this and run the installer from my regular, 10.14.4 desktop (via terminal or without, I'm not sure it matters).
Yes, the full installer is just an app that goes into the Applications folder. So we just need to double-click and run it. It will begin the upgrade process.
I really want to be 100% sure because I'd rather not have to erase the drive and re-clone if it's not necessary. I have a working cloned backup, yes, but still...
When we run the full installer from within a running instance of macOS, it will perform an in-place update. Always keep an up-to-date backup, however.
 
Last edited:
Hi All--

I followed the instructions before attempting to update to 10.15.1 (as well as copying over the latest versions of VirtualSMC, AppleALC, and Lilu). After which, I have attempted running the the upgrade multiple times. Each time, the system does a reboot, and after I log back in, the 10.15.1 upgrade notification reappears and prompts me to update.

Any thoughts?

Cheers!
Each time the system reboots during the installation process, press an arrow key on the keyboard when the Clover Boot Menu appears. Don't let the Clover Boot Menu automatically count-down and boot the default disk.

Now take a look at all the boot choices shown.

One of them will contain the word Install. For example, if you are upgrading from Mojave, then the name of your disk might be Mojave. So one of the boot choices will be Boot macOS Install from Mojave.

See that magic word "Install"?

You must select that. The next time the system reboots, you might see a slightly different boot option containing the word Install, like this:

Boot macOS Install from Mojave - Data

Notice that now it says "Mojave - Data". This is normal. Select this option.

When Catalina is fully installed, it will remove the Install boot options.
 
Last edited:
Hi @CaseySJ . Thanks for this. As you can see from the attachment there is a blip in the GFX. I assume this is an indication it is working. Thanks for all your help - amazing! Now to backup my system!!
Yes, it's working. You'll mostly see iGPU activity when encoding/decoding HEVC (H.265) content. iGPU will be used for other tasks, but it may register only a faint blip in Intel Power Gadget. HEVC requires more heavy lifting, hence a more noticeable blip.
 
Last edited:
Hi
I have updated to 10.15.1 MAC OS
1. Now Igpu does not work anymore ( It seems I have to change anything)


2. I checked in your discription for updates. I have Fractal R6 and I am using all ports on top

View attachment 434659
  • SSDT-DESIGNARE-Z390-NO-CNVW.aml
  • I do not find for download!
  • Is the way I have it correct?

Thanks for the help
Upgrading to 10.15.1 should not affect iGPU if you updated WhateverGreen to 1.3.4. To check if iGPU is still engaged, run IORegistryExplorer and scroll the device tree on left side until you get to iGPU@2. Then see if the next item under iGPU@2 is AppleIntelFramebuffer. If so, iGPU is running.
 
I did as you said, but I got an error message. As a result, I started a reinstallation of Mojave, not without difficulty because the installer was defective and I had to download the one from the US Appstore. Finally, it worked, by doing the EFI again in the process. For the moment, it's working again, I can mount the EFI partition again! I hope that Bluetooth will never be talked about again.
In the meantime, I'm trying to install Windows 10 to access the EFI in case of a problem but it's impossible for me to boot on the installation key, the system doesn't see it. I checked my Windows installation key when I started my PC and it was working. I dropped the last Rufus who didn't give me any option to take version 2.15, trying in MBR, GPT, still in FAT32, without result. Whatever the option chosen, the key is not seen at boot via F12, the only thing that appears is my main SSD in UEFI (all other disks are unplugged). If I go beyond the boot screen and get to Clover's, the key is always called "boot Windows from legacy HD1", again regardless of the key creation option, and nothing happens if I choose the key. I would like to point out that I use Windows 10 ìso 1903 in 64-bit version. Secure boot is disabled by default in bios.
Let me see if I understand:
  • You're trying to install Windows 10 from a USB flash disk.
  • Have you used Microsoft's Media Creation Tool to create the USB installer?
  • If so, it should appear in the F12 BIOS boot menu. If it still does not appear, try this:
    • Shutdown the system.
    • Flip power switch on PSU (or pull power cable from the wall) for 10 seconds. This performs a soft CMOS reset.
    • Turn computer on again and check F12 menu.
  • Also note:
    • If installing Windows to an NVMe M.2 SSD, install the M.2 SSD into the top M2M slot.
      • Physically remove the macOS NVMe M.2 SSD.
      • Disconnect all SATA drives.
 
Back
Top