Contribute
Register

[Guide] Install High Sierra or Mojave on the Dell Optiplex 7010 / 9010 Desktop PC - Revision II

Status
Not open for further replies.
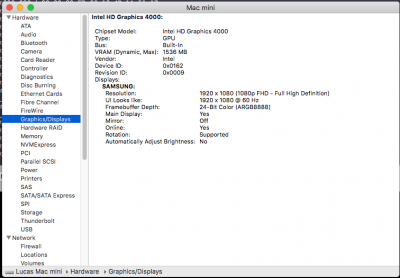
Yes, that's what my MT reliably also reported - Metal! I am going to ignore that for a moment.

Here is the Dell USFF boot log with the new MB. Anything look strange here?
(only front USB ports not working, might be a loose wire inside, not an install issue - rear USB ports working fine).
 

Attachments

  • Screen Shot 2013-01-10 at 5.10.19 AM.png
    Screen Shot 2013-01-10 at 5.10.19 AM.png
    93.9 KB · Views: 145
  • bootlog.txt
    27.8 KB · Views: 73
Interestingly, Metal used to show up on this one, but no Metal on this one either. Must be because of Halloween?
Yes, this could be caused by gremlins that have gotten into your Dell PCs. :) More likely though that something is wrong in your config.plist. Zip up your EFI Clover folder and attach that here.
 
Yes, this could be caused by gremlins that have gotten into your Dell PCs. :) More likely though that something is wrong in your config.plist. Zip up your EFI Clover folder and attach that here.

Thanks!
 

Attachments

  • EFI.zip
    25 MB · Views: 161
Why are you using this fake ID for IMEI ?

Screen Shot 2019-10-31 at 7.38.48 PM.png


Also try changing this in Rt Variables to UseMacAddr0
Not sure where you got the ROM value from.

Screen Shot 2019-10-31 at 7.37.06 PM.png
 
Why are you using this fake ID for IMEI ?

Also try changing this in Rt Variables to UseMacAddr0
Not sure where you got the ROM value from.

I think I was trying a specific fake ID a while back (found it on another thread). I’ve removed it.
As for ROM, no recollection where that came from. Fixed it as suggested...
 
No change. Might try a complete new install on another drive as a test to see if that changes anything...
 
Just succeeded in enabling ME/AMT on a 7010 that was factory ME Disabled (a big 3 on the white label inside). This seems to be needed to get the HD4000 going properly on this build. I basically followed the instructions on the win-raid forum but it took a little sifting through to get to the point that I was confident to give it a go. Luckily it worked. So for anyone wanting to try this also, the thread is over at the win-raid forum. Or the simple version is to follow the instructions below - At Your Own Risk. Basically I downgraded the firmware to A25 first as that was the matching ME/AMT-Enabled ME section of the firmware that I had. I dont think you strictly need to do this and whether you do or dont, the firmware can be reflashed to A29 (current as of today) in order to get both the latest BIOS and ME versions back to latest. If you struggle with this then the best bet is probably to ask over at win-raid as I dont have any expertise in this; I was just the guinea pig.

You will need to locate the Service Mode jumper on the motherboard (in different places depending if you have a MT/DT or a SFF). I do not know if the USFF has a Service Mode jumper as I do not have that machine, but the other 3 definitely do.

Credit to the win-raid forum and plutomaniac in particualar and others who worked out how to do this.

Here is what I did and the necessary files are attached:

1. Flash BIOS to A25
2. Reboot
3. Reset BIOS to defaults
4. Shutdown
5. Set jumper to Service Mode
6 Have a FREEDOS Boot USB ready with "fpt.exe" and "fparts.txt" files (Flash Programming Tool from Intel ME System Tools v8.3) on it
7. Have the "me.bin" file also on the FREEDOS Boot USB ready
8. Boot the FREEDOS USB (F12) and flash the ME area of the firmware ONLY using "me.bin" via the command "fpt -rewrite -me -f me.bin"
9. Perform ME reset via "fpt -greset"
10. Shutdown
11. Set Service Mode jumper back to normal mode (Jumper Off)
12. Set the Clear CMOS jumper (may be marked RTCRESET on some models)
13. Switch on and allow CMOS to clear
14. Switch off and put Clear CMOS jumper back to normal
15. Switch on and AMT should now be operational
16. Adjust BIOS settings as necessary
17. Update BIOS to latest as desired

Once again, try this at your own risk, although it seems relatively safe as we are only changing the ME region, which is currently disabled anyway - but having said that........
I've tried this and not getting any results - CTRL-P doesn't do anything nor does anything special show up in F12 menu related to MEBx
 
Success! Got Metal HD4000 accelerated graphics working using this flashing process https://www.win-raid.com/t1053f39-Optiplex-and-VPro-AMT-ME-9.html#msg75549

Basically, setup a bootable FreeDOS USB drive with all of the files (FPT.EXE, fparts.txt, A29_AMT.bin, O7010A29.EXE) needed for enabling AMT on the 7010. If the BIOS is not already at A29, flash the BIOS to version A29 by running the update file. Then, shut the PC off and put a jumper on the the service mode pins. Then simply reboot up the PC with FreeDOS USB drive and run these commands:

FPT -rewrite -desc -f A29_AMT.bin
FPT -rewrite -ME -f A29_AMT.bin
FPT -greset

The first command will write to the Flash Descriptor and includes the change to enable AMT if it a machine that has the AMT lockout (6 according to the sticker inside the cover) as well as the change to disable the 3G driver since the Intel Anti-theft Technology is disabled in the ME due to being EOL. The second command flashes the ME region which includes enabling full AMT, including KVM, and the disabling of the EOL Intel Anti-theft Technology.

After the machine reboots, shut the PC off and remove the jumper from the service mode pins and boot back up and hold Ctrl+P when it reboots to go setup AMT. It will be listed as MEBx in the F12 boot options menu. The password starts as "admin" but you must specify a more elaborate password with uppercase/lowercase and punctuation characters. Then basically make sure AMT is enabled and continue to setup BIOS per the instructions for MacOS listed in the guide.

Metal shows up in the system report after these fixes. I applied it to my 2 7010 systems (both had ME lockout 6), a MT and USFF. There are service mode pins on all 7010 motherboards. Check the Dell 7010 manual to determine their locations.
 

Attachments

  • ME_AMT_7010.zip
    6 MB · Views: 337
Last edited:
Metal shows up in the system report:
What a about the replacement motherboard you bought ? That didn't have a "6" or ME lockout did it ?
After the machine reboots, shut the PC off and remove the jumper from the service mode pins and boot back up and hold Ctrl+P when it reboots to go setup AMT
Would be great if you could post a pic of where readers can find that jumper on the board. I know that it's very tiny and difficult to locate.

In Summary:
For those buying a complete Dell PC it may be best to ask the seller to look at the sticker on the inside of the side cover. If it has the #1 that's perfect. If it's got a #3 or #6, ask them to send a different one. Then you'll know for certain whether or not you'd have to jump through all these hoops just to get graphics to work. For those buying just a Dell Optiplex board and not the whole Dell PC, you really have no way of knowing the status until you get it and test.
 
Last edited:
What a about the replacement motherboard you bought ? That didn't have a "6" or ME lockout did it ?

Would be great if you could post a pic of where readers can find that jumper on the board. I know that it's very tiny and difficult to locate.

In Summary:
For those buying a complete Dell PC it may be best to ask the seller to look at the sticker on the inside of the side cover. If it has the #1 that's perfect. If it's got a #3 or #6, ask them to send a different one. Then you'll know for certain whether or not you'd have to jump through all these hoops just to get graphics to work. For those buying just a Dell Optiplex board and not the whole Dell PC, you really have no way of knowing the status until you get it and test.

This was required on the new motherboard. It was not clear what the sticker would have been with the new board, but ME was missing in the boot menu. Presumably, I can do the same flashing steps on the old MB as well to get it to work. I will likely do the same steps on my Mini Tower.

Here is my proposed summary to help others:

- IF you plan to use a graphics accelerator card, THEN you do not have to worry about ME except to possibly disable it entirely (for security reasons - as outlined in the guide)

- IF you plan to use integrated HD4000 graphics, THEN you MUST have ME enabled for it to work reliably. From here there are 2 cases:
1. MEBx is not disabled and is visible in the F12 boot menu or can get to it by pressing CTRL-P during POST. You should proceed to try to ensure it's enabled if you don't see "Metal" available in the System Report. The default password is "admin", however if a password has already been set, then remove the CMOS battery and wait 5 minutes and reinsert the battery to get the opportunity to set your own MEBx password.

2. You cannot find MEBx in the F12 menu and CTRL-P doesn't do anything. If you have sticker #3 or #6 you can either try to return the machine or proceed to flash using a ZIP file with the files and steps listed. It's actually not that bad, but do at your own risk of something going wrong.

Post 847 provides some instructions that did not work for me, but clearly there are cases where people cannot get acceleration to work. I think there are just batches of surplus units that have ME disabled in the factory. I purchased both of my 7010s on Ebay for what it's worth.
 
Status
Not open for further replies.
Back
Top