
You are using an out of date browser. It may not display this or other websites correctly.
You should upgrade or use an alternative browser.
You should upgrade or use an alternative browser.
[SUCCESS] Gigabyte Designare Z390 (Thunderbolt 3) + i7-9700K + AMD RX 580
- Thread starter CaseySJ
- Start date
-
- Tags
- gigabyte thunderbolt 3
- Joined
- Sep 21, 2010
- Messages
- 13,411
- Motherboard
- HP 17" 17-by3053cl
- CPU
- i5-1035G1
- Graphics
- Intel UHD Graphics, 1920x1080
- Mac
- Classic Mac
- Mobile Phone
CaseySJ
Moderator
- Joined
- Nov 11, 2018
- Messages
- 22,187
- Motherboard
- Asus ProArt Z690-Creator
- CPU
- i7-12700K
- Graphics
- RX 6800 XT
- Mac
- Classic Mac
- Mobile Phone
I have both the ThunderboltEX 2 and EX 3, and happy to say that both work, but unhappy to say that hotplug has not (yet) been successful on either.@CaseySJ,
I have an OT question. Did you get your X99's ASUS ThunderboltEX3 working? If so, did you post your installation in this thread or did you start another thread?
I ask because I can't get the ASUS ThunderboltEX3 working in MyHero build. TIA.
I’ll install the EX 3 back into this system and work on hotplug once again. The EX 2 card has been continuously installed since it arrived. I can post BIOS screenshots and SSDTs for the EX 3.
I’ve also seen reports of some Thunderbolt eGPUs not working at all in Catalina. I can in fact confirm that my PowerColor Gaming Station X is not recognized in Catalina, but has no problem in Mojave (other than not being hot-pluggable). Apple has apparently been informed.
CaseySJ
Moderator
- Joined
- Nov 11, 2018
- Messages
- 22,187
- Motherboard
- Asus ProArt Z690-Creator
- CPU
- i7-12700K
- Graphics
- RX 6800 XT
- Mac
- Classic Mac
- Mobile Phone
If you're attempting an in-place upgrade from Mojave to Catalina, here are some comments and guidelines:I followed your steps, but no luck. When booting from iGPU, it showed several vertical bars, and it couldn’t go anywhere. Hope you can shares another tips.
- If you're using SMBIOS iMac19,1 you will have a smoother experience than Macmini8,1. SMBIOS iMacPro1,1 might also be smoother. All three of these SMBIOSes will work.
- Connect monitor to your AMD GPU.
- Some people have disabled the 3-second or 5-second countdown timer in Clover so that the Clover Boot Menu does not appear, and instead they go right to the Apple Logo boot screen.
- TURN THIS OFF before doing any MacOS update.
- Instead, specify a 3 or 5 second timeout as shown here:
-

- Whenever the system reboots during the macOS update and the Clover Boot Menu appears, press right-arrow or left-arrow key to stop the countdown.
- Then look at all the available boot volumes.
- If there is any boot option whose name is like this "Boot macOS Install from Catalina - Data" you must select that.
- During installation, some of the steps can take 5 minutes or more before the installation process begins. Give it some time and, if possible, do not leave.
- Stay with the computer and watch the screen at least every couple of minutes because the computer will reboot without warning!
- Each time it reboots, you must be there to look at the boot options available in Clover Boot Menu, and you must manually select the right one.
- If there is a boot option with the word "Install", choose it.
- If there is no longer a boot option with the word "Install" then choose the standard Boot into macOS.
CaseySJ
Moderator
- Joined
- Nov 11, 2018
- Messages
- 22,187
- Motherboard
- Asus ProArt Z690-Creator
- CPU
- i7-12700K
- Graphics
- RX 6800 XT
- Mac
- Classic Mac
- Mobile Phone
OK. Using your information, I just tried with my 19,1 SMBIOS and tried with combinations of 32/128, 32/256, 64/128 and 64/256. I could not get a solid boot and I'm running AptioMemoryFix also. I have shiki values set in my config and I'll have to play with taking those out. But simply using the lower 32 on the pre-allocated did not work for me running 19,1.
Over the weekend I experimented with AptioMemoryFix and various slide values (including no slide parameter at all). What I found was baffling and inscrutable. I took a lot of notes which I can summarize later, but the key observations were as follows:It all depends on what you get from Clover -> UEFI Shell -> memmap -b.
In my case this is enough. In other cases it won't be. If I were to add another PCI card this may completely fail for me.
I used slide=0 and that's something I've needed in any case. We have the same board and CPU but you have a different GPU.
You could screenshot memmap -b from the UEFI shell and post it here, though you may just be stuck with free2000.
Setting up the Experiment:
- My configuration:
- SMBIOS Macmini8,1
- IGFX enabled and Platform ID 0x3E980003 (headless).
- Fenvi FV-T919 in bottom PCIe x1 slot.
- RX 580 GPU in Slot 1.
- I created 20 different config.plist files, named config-1.plist through config-20.plist.
- config-1.plist specified slide=1
- config-2.plist specified slide=2
- ...
- config-20.plist specified slide=20
- At the Clover Boot Menu we can select the Options option (ha!) and pick from any of the .plist files in the CLOVERfolder.
- This is very handy because we can quickly cycle between all 20 values of slide without having to go through the whole tedium of booting into macOS, mounting EFI, modifying config.plist, etc.
- I also tried a random set of much larger values of slide, such as slide=167.
- I ran memmap several times (with several reboots) to make sure that the map was the same or very nearly the same each time.
- And sure enough, the memory map was the same after each reboot.
- Based on the information we have seen from vit9696 and others regarding calculation of slide values, I fully expected each slide value to generate a consistent, repeatable memory address.
- For example, if I use slide=1, I expected macOS kernel to allocate a block of memory at the same memory address on each and every reboot (as long as memmap was the same, which it was).
- So I selected config-1.plist and I immediately received a Couldn't allocate runtime area error, along with a memory address and size.
- So I made a note of the memory address and rebooted/repeated the same experiment with the same slide value.
- Surprisingly, the memory address changed...
- Each time I repeated the experiment, I got a different memory address.
- So I switched to slide=2, then slide=3, then slide=4, and so on. And I repeated the experiment multiple times with each slide value.
- As we increase slide from 1 to 20 and then to 167 we expect the base memory address to increase.
- But I did not observe any such behavior.
- When I used slide=167 I found that macOS was attempting to allocate memory in the same region as slide=5 or slide=7.
- When I used slide=15 I found that macOS was attempting to allocate memory in the same region as slide=1 or slide=167 or slide=12.
- In other words, the value of slide did not seem to make any difference.
- After spending a couple of hours on this, I was exhausted and happily went back to OsxAptioFix2Drv-free2000.
- Joined
- Jun 13, 2019
- Messages
- 271
- Motherboard
- ASUS ProArt Z690-CREATOR WIFI
- CPU
- i9-12900K
- Graphics
- RX 6900 XT
Over the weekend I experimented with AptioMemoryFix and various slide values (including no slide parameter at all). What I found was baffling and inscrutable. I took a lot of notes which I can summarize later, but the key observations were as follows:
Setting up the Experiment:
Expectations:
- My configuration:
- SMBIOS Macmini8,1
- IGFX enabled and Platform ID 0x3E980003 (headless).
- Fenvi FV-T919 in bottom PCIe x1 slot.
- RX 580 GPU in Slot 1.
- I created 20 different config.plist files, named config-1.plist through config-20.plist.
- config-1.plist specified slide=1
- config-2.plist specified slide=2
- ...
- config-20.plist specified slide=20
- At the Clover Boot Menu we can select the Options option (ha!) and pick from any of the .plist files in the CLOVERfolder.
- This is very handy because we can quickly cycle between all 20 values of slide without having to go through the whole tedium of booting into macOS, mounting EFI, modifying config.plist, etc.
- I also tried a random set of much larger values of slide, such as slide=167.
- I ran memmap several times (with several reboots) to make sure that the map was the same or very nearly the same each time.
- And sure enough, the memory map was the same after each reboot.
Overall Observations:
- Based on the information we have seen from vit9696 and others regarding calculation of slide values, I fully expected each slide value to generate a consistent, repeatable memory address.
- For example, if I use slide=1, I expected macOS kernel to allocate a block of memory at the same memory address on each and every reboot (as long as memmap was the same, which it was).
- So I selected config-1.plist and I immediately received a Couldn't allocate runtime area error, along with a memory address and size.
- So I made a note of the memory address and rebooted/repeated the same experiment with the same slide value.
- Surprisingly, the memory address changed...
- Each time I repeated the experiment, I got a different memory address.
- So I switched to slide=2, then slide=3, then slide=4, and so on. And I repeated the experiment multiple times with each slide value.
If you have also experimented with Slide values, did you observe the same behavior? If not, what did you observe?
- As we increase slide from 1 to 20 and then to 167 we expect the base memory address to increase.
- But I did not observe any such behavior.
- When I used slide=167 I found that macOS was attempting to allocate memory in the same region as slide=5 or slide=7.
- When I used slide=15 I found that macOS was attempting to allocate memory in the same region as slide=1 or slide=167 or slide=12.
- In other words, the value of slide did not seem to make any difference.
- After spending a couple of hours on this, I was exhausted and happily went back to OsxAptioFix2Drv-free2000.
My recent test I used slide=0, slide=1, slide=161, slide=162, and slide=163.
I did not see changes in the memmap based on slide, but I don't think that kicks in until actually booting.
What I did observe is that I get different errors based on the slide value. I didn't pay attention to the address, just the number of pages error.
I got Error allocating 0x11c89 pages with slide=0 and slide=1 if I recall. I don't think I recorded the value for 161-163, but if I booted with no slide value, I got 0x1c1d. That was with iGPU on and 64MB DVMT preallocated.
The difference between 64MB and 32MB DVMT got me 0x2000 extra pages. I may want to test again with this extra space.
PS: As opposed to making all those config.plists, there is an option to edit the boot args. So you can edit it right in clover on the fly. That's how I tested it.
- Joined
- Apr 25, 2011
- Messages
- 70
- Motherboard
- Gigabyte Z390 Designare
- CPU
- i7-9700K
- Graphics
- RX 580
- Mac
- Mobile Phone
Finally I have Mojave installed WITH a FW PCIe card.
Sleep/wake/shutdown works with FixFirewire enabled in Clover.
I have a http://www.bare-bone.com/fwb-pcie1x21a/eindex.htm card.
Also know as Delock product https://www.delock.de/produkte/1114_FireWire/61643/merkmale.html
I got the A version with an FW400 port and 2 FW800 ports. The B version is with 3 FW800 ports.
When I put it in the PCIEX1_2 card I got an ACPI table error and won't boot further to Mojave.
When I put it in the PCIEX8 slot it WORKS like a charm.
- Joined
- Mar 21, 2011
- Messages
- 801
- Motherboard
- GA-Z390-Aorus Pro
- CPU
- i7-9700K
- Graphics
- RX 590
a long shot, but....Oops, I didn't see the typo either.
The command gives the answer Volume on disk0s1 failed to mount
If the volume is damaged, try the "readOnly" option
CloverConfigurator: nothing happens after the password request
EFI Mounter: AppleEvent manager failed, error -10000
EFI Agent: failed to mount, it tells me the same thing for all the EFI volumes present
if you have more than one SSD or HD in your system, the one you're trying to mount may not be disk0. if you have multiple drives, try disk1s1, or disk2s2, etc depending on how many drives you have.
I have an m.2 ssd, and a spinning HD. randomly, from boot to boot, my ssd may be assigned disk0 or it may be disk1. I always have to check by opening disk utility. if you can boot your system, open disk utility to see what disk number bios has assigned to the drive your EFI folder is on.
CaseySJ
Moderator
- Joined
- Nov 11, 2018
- Messages
- 22,187
- Motherboard
- Asus ProArt Z690-Creator
- CPU
- i7-12700K
- Graphics
- RX 6800 XT
- Mac
- Classic Mac
- Mobile Phone
*** Mini-Guide ***
Mojave Users: Configure Carbon Copy Cloner for One-Key Bootable Backup
Please do not quote this guide in its entirety. Post a link instead.
These instructions are for Mojave (10.14.x) users only. Catalina users should refer to the Mini-Guide below.
Update 8-Mar-2020:
We are now using a modified version of @byteminer's EFIClone from my GitHub repository. Instructions are provided in the spoiler below. Note that the script has TEST_SWITCH set to "Y". This puts the script in dry-run mode in which it will only log the files to be deleted and copied, but will not delete or copy any files.Mojave Users: Configure Carbon Copy Cloner for One-Key Bootable Backup
Please do not quote this guide in its entirety. Post a link instead.
These instructions are for Mojave (10.14.x) users only. Catalina users should refer to the Mini-Guide below.
Update 8-Mar-2020:
- Your first cloning operation should be run with TEST_SWITCH set to "Y". Then examine EFIClone.log as described at the bottom of the procedure to ensure that only files in the source and target EFI partitions are listed in the log.
- If files from any other disks or partitions are listed in the log, then STOP AND POST YOUR EFIClone.log file.
- However, if the log looks good, then edit the script, change TEST_SWITCH to "N" at the top of the file and save. The file can be found by selecting Utilities --> Reveal CCC's Scripts Folder from within Carbon Copy Cloner. Edit the file located in the Finder window that opens and save it with TEST_SWITCH changed to N.

Prerequisites: These steps are only performed once on a new SATA SSD.
Your SATA SSD will be divided into a primary APFS partition and a secondary EFI partition. When formatting is complete, only the APFS partition will be mounted.
Now we're ready to set up our one-key backup task in Carbon Copy Cloner. This task will copy everything from the APFS and EFI partitions to the external USB SATA SSD.
Step 1: Create Backup Task
Step 3: Test Run
Keep your bootable USB SSD up to date by running CCC periodically. Simply boot from the normal internal disk, mount the USB SSD, and run the CCC backup task. It will mount both the source and destination EFI partitions automatically and then dismount both EFI partitions after the clone is complete.
If your clone or backup disk is internally mounted (always present in the system), it may be a good idea to disable Spotlight search on that drive because it's just a duplicate. This can be done from System Preferences --> Spotlight as follows:

- Purchase or use a 2.5-inch SATA SSD that is large enough to hold everything in your Mojave OS disk. The backup disk only needs to be as large as the amount of space used on the source disk. If the source disk is 1TB, but only 100GB is used, then a 128GB backup SSD is sufficient.
- Purchase or use a USB 3 external SSD enclosure. These can be purchased from Amazon for under US$10. Here's an example.
- Install the SATA SSD into the USB 3 enclosure and connect the USB 3 cable to an available blue, yellow or red USB 3 port on the Hackintosh.
- Run Disk Utility, select View --> Show All Devices, and click on the parent name of the external USB SSD. Double-check that all of these steps have been followed; ask for help if necessary.
- Select Erase and make sure that a dialog appears with 3 options:
- Name: Select something like "Mojave Local Backup".
- Format: Select "APFS" (the first item in the pop-up menu).
- Scheme: Select "GUID Partition Map". This option is necessary so that an EFI partition gets created.
- Click Erase at the bottom right of the dialog.
- Check that Carbon Copy Cloner has Full Disk Access by selecting Grant Full Disk Access to CCC... as shown:

Your SATA SSD will be divided into a primary APFS partition and a secondary EFI partition. When formatting is complete, only the APFS partition will be mounted.
Now we're ready to set up our one-key backup task in Carbon Copy Cloner. This task will copy everything from the APFS and EFI partitions to the external USB SATA SSD.
Step 1: Create Backup Task
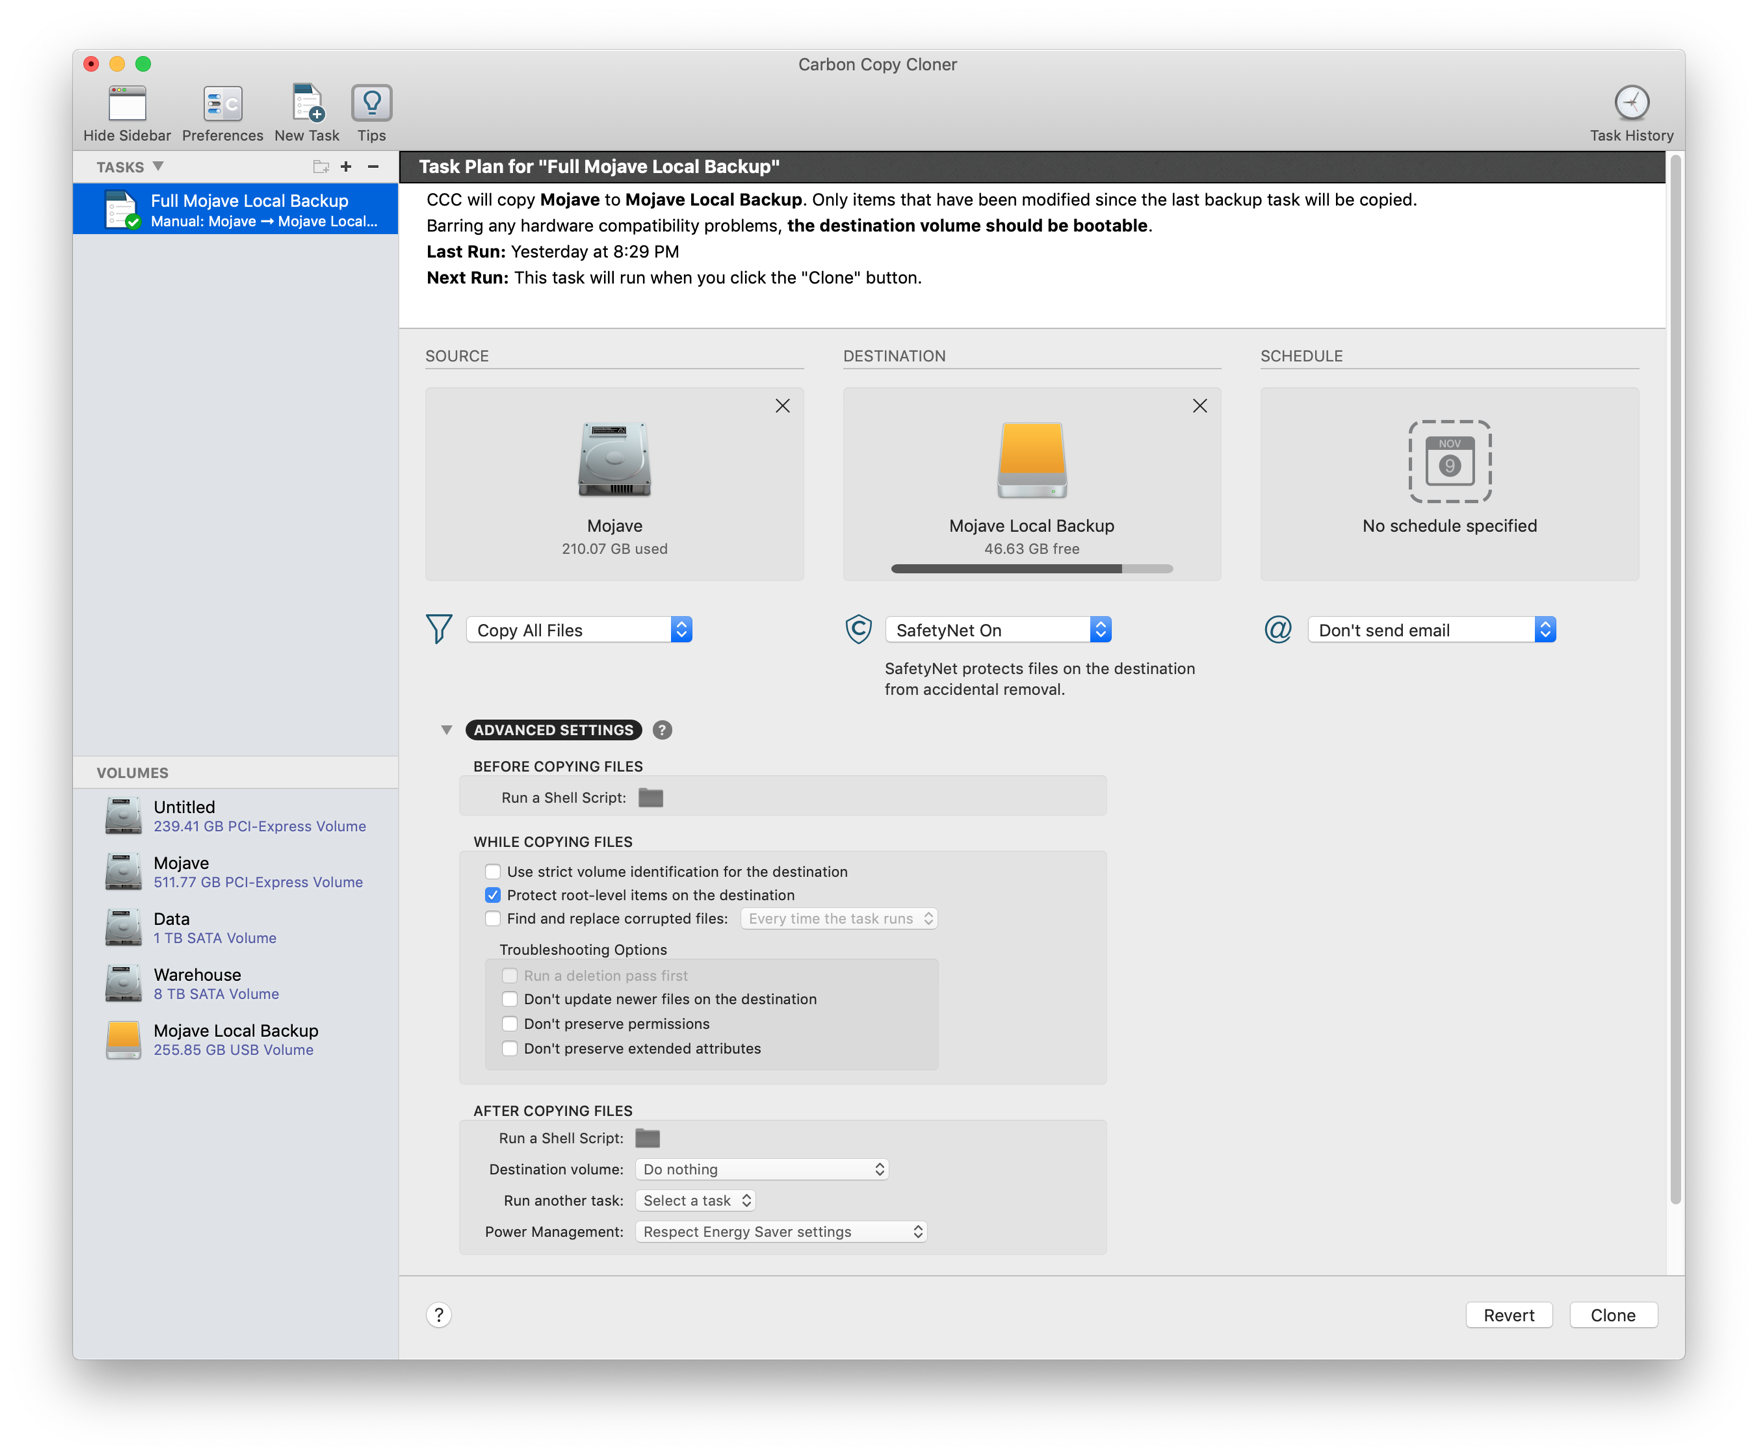
- Run Carbon Copy Cloner (CCC) and create a new backup task by selecting your Mojave SSD as the SOURCE disk and your external USB SATA SSD as the DESTINATION disk. Note that you must select the currently booted Mojave SSD as the Source disk.
- Click on ADVANCED SETTINGS to expand that section, but don't make any changes there yet.
- Give the task a name on the left side panel.
- Compare your screen with the screenshot below. I've named my task Full Mojave Local Backup.
- Download EFIClone.sh by clicking here and selecting the green button Code followed by Download ZIP as shown:
- IMPORTANT NOTE: Because this file is downloaded from the web, it may automatically receive a "quarantine" flag in macOS. Simply run Terminal, "cd" to the folder containing the file, and type
xattr -d com.apple.quarantine EFIClone.sh. Then quit Terminal and continue to next step. - Open Finder and navigate to the folder containing this file.
- From Carbon Copy Cloner's Utilities menu, select Reveal CCC's Scripts Folder as shown.
- Drag and drop EFIClone.sh into the Scripts folder. Mojave will ask for authentication, so enter your password when requested. The Scripts folder should look like this:
- Now we need to fix ownerships and permissions, which is done easily from the same Utilities menu. When this menu is now selected, notice that the last option has changed to Secure CCC's Scripts folder. Choose this item now.
- Great. We're nearly done. Now let's attach our script to the backup task by clicking the folder icon next to AFTER COPYING FILES --> Run a Shell Script and selecting EFIClone.sh.
- Verify that your screen matches the items in the red box below.
- Save the task by pressing CMD-S or File --> Save.


Step 3: Test Run
- Make sure that the external USB SATA SSD is mounted.
- Click the Clone button at the bottom right of the CCC window.
- From the Utilities menu, select Terminal to open a Terminal window.
- In the Terminal window, type
tail -f /EFIClone.log. - When the main APFS partition has been backed up, CCC will invoke the EFIClone script. At that time you will see detailed logs messages in the Terminal window.
- Press CONTROL-C to stop the log display and quit Terminal.
- When the CCC backup task is complete, press OK at the top right.
- Use Clover Configurator or EFI Agent to mount the EFI partition of the external USB SATA SSD.
- Open the CLOVER folder on that partition and check that everything has been copied.
- Finally, reboot your machine and press F12 at the BIOS splash screen to select the USB SSD as the boot drive.
- From the Clover Boot Menu, select "Boot macOS from Mojave Local Backup" (replace "Mojave Local Backup" with the actual name you gave to the USB SSD).
- Make sure Mojave can boot up fully. Then reboot, disconnect the USB SSD, and boot from the internal Mojave SSD.
Keep your bootable USB SSD up to date by running CCC periodically. Simply boot from the normal internal disk, mount the USB SSD, and run the CCC backup task. It will mount both the source and destination EFI partitions automatically and then dismount both EFI partitions after the clone is complete.
If your clone or backup disk is internally mounted (always present in the system), it may be a good idea to disable Spotlight search on that drive because it's just a duplicate. This can be done from System Preferences --> Spotlight as follows:
Last edited:
CaseySJ
Moderator
- Joined
- Nov 11, 2018
- Messages
- 22,187
- Motherboard
- Asus ProArt Z690-Creator
- CPU
- i7-12700K
- Graphics
- RX 6800 XT
- Mac
- Classic Mac
- Mobile Phone
*** Mini-Guide ***
Catalina/Big Sur: Configure Carbon Copy Cloner for One-Key Bootable Backup
Please do not quote this guide in its entirety. Post a link instead.
These instructions are for Catalina (10.15.x) and Big Sur (11.x) users
Mojave users should refer to the Mini-Guide above
macOS 11 Big Sur Users: Please see this additional information
WARNING: If you are running a non-English installation of Catalina, this procedure requires Catalina 10.15 with Supplemental Updates (Build 19A602) or newer. If you're running an English installation, any version of Catalina is okay.
Update 8-Mar-2020:
We are now using a modified version of @byteminer's EFIClone from my GitHub repository. Instructions are provided in the spoiler below. Note that the script has TEST_SWITCH set to "Y". This puts the script in dry-run mode in which it will only log the files to be deleted and copied, but will not delete or copy any files.- Your first cloning operation should be run with TEST_SWITCH set to "Y". Then examine EFIClone.log as described at the bottom of the procedure to ensure that only files in the source and target EFI partitions are listed in the log.
- If files from any other disks or partitions are listed in the log, then STOP AND POST YOUR EFIClone.log file.
- However, if the log looks good, then edit the script, change TEST_SWITCH to "N" at the top of the file and save. The file can be found by selecting Utilities --> Reveal CCC's Scripts Folder from within Carbon Copy Cloner. Edit the file located in the Finder window that opens and save it with TEST_SWITCH changed to N.

Prerequisites: These steps are only performed once on a new SATA SSD.
Your SATA SSD will be divided into a primary APFS partition and a secondary EFI partition. When formatting is complete, only the APFS partition will be mounted.
Now we're ready to set up our one-key backup task in Carbon Copy Cloner. This task will copy everything from the APFS and EFI partitions to the external USB SATA SSD.
Step 1: Create Backup Task
Step 3: Test Run
Keep your bootable USB SSD up to date by running CCC periodically. Simply boot from the normal internal disk, mount the USB SSD, and run the CCC backup task. It will mount both the source and destination EFI partitions automatically and then dismount both EFI partitions after the clone is complete.
If your clone or backup disk is internally mounted (always present in the system), it may be a good idea to disable Spotlight search on that drive because it's just a duplicate. This can be done from System Preferences --> Spotlight as follows:

- Purchase or use a 2.5-inch SATA SSD that is large enough to hold everything in your Catalina OS disk. The backup disk only needs to be as large as the amount of space used on the source disk. If the source disk is 1TB, but only 100GB is used, then a 128GB backup SSD is sufficient.
- Purchase or use a USB 3 external SSD enclosure. These can be purchased from Amazon for under US$10. Here's an example.
- Install the SATA SSD into the USB 3 enclosure and connect the USB 3 cable to an available blue, yellow or red USB 3 port on the Hackintosh.
- Run Disk Utility, select View --> Show All Devices, and click on the parent name of the external USB SSD. Double-check that all of these steps have been followed; ask for help if necessary.
- Select Erase and make sure that a dialog appears with 3 options:
- Name: Select something like "Catalina Local Backup".
- Format: Select "APFS" (the first item in the pop-up menu).
- Scheme: Select "GUID Partition Map". This option is necessary so that an EFI partition gets created.
- Click Erase at the bottom right of the dialog.
- Check that Carbon Copy Cloner has Full Disk Access by selecting Grant Full Disk Access to CCC... as shown:
Your SATA SSD will be divided into a primary APFS partition and a secondary EFI partition. When formatting is complete, only the APFS partition will be mounted.
Now we're ready to set up our one-key backup task in Carbon Copy Cloner. This task will copy everything from the APFS and EFI partitions to the external USB SATA SSD.
Step 1: Create Backup Task
- Run Carbon Copy Cloner (CCC) and create a new backup task by selecting your Catalina SSD as the SOURCE disk and your external USB SATA SSD as the DESTINATION disk. Note that you must select the currently booted Catalina SSD as the Source disk.
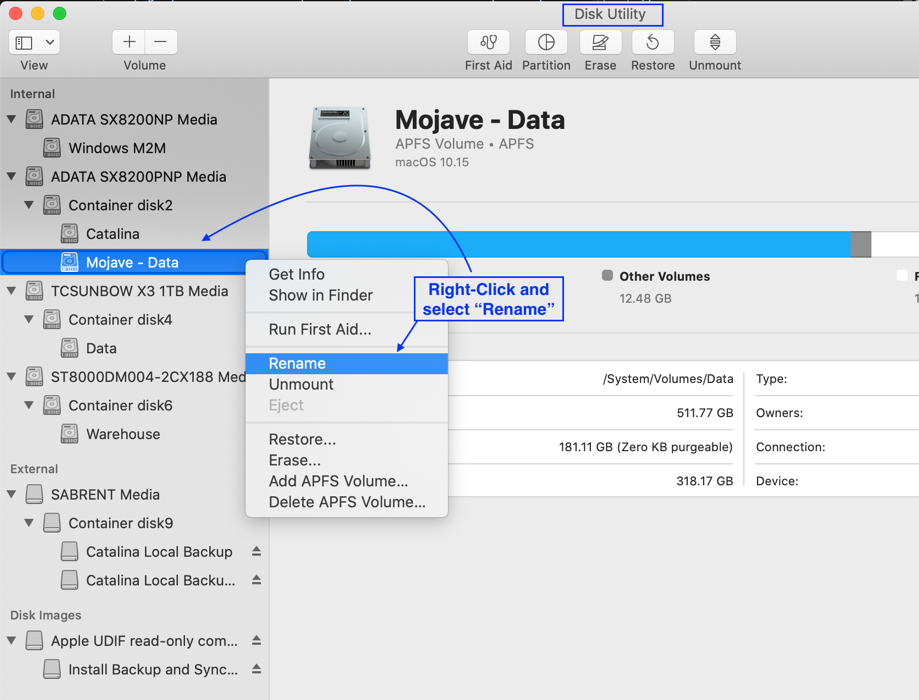
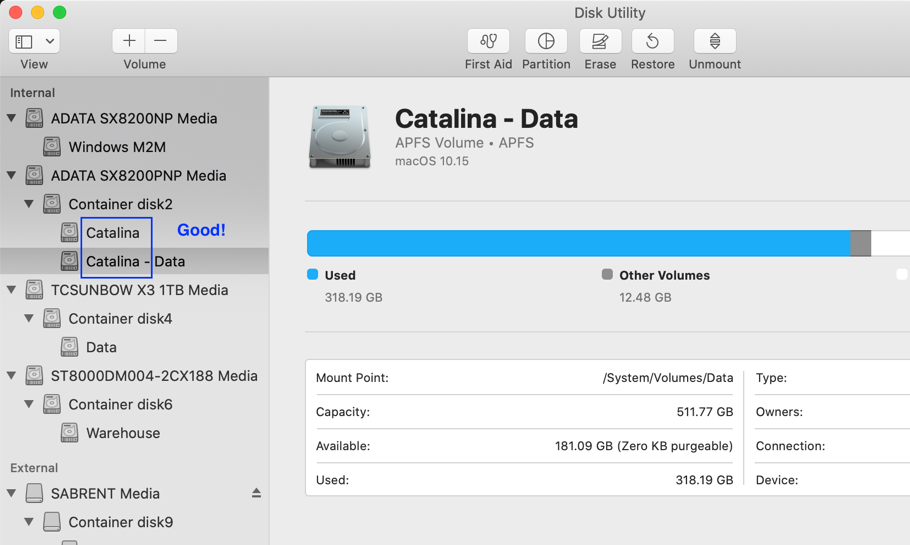
- Now look at the lower left side of Carbon Copy Cloner (see screenshot below). Your SOURCE disk will contain 2 volume names. In this example (see Step 2 in screenshot) our SOURCE disk has the names Catalina - Data and Catalina. Note that the base name is the same for both -- the base name is just Catalina.
- Now look at Step 4 in the screenshot below.
- The DESTINATION disk will have only 1 volume name immediately after the disk has been formatted with Disk Utility. In other words, if the DESTINATION disk is empty, then it will have only 1 volume name. So you can skip Step 4 in the screenshot below.
- But if a clone has previously been made to the DESTINATION disk, then it will have 2 volume names. So check that the base volume name is the same. In this case, the base volume name is Catalina Local Backup.
- Follow Steps 1, 2, 3 in the image below, but do not perform Step 5 yet. Skip Step 4 if the DESTINATION disk has just been formatted (i.e. if the DESTINATION disk is empty).
- WARNING: If the 2 base names of the SOURCE are not the same or the 2 base names of DESTINATION are not the same, you must use Disk Utility to rename the incorrect volume(s).
- Use Disk Utility to fix any volume name mismatches. See screenshots below in which my former "Mojave" drive has a mismatched pair of volume names. This mismatch must be corrected as shown in subsequent images.
- Use Disk Utility to fix any volume name mismatches. See screenshots below in which my former "Mojave" drive has a mismatched pair of volume names. This mismatch must be corrected as shown in subsequent images.
- Now let's get back to Carbon Copy Cloner setup. Here's that screenshot once again:
- Click on ADVANCED SETTINGS to expand that section, but don't make any changes there yet. In the diagram above, don't perform Step 5 until later.
- Give the task a name on the left side panel.
- Compare your screen with the screenshot above. I've named my task Full Catalina Local Backup.

- Download EFIClone.sh by clicking here and selecting the green button Code followed by Download ZIP as shown:
- IMPORTANT NOTE: Because this file is downloaded from the web, it may automatically receive a "quarantine" flag in macOS. Simply run Terminal, "cd" to the folder containing the file, and type
xattr -d com.apple.quarantine EFIClone.sh. Then quit Terminal and continue to next step. - Open Finder and navigate to the folder containing this file.
- From Carbon Copy Cloner's Utilities menu, select Reveal CCC's Scripts Folder as shown.
- Drag and drop EFIClone.sh into the Scripts folder. Catalina will ask for authentication, so enter your password when requested. The Scripts folder should look like this:
- Now we need to fix ownerships and permissions, which is done easily from the same Utilities menu. When this menu is now selected, notice that the last option has changed to Secure CCC's Scripts folder. Choose this item now.
- Great. We're nearly done. Now let's attach our script to the backup task by clicking the folder icon next to AFTER COPYING FILES --> Run a Shell Script and selecting EFIClone.sh.
- Verify that your screen matches the items in the red box below.
- Save the task by pressing CMD-S or File --> Save.
Step 3: Test Run
- Make sure that the external USB SATA SSD is mounted.
- Click the Clone button at the bottom right of the CCC window.
- From the Utilities menu, select Terminal to open a Terminal window.
- In the Terminal window, type:
Code:cd /System/Volumes/Data/Users/Shared tail -f EFIClone.log - When the main APFS partition has been backed up, CCC will invoke the EFIClone script. At that time you will see detailed logs messages in the Terminal window.
- Press CONTROL-C to stop the log display and quit Terminal.
- When the CCC backup task is complete, press OK at the top right.
- Use Clover Configurator or EFI Agent to mount the EFI partition of the external USB SATA SSD.
- Open the CLOVER folder on that partition and check that everything has been copied.
- Finally, reboot your machine and press F12 at the BIOS splash screen to select the USB SSD as the boot drive.
- From the Clover Boot Menu, select "Boot macOS from Catalina Local Backup" (replace "Catalina Local Backup" with the actual name you gave to the USB SSD).
- Make sure Catalina can boot up fully. Then reboot, disconnect the USB SSD, and boot from the internal Catalina SSD.
Keep your bootable USB SSD up to date by running CCC periodically. Simply boot from the normal internal disk, mount the USB SSD, and run the CCC backup task. It will mount both the source and destination EFI partitions automatically and then dismount both EFI partitions after the clone is complete.
If your clone or backup disk is internally mounted (always present in the system), it may be a good idea to disable Spotlight search on that drive because it's just a duplicate. This can be done from System Preferences --> Spotlight as follows:
Last edited:
Copyright © 2010 - 2024 tonymacx86 LLC