Contribute
Register

[Guide] Lenovo Ideapad 330S-14IKB (i5-8250u) Mojave 10.14.6+Windows 10

Status
Not open for further replies.
Joined
May 10, 2019
Messages
155
Motherboard
Lenovo Ideapad 330S-14IKB 81F400PFIN
CPU
i5-8250U
Graphics
UHD 620
Mobile Phone
  1. Android
408345


Hardware upgrades
  • Added additional Crucial 2400 DDR4 4GB RAM.
  • Removed Intel Optane and replaced with a Kingston 240GB NVMe M.2 SSD. (macOS)
  • Removed 1TB Internal Hard Drive and replaced with a Crucial 500GB SSD. (Windows 10)
  • Removed Intel WiFi card and replaced with Lenovo Branded Broadcom BCM94352Z.
Issues
  • Sometimes sleep doesn't work while closing the lid. (Very Random) (Fixed in Catalina)
  • Keyboard mute shortcut. (Displays muted but doesn't actually mute)
  • iMessage and Facetime. (Didn't bother as I don't use them)
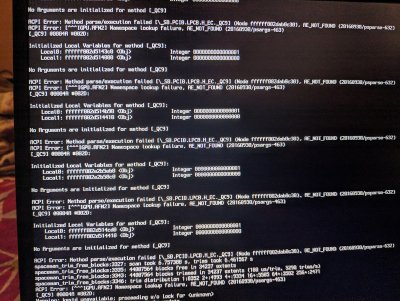
  • One ACPI error. (screenshot in post #1)
Bios Settings
  • Upgrade to the latest BIOS.
  • If yours came with Intel Optane, you need to disable that and use AHCI Legacy mode (Not RST).
  • Disable secure boot and unload optimized defaults for Windows 10.
  • Disable Virtualization
1. Make Install USB (You will need a mac for this)
In Terminal:
Code:
diskutil list
In my case, it provides this output:
Code:
/dev/disk0 (internal):
   #:                       TYPE NAME                    SIZE       IDENTIFIER
   0:      GUID_partition_scheme                         240.1 GB   disk0
   1:                        EFI EFI                     209.7 MB   disk0s1
   2:                 Apple_APFS Container disk2         239.8 GB   disk0s2

/dev/disk1 (synthesized):
   #:                       TYPE NAME                    SIZE       IDENTIFIER
   0:      APFS Container Scheme -                      +239.8 GB   disk1
                                 Physical Store disk0s2
   1:                APFS Volume macOS                   58.9 GB    disk1s1
   2:                APFS Volume Preboot                 43.7 MB    disk1s2
   3:                APFS Volume Recovery                509.7 MB   disk1s3
   4:                APFS Volume VM                      20.5 KB    disk1s4

/dev/disk2 (external, physical):
   #:                       TYPE NAME                    SIZE       IDENTIFIER
   0:      GUID_partition_scheme                        *30.8 GB    disk2
   1:       Microsoft Basic Data ERIN                    30.8 GB    disk2s1
So I can see that the USB is at /dev/disk2, time to format it. (Be sure to change the path according your flash drive)
Code:
# repartition /dev/disk2 GPT, one partition
# EFI will be created automatically
# second partition, "install_osx", HFS+J, remainder
diskutil partitionDisk /dev/disk2 1 GPT HFS+J "install_osx" R
Download macOS Mojave from the Mac App Store, after the download process has finished, now create the USB Installer by opening terminal and writing the following command:
Code:
sudo "/Applications/Install macOS Mojave.app/Contents/Resources/createinstallmedia" --volume  /Volumes/install_osx --nointeraction
2. Installing Clover
Download the latest version of clover bootloader from here.
Open Clover bootloader installer, click on continue, agree, continue and when you reach the screen "Installtion Type", click on "Change Install Location".
Choose your USB disk which should be labelled as "install_osx" as the install location.
Next click on "Customize". Make surethe following options are selected:
-Clover for UEFI booting only
-Install Clover in the ESP
-Themes
-UEFI Drivers (Under Drivers, uncheck SMCHelper-64, as we will be using VirtualSMC)
Click Install

3. Copying relevant drivers and kext files (My Clover Folder Attached Below)

Copy the files from the "drivers/UEFI" (NvmExpressDxe needed only for NVMe drives) and "kexts" folder to your USB where you have installed clover.
Replace the config.plist with the config.plist from my folder.

4. Installation

Step 1:

Plugin your USB, Power on your laptop, after the laptop screen turns on, press F1 repeatedly to enter into the BIOS.
Change the boot order to set the USB as the first boot device. Save and exit the BIOS.
Now it should bring you into the Clover Bootloader menu, select Install macOS Mojave (USB Drive) and press enter.
The Installer now should boot and reach installation menu.

Step 2:
From the installation menu, open Disk Utility, select the partition that you plan to install macOS, format it as Mac OS Journaled and name for the purpose of this guide we will name it "macOS". Exit Disk Utility after the format process has finished, this will bring you back to the Installer Main Menu.
Now select install macOS Mojave, agree to the "terms and conditions", select your HDD/SSD that you formatted and the installation process will begin. this will be the part 1 install. Part 1 should take around 5 minutes.

Step 3:
Laptop will automatically reboot when Part 1 installation ends. now as soon as Clover Bootloader menu shows up, this time you select the "macOS" partition to boot from, the installer will continue with Part 2 now and show the progress bar with time remaining under the Apple boot logo.
Note: Sometimes as soon as the time remaining shows up under the Apple boot logo, the laptop will reboot once more, if this happens, choose to boot from the "macOS" partition and Part 2 installation will continue and complete.
After the installation has been completed, the laptop will reboot and bring you to the Part 3 - first boot user setup.

Step 4:
Select Language, Continue, Connecting to Internet is optional or you can skip it for now.
When you reach the menu to sign with your Apple ID, make sure to skip this step, it will be important if you want to setup iMessage & FaceTime.

5. Post Installation

Step 1:

Open terminal and enter the following command:
Code:
sudo spctl --master-disable
This allows you to install Applications downloaded from Internet / Outside of the Mac App Store.

Step 2:
Open Clover Bootloader installer and continue with bootloader installation into the HDD/SSD that we installed macOS.
The procedures are exactly the same as on the Creating USB Installer, except that this time, instead of the USB Drive, we select the "macOS" HDD/SSD that we installed macOS. Also copy drivers from the "drivers64UEFI" folder to the "drivers64UEFI" folder on the Hard drive.

Step 3:
Now we need to install all the needed kexts into the HDD/SSD where we installed macOS.
All kexts should be installed into /Library/Extensions. Easiest way to Install kexts is with HackinTool. (Guide). Install all the kexts from the Library/Extensions folder I have attached.
Remove AppleIntelLpssI2C.kext and AppleIntelLpssI2CController.kext from /System/Library/Extentions or disable them with clover configurator (rebuild cache with hackintool)
Remove all kexts except for Lilu,VirtualSMC and WhateverGreen from your \EFI\CLOVER\kexts\Other
Reboot and press F4 and Fn+F4 at the bootloader. (This will generate you DSDT and SSDT files)
Boot into the system and copy the DSDT and SSDT-PNLF from my Clover folder to EFI\CLOVER\ACPI\patched. (You should ideally create these on your own)

That's it! Ideally, if you have the same config you should be done, but I would always recommend the Vanilla way and fix issues one by one. (I have made simple Guides for this attached in my folder).
Step 4:
Use Hackintool to fix hibernation and for USB port patching. (Guides in the folder)
Add DPI controls here.

Credits
Thanks to @RehabMan for his guides.
Thanks to @muchmore for his battery patch and @Whab for some suggestions in the 15IKB thread.
Thanks to @Sniki for his V330 guide.
 

Attachments

  • Lenovo 330s 14ikb Complete Project Public.zip
    65.2 MB · Views: 2,500
Last edited:
This is the ACPI error that I get many times while booting. Hoping someone can fix it.
 

Attachments

  • ACPI Error.jpg
    ACPI Error.jpg
    823.6 KB · Views: 1,155
Last edited:
Ho
View attachment 408345

Hardware upgrades
  • Added additional Crucial 2400 DDR4 4GB RAM.
  • Removed Intel Optane and replaced with a Kingston 240GB NVMe M.2 SSD. (macOS)
  • Removed 1TB Internal Hard Drive and replaced with a Crucial 500GB SSD. (Windows 10)
  • Removed Intel WiFi card and replaced with Lenovo Branded Broadcom BCM94352Z.
Issues
  • Bluetooth sometimes not available after sleep. (Restart fixes it) Fixed thanks to @GridH
  • Sometimes sleep doesn't work while closing the lid. (Very Random)
  • Keyboard mute shortcut. (Displays muted but doesn't actually mute)
  • iMessage and Facetime. (Didn't bother as I don't use them)
  • One ACPI Error while booting. (Hoping someone can help me with this)
Bios Settings
  • Upgrade to the latest BIOS.
  • If yours came with Intel Optane, you need to disable that and use AHCI Legacy mode (Not RST).
  • Disable secure boot and unload optimized defaults for windows 10.
  • Disable Virtualization
1. Make Install USB (You will need a mac for this)
In Terminal:
Code:
diskutil list
In my case, it provides this output:
Code:
/dev/disk0 (internal):
   #:                       TYPE NAME                    SIZE       IDENTIFIER
   0:      GUID_partition_scheme                         240.1 GB   disk0
   1:                        EFI EFI                     209.7 MB   disk0s1
   2:                 Apple_APFS Container disk2         239.8 GB   disk0s2

/dev/disk1 (synthesized):
   #:                       TYPE NAME                    SIZE       IDENTIFIER
   0:      APFS Container Scheme -                      +239.8 GB   disk1
                                 Physical Store disk0s2
   1:                APFS Volume macOS                   58.9 GB    disk1s1
   2:                APFS Volume Preboot                 43.7 MB    disk1s2
   3:                APFS Volume Recovery                509.7 MB   disk1s3
   4:                APFS Volume VM                      20.5 KB    disk1s4

/dev/disk2 (external, physical):
   #:                       TYPE NAME                    SIZE       IDENTIFIER
   0:      GUID_partition_scheme                        *30.8 GB    disk2
   1:       Microsoft Basic Data ERIN                    30.8 GB    disk2s1
So I can see that the USB is at /dev/disk2, time to format it. (Be sure to change the path according your flash drive)
Code:
# repartition /dev/disk2 GPT, one partition
# EFI will be created automatically
# second partition, "install_osx", HFS+J, remainder
diskutil partitionDisk /dev/disk2 1 GPT HFS+J "install_osx" R
Download macOS Mojave from the Mac App Store, after the download process has finished, now create the USB Installer by opening terminal and writing the following command:
Code:
sudo "/Applications/Install macOS Mojave.app/Contents/Resources/createinstallmedia" --volume  /Volumes/install_osx --nointeraction
2. Installing Clover
Download the latest version of clover bootloader from here.
Open Clover bootloader installer, click on continue, agree, continue and when you reach the screen "Installtion Type", click on "Change Install Location".
Choose your USB disk which should be labelled as "install_osx" as the install location.
Next click on "Customize". Make surethe following options are selected:
-Clover for UEFI booting only
-Install Clover in the ESP
-Themes
-UEFI Drivers (Under Drivers, uncheck SMCHelper-64, as we will be using VirtualSMC)
Click Install

3. Copying relevant drivers and kext files (My Clover Folder Attached Below)

Copy the files from the "drivers64UEFI" (NvmExpressDxe-64 needed only for NVMe drives) and "kexts" folder to your USB where you have installed clover.
Replace the config.plist with the config.plist from my folder.

4. Installation

Step 1:

Plugin your USB, Power on your laptop, after the laptop screen turns on, press F1 repeatedly to enter into the BIOS.
Change the boot order to set the USB as the first boot device. Save and exit the BIOS.
Now it should bring you into the Clover Bootloader menu, select Install macOS Mojave (USB Drive) and press enter.
The Installer now should boot and reach installation menu.

Step 2:
From the installation menu, open Disk Utility, select the partition that you plan to install macOS, format it as Mac OS Journaled and name for the purpose of this guide we will name it "macOS". Exit Disk Utility after the format process has finished, this will bring you back to the Installer Main Menu.
Now select install macOS Mojave, agree to the "terms and conditions", select your HDD/SSD that you formatted and the installation process will begin. this will be the part 1 install. Part 1 should take around 5 minutes.

Step 3:
Laptop will automatically reboot when Part 1 installation ends. now as soon as Clover Bootloader menu shows up, this time you select the "macOS" partition to boot from, the installer will continue with Part 2 now and show the progress bar with time remaining under the Apple boot logo.
Note: Sometimes as soon as the time remaining shows up under the Apple boot logo, the laptop will reboot once more, if this happens, choose to boot from the "macOS" partition and Part 2 installation will continue and complete.
After the installation has been completed, laptop will reboot and bring you to the Part 3 - first boot user setup.

Step 4:
Select Language, Continue, Connecting to Internet is optional or you can skip it for now.
When you reach the menu to sign with your Apple ID, make sure to skip this step, it will be important if you want to setup iMessage & FaceTime.

5. Post Installation

Step 1:

Open terminal and enter the following command:
Code:
sudo spctl --master-disable
This allows you to install Applications downloaded from Internet / Outside of the Mac App Store.

Step 2:
Open Clover Bootloader installer and continue with bootloader installation into the HDD/SSD that we installed macOS.
The procedures are exactly the same as on the Creating USB Installer, except that this time, instead of the USB Drive, we select the "macOS" HDD/SSD that we installed macOS. Also copy drivers from the "drivers64UEFI" folder to the "drivers64UEFI" folder on the Hard drive.

Step 3:
Now we need to install all the needed kexts into the HDD/SSD where we installed macOS.
All kexts should be installed into /Library/Extensions. Easiest way to Install kexts is with HackinTool. (Guide). Install all the kexts from the Library/Extensions folder I have attached.
Remove AppleIntelLpssI2C.kext and AppleIntelLpssI2CController.kext from /System/Library/Extentions or disable them with clover configurator (rebuild cache with hackintool)
Remove all kexts except for Lilu,VirtualSMC and WhateverGreen from your \EFI\CLOVER\kexts\Other
Reboot and press F4 and Fn+F4 at the bootloader. (This will generate you DSDT and SSDT files)
Boot into the system and copy the DSDT and SSDT-PNLF from my Clover folder to EFI\CLOVER\ACPI\patched. (You should ideally create these on your own)

That's it! Ideally if you have the same config you should be done, but I would always recommend the Vanilla way and fix issues one by one. (I have made simple Guides for this attached in my folder).
Step 4:
Use Hackintool to fix hibernation and for USB port patching. (Guides in the folder)

Credits
Thanks to @RehabMan for his guides.
Thanks to @muchmore for his battery patch and @Whab for some suggestions in the 15IKB thread.
Thanks to @Sniki for his V330 guide.


How to get audio working on this?
 
View attachment 408345

Hardware upgrades
  • Added additional Crucial 2400 DDR4 4GB RAM.
  • Removed Intel Optane and replaced with a Kingston 240GB NVMe M.2 SSD. (macOS)
  • Removed 1TB Internal Hard Drive and replaced with a Crucial 500GB SSD. (Windows 10)
  • Removed Intel WiFi card and replaced with Lenovo Branded Broadcom BCM94352Z.
Issues
  • Bluetooth sometimes not available after sleep. (Restart fixes it) Fixed thanks to @GridH
  • Sometimes sleep doesn't work while closing the lid. (Very Random)
  • Keyboard mute shortcut. (Displays muted but doesn't actually mute)
  • iMessage and Facetime. (Didn't bother as I don't use them)
  • One ACPI Error while booting. (Hoping someone can help me with this)
Bios Settings
  • Upgrade to the latest BIOS.
  • If yours came with Intel Optane, you need to disable that and use AHCI Legacy mode (Not RST).
  • Disable secure boot and unload optimized defaults for windows 10.
  • Disable Virtualization
1. Make Install USB (You will need a mac for this)
In Terminal:
Code:
diskutil list
In my case, it provides this output:
Code:
/dev/disk0 (internal):
   #:                       TYPE NAME                    SIZE       IDENTIFIER
   0:      GUID_partition_scheme                         240.1 GB   disk0
   1:                        EFI EFI                     209.7 MB   disk0s1
   2:                 Apple_APFS Container disk2         239.8 GB   disk0s2

/dev/disk1 (synthesized):
   #:                       TYPE NAME                    SIZE       IDENTIFIER
   0:      APFS Container Scheme -                      +239.8 GB   disk1
                                 Physical Store disk0s2
   1:                APFS Volume macOS                   58.9 GB    disk1s1
   2:                APFS Volume Preboot                 43.7 MB    disk1s2
   3:                APFS Volume Recovery                509.7 MB   disk1s3
   4:                APFS Volume VM                      20.5 KB    disk1s4

/dev/disk2 (external, physical):
   #:                       TYPE NAME                    SIZE       IDENTIFIER
   0:      GUID_partition_scheme                        *30.8 GB    disk2
   1:       Microsoft Basic Data ERIN                    30.8 GB    disk2s1
So I can see that the USB is at /dev/disk2, time to format it. (Be sure to change the path according your flash drive)
Code:
# repartition /dev/disk2 GPT, one partition
# EFI will be created automatically
# second partition, "install_osx", HFS+J, remainder
diskutil partitionDisk /dev/disk2 1 GPT HFS+J "install_osx" R
Download macOS Mojave from the Mac App Store, after the download process has finished, now create the USB Installer by opening terminal and writing the following command:
Code:
sudo "/Applications/Install macOS Mojave.app/Contents/Resources/createinstallmedia" --volume  /Volumes/install_osx --nointeraction
2. Installing Clover
Download the latest version of clover bootloader from here.
Open Clover bootloader installer, click on continue, agree, continue and when you reach the screen "Installtion Type", click on "Change Install Location".
Choose your USB disk which should be labelled as "install_osx" as the install location.
Next click on "Customize". Make surethe following options are selected:
-Clover for UEFI booting only
-Install Clover in the ESP
-Themes
-UEFI Drivers (Under Drivers, uncheck SMCHelper-64, as we will be using VirtualSMC)
Click Install

3. Copying relevant drivers and kext files (My Clover Folder Attached Below)

Copy the files from the "drivers64UEFI" (NvmExpressDxe-64 needed only for NVMe drives) and "kexts" folder to your USB where you have installed clover.
Replace the config.plist with the config.plist from my folder.

4. Installation

Step 1:

Plugin your USB, Power on your laptop, after the laptop screen turns on, press F1 repeatedly to enter into the BIOS.
Change the boot order to set the USB as the first boot device. Save and exit the BIOS.
Now it should bring you into the Clover Bootloader menu, select Install macOS Mojave (USB Drive) and press enter.
The Installer now should boot and reach installation menu.

Step 2:
From the installation menu, open Disk Utility, select the partition that you plan to install macOS, format it as Mac OS Journaled and name for the purpose of this guide we will name it "macOS". Exit Disk Utility after the format process has finished, this will bring you back to the Installer Main Menu.
Now select install macOS Mojave, agree to the "terms and conditions", select your HDD/SSD that you formatted and the installation process will begin. this will be the part 1 install. Part 1 should take around 5 minutes.

Step 3:
Laptop will automatically reboot when Part 1 installation ends. now as soon as Clover Bootloader menu shows up, this time you select the "macOS" partition to boot from, the installer will continue with Part 2 now and show the progress bar with time remaining under the Apple boot logo.
Note: Sometimes as soon as the time remaining shows up under the Apple boot logo, the laptop will reboot once more, if this happens, choose to boot from the "macOS" partition and Part 2 installation will continue and complete.
After the installation has been completed, laptop will reboot and bring you to the Part 3 - first boot user setup.

Step 4:
Select Language, Continue, Connecting to Internet is optional or you can skip it for now.
When you reach the menu to sign with your Apple ID, make sure to skip this step, it will be important if you want to setup iMessage & FaceTime.

5. Post Installation

Step 1:

Open terminal and enter the following command:
Code:
sudo spctl --master-disable
This allows you to install Applications downloaded from Internet / Outside of the Mac App Store.

Step 2:
Open Clover Bootloader installer and continue with bootloader installation into the HDD/SSD that we installed macOS.
The procedures are exactly the same as on the Creating USB Installer, except that this time, instead of the USB Drive, we select the "macOS" HDD/SSD that we installed macOS. Also copy drivers from the "drivers64UEFI" folder to the "drivers64UEFI" folder on the Hard drive.

Step 3:
Now we need to install all the needed kexts into the HDD/SSD where we installed macOS.
All kexts should be installed into /Library/Extensions. Easiest way to Install kexts is with HackinTool. (Guide). Install all the kexts from the Library/Extensions folder I have attached.
Remove AppleIntelLpssI2C.kext and AppleIntelLpssI2CController.kext from /System/Library/Extentions or disable them with clover configurator (rebuild cache with hackintool)
Remove all kexts except for Lilu,VirtualSMC and WhateverGreen from your \EFI\CLOVER\kexts\Other
Reboot and press F4 and Fn+F4 at the bootloader. (This will generate you DSDT and SSDT files)
Boot into the system and copy the DSDT and SSDT-PNLF from my Clover folder to EFI\CLOVER\ACPI\patched. (You should ideally create these on your own)

That's it! Ideally if you have the same config you should be done, but I would always recommend the Vanilla way and fix issues one by one. (I have made simple Guides for this attached in my folder).
Step 4:
Use Hackintool to fix hibernation and for USB port patching. (Guides in the folder)

Credits
Thanks to @RehabMan for his guides.
Thanks to @muchmore for his battery patch and @Whab for some suggestions in the 15IKB thread.
Thanks to @Sniki for his V330 guide.
Thanks for this guide!
Its gonna help me as i am planning to hackintosh same model as yours except cpu that is i3 7020u.
Btw did you solved your acpi issue?
 
I have the Ideapad 330s 15ikb and sleep by closing the lid is not working at all. Could somebody please show me how to make it work or just show me a guide where it is explained?
 
So as you mentioned sleep by lid close is just not working everytime, but otherwise my laptop is running really good, thanks for doing all the hard work! I figuered out that my laptop starts signifcantly faster when I use FakeSMC instead of VirtualSMC. whats your usual boot up time?
and I noticed that you have some similar kexts in Clover/kext/other and /L/E, is there any reason for this or are one of them just redundant?
Boot time is ~15-20 seconds for me. I just keep the necessary kexts needed for bootup in Clover/kexts.
 
Can you get your laptop to boot with VirtualSMC? I always get a KP but it seems like it’s always related to voodoops2
 
Can you get your laptop to boot with VirtualSMC? I always get a KP but it seems like it’s always related to voodoops2
Yup, I've been using VirtualSMC without any issues. Try updating the VoodooPS2 controller kext.
 
Tried that but didn’t help, somehow VirtualSMC doesn’t work well for me.

Could you already resolve the acpi error during boot? Googled a lot but couldn’t find any solution or guide how to handle acpi errors that don’t prevent a hackintosh from booting.
 
Status
Not open for further replies.
Back
Top