pastrychef
Moderator
- Joined
- May 29, 2013
- Messages
- 19,458
- Motherboard
- Mac Studio - Mac13,1
- CPU
- M1 Max
- Graphics
- 32 Core
- Mac
- Classic Mac
- Mobile Phone
10.14.3 Supplemental Update was smooth and fast.




With you laptop, you can use trip monitor ?I've been busy lately and finally had some time to try the 10.14.4 update today. Unfortunately, the update failed. For some reason, the stolenmem to address DVMT Pre-Alloc being too small isn't working. I'll try to work on it in the coming week and I'll update once I have it working.
For now, stay on 10.14.3 because 10.14.4 won't work.
With you laptop, you can use trip monitor ?
vga port of me not work for monitor three
By somehow, I have completed update mac os to 10.14.4 although it through the error that I think it is the same with you. But after restart, I got the macOS Mojave for my laptopSince the first day I got macOS running on this laptop, I had been using software tricks to increase the DVMT Pre-Alloc to a level that macOS requires. These tricks included config.plist > KextsToPatch, IntelDVMTGraphicsFixup.kext, and config.plist > Devices > Properties when IntelDVMTGraphicsFixup.kext got rolled in to WhateverGreen.kext.
For some reason, these software tricks do not work with macOS 10.14.4. Using them would result in a kernel panic during the booting phase of the update process. After searching around for an update on the software tricks and not finding anything, I gave up and decided to just change the DVMT Pre-Alloc setting in BIOS.
As with most laptops, this setting is hidden in the BIOS GUI. Therefore, we have to change the setting via EFI Shell. Detailed instructions on how to do it can be found here. The only difference is that I used Universal BIOS Backup Toolkit 2.0 instead of Phoenixtool256 to extract the BIOS. Below is an outline of what I did.
Tools needed:
Universal BIOS Backup Toolkit 2.0 - Used to read and backup the BIOS.
UEFITool - Used to extract sections of the BIOS.
Universal IFR Extractor - Used to convert the file extracted by UEFITool in to readable text.
EFI Shell
Windows 10 (older versions of Windows should also work, but I used Windows 10)
A USB flash drive
1. First we have to disable Windows Defender because it will wrongly report Universal BIOS Backup Toolkit 2.0 as a virus and prevent it from running.
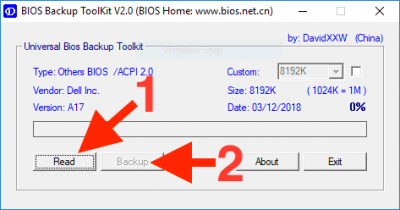
2. Next, launch Universal BIOS Backup Toolkit 2.0 as administrator. Click on the "Read" button and, when done, click on the "Backup" button. Name it anything you like. I named mine "DellInc-A17.rom".
View attachment 397202
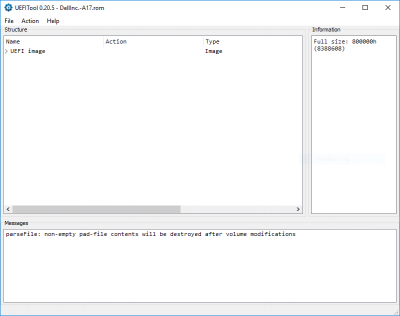
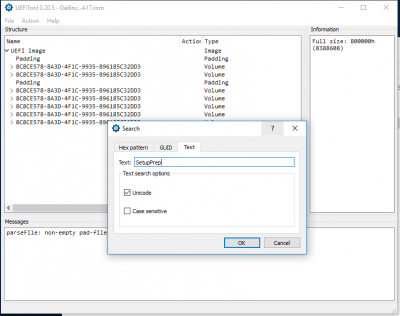
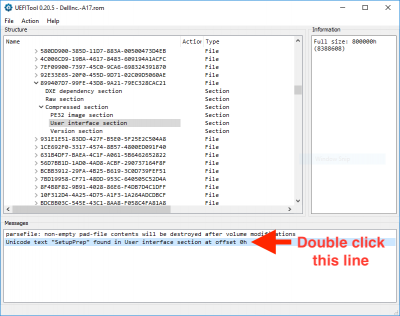
3. Launch UEFITool. Use the Search to find the text "SetupPrep".
View attachment 397204 View attachment 397205
4. Highlight the section, right click on it and select "Save as is". Name it anything you like. I named mine "setup.bin".
View attachment 397209 View attachment 397210
5. Launch Universal IFR Extractor and convert the previous file in to readable text.
View attachment 397211
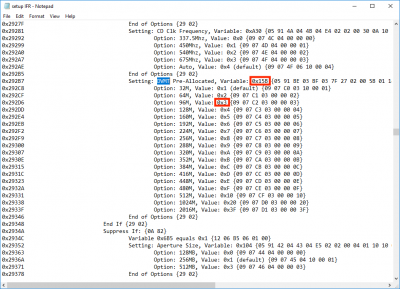
6. Open the file in Notepad and search for "DVMT". You will find multiple results, but we are only interested in the first one. The values we are interested in are (1) the address and (2) the value that corresponds to 96MB. I tried higher values but macOS wouldn't boot with them.
View attachment 397213
7. Make sure your USB flash drive is formatted as FAT32.
8. Copy BOOTX64.efi to the /EFI/BOOT/ folder.
9. Reboot from the USB flash drive.
10. At the Grub prompt, enter "setup_var 0x15B 0x3". Press Enter.
11. Update Clover and Lilu/AppleALC/WhateverGreen and update to 10.14.4.
12. Done.
Now, we will never have to worry about the DVMT Pre-Alloc again.
View attachment 397217
I follow
By somehow, I have completed update mac os to 10.14.4 although it through the error that I think it is the same with you. But after restart, I got the macOS Mojave for my laptop), that's weird.
I have some trouble when increase brightness or decrease brightness with keyboard Fn + F11 or Fn + F12 even I install Karabiner app, the problem when I click the box 'Use all F1, F2, etc..keys as standard function key'. I wonder that are you success when use with Fn to adjust brightness.
