Contribute
Register

[SUCCESS] Gigabyte Designare Z390 (Thunderbolt 3) + i7-9700K + AMD RX 580

I did my first Hackintosh last week using your guide, and it works like a charm on the first try! Thank you so much!!

I just have a question - I got two SSD's, one is for the macOS. But the other one, I want to use for Windows and be able to boot from it trough clover(?).. I want to have have windows for mainly for gaming.

Does someone have that setup right now using CaseySJ guide? Or maybe just point me in the right direction to make this work? :)
 
Last edited:
Please test the attached file by copying it to the CLOVER/ACPI/patched folder in the EFI partition of your Mojave SSD and rebooting.


@CaseySJ, thanks for the ACPI patch you provided, it works as intended, i.e. disable my GTX 1080 in slot-1 in order to use my IGPU without the need to remove or disconnect the dGPU.

It took me a while to figure out the other settings to make the UHD 630 work, as initially I could not even boot, always getting the forbidden sign. (BIOS settings: Chipset → Integrated Graphics : Enabled and Peripherals → Initial Display Output : IGFX) This I eventually solved by updating BIOS from F3 to F6, updating Clover to r4920, updating AppleALC, Lilu, WhateverGreen & using slide=0.

My initial screen was glitchy, and this was solved by changing SMBIOS from iMac8,3 to iMac8,1. At this point, I thought I finally reached success. When I tried multi-screen, however, all hell broke loose.

Initially, my ig_platform_id was 0x59120000 & device_id was 0x59128086. I used your HDMI patch and changed ig_platform_id to 0x3E9B0007 and leaving device_id blank (as I am on macOS 10.14.4). This worked when I hot-plugged the HDMI, and I thought I reached success with multi-screen. This was until I rebooted and once again, all hell broke loose.

Upon reboot, initially only the DP screen would function, the HDMI screen black, even though two monitors are detected by the system. Then the glitch as the DP screen would black out and the HDMI would turn on, but looking like a heavily redacted Mueller report. (Do I need a shikigva=?)

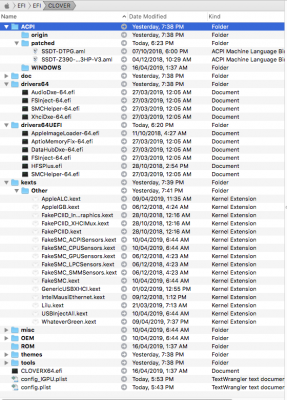
Turning off, booting with only the DP monitor, and then hot-plugging the HDMI monitor works. I would appreciate if you could take a look at my config_IGPU.plist (attached). I still use SMBIOS iMac8,1 because using Macmini8,1 makes no difference. I also attach my EFI screenshot for you to check if I have all the needed kexts. I have nothing installed in L/E.

By the way, while it indeed works, your ACPI patch for disabling the dGPU needs to be deleted everytime I would like to boot High Sierra (which happily uses GTX 1080), and reinstalled everytime I would like to boot Mojave. Is it possible to simply hot patch this in a config.plist? In my case, this would enable me to simply boot High Sierra with config.plist and boot Mojave with config_IGPU.plist.

Many thanks.
 

Attachments

  • config_IGPU.plist
    11.1 KB · Views: 128
  • EFI.png
    EFI.png
    253.1 KB · Views: 79
Does someone have that setup right now using CaseySJ guide? Or maybe just point me in the right direction to make this work? :)

I'm running macOS 10.14.4 and Win10 on different SSDs:
  • first install macOS
  • unplug the macOS SSD
  • install Win10
  • replug the macOS SSD
  • change the boot-order in BIOS (1. macOS, 2. Win10)
Clover should show both operating systems as boot entries.
 
I did my first Hackintosh last week using your guide, and it works like a charm on the first try! Thank you so much!!

I just have a question - I got two SSD's, one is for the macOS. But the other one, I want to use for Windows and be able to boot from it trough clover(?).. I want to have have windows for mainly for gaming.

Does someone have that setup right now using CaseySJ guide? Or maybe just point me in the right direction to make this work? :)
You can do it in a couple of ways. Like you are planning to do, I usually install Windows on a separate physical HD or SSD.

The way I install windows, after macOS is installed, is to remove the macOS SSD, install the SSD for Windows, and boot from the Windows installer. Go through the Windows installation, install whatever drivers you need for the devices on the motherboard, plus your Radeon GPU driver, and, then, run Windows update.

Then power down and reinstall the macOS SSD. Since that is where Clover is installed, make sure that it is set as the boot volume in BIOS. At the Clover screen you will see one or more Windows icons. Use trial and error to see which is the correct one. If there is one called Boot Microsoft EFI from EFI, try that one first. If you choose the wrong one, you'll just get a small image of the Windows icon on the screen. Cycle the power and try again choosing a different boot choice.

The other way to do it is to leave the macOS SSD installed while installing Windows. But the windows installer creates some boot information on the macOS drive, and the computer will want to boot from that rather than Clover. To fix it, you need to boot into macOS from the USB stick, and go into the Microsoft folder on the Mac drive's EFI/Clover and rename a file.

Much easier to use the method to temporarily remove the macOS SSD.

Ken
Hi! Yeah, your first solution sounds great, and that was my thought, too. To remove the macOS SSD, and so I did...
I made a bootable USB drive with Windows, but I got an error when the installation was about to begin the first step. I could choose region language etc. But, when the first phase started, I got an error. I think that my bootable Windows USB is crappy.

What's the best solution to make a bootable USB with Windows when I'm on macOS? I Googled several solutions, but can't get it to work correctly.
 
Hi, CaseySJ! Tthanks a lot for your answers. They're very helpful. I have been testing different things and bench, everything run smooth, it's so fast! Fans are spinning maybe a bit fast (I can slightly feel the vibration) but the CPU is only 30° hot at the moment. So I guess it's really running cool. Is there's a way (with a software maybe?) to check the speed and adjust it manually if necessary?

I also couldn't inject Audio Layout 16 because there's no <key>Properties</key> line in my config.plist so i didn't knew where to paste the test exactly.

And last, I only have 2 issue with my monitor (BenQ PD2700U):
- the monitor have 4 USB 3.0 but none of them are working. Both mini DP port and HDMI are working, but no USB 3.0.
- the monitor have loudspeaker. They work, but I can't adjust the volume (is this related with Audio Layout 16?)
I have checked if some driver where available, but there's none for Mac

Finally, here I attach a few screenshots from my system info. Can you check it and tell me if something odd?

Thanks a lot, again, for all your support. it's really amazing! I am so excited my hackintosh is working. It's wonderful!
 

Attachments

  • Screenshot 2019-04-20 at 09.30.18.png
    Screenshot 2019-04-20 at 09.30.18.png
    284.3 KB · Views: 69
  • Screenshot 2019-04-20 at 09.30.03.png
    Screenshot 2019-04-20 at 09.30.03.png
    317.3 KB · Views: 86
  • Screenshot 2019-04-20 at 09.31.04.png
    Screenshot 2019-04-20 at 09.31.04.png
    272.6 KB · Views: 62
  • Screenshot 2019-04-20 at 09.32.16.png
    Screenshot 2019-04-20 at 09.32.16.png
    417.5 KB · Views: 82
Hi! Yeah, your first solution sounds great, and that was my thought, too. To remove the macOS SSD, and so I did...
I made a bootable USB drive with Windows, but I got an error when the installation was about to begin the first step. I could choose region language etc. But, when the first phase started, I got an error. I think that my bootable Windows USB is crappy.

What's the best solution to make a bootable USB with Windows when I'm on macOS? I Googled several solutions, but can't get it to work correctly.
Probably somewhat convoluted to create a bootable USB for Windows on a Mac. What I would do is google Download Windows 10, go to the download page, choose the October 2018 version, and download it. It will then be an .iso file in your download folder, and you can burn to a DVD on your Mac. It will be bootable, albeit, a bit slower than a USB, but it will work. I rebuild old PC's, and I never can find my Win 10 install USB, so often I have gone the DVD route.
 
And last, I only have 2 issue with my monitor (BenQ PD2700U):
- the monitor have 4 USB 3.0 but none of them are working. Both mini DP port and HDMI are working, but no USB 3.0.
- the monitor have loudspeaker. They work, but I can't adjust the volume (is this related with Audio Layout 16?)
I have checked if some driver where available, but there's none for Mac
I assume there is a USB3 extension cable between your monitor and a USB3 port on your computer. Unplug the USB cable going to the monitor and plug a USB3 device into the USB port that you used for the monitor cable, and see if the port is active.
 
Fans are spinning maybe a bit fast (I can slightly feel the vibration) but the CPU is only 30° hot at the moment. So I guess it's really running cool. Is there's a way (with a software maybe?) to check the speed and adjust it manually if necessary?
If the fans are not too loud, I would not worry about them for now because 10.14.5 should be coming out soon. If the fan noise does become bothersome then it’s certainly okay to experiment with one of the Vega fan/power control solutions described in the Contributed Files and Tips section.

I also couldn't inject Audio Layout 16 because there's no <key>Properties</key> line in my config.plist so i didn't knew where to paste the test exactly.
You can also copy-and-paste the entire XML above the line <key>USB</key> in config.plist. Let me know if you need help. It should be quite easy!

And last, I only have 2 issue with my monitor (BenQ PD2700U):
- the monitor have 4 USB 3.0 but none of them are working. Both mini DP port and HDMI are working, but no USB 3.0.
- the monitor have loudspeaker. They work, but I can't adjust the volume (is this related with Audio Layout 16?)
I have checked if some driver where available, but there's none for Mac
When you connect DisplayPort or HDMI cable to a monitor, the cable transmits both video and audio. But USB needs a different dedicated cable. Usually it’s a USB Type A to Type B uplink cable. Audio Layout 16 will not affect this; that is for the internal audio controller only.

Finally, here I attach a few screenshots from my system info. Can you check it and tell me if something odd?
Looks good!

Thanks a lot, again, for all your support. it's really amazing! I am so excited my hackintosh is working. It's wonderful!
:)
 
- the monitor have loudspeaker. They work, but I can't adjust the volume (is this related with Audio Layout 16?)
I have checked if some driver where available, but there's none for Mac
As casey said, audio is conveyed to the monitor via HDMI. Audio controls for HDMI audio are always on the display/TV device. Unfortunately, most monitors rely on the monitor setup menu to show the volume level control. For a couple more dollars they could easily put vol up, down, and mute as discrete buttons somewhere on the monitor, but whatever...
 
Back
Top