
You are using an out of date browser. It may not display this or other websites correctly.
You should upgrade or use an alternative browser.
You should upgrade or use an alternative browser.
I can not install mojave
- Thread starter anllelet
- Start date
- Status
- Not open for further replies.
- Joined
- Jul 25, 2012
- Messages
- 6,663
- Motherboard
- Gigabyte GA-Z77X-UP5 TH
- CPU
- i7-3770K
- Graphics
- HD 4000+GT 710
- Mac
- Mobile Phone
please help me I do not know how to do it
- In the BIOS, you need to expand the listed menu with ">" sign next to each to get another screen with choices to make.[see my edited image]
- You have to upload photos of each of those screens to get help/Suggestions to edit.
- I will also need your Current edited CLOVER to make sure everything there is OK too.
- To upload CLOVER from USB Installer use the bulleted steps you can find here:
Attachments

- Joined
- Jul 25, 2012
- Messages
- 6,663
- Motherboard
- Gigabyte GA-Z77X-UP5 TH
- CPU
- i7-3770K
- Graphics
- HD 4000+GT 710
- Mac
- Mobile Phone
how do I solve that problem
how do I solve that problem
how do I solve that problem
To get better BIOS Images in MSI Boards , the steps are the Same as in Gigabyte Boards.
- You need a USB Flash disk formatted in FAT32 to capture and Save the BIOS screens you are viewing AUTOMATICALLY on that FAT32 Disk space.
- Your 16GB macOS USB Installer Flash disk has FAT32 formatting in its EFI Partition.
- The EFI partition in the macOS USB Installer is ~ 200MB
- Some Space is taken up by the EFI Folder containing CLOVER FileTree.
- There is PLENTY of Free Blank Space in the EFI Partition to save all the Screen shots you can take from the BIOS
- Enter BIOS setup with Hotkey on reboot, with FAT32 Formatted USB Flash drive in the USB port
- View each screen
- Press F12 key to get the FAT32 Formatted USB Disk to get ready
- A few seconds later, you will get a Screen Prompt "OK"
- Press ENTER key to Capture and Save that screen
- Move on to Next Screen and repeat the same F-12 >ENTER routine until you Capture and Save all the screens you have viewed and wanted to save
- The Image format is BMP
- Our Forum accepts JPG and PNG
- You have to convert the image captured to PNG/JPG
- The Images Captured have no real Name; only Numbers that are not useful
- You have to take the macOS USB Installer Disk to a Mac /hack and mount its EFI as the EFI Partition of your macOS USB Disk is hidden ; if you use a regular USB Disk formatted in FAT32, you can view the images without having to mount the EFI
- To 'mount' the hidden EFI Partition to view saved images use bulleted steps-> #4
- Open the image in Preview and then click File>Export..
- In the next screen type in the File Name: to a unique name instead of default number; and change Format from BMP to PNG or JPG
- Save the Edited photo on Desktop (or Folder of your choice) .
- Upload to the Forum
Last edited:
- Joined
- Jul 25, 2012
- Messages
- 6,663
- Motherboard
- Gigabyte GA-Z77X-UP5 TH
- CPU
- i7-3770K
- Graphics
- HD 4000+GT 710
- Mac
- Mobile Phone
I was wrong to clover
- I have reviewed all your uploaded BIOS images. As I have posted earlier, I have no MSI MoBo to know how its BIOS menu items are displayed to select.
- I find all your USB Options and SATA options OK
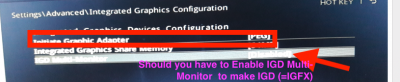
- In the Integrated Graphics Configuration, I have some questions.
- I noted you have made PEG [PCIE Graphics Card , the Nvidia Card you had removed] as your Graphics.
- It must be IGD or IGFX
- I wonder if you make the IGD Multi-Monitor from Disabled to Enabled, if you will get the IGD option to choose at the line Initiate Graphics Adapter: replacing PEG .
- Try the above and upload the BIOS image.
- You apparently did not use the posted steps to get good BIOS screen shots automatically Saved on FAT32 Formatted Flash drive .
- Camera shots give very crooked images and difficult to edit properly.
- Your CLOVER uploaded is basically OK
- I have edited its config.plist hoping to help.
- Paste this edited CLOVER to Replace your current one [after CLOVER.zip is unzipped and extracted} .
Attachments

- Joined
- Jul 25, 2012
- Messages
- 6,663
- Motherboard
- Gigabyte GA-Z77X-UP5 TH
- CPU
- i7-3770K
- Graphics
- HD 4000+GT 710
- Mac
- Mobile Phone
I'm sorry, he turned around
- The BIOS shot shows you have IGD as the Graphics Adapter chosen to boot.
- Now use that edited and Saved BIOS option to boot your USB Installer in Verbose Mode.
- Take Photo of any Screen that stops and upload.
- Hope using the uploaded CLOVER and current BIOS saved you will be able to boot using your Intel HD graphics.
- Status
- Not open for further replies.
Copyright © 2010 - 2024 tonymacx86 LLC