Contribute
Register

[Success] GIGABYTE Z370 Gaming 7 + Intel Core i7-8700K + RX 580 + (2x) Dell P2715Q 4k @ 60Hz

Gotcha. Makes sense to do as much research as possible.

Just for reference, I only have one m2 drive (macOS High Sierra) in the middle slot, and Windows 10 off a SATA SSD. An additional m2 drive will block a lane shared by SATA ports, and these are covered in Page 33 of the Z370 Aorus Gaming 7 Manual. If you don't have more than 4-5 SATA drives needed on top of the two m2 drives, then you're good.

Also, one thing I've found in my setup is related to audio and MacOS and Windows. Well, I have my speakers connected via the line out I highlighted in my manual. For Windows, it uses a different line out port. So rather than unplugging the speakers each time I boot up into the other OS, I'm going to get a "Y" splitter cable and test it out. It's on order, and I'l update the manual as needed for those who create a dual-boot system of Mac and Windows.

A lane? does that refer to one of the sata ports or a "lane" being as the ports are stacked 2 x 2 x 2, 2 of the ports being considered a "lane" are now blocked?
 
A lane? does that refer to one of the sata ports or a "lane" being as the ports are stacked 2 x 2 x 2, 2 of the ports being considered a "lane" are now blocked?

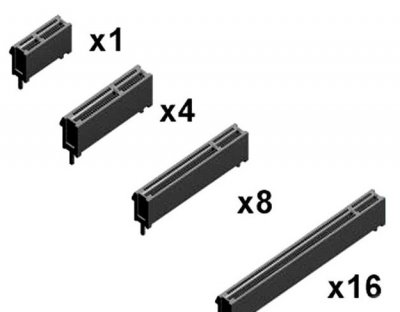
A PCIe connection consists of one or more data-transmission lanes, connected serially. Each lane consists of two pairs of wires, one for receiving and one for transmitting. You can have one, four, eight, or sixteen lanes in a single consumer PCIe slot--denoted as x1, x4, x8, or x16. See the graphic attached below of the 4 variations of PCIe slots on motherboards.

With a Z370 board you get just 16 total PCIe 3.0 CPU lanes. You need to plan accordingly to install your hardware. For example, it's best to put your graphics card into the PCIe x16 slot, which is closest to your CPU. If you put it into the slot farthest from the CPU socket it's not ideal. (limited to 4 lanes) You'll get the best throughput and maximize the performance of your dedicated graphics card when installed in the first slot which is always wired x16. Here's how the sharing of lanes works in the Aorus 7:
Screen Shot 12.jpg

You have 24 PCIe 3.0 chipset lanes available, so when using an NVME drive as HackaShaq is, that could disable specific Sata connections that are used for conventional 2.5" SSDs. As mentioned by the author, "The middle M2A_32G does not share any SATA lanes, and allows for all SATA devices to be used." if you want to preserve the function of all your Sata 6Gb/s connections put your NVME drive in the middle slot as described. Think of a pie cut into 8 pieces. If that's all there are and 9 nine people want a slice one will have to go without. There are only so many slices (lanes) available for consumption.

This is why you must read your motherboard manual to learn all the specifics of the board you will build with.

For more reading on this subject see: https://silentpc.com/articles/performance-and-pci-express-bus-lanes
Also read the Wiki on Serial ATA https://en.wikipedia.org/wiki/Serial_ATA
 

Attachments

  • pic_90.jpg
    pic_90.jpg
    24.9 KB · Views: 209
Last edited:
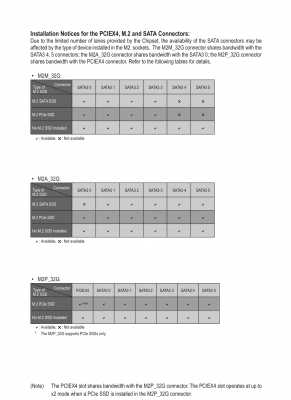
@imgarrett trs86 just gave a perfect answer for the definition of the lanes. To better assist you, for this exact motherboard, the manual can be downloaded here, and on page 33 as I noted in the build post, you will see the following:

page33.png

As you can see, the middle chart (corresponding to the middle slot on the board) is m2 drive slot M2A_32G. You can see by the chart that if you place your m2 in this slot, all SATA3 connections are available (designated by the "Available" checkboxes in the chart).

You can also see that the top chart (corresponding to the top slot on the board closest to the processor) is slot M2M_32G, and if you place your m2 drive in this slot, some SATA connections will be unavailable (SATA3 4, and SATA3 5) which are designated by the "Not Available" "X" marks in the chart.

So if you're installing two M.2 in two slots, if you need max SATA 3 drive connections, your best bet is to install these in the middle and bottom M.2 slots, and leave the top M.2 near the processor empty. But please see the note in the manual about how installing an m2 in this bottom slot (M2P_32G) will effect PCIEX4 slot as per the manual's note.

Each configuration and installation will depend on your needs and exact hardware.
 
Thanks for the explanation fellas! Lucky enough for me I happened to install the two m2's in both the middle and the bottom, leaving the top slot free. I have limited knowledge in all of this obviously, but for some reason knew the top PCIE was 16x and initially of which was where I needed to install my GPU, next down the line I installed my TB3 Alpine Ridge card and then below that is my bluetooth and wifi card. Unfortunately being a novice builder I hadn't planned for running out of USB Headers on my mobo which my wifi and bluetooth card requires one. So I placed an order into amazon for a https://www.amazon.com/gp/product/B01IFGFTJ2/?tag=tonymacx86com-20

Essentially besides that small hiccup on my part, my computer is ready to boot in which I'm anxious to fire it up, but I've been holding off as I'm trying to figure out wether to just jump into high sierra or dual boot (which was my initial plan) I'm thinking I would like to get Windows 10 running first so I can run all the firmware updates for compatibility of all my hardware as well as put my computer through it's paces, running tests and benchmarks, but additionally I am not sure of the order of processes of everything. Should I boot first and make any required changes in my bios, then install Windows 10, run the firmware updates, then install High Sierra and then comes the fact of trying to wrap my head around this whole process and kexts, etc.

Just to input my two-penny-worth here:

Yes, set the BIOS up for macOS first, then install Windows etc. The reason for this is that Windows will boot and load drivers for all kinds of settings a Hackintosh will not boot with. If you set up the BIOS for a macOS build, Windows will adjust to that, although occasionally some apps running in Windows may complain etc. For example disabling Serial/Parallel ports, XHCI enabled etc etc.

:)
 
Step Thirteen (Optional...but not really. Do This, Seriously): Create a bootable backup.
Now that you're done, you're probably happy and just want to enjoy your new Mac, and that's great! But if you're new to building a Hackintosh, remember that this isn't exactly a standard Mac. You'll want to create a bootable backup before applying any system updates to this machine.

Let me repeat: You'll want to create a bootable backup before applying any system updates to this machine. :)

There is an excellent video on how to exactly make a bootable backup for your Hackintosh. Since I've already maxed out on the number of videos I can embed in this write up, please search you tube for the video called "Easiest Way to Create Bootable Hackintosh Backups!" with the YT video id: v=l_XuXdJ53iY


The way I personally do this is to do the following:

1. Use a backup tool like SuperDuper or Carbon Copy Cloner to mirror your boot drive to a backup SSD or Hard Drive.
(I personally use SuperDuper, but either tool works great.).

NOTE: On a standard Mac, you would be done creating a backup, but for a Hackintosh, you need to also backup the EFI folder from your boot drive, and manually copy this EFI folder to your backup EFI partition.

2. After mirroring your boot drive to a backup drive, launch Clover Configurator and mount your boot drive's partition. (Find this in the Mount EFI sidebar with Clover Configurator, and then select the EFI for your book disk)

3. Making sure this is the EFI folder for your boot drive, select Open Partition, and you should see an EFI folder in the finder. (Just to confirm, this will have a folder inside your EFI folder called CLOVER along with other folders and subfolder. If you do not see a CLOVER folder inside your EFI folder, then you have not properly selected your boot drive.

4. Once you have your boot drive's EFI folder open on the desktop, you'll want to repeat the process in Clover Configurator and mount your backup drive's partition and EFI folder. Open this in your Finder as well and set it aside.

5. You now simply want to drag the EFI folder from your boot drive to the EFI folder on your backup drive.
(You will replace the backup drive's EFI folder and entire contents.)

6. After you have mirrored your boot drive, you now how a bootable backup. This is crucial if something goes wrong, and you need to recover your system.

7. You can test this by starting and selecting your bootable backup drive from the startup boot loader screen.

8. Before attempting any macOS updates of any kind, it's wise to check the forums to ensure the update will not be problematic. And just to test this, on a mission critical machine, I would personally recommend booting into the backup OS first, and then applying any update. If the update bricks the machine, your original machine's OS and EFI folder will not be affected and you can use the bootable backup as a test. In fact, it's not a bad idea to have two bootable backups, where one backup is a "guinea pig" drive to test any OS updates to ensure something doesn't break. Then if it works, you can proceed with a real update on your boot drive, and still have your backup untouched and intact.

9. If these instructions are confusing in anyway, I would highly recommend watching the short 5 minute you tube video included above.​
 
HackaShaq, can I ask you bud, what made you choose Corsair Vengeance ram? Being new to Hackintoshing I see the only recommended ram in the Buyers Guide on this site for a Mac Pro build is the Crucial Ballistix Sport. Will any DDR4 ram work so long as its compatible with the MoBo? How did you know that that particular ram would pose no issues or even work at all? I'm still trying to reverse engineer how one chooses parts beyond the very limited Buyers Guide list of parts so I can make more informed choices. If its all the same I'd rather buy a ram that presents the best value vs performance here in the UK but the last thing I want is unexpected issues with it.
 
.
 
Last edited:
Back
Top