Contribute
Register

[SUCCESS] ASUS Maximus VII Hero - HIGH SIERRA - 10.13.4 - Custom SSDT for USBInjectAll.kext

Status
Not open for further replies.
I have ordered a ps2 keyboard gonna try and login with that before really messing something up. Will report back thanks for your help

Just for your information -and once you have access to your High Sierra build.

I have created a guide SSDT for my GA Z170N WIFI,
https://www.tonymacx86.com/threads/...2-6-custom-ssdt-for-usbinjectall-kext.250032/

the SSDT-UIAC.aml file I posted there,
although created under Sierra will of course work under high Sierra just put it in
EFI/Clover/ACPI/patched.
 
(just saw in profile that your computer is a Z170-N , the custom SSDT file in this guide is for Maximus Hero VII - Z97, methodology is grosely the same but will have some changes (port limit patch etc) for 100- series. See main guide. Just so you know once you get access to your High Sierra install)


This might helped you if you find PS2 not working.


I created a EFI folder for high Sierra based on my Z170N-Wifi - EFi
this should allow you to create a bootable USB and access your drive/USB ports

****this assumes the info in your avatar is correct - so Skylake - Z170-WIFI and Nvidia Pascal graphics


as the EFI is on the USB drive it will in no way affect your install/EFi partition on your main SSD.
You can try if it doesn't work, no harm, remove USB drive.

This EFI folder also contains the custom SSDT-UIAC. aml I created for my GA Z170N WIFI board.
https://www.tonymacx86.com/threads/...2-6-custom-ssdt-for-usbinjectall-kext.250032/

because you board is Z170N-WIFI maybe we better continue discussion there
after this, any way up to you.
all the best


=================

1. Create a new bootable usbdrive (preferable usb2)
1. Insert the USB drive
2. Open /Applications/Utilities/Disk Utility
3. Highlight the USB drive in left column
4. Click Erase button
5. For Name: type Cloverboot (or any name you like)
6. For Format: choose Mac OS Extended (Journaled)
7. Click Erase then Done


2.mount the EFI partition of the USB drive

I use clover configurator
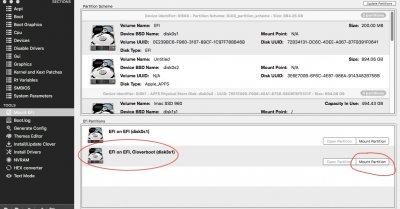
clover mount efi.jpeg


3.Open the empty partition

and copy the EFI folder into the partition.
Make sure it is called EFI.
(the attached file is compressed so make sure it is uncompressed, usually automatically after download)
the partition will then look like this
Cloverboot EFI folder.jpeg


the contents looks like this if you wanted to look at which drivers/settings have been made before downloading
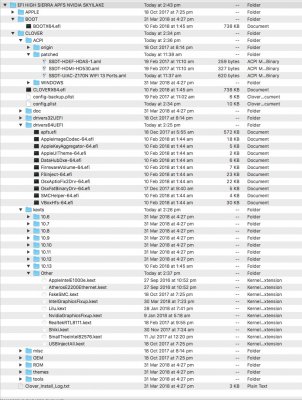
EFI high sierra skylake nvidia gpu.jpeg

you can see that SSDT-UIAC-Z170N-Wifi in patched for example
and also USBInjectAll kext etc.
of course eventually better to have USBInjectAll.kext in S/L/E on your main drive
but this is just to see if we can get you to login

Below a grab from the Plist with boot arguments -again I assume you want to display on NVIDIA
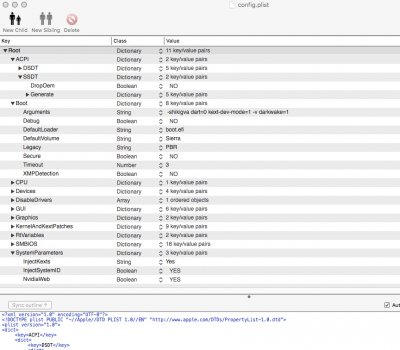
config plist high sierra z170N-WIFI.jpeg
 

Attachments

  • EFI.zip
    16.3 MB · Views: 121
Last edited:
Thank you your help has been amazing! Will try all that was suggested later
 
Do you happen to have an installation guide for your build? I have nearly the same build and have had 0 luck so far.
 
@YoshiMac you sir are an absolute legend.

I was able to download your EFI. Mount the efi usb on Windows 10 using MiniTool Partition wizard and Explorer++ and replace the usb version (after backup)

Had a small issue where I had to remove the Intel gfx inject but that was it. The whole thing worked, and better than ever!

Even display link works! Although only with clone due to the display link bug in 10.13.4

Is there a way I can buy you a beer?
 

Fun Spunge :p

Sorry to break the rules but he saved me a TON of time and heart ache!
 
@YoshiMac you sir are an absolute legend.

I was able to download your EFI. Mount the efi usb on Windows 10 using MiniTool Partition wizard and Explorer++ and replace the usb version (after backup)

Had a small issue where I had to remove the Intel gfx inject but that was it. The whole thing worked, and better than ever!

Even display link works! Although only with clone due to the display link bug in 10.13.4

Is there a way I can buy you a beer?

You’re welcome. Glad it worked out! It’s quite satisfying to get a hackintosh working, isn’t it?
Always more to tinker around with and optimise of course.
And yes we all are sharing info here, no need for any compensation (and also against rules of forum).
 
Do you happen to have an installation guide for your build? I have nearly the same build and have had 0 luck so far.
No installation guide yet.
I will get something on the forum this weekend.

I will briefly say a couple of things now:
I had my troubles along the way, with my USB3 high Sierra unibeast flash drive
especially because I did not have my USB injection sorted beforehand.
So I ended using a old unibeast Sierra installer on usb2 flash drive I had from my other hackintosh.
Installed Sierra (I removed all drives except a new ssd I bought specifically for the customac install, and I also started with only integrated graphics , so removed my Nvidia card).
Upgraded to High Sierra with APFS.
Then downloaded Nvidia web drivers
Then installed my GTX970.
I will put up a more detailed write up of build on the weekend.
 
Status
Not open for further replies.
Back
Top