
- Joined
- Mar 25, 2012
- Messages
- 33
- Motherboard
- GA-Z170X-Designare
- CPU
- Intel Core i7-6700K
- Graphics
- NVIDIA (Zotac) GTX 1080
- Mac
- Classic Mac
- Mobile Phone
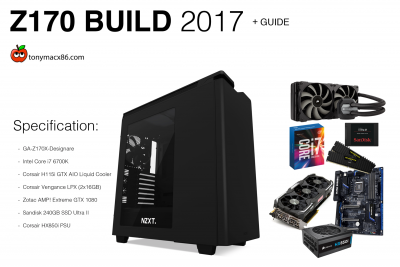
saganic0’s 2017 build – Gigabyte Z170X Designare - i7-6700K – Zotac AMP! Extreme GTX 1080
Components
Gigabyte Z170X Designare Motherboard
Amazon US Amazon EU Newegg US
Intel i7-6700K Processor
Amazon US Amazon EU Newegg US
Corsair Vengeance LPX 32GB 3000MHz (2x16GB) Memory (CMK32GX4M2B3000C15)
Amazon US Amazon EU Newegg US
Zotac AMP! Extreme GTX 1080 Graphics CArd
Amazon US Amazon EU Newegg US
Sandisk 240GB SSD Ultra II
Amazon US Amazon EU Newegg US
Corsair HX850i Power Supply (80+ Platinum)
Amazon US Amazon EU Newegg US
Already owned
NZXT H440 Black Computer Case
Amazon US Amazon EU Newegg US
Corsair K70 RGB Mechanical Keyboard
Amazon US Amazon EU Newegg US
Logitech G502 Proteus Spectrum RGB Mouse
Amazon US Amazon EU Newegg US
Samsung S27D390H 27” – 1920 x 1080 Monitor
No EU Link Amazon US Newgg US
Dell UltraSharp 2009W 18.6” - 1060 x 1050 Monitor
No links, very old monitor
Comments
I’ve been a part of the hackintosh community since the SL days. My first build was a GA-P35-DS3L with a Core 2 Duo E4200 and 4GB unbranded RAM. Originally running Windows XP, I bought a 13-inch 2010 MacBook Pro and fell in love with the OS, specifically, the terminal.
Being a student Web Developer I found the terminal in OSX so beautiful compared to the Windows prompt. As well as this, I was beginning to get used to the UI and shortcuts on my MacBook Pro, so I decided to attempt the hack.
Back then, there were various methods, UniBeast wasn’t really a thing yet and the use of iBoot and various other bootloaders was common. I managed to get a hack working flawlessly on the above rig and since then I’ve followed the tonymac community, year on year.
In 2014 I built a new rig. This was based off of much more solid research done by the community here at tonymac and I quickly realized how far the scene had come since the early days. UniBeast was an amazing utility as was the post-installation utility, MultiBeast. This made it all very, very easy to setup. This rig was a beast compared with my first build as well, running a GA-Z77X-UD5H, an i5-3570k, 16GB Corsair Vengeance and an Asus GTX 650.
A year later, in 2015, I started at University. Being in halls, I wanted to cram all of this hardware into a smaller case. I ended up buying a Bitfenix Prodigy (at the time they were all the rage). I purchased an H61N-USB3 and used the same CPU and other hardware in a smaller form factor, solid.
Enter 2017 – and the hackintosh scene is as strong as ever. Sierra, UniBeast, MultiBeast, all working fantastically well, success stories in the hundreds. Even Linus Sebastian and some other major YouTubers have now made videos featuring hackintosh builds and I felt it was very much time for a refresh. I’ve now finished University and am working full-time, so it’s time to give my working rig a complete overhaul.
Updates
UPDATE #1 - I've just finished a complimentary macOS Sierra server build which you can see here
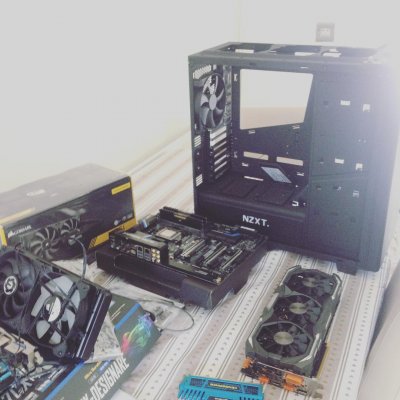
The Build
Motherboard
Having worked with all Gigabyte boards over the years, I was used to the reliability I had come to experience from using the Ultra Durable series. I was used to their BIOS as well, however I had yet to hop on the ‘RGB’ bandwagon that seemed to crawl through the cracks of PC enthusiast culture in 2016/17. Time to try it out. I no longer required a small build either, so an ATX motherboard would do just fine. I wanted to try something slightly different to the recommended builds on here, so I decided to purchase the Designare (very similar feature-set to the Gaming 5, 7 series boards too).
CPU
Having never owned an i7 or a Core 2 Quad (what I would have done for a Q6600 back in the day), I went with an i7-6700K.
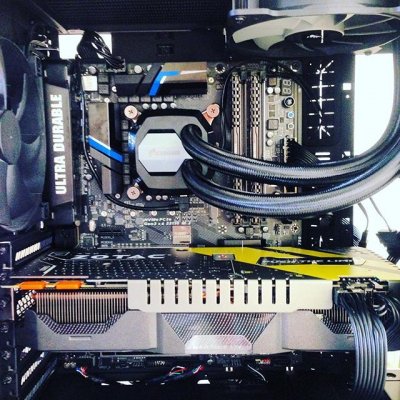
Cooling
Here, I chose an AIO liquid cooler. Having read some decent reviews of the Corsair H115i GTX online, I decided to try it out.
Power Supply
I went with Corsair. My original builds all used Corsair power supplies and again, I was used to this manufacturer. The first I owned was a 450W and the second a 750W. Reliability was always good and power delivery always matched up to the specs on the back of the box. Originally, however, I wasn’t aware of fully modular power supplies (only semi-modular), having looked, I realised that there were now fully modular PSUs on the market & in my price range. Good stuff.
Case
I’d bought this for a client a few months back and they had decided against using it. I bought this off them for the price they had bought it for so it was just lying around unused.
The NZXT H440 could be described as plain but I like the aesthetic. Simple and clean edges, no bull***t. It also came with some pretty decent case fans!
GPU
We all know the long wait we’ve had for the GTX 1080 support. Only last week were the drivers announced and released. Until now I’d been holding off installing macOS on the new rig because I had been using the card in Windows 10 for various games and Adobe applications. Finally, though, we have full support – well impressed.
The rest of the components
A simple case of Price : Performance. The SSD needn’t have been large, OS only. The RAM, low profile and I guess I wanted the room to upgrade if ever necessary.
Installation
Follow Cmfusco11's Build: GA-Z170X-UD5 TH - i7-6700K - Gigabyte GTX 970 for the most part.
Just to make sure…
1. Set your BIOS as follows:
Save & Exit > Load optimized defaults
Peripherals > XHCI Hand-off > Enable
Peripherals > Super IO Configuration > Disable
Chipset > VT-d > Disabled
BIOS Features > Windows 8/10 Features > Other OS
BIOS Features > Storage Boot Option Control > UEFI Only
BIOS Features > Boot Option #1 > UEFI USB Drive
Save & Exit > Save Changes & Restart
Peripherals > XHCI Hand-off > Enable
Peripherals > Super IO Configuration > Disable
Chipset > VT-d > Disabled
BIOS Features > Windows 8/10 Features > Other OS
BIOS Features > Storage Boot Option Control > UEFI Only
BIOS Features > Boot Option #1 > UEFI USB Drive
Save & Exit > Save Changes & Restart
2. Make your UniBeast installer flash drive.
3. Install macOS as per the guide
4. Run MultiBeast with the following parameters:
5. Install GTX1080 / Pascal NVIDIA web drivers from this thread
6. Notice with this board, we run into the default graphics driver issue, which sets the default macOS driver every time you restart, never enabling the 1080 properly.
Following this fix (Probem 6: You select NVIDIA Web Drivers in the menu bar or the NVIDIA Driver Manager preference pane but when you restart macOS Default Graphics Driver is checked.)
To recap…
This is caused when your board does not have native NVRAM support such as Gigabyte 100 series boards.
Fix: setup emulated NVRAM to store the nvda_drv=1 boot flag in boot-args.
Download the latest Clover installer pkg here, launch the installer and choose customize here:

After that make sure you have selected EmuVariableUefi-64:

Proceed with the Clover upgrade install and reboot when done. After the reboot open up your system preferences and go the NVIDIA Driver Manager. It is a good idea to make sure you have the most up to date driver so go to the updates tab and click the Check Now button. If there is an update, perform the update and reboot when it tell you to. You should be done at this point. If there isn't an update proceed to the next step.

If there was no upgrade, click on the Graphics Drivers tab and then choose the radio button next to the NVIDIA Web Drive. Reboot. Once rebooted, it should say that you are using the NVIDIA web driver
What works
- Sleep and wake
- USB 3.0
- Audio
- Ethernet
- NVIDIA Pascal Drivers
What doesn’t work
Messages – looking into definitions for a fix.
Additional Notes
This was a very easy setup compared with some of my previous builds. A lot of fun too. I will check back whenever I can with an update, as well as attempt to offer some help for people with similar hardware.
Once again, massive thanks to the tonymac community. Still going strong – peace out for now!
Attachments
-
 upload_2017-4-15_12-38-56.png974.5 KB · Views: 20,942
 -
 upload_2017-4-15_12-39-23.png121 KB · Views: 19,386
 -
 17796198_1904512366446686_7512879067195088535_n.jpg79.2 KB · Views: 2,354
 -
 14553177_1367161783302088_8442219216307748864_n.jpg105.7 KB · Views: 2,475
 -
 14240832_945394498898481_1611746844_n.jpg113.2 KB · Views: 2,502
 -
 12393771_1666427890302999_93365270_n.jpg50.2 KB · Views: 2,361
Last edited:
")