BoomR
Moderator
- Joined
- Dec 18, 2011
- Messages
- 1,256
- Motherboard
- Gigabyte Z490 VISION D
- CPU
- i9-10850K
- Graphics
- RX 580
- Mac
- Classic Mac
- Mobile Phone
Components:
Gigabyte GA-Z170X Designare ATX Motherboard
https://www.amazon.com/dp/B01H74VOY2/?tag=tonymacx86com-20
https://www.newegg.com/Product/Product.aspx?Item=N82E16813128942
http://www.gigabyte.com/Motherboard/GA-Z170X-Designare-rev-10
Intel Core i7-6700K CPU
https://www.amazon.com/dp/B012M8LXQW/?tag=tonymacx86com-20
https://www.newegg.com/Product/Product.aspx?Item=N82E16819117559
Update: Corsair Hydro Series h115i Extreme Performance Liquid CPU Cooler
https://www.newegg.com/Product/Product.aspx?Item=N82E16835181100
Corsair Vengeance LPX 16GB (2 x 8GB) DDR4 DRAM 3600MHz
https://www.amazon.com/dp/B01AKWSUOU/?tag=tonymacx86com-20
Samsung 960 PRO Series - 512GB PCIe NVMe - M.2 Internal SSD
https://www.amazon.com/dp/B01LXS4TYB/?tag=tonymacx86com-20
NVIDIA GeForce GTX 970 4GB PCIe Video Card (refurb at local MicroCenter)
http://www.microcenter.com/product/453500/GeForce_GTX_970_(Refurbished)_4GB_PCIe_Video_Card
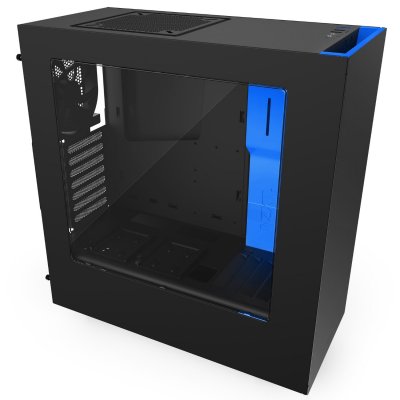
Update: NZXT S340 Mid Tower Computer Case (matte black/blue)
https://www.newegg.com/Product/Product.aspx?Item=N82E16811146197
Logitech Wireless Solar Keyboard K750 for Mac
https://www.amazon.com/dp/B00UVUU44Q/?tag=tonymacx86com-20
Logitech Wireless Marathon Mouse M705
https://www.amazon.com/dp/B003TG75EG/?tag=tonymacx86com-20'
Already Owned
Corsair RM Series, RM650, 650 Watt (650W), Fully Modular Power Supply, 80+ Gold Certified
https://www.amazon.com/dp/B00EB7UIRS/?tag=tonymacx86com-20
Samsung U28E590D 28-Inch UHD LED-Lit Monitor
https://www.amazon.com/dp/B00YD3DBOC/?tag=tonymacx86com-20
Samsung 840 EVO - 120GB (for Windows 10)
https://www.newegg.com/Product/Product.aspx?Item=9SIAADF4M04384&cm_re=samsung_840_evo-_-20-147-252-_-Product
Comments
Credits
Purpose
The purpose of this build is to create a high-end workhorse that will handle a new “day job” initiative where I’m now shooting/editing/producing training videos in 4K/360. My 3.5 yr old MacBook Pro does “ok” editing 1080P in Final Cut Pro X. But 4K/360 brings my work laptop to its knees. A new video production facility is in the works, including a couple post rooms that will have high-end MacPros, etc. But until then, I still need to produce some content that can be “proof of concept” on why we need to take our game to the next level.
The Build
Chapter 1: BIOS settings
I pretty much used the same BIOS settings as in OkY’s post above, with the exception that I am not using on-board graphics (I have the NVIDIA GTX 970 card). So I ignored his BIOS recommendations on IGFX (in fact, I completely disabled in BIOS). For the time being, I also ignored his recommendations on increasing the memory allocated to TB; the types of TB devices I’m using with this build are not audio interfaces, and I’m not daisy-chaining anything. Other than that, BIOS settings are the same as in his post.
Chapter 2: Activate Thunderbolt 3 ports in Windows
Next, to install Windows 10 for activating the two on-board Thunderbolt ports. I have a spare Samsung 840 EVO 120GB that I use when I need to fiddle with things, but don’t want to mess with my production drive. Thanks to OkY for quoting (and tweaking) Tonymacx86’s post in his build post – I simply followed those instructions for locating & running the firmware flash file. NOTE: You have to page forward about 6 pages on the Gigabyte web site, as the TB utility/flasher is on page 6 (at the time of this writing). Pay careful attention to also download the correct version (as there are links to other supported boards with TB3).
Chapter 3: Gathering info to get M.2 working
Before we leave Windows, I also needed to go into my Win10 install > Device Manager, and gather some information that will be used to get the M.2 drive visible by my UniBeast install USB: “Determining the ACPI path of your NVMe device(s)” from RehabMan’s post linked above. I did a screen shot of the path, plus was able to copy/paste it into a text document - saving both items on a FAT32 formatted USB stick.
Chapter 4: Preparing UniBeast installer USB (this build uses 10.12.3)
To start, follow the same instructions provided by OkY – specifically steps #1 and #2 ONLY (since I'm using dedicated GPU). BTW, I added the NVIDIA Web drivers to my “Other” folder, since I’m using dedicated GPU. Also, I prefer using KextWizard because it has some additional functionality that I like. Finally, I also add RehabMan’s CodecCommander for best success with audio. I utilized the links OkY so kindly provided for the resources you need. Now having said that…
I did not follow OkY’s instructions for getting the M.2 drive visible – instead, I used the method as provided by @RehabMan. Once my UniBeast USB key was successfully built, with all the goodies in my “Other” folder, I replaced OkY’s next set of instructions with a 3-step process as outlined in RehabMan’s post:
1. Creating SSDT-NVMe-Pcc.aml – After downloading the MaciASLapp and launching, I selected File > New to create a new project. Using his code as a template, I copied/pasted the template code into the workspace. Now I grabbed the actual path of my M.2 drive off the text file that I had saved under Windows, and replaced his “placeholder” code with the actual path. Finally, following RehabMan’s instructions on how to save, I was able to successfully create my own SSDT-NVMe-Pcc.aml for my particular drive (it’s really not that difficult to do!).
2. Existing _DSM methods – in my case, I had an existing DSM, so I had to follow the steps here in RehabMan’s post as well. For this, I used PlistEditPro, and found this to be a really easy method (vs. risking messing up syntax by simply using TextEdit). At this point, my UniBeast key is still mounted – including the USB drive’s EFI partition. I launch PlistEditPro and use the Open menu to open the UB key’s config.plist file. Use the illustration in RehabMan’s post to drill down to Patches and create a new “sibling.” Add the necessary “child” lines to accommodate the lines of code as supplied by RehabMan. NOTE: in my case, I had to omit the “ < ” and “ > ” characters as shown in RehabMan’s screen shot (otherwise, I’d get an error message from PlistEditPro about incorrect hex or some such thing). Finally, when you’ve added the patch, save your work and exit the program.
3. Creating HackrNVMeFamily*.kext with the spoofed class-code - this one is pretty self-explanatory. Make sure you copy/paste the code in Terminal exactly as he outlines, verifying that you are using the “spoof” option.
Finish up by installing the newly created HackrNVMeFamily-10_12_3.kext per RehabMan’s instructions in EFI/Clover/kexts/Other. In addition, use Kext Wizard or tonymacx86's KextBeast to install in your UniBeast S/L/E folder, too. Once that’s done, you can use Kext Wizard’s first tab to rebuild kext caches, which KextBeast automatically does.
Chapter 5: Install macOS
At this point, I jumped back in to OkY’s instructions, starting at: Use a Black USB port… Basically continue with the normal instructions for installing Sierra. Note here in OkY’s post, he references 10.11.6, (a remnant from the original build in EC, but I know he’s in the process of updating this for Sierra). Pay close attention to ignore the network & Internet selection process during the setup wizard – this board’s Ethernet driver may not be available on the USB, so trying to activate network crashes your install. Finally, complete the process by booting again from the USB key, but select your fresh install of Sierra so you can do your MultiBeast install. Note that with the NVIDIA card, graphics will be a little glitchy – I’ll address that in a bit.
Chapter 6: Run MultiBeast
Run MultiBeast from your “Other” folder. My settings are shown below:

Now, because we are using RehabMan’s process for M.2, we need to make some modifications to the EFI > Clover folder on the M.2:
1. Use Clover Configurator to mount both the USB and M.2’s EFI partitions.
2. Copy the SSDT-NVMe-Pcc.aml from your USB key to the same path on the M.2 EFI. (EFI/Clover/ACPI/patched). Also added my system’s SSDT.aml while I’m at it.
3. Copy the HackrNVMeFamily-10_12_3.kext to the same path on the M.2 EFI (EFI/Clover/kexts/Other)
4. Use Kext Wizard to install HackrNVMeFamily-10_12_3.kext to S/L/E
5. Enable Trim
Chapter 7: Post-MultiBeast tasks (Audio)
At this point, you should be able to reboot your computer from the M.2 – BUT, we still have a couple more things to do to get everything working. Note that OkY is using his UA Apollo for sound, so really didn’t spend too much time w/onboard audio. Basically, use KextBeast or Kext Wizard to install the “Release” version of RehabMan's CodecCommander to S/L/E - and rebuild kext caches.
Chapter 8: Post-MultiBeast tasks (Video)
As you’ve noticed, using an NVIDIA GPU means that you still have a few more steps to get it working. Here’s what I found to be successful:
1. Install the NVIDIA Web drivers that you stored in your “Other” folder. A reboot is required after install. Note that, until we do a few more tweaks, you’ll need to use nv_disable=1 @ reboot until everything is complete.
2. Download latest Clover installer – run this to update to latest version of Clover. In the process, we need to add/select EmuVariableUefi-64.efi. Without this, the Web driver setting won’t “stick” and will always revert back to macOS driver setting.
3. Open your config.plist in Clover Configurator. Under System Parameters, make sure that Inject kexts = Detect and check the box/select: NvidiaWeb. Also click Boot and select: npci=0x2000. SAVE.
4. Open your config.plist file on your new boot drive EFI, and do a text search for CsrActiveConfig – change the variable to: 0x67 --without this, we cannot complete the next step (this disables security so you can make one final patch for NVIDIA). See this post for more info (it’s the same for Sierra): https://www.tonymacx86.com/threads/solved-cant-disable-sip-el-capitan.176151/ (revert back to the default when you're done).
5. Because we are using iMac17,1 definition, you will get “black screen” about half-way through boot. See Problem 4 at this link. You will now Use Shilohh's AGDPfix - Please download the version for iMac17,1 –AGDPfix.v1.3.zip and run.
At this point, you should now be able to boot your new system without having to use nv_disable=1. You should be able to boot completely to the desktop with out the “black screen” issue, and the NVIDIA Driver option should be selected in the NVIDIA menu in the upper-right. Ladies & gentlemen, I think we are now good to go!
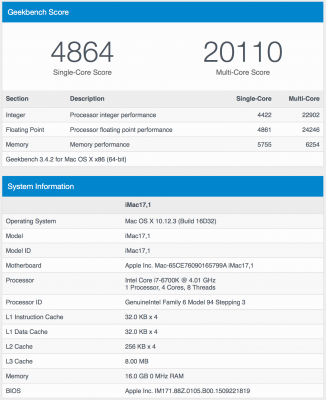
**NOTE: The GB score here reflects a modest overclock using the BIOS settings (OC from 4.0 to 4.4 GHz - simply by using one of the BIOS options)
Epilogue
What’s Working
** - Thunderbolt: No hot-swapping/plugging of TB devices – this is a known issue since the beginning of TB on a CustoMac. Also, I find it works best to make sure TB devices are powered on, and then connect them to TB port at Clover screen (I set my time-out to 10 seconds). This yields for me best success. Tested with:
*** - Shut-down: It seems that, even though I have “wake on mouse” and “wake on keyboard” disabled in the BIOS, my system actually starts/boots up if I accidentally move my mouse or bump a key. I’m wondering if this is what OkY and others might be experiencing with the shutdown/reboot issue?? Enabling & then disabling in BIOS seems to have no effect. So when I shut down, I’m careful not to move mouse or press any keys.
What’s Not Working
--BoomR
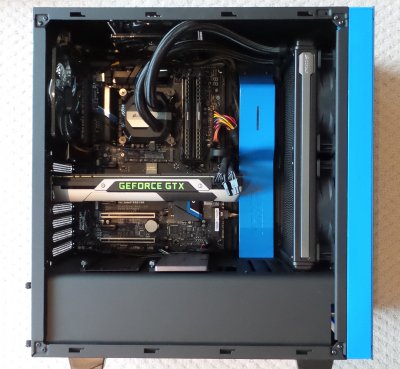
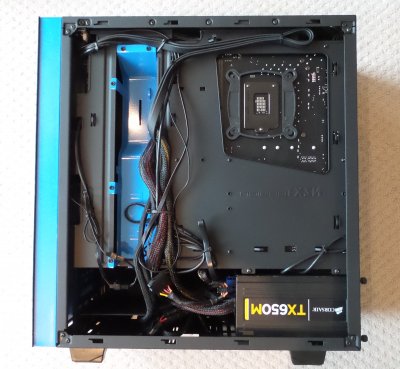
UPDATE: (05 March 2016) A few days into full production on this machine, and I discovered that with the slight overclock to 4.4 GHz, my CPU temps were hitting anywhere from 78C - 84C when video transcoding using Handbrake. The air cooler was just not doing the job. So after doing a little research & talking to one of the sales guys at MicroCenter, I chose to replace the Cooler Master air cooler with the new top-line Corsair Hydro series H115i Extreme Performance Liquid CPU Cooler. But as luck would have it, it would not fit into the original case I purchased. So thankfully, was able to return the original case & CPU cooler, and walked out with the new cooler and the NZXT S340 case that you see pictured above/below. While the salesperson assured me that the radiator would fit, you actually have to use the long screws to mount the fans to the back of the front panel, and THEN the radiator (so that the fans are "pushing" the air through the radiator vs. pulling). Otherwise all is good! With the new case & cooler, temps hover in the mid-to-upper 60C's to maybe up to 72C. I still need to figure out how, in macOS to get the cooler's fans to spin up a bit faster when there is more workload. I think that would help keep temps down in the 60C's... There is a killer utility on the Windows side. I suspect that the settings you choose there only work if you are running windows. Any suggestions or tips would be much appreciated! Here are some pics:


Gigabyte GA-Z170X Designare ATX Motherboard
https://www.amazon.com/dp/B01H74VOY2/?tag=tonymacx86com-20
https://www.newegg.com/Product/Product.aspx?Item=N82E16813128942
http://www.gigabyte.com/Motherboard/GA-Z170X-Designare-rev-10
Intel Core i7-6700K CPU
https://www.amazon.com/dp/B012M8LXQW/?tag=tonymacx86com-20
https://www.newegg.com/Product/Product.aspx?Item=N82E16819117559
Update: Corsair Hydro Series h115i Extreme Performance Liquid CPU Cooler
https://www.newegg.com/Product/Product.aspx?Item=N82E16835181100
Corsair Vengeance LPX 16GB (2 x 8GB) DDR4 DRAM 3600MHz
https://www.amazon.com/dp/B01AKWSUOU/?tag=tonymacx86com-20
Samsung 960 PRO Series - 512GB PCIe NVMe - M.2 Internal SSD
https://www.amazon.com/dp/B01LXS4TYB/?tag=tonymacx86com-20
NVIDIA GeForce GTX 970 4GB PCIe Video Card (refurb at local MicroCenter)
http://www.microcenter.com/product/453500/GeForce_GTX_970_(Refurbished)_4GB_PCIe_Video_Card
Update: NZXT S340 Mid Tower Computer Case (matte black/blue)
https://www.newegg.com/Product/Product.aspx?Item=N82E16811146197
Logitech Wireless Solar Keyboard K750 for Mac
https://www.amazon.com/dp/B00UVUU44Q/?tag=tonymacx86com-20
Logitech Wireless Marathon Mouse M705
https://www.amazon.com/dp/B003TG75EG/?tag=tonymacx86com-20'
Already Owned
Corsair RM Series, RM650, 650 Watt (650W), Fully Modular Power Supply, 80+ Gold Certified
https://www.amazon.com/dp/B00EB7UIRS/?tag=tonymacx86com-20
Samsung U28E590D 28-Inch UHD LED-Lit Monitor
https://www.amazon.com/dp/B00YD3DBOC/?tag=tonymacx86com-20
Samsung 840 EVO - 120GB (for Windows 10)
https://www.newegg.com/Product/Product.aspx?Item=9SIAADF4M04384&cm_re=samsung_840_evo-_-20-147-252-_-Product
Comments
Credits
- First off, KUDOS to @QkY for the inspiration on his music production build.
- Additional KUDOS to @RehabMan for his amazing work on the proper way to configure your system to use M.2 SSD drives.
Purpose
The purpose of this build is to create a high-end workhorse that will handle a new “day job” initiative where I’m now shooting/editing/producing training videos in 4K/360. My 3.5 yr old MacBook Pro does “ok” editing 1080P in Final Cut Pro X. But 4K/360 brings my work laptop to its knees. A new video production facility is in the works, including a couple post rooms that will have high-end MacPros, etc. But until then, I still need to produce some content that can be “proof of concept” on why we need to take our game to the next level.
The Build
Chapter 1: BIOS settings
I pretty much used the same BIOS settings as in OkY’s post above, with the exception that I am not using on-board graphics (I have the NVIDIA GTX 970 card). So I ignored his BIOS recommendations on IGFX (in fact, I completely disabled in BIOS). For the time being, I also ignored his recommendations on increasing the memory allocated to TB; the types of TB devices I’m using with this build are not audio interfaces, and I’m not daisy-chaining anything. Other than that, BIOS settings are the same as in his post.
Chapter 2: Activate Thunderbolt 3 ports in Windows
Next, to install Windows 10 for activating the two on-board Thunderbolt ports. I have a spare Samsung 840 EVO 120GB that I use when I need to fiddle with things, but don’t want to mess with my production drive. Thanks to OkY for quoting (and tweaking) Tonymacx86’s post in his build post – I simply followed those instructions for locating & running the firmware flash file. NOTE: You have to page forward about 6 pages on the Gigabyte web site, as the TB utility/flasher is on page 6 (at the time of this writing). Pay careful attention to also download the correct version (as there are links to other supported boards with TB3).
Chapter 3: Gathering info to get M.2 working
Before we leave Windows, I also needed to go into my Win10 install > Device Manager, and gather some information that will be used to get the M.2 drive visible by my UniBeast install USB: “Determining the ACPI path of your NVMe device(s)” from RehabMan’s post linked above. I did a screen shot of the path, plus was able to copy/paste it into a text document - saving both items on a FAT32 formatted USB stick.
Chapter 4: Preparing UniBeast installer USB (this build uses 10.12.3)
To start, follow the same instructions provided by OkY – specifically steps #1 and #2 ONLY (since I'm using dedicated GPU). BTW, I added the NVIDIA Web drivers to my “Other” folder, since I’m using dedicated GPU. Also, I prefer using KextWizard because it has some additional functionality that I like. Finally, I also add RehabMan’s CodecCommander for best success with audio. I utilized the links OkY so kindly provided for the resources you need. Now having said that…
I did not follow OkY’s instructions for getting the M.2 drive visible – instead, I used the method as provided by @RehabMan. Once my UniBeast USB key was successfully built, with all the goodies in my “Other” folder, I replaced OkY’s next set of instructions with a 3-step process as outlined in RehabMan’s post:
1. Creating SSDT-NVMe-Pcc.aml – After downloading the MaciASLapp and launching, I selected File > New to create a new project. Using his code as a template, I copied/pasted the template code into the workspace. Now I grabbed the actual path of my M.2 drive off the text file that I had saved under Windows, and replaced his “placeholder” code with the actual path. Finally, following RehabMan’s instructions on how to save, I was able to successfully create my own SSDT-NVMe-Pcc.aml for my particular drive (it’s really not that difficult to do!).
2. Existing _DSM methods – in my case, I had an existing DSM, so I had to follow the steps here in RehabMan’s post as well. For this, I used PlistEditPro, and found this to be a really easy method (vs. risking messing up syntax by simply using TextEdit). At this point, my UniBeast key is still mounted – including the USB drive’s EFI partition. I launch PlistEditPro and use the Open menu to open the UB key’s config.plist file. Use the illustration in RehabMan’s post to drill down to Patches and create a new “sibling.” Add the necessary “child” lines to accommodate the lines of code as supplied by RehabMan. NOTE: in my case, I had to omit the “ < ” and “ > ” characters as shown in RehabMan’s screen shot (otherwise, I’d get an error message from PlistEditPro about incorrect hex or some such thing). Finally, when you’ve added the patch, save your work and exit the program.
3. Creating HackrNVMeFamily*.kext with the spoofed class-code - this one is pretty self-explanatory. Make sure you copy/paste the code in Terminal exactly as he outlines, verifying that you are using the “spoof” option.
Finish up by installing the newly created HackrNVMeFamily-10_12_3.kext per RehabMan’s instructions in EFI/Clover/kexts/Other. In addition, use Kext Wizard or tonymacx86's KextBeast to install in your UniBeast S/L/E folder, too. Once that’s done, you can use Kext Wizard’s first tab to rebuild kext caches, which KextBeast automatically does.
Chapter 5: Install macOS
At this point, I jumped back in to OkY’s instructions, starting at: Use a Black USB port… Basically continue with the normal instructions for installing Sierra. Note here in OkY’s post, he references 10.11.6, (a remnant from the original build in EC, but I know he’s in the process of updating this for Sierra). Pay close attention to ignore the network & Internet selection process during the setup wizard – this board’s Ethernet driver may not be available on the USB, so trying to activate network crashes your install. Finally, complete the process by booting again from the USB key, but select your fresh install of Sierra so you can do your MultiBeast install. Note that with the NVIDIA card, graphics will be a little glitchy – I’ll address that in a bit.
Chapter 6: Run MultiBeast
Run MultiBeast from your “Other” folder. My settings are shown below:

Now, because we are using RehabMan’s process for M.2, we need to make some modifications to the EFI > Clover folder on the M.2:
1. Use Clover Configurator to mount both the USB and M.2’s EFI partitions.
2. Copy the SSDT-NVMe-Pcc.aml from your USB key to the same path on the M.2 EFI. (EFI/Clover/ACPI/patched). Also added my system’s SSDT.aml while I’m at it.
3. Copy the HackrNVMeFamily-10_12_3.kext to the same path on the M.2 EFI (EFI/Clover/kexts/Other)
4. Use Kext Wizard to install HackrNVMeFamily-10_12_3.kext to S/L/E
5. Enable Trim
Chapter 7: Post-MultiBeast tasks (Audio)
At this point, you should be able to reboot your computer from the M.2 – BUT, we still have a couple more things to do to get everything working. Note that OkY is using his UA Apollo for sound, so really didn’t spend too much time w/onboard audio. Basically, use KextBeast or Kext Wizard to install the “Release” version of RehabMan's CodecCommander to S/L/E - and rebuild kext caches.
Chapter 8: Post-MultiBeast tasks (Video)
As you’ve noticed, using an NVIDIA GPU means that you still have a few more steps to get it working. Here’s what I found to be successful:
1. Install the NVIDIA Web drivers that you stored in your “Other” folder. A reboot is required after install. Note that, until we do a few more tweaks, you’ll need to use nv_disable=1 @ reboot until everything is complete.
2. Download latest Clover installer – run this to update to latest version of Clover. In the process, we need to add/select EmuVariableUefi-64.efi. Without this, the Web driver setting won’t “stick” and will always revert back to macOS driver setting.
3. Open your config.plist in Clover Configurator. Under System Parameters, make sure that Inject kexts = Detect and check the box/select: NvidiaWeb. Also click Boot and select: npci=0x2000. SAVE.
4. Open your config.plist file on your new boot drive EFI, and do a text search for CsrActiveConfig – change the variable to: 0x67 --without this, we cannot complete the next step (this disables security so you can make one final patch for NVIDIA). See this post for more info (it’s the same for Sierra): https://www.tonymacx86.com/threads/solved-cant-disable-sip-el-capitan.176151/ (revert back to the default when you're done).
5. Because we are using iMac17,1 definition, you will get “black screen” about half-way through boot. See Problem 4 at this link. You will now Use Shilohh's AGDPfix - Please download the version for iMac17,1 –AGDPfix.v1.3.zip and run.
At this point, you should now be able to boot your new system without having to use nv_disable=1. You should be able to boot completely to the desktop with out the “black screen” issue, and the NVIDIA Driver option should be selected in the NVIDIA menu in the upper-right. Ladies & gentlemen, I think we are now good to go!


**NOTE: The GB score here reflects a modest overclock using the BIOS settings (OC from 4.0 to 4.4 GHz - simply by using one of the BIOS options)
Epilogue
What’s Working
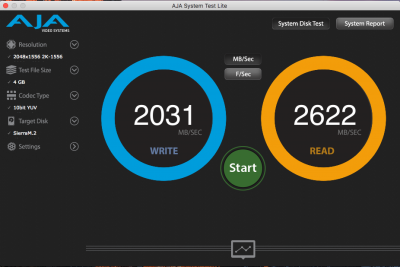
- System is booting from M.2 drive successfully. Read/write speeds both pegged out BlackMagic Disk Speed Test
- NVIDIA Web drivers activated
- Thunderbolt 3 working (albeit, I do not have any TB3 devices – only TB2 using Apple TB3 > TB2 adapter)**
- App Store/iCloud
- USB3
- On-board sound
- Both Ethernet ports (note my Ethernet settings in MB – must install 2 different Ethernet drivers)
- Boot time – about 6-7 seconds once I’m past the Clover screen. Pretty zippy I think
- Shut-down***
** - Thunderbolt: No hot-swapping/plugging of TB devices – this is a known issue since the beginning of TB on a CustoMac. Also, I find it works best to make sure TB devices are powered on, and then connect them to TB port at Clover screen (I set my time-out to 10 seconds). This yields for me best success. Tested with:
- Belkin Thunderbolt 2 Dock (all functions working)
- LaCie d2 Thunderbolt 2 Drive (4TB)
- Promise Pegasus2 – R6 (12TB RAID)
- OWC Thunderbolt 2 Dock (all functions working)
- Seagate GoFlex 1TB Thunderbolt (v1) drive
- Akitio Thunder2 PCIe Expansion Box
*** - Shut-down: It seems that, even though I have “wake on mouse” and “wake on keyboard” disabled in the BIOS, my system actually starts/boots up if I accidentally move my mouse or bump a key. I’m wondering if this is what OkY and others might be experiencing with the shutdown/reboot issue?? Enabling & then disabling in BIOS seems to have no effect. So when I shut down, I’m careful not to move mouse or press any keys.
What’s Not Working
- Wake from sleep – this is not a show-stopper for me, as sleep is sort of a no-no in the world of audio production (not sure about video systems, but still…).
- Getting a proper SSDT.aml that supports overclocking. I can still overclock slightly using some cool presets in the BIOS. But I’m sure things will run more efficiently with the correct SSDT, optimized for overclocking.
- Getting “About This Mac” to read the actual OC speed.
- Seeing if there are any TB settings I can change so that I can keep devices connected on bootup (vs. hot-plugging them at the Clover screen).
--BoomR
UPDATE: (05 March 2016) A few days into full production on this machine, and I discovered that with the slight overclock to 4.4 GHz, my CPU temps were hitting anywhere from 78C - 84C when video transcoding using Handbrake. The air cooler was just not doing the job. So after doing a little research & talking to one of the sales guys at MicroCenter, I chose to replace the Cooler Master air cooler with the new top-line Corsair Hydro series H115i Extreme Performance Liquid CPU Cooler. But as luck would have it, it would not fit into the original case I purchased. So thankfully, was able to return the original case & CPU cooler, and walked out with the new cooler and the NZXT S340 case that you see pictured above/below. While the salesperson assured me that the radiator would fit, you actually have to use the long screws to mount the fans to the back of the front panel, and THEN the radiator (so that the fans are "pushing" the air through the radiator vs. pulling). Otherwise all is good! With the new case & cooler, temps hover in the mid-to-upper 60C's to maybe up to 72C. I still need to figure out how, in macOS to get the cooler's fans to spin up a bit faster when there is more workload. I think that would help keep temps down in the 60C's... There is a killer utility on the Windows side. I suspect that the settings you choose there only work if you are running windows. Any suggestions or tips would be much appreciated! Here are some pics:


Last edited:

