- Joined
- Feb 3, 2017
- Messages
- 183
- Motherboard
- Dell XPS 13 9350 - BIOS 1.7
- CPU
- i7-6500U
- Graphics
- HD 520, 3200 x 1800
- Mac
- Mobile Phone
(I upgrade BIOS to F20 on my Mobo and had to do a reinstall but finally I have everything I need working)
See post on second page for successful build on 19/2/17)
(please note that this build was for Sierra 10.12.3,
I haven't upgraded to 10.12.6, and there have been some changes to how intel HD5xx graphics are handled, starting from 10.12.5.
So this step by step example may not work properly now. see general tonymacx86 guide)
****2018 Update*****
I have upgraded to Sierra 10.12.6 no problem
I also in the meantime have created a custom SSDT for USBInjectAll.kext
https://www.tonymacx86.com/threads/...2-6-custom-ssdt-for-usbinjectall-kext.250032/
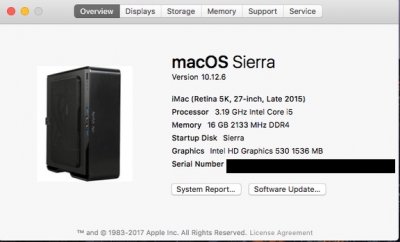
custom picture in about this MAC information

*************
**********
Update November 2018
I decided to install a second SSD, which I would clone , so that I have a working SSD and and testing SSD.
I cloned my second SSD with Carbon Copy Cloner, and copied the EFI folder to EFI partition
however bios would not recognise my second testing SSD as a boot volume.
Found that I could manually add the second SSD to my bios via the Clover shell
see post below #38 how I did it
***************
Hi everyone!
Started building my very first CustoMac!
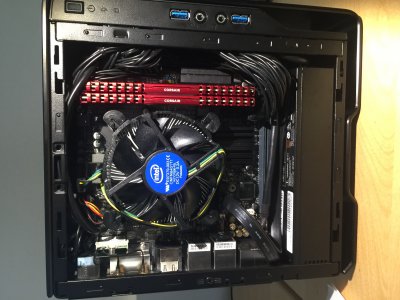
This is going to be a a small form factor/macmini like build.
Hope it goes well.
These are the parts I have.
I live in Australia, so here are the links to PCcasegear and ebay.
that i used.
Prices also probably more expensive than US is used to.
We are a bit isolated here in Oz, and with a small market, things do get more expensive.
Gigabyte Z170N-WIFI Motherboard
https://www.pccasegear.com/products/33167
Intel Core i5 6500
https://www.pccasegear.com/products/33192
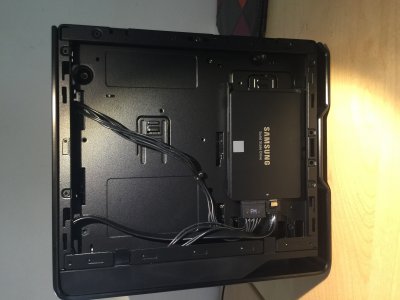
Samsung 850 EVO 250GB SSD
https://www.pccasegear.com/products/30448
In Win Chopin Mini-ITX Chassis with 150W 80 Plus Bronze PSU
https://www.pccasegear.com/products/35755
Corsair Vengeance LPX CMK16GX4M2A2133C13R 16GB (2x8GB) DDR4 Red
https://www.pccasegear.com/products/32847
ID-COOLING is-40 TDP 95W for ITX and HTPC systems Low-Profile CPU Cooler
http://www.ebay.com.au/itm/171060725976?ul_noapp=true
ordered from IDcooling china directly via ebay - waiting for it to arrive - in mean time will use heatsink that came with intel CPU.
Graphics:
i will use the integrated HD 530 ( i wont be using this mac for heavy video use so hoping to get away with the HD530 only)
Bluetooth:
I hope to be able to use the onboard bluetooth of the Z170N motherboard.
but if not I also have a Dell 9350 wifi card spare: BCM94350ZAE
which is not the recommended broadcom: BCM94352Z but hoping that could work
Lastly I also have a mini pcie adapter lying around that i could use and then order a apple wifi/bluetooth BCM94360CD to slot into the adapter and then replace the stock wifi/bt combo
Wifi:
I don’t realy need wifi so not too bothered about it - will hardwire via RJ45 to local network.
will update as I go along.
—————————————
Here is what I have done so far using standard guide
STEP 1: Download macOS Sierra
version 10.12.3
The full operating system is a free download for anyone who has purchased Mac OS X Snow Leopard, Lion, or Mountain Lion or has a Mac preloaded with OS X Mavericks, Yosemite, El Capitan, or macOS Sierra. Download the Application from the Mac App Store using your Apple ID on any Mac or functional computer running OS X 10.7.5 or later.
1. Open Mac App Store
2. Log in with your Apple ID
3. Download macOS Sierra
The Application Install macOS Sierra will appear in /Applications.
STEP 2: Create a Bootable USB Drive with UniBeast
1. Insert the USB drive - 16GB
2. Open /Applications/Utilities/Disk Utility
3. Highlight the USB drive in left column
4. Click Erase button
5. For Name: type USB (You can rename it later)
6. For Format: choose OS X Extended (Journaled)
7. For Scheme: choose GUID Partition Map
8. Click Erase then Done
9. Download and run UniBeast 7.0.1
10. Click Continue, Continue, Continue, Continue, Agree
11. At Destination Select, choose USB and click Continue
12. At Select OS Installation screen choose Sierra and click Continue
13. At Bootloader Options screen choose UEFI Boot Mode
14. (Optional) At Graphics Configuration screen choose the appropriate graphics option for your system and click Continue. (did not click any)
Got following error
“ Make sure neither 'OS X Install ESD' or 'OS X Base System' are mounted on your drive.”
fixed it with going to
finder
go to
/volumes
and ejected ‘OS X install ESD’ to unmount
Long USB install wait
starting installing but install seemed to hang around 20%
reformatted, and tried again, seem to hang again.
changed everyone read and write permissions on USB drive
reformatted and tried again (3rd time lucky?)
looked at logfile
~/Library/Logs/Unibeast.log
02/06/17 20:40:42 - Starting UniBeast 7.0.1-20160926
02/06/17 20:41:02 - Mounting Volumes...
02/06/17 20:41:04 - Copying Files...
20:48:.. - OS X base system coming up as drive - and showing empty
few seconds later folders come up
02/06/17 21:15:29 - Detaching Volumes...
02/06/17 21:15:30 - Installing Bootloader...
02/06/17 21:18:36 - Cleaning Up...
02/06/17 21:20:28 - Install Successful
YAY!
The moral of the story with the USB install is to be patient. It can take some time even when progress bar seems stuck/keep waiting.
I was installing from a late 2009 2.66GZh quadcore i5 27” iMac - running sierra 10.12.3 and it took almost 40 minutes to complete
15. Downloaded Multibeast 9.0.1 Sierra version
16. copied to USB drive
That’s it so far.
Will assemble Mobo and components next time and start booting with USB.
So far so good.
================
See post on second page for successful build on 19/2/17)
(please note that this build was for Sierra 10.12.3,
I haven't upgraded to 10.12.6, and there have been some changes to how intel HD5xx graphics are handled, starting from 10.12.5.
So this step by step example may not work properly now. see general tonymacx86 guide)
****2018 Update*****
I have upgraded to Sierra 10.12.6 no problem
I also in the meantime have created a custom SSDT for USBInjectAll.kext
https://www.tonymacx86.com/threads/...2-6-custom-ssdt-for-usbinjectall-kext.250032/
custom picture in about this MAC information

*************
**********
Update November 2018
I decided to install a second SSD, which I would clone , so that I have a working SSD and and testing SSD.
I cloned my second SSD with Carbon Copy Cloner, and copied the EFI folder to EFI partition
however bios would not recognise my second testing SSD as a boot volume.
Found that I could manually add the second SSD to my bios via the Clover shell
see post below #38 how I did it
***************
Hi everyone!
Started building my very first CustoMac!
This is going to be a a small form factor/macmini like build.
Hope it goes well.
These are the parts I have.
I live in Australia, so here are the links to PCcasegear and ebay.
that i used.
Prices also probably more expensive than US is used to.
We are a bit isolated here in Oz, and with a small market, things do get more expensive.
Gigabyte Z170N-WIFI Motherboard
https://www.pccasegear.com/products/33167
Intel Core i5 6500
https://www.pccasegear.com/products/33192
Samsung 850 EVO 250GB SSD
https://www.pccasegear.com/products/30448
In Win Chopin Mini-ITX Chassis with 150W 80 Plus Bronze PSU
https://www.pccasegear.com/products/35755
Corsair Vengeance LPX CMK16GX4M2A2133C13R 16GB (2x8GB) DDR4 Red
https://www.pccasegear.com/products/32847
ID-COOLING is-40 TDP 95W for ITX and HTPC systems Low-Profile CPU Cooler
http://www.ebay.com.au/itm/171060725976?ul_noapp=true
ordered from IDcooling china directly via ebay - waiting for it to arrive - in mean time will use heatsink that came with intel CPU.
Graphics:
i will use the integrated HD 530 ( i wont be using this mac for heavy video use so hoping to get away with the HD530 only)
Bluetooth:
I hope to be able to use the onboard bluetooth of the Z170N motherboard.
but if not I also have a Dell 9350 wifi card spare: BCM94350ZAE
which is not the recommended broadcom: BCM94352Z but hoping that could work
Lastly I also have a mini pcie adapter lying around that i could use and then order a apple wifi/bluetooth BCM94360CD to slot into the adapter and then replace the stock wifi/bt combo
Wifi:
I don’t realy need wifi so not too bothered about it - will hardwire via RJ45 to local network.
will update as I go along.
—————————————
Here is what I have done so far using standard guide
STEP 1: Download macOS Sierra
version 10.12.3
The full operating system is a free download for anyone who has purchased Mac OS X Snow Leopard, Lion, or Mountain Lion or has a Mac preloaded with OS X Mavericks, Yosemite, El Capitan, or macOS Sierra. Download the Application from the Mac App Store using your Apple ID on any Mac or functional computer running OS X 10.7.5 or later.
1. Open Mac App Store
2. Log in with your Apple ID
3. Download macOS Sierra
The Application Install macOS Sierra will appear in /Applications.
STEP 2: Create a Bootable USB Drive with UniBeast
1. Insert the USB drive - 16GB
2. Open /Applications/Utilities/Disk Utility
3. Highlight the USB drive in left column
4. Click Erase button
5. For Name: type USB (You can rename it later)
6. For Format: choose OS X Extended (Journaled)
7. For Scheme: choose GUID Partition Map
8. Click Erase then Done
9. Download and run UniBeast 7.0.1
10. Click Continue, Continue, Continue, Continue, Agree
11. At Destination Select, choose USB and click Continue
12. At Select OS Installation screen choose Sierra and click Continue
13. At Bootloader Options screen choose UEFI Boot Mode
14. (Optional) At Graphics Configuration screen choose the appropriate graphics option for your system and click Continue. (did not click any)
Got following error
“ Make sure neither 'OS X Install ESD' or 'OS X Base System' are mounted on your drive.”
fixed it with going to
finder
go to
/volumes
and ejected ‘OS X install ESD’ to unmount
Long USB install wait
starting installing but install seemed to hang around 20%
reformatted, and tried again, seem to hang again.
changed everyone read and write permissions on USB drive
reformatted and tried again (3rd time lucky?)
looked at logfile
~/Library/Logs/Unibeast.log
02/06/17 20:40:42 - Starting UniBeast 7.0.1-20160926
02/06/17 20:41:02 - Mounting Volumes...
02/06/17 20:41:04 - Copying Files...
20:48:.. - OS X base system coming up as drive - and showing empty
few seconds later folders come up
02/06/17 21:15:29 - Detaching Volumes...
02/06/17 21:15:30 - Installing Bootloader...
02/06/17 21:18:36 - Cleaning Up...
02/06/17 21:20:28 - Install Successful
YAY!
The moral of the story with the USB install is to be patient. It can take some time even when progress bar seems stuck/keep waiting.
I was installing from a late 2009 2.66GZh quadcore i5 27” iMac - running sierra 10.12.3 and it took almost 40 minutes to complete
15. Downloaded Multibeast 9.0.1 Sierra version
16. copied to USB drive
That’s it so far.
Will assemble Mobo and components next time and start booting with USB.
So far so good.
================
Attachments
Last edited:


