- Joined
- May 9, 2010
- Messages
- 227
- Motherboard
- Gigabyte Z690 Gaming X
- CPU
- i5-12600K
- Graphics
- RX 6800 XT
- Mobile Phone
New Components
My first Hackintosh was based around a Gigabyte GA-P55M-UD2 motherboard. Fast forward a couple of years, and my last Hackintosh system was built around a Gigabyte Z77X-UD4H 'board.
That brings us to today, where I’m using an Asus Z170 Maximus VIII Ranger motherboard. Why the move to ASUS? I was disappointed with the poor fan controls on my previous two Gigabyte motherboards, and had heard good things about ASUS' Q-Fan system. I also wanted a quiet computer, so good fan controls would be important to this build.
(Before starting, I made sure my BIOS was updated to the latest version. You can do this by going to Asus' web-site for your motherboard and downloading the latest BIOS update. Copy the new BIOS file to a USB Drive, then use Asus' EZ Flash Utility in your BIOS to flash the new one.)
Installation – macOS High Sierra
I wanted to upgrade my current installation of Sierra to (the recently released) High Sierra. I wasn't going to do a clean install - instead I was going to use a USB Stick (with the High Sierra Installer on it) to upgrade the existing OS.
BIOS settings before setting off were (BIOS version used was 3504 - released 18.08.2017):
I started by choosing a USB Stick (I settled for a 16GB Sandisk Extreme), which I was going to use for the High Sierra Installer. My next step was to download the "Install macOS High Sierra.app" from the App Store using my existing install. Then I formatted the 16GB USB Drive as HFS+ in Disk Utility, naming it Untitled. After this, in terminal, I ran the command:
On a 2GB USB stick I installed the latest version of Clover, customised for my build, which I would use to launch this newly-created USB Installer.
In Clover/kexts/Other I had:
1. DSDT - I used FixShutdown because I was having problems with High Sierra not shutting down properly. FixHeaders was included instead of dropping my DMAR table, and is required for a working Hackintosh with my motherboard:
These fixes go under ACPI -> DSDT:
2. Code for hiding the Preboot partition on the Clover boot screen (created by installing High Sierra on an APFS volume).
Add this to your GUI Section:
Using my Clover Boot Stick & USB Installer, I was able to successfully complete my upgrade to High Sierra.
The next few sections go into detail about how I got various components and features on my Hackintosh to work under High Sierra:
1. Sound
For working sound, I used AppleALC.kext, and placed it in Clover/kexts/Other. To get it to work, I added this code to my config.plist, under ACPI:
Also, a Devices section needed to be added to config.plist:
Once this was done, I had working Realtek 1150 sound.
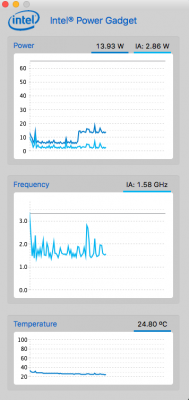
2. CPU Power Management
To enable CPU power management, I used RehabMan's [Guide] Native Power Management for Laptops.
So, I simply added this to my config.plist:
And now power management seems to be working for me. I also used an iMac17,1 SMBIOS for my PC, as this real-life Mac uses a similar Skylake processor to my own system (a black-screen patch is needed though - see the following section).
3. Black Screen fix for MacPro6,1 Definition
WhateverGreen.kext (the successor to NvidiaGraphicsFixup.kext & IntelGraphicsFixup.kext - combining the functionality of both) was used in conjunction with Lilu.kext, as this seemed the best way to prevent my Nvidia GPU's black-screen on startup issue.
4. Nvidia Web Drivers
For High Sierra Nvidia Web Drivers, you can download the latest ones from Nvidia Web Driver updates for macOS High Sierra.
Before installing them in High Sierra, you need to enable SIP, by changing CsrActiveConfig=0x67 to CsrActiveConfig=0x00 in your config.plist. After installation, SIP can be disabled again, by setting CsrActiveConfig=0x67. However, I've found High Sierra works fine with SIP enabled.
5. Onboard Intel Graphics
If you prefer to use onboard Intel Graphics under High Sierra, these can work, with no edits needed to config.plist.
The same WhateverGreen.kext can now be used to enable your Intel Onboard GPU - great! Before using, reboot into BIOS, and set IGFX to Primary (BIOS: Advanced -> System Agent (SA) Configuration -> Primary Display -> IGFX).
6. Sleep
In Sierra, I needed a patched DSDT.aml for sleep to work. I'm happy to report that in High Sierra, I have no issues with sleep in macOS, and can even wake my system using my PC's keyboard and mouse.
The only fixes I have in my config.plist regarding sleep are the darkwake=10 boot-arg and ACPI/DSDT/HaltEnabler=true. I'm not sure these still are needed, but sleep works on my system, so I'm keeping them in my config.plist for the time being")
7. ASMedia USB 3.1 support
Starting with Sierra, macOS now has native support for my motherboard's ASMedia 3.1 USB port.
What works
MacOS High Sierra was released to the public on 25th September 2017. Apart from having to update Clover to the latest High Sierra-compatible version, only a few other changes were needed to get this working on my machine. As mentioned earlier, initially apfs.efi was needed for the file-system conversion when you first install High Sierra. Now Clover includes ApfsDriverLoader-64.efi, so apfs.efi doesn't need to be updated after every macOS update.
I also had to wait for new Nvidia Web Drivers to be released, along with High Sierra versions of Lilu.kext, NvidiaGraphicsFixup.kext and AppleALC.kext (although these could be made to work with the -xxxbeta boot-arg). Some software also needed time to become High Sierra compatible (like Paragon NTFS for Mac & MacDrive). Now it's 11.09.2018, and the whole upgrade cycle is starting again with the new macOS Mojave Beta ;-)
02.09.2016 - Updated Black Screen fix section, and uploaded new SSDT-USB.aml as previous version was incorrect - this file is still a work in progress.
20.09.2016 - Added Sierra section, and info about Pike's freqVectorsEdit script.
19/10/2016 - Added Port Limit Patch link for Sierra, updated Sierra section and added Sierra information for ASMedia 3.1 USB port.
16/10/2017 - Guide updated for macOS High Sierra. Removed most files except for Power Management screenshot.
16.10.2017 - This is probably my final update to this guide - hope some of you found it useful
10.11.2017 - Clean-up of many mistakes.
11.09.2018 - Guide refactoring ;-)
- Intel i5-6600 CPU
- Asus Maximus VIII Ranger Z170 Motherboard
- MSI GTX 1070 Graphics Card
- Corsair Vengeance LPX 16GB (2x8GB) 2666MHz Memory Kit
- Noctua NH-U12S CPU Cooler
- Corsair Carbide 600Q Full-Tower Case
- Corsair RM750 PSU
- 2 x Noctua NF-S12A ULN 120mm Fans
- 2 x Noctua NF-A14 ULN 140mm Fans
- Crucial BX100 250GB SSD (this is used for my macOS Drive)
My first Hackintosh was based around a Gigabyte GA-P55M-UD2 motherboard. Fast forward a couple of years, and my last Hackintosh system was built around a Gigabyte Z77X-UD4H 'board.
That brings us to today, where I’m using an Asus Z170 Maximus VIII Ranger motherboard. Why the move to ASUS? I was disappointed with the poor fan controls on my previous two Gigabyte motherboards, and had heard good things about ASUS' Q-Fan system. I also wanted a quiet computer, so good fan controls would be important to this build.
(Before starting, I made sure my BIOS was updated to the latest version. You can do this by going to Asus' web-site for your motherboard and downloading the latest BIOS update. Copy the new BIOS file to a USB Drive, then use Asus' EZ Flash Utility in your BIOS to flash the new one.)
Guide updated for macOS High Sierra - 16.10.2017
Installation – macOS High Sierra
I wanted to upgrade my current installation of Sierra to (the recently released) High Sierra. I wasn't going to do a clean install - instead I was going to use a USB Stick (with the High Sierra Installer on it) to upgrade the existing OS.
BIOS settings before setting off were (BIOS version used was 3504 - released 18.08.2017):
- Main -> Ai Overclock Tuner -> XMP
- Advanced -> System Agent (SA) Configuration -> Primary Display -> PEG
- Advanced -> System Agent (SA) Configuration -> VT-d -> Disabled
(Added 11.09.2018 - Enabling this caused occasional startup kernel crashes for me, until I found this was the culprit, and needed disabling) - Monitor -> Q-Fan Configuration -> Q-Fan Tuning (for setting CPU & Case fan speeds automatically)
- Boot -> Fast Boot -> Disabled
- Boot -> CSM (Compatibility Support Module) -> Launch CSM (Compatibility Support Module) -> Disabled
- Boot -> Secure Boot -> OS Type -> Other OS
- Boot -> Secure Boot -> Key Management -> Clear Secure Boot Keys (disables Secure Boot - only needed if this hasn't already been done)
I started by choosing a USB Stick (I settled for a 16GB Sandisk Extreme), which I was going to use for the High Sierra Installer. My next step was to download the "Install macOS High Sierra.app" from the App Store using my existing install. Then I formatted the 16GB USB Drive as HFS+ in Disk Utility, naming it Untitled. After this, in terminal, I ran the command:
Code:
sudo /Applications/Install\ macOS\ High\ Sierra.app/Contents/Resources/createinstallmedia --volume /Volumes/Untitled —nointeractionOn a 2GB USB stick I installed the latest version of Clover, customised for my build, which I would use to launch this newly-created USB Installer.
In Clover/kexts/Other I had:
- USBInjectAll.kext - for USB port injection. More Information here.
- IntelMausiEthernet.kext - to enable my onboard Intel I219V ethernet port in macOS.
- RehabMan's branch of FakeSMC.kext.
- Lilu.kext is needed for the following two kexts to work (for best results always use the latest version of Lilu.kext and its plugins):
- AppleALC.kext - Needed for onboard sound to work (more details later).
- WhateverGreen.kext - Used in conjunction with an iMac17,1 SMBIOS - prevents black screen on startup with my Nvidia GPU - amongst other things.
- ApfsDriverLoader-64.efi - Open source apfs.efi loader. Chain loads the apfs.efi driver that is already embedded in the APFS container from this container. More info here
- AptioMemoryFix.efi
- #EmuVariableUefi-64.efi - no longer needed.
- FSInject-64.efi
- VBoxHfs-64.efi - Open-source HFS+ driver.
- SSDT-UIAC.aml - a custom SSDT that is used in conjunction with RehabMan's USBInjectAll.kext. More information in RehabMan's
[Guide] Creating a Custom SSDT for USBInjectAll.kext.
1. DSDT - I used FixShutdown because I was having problems with High Sierra not shutting down properly. FixHeaders was included instead of dropping my DMAR table, and is required for a working Hackintosh with my motherboard:
These fixes go under ACPI -> DSDT:
Code:
<key>Fixes</key>
<dict>
      <key>FixShutdown_0004</key>
      <true/>
      <key>FixHeaders_20000000</key>
      <true/>
</dict>
2. Code for hiding the Preboot partition on the Clover boot screen (created by installing High Sierra on an APFS volume).
Add this to your GUI Section:
Code:
<key>Hide</key>
<array>
      <string>Preboot</string>
</array>
Using my Clover Boot Stick & USB Installer, I was able to successfully complete my upgrade to High Sierra.
The next few sections go into detail about how I got various components and features on my Hackintosh to work under High Sierra:
1. Sound
For working sound, I used AppleALC.kext, and placed it in Clover/kexts/Other. To get it to work, I added this code to my config.plist, under ACPI:
Code:
<key>DSDT</key>
<dict>
      <key>Patches</key>
      <array>
          <dict>
              <key>Comment</key>
              <string>Rename HDAS to HDEF</string>
              <key>Find</key>
              <data>SERBUw==</data>
              <key>Replace</key>
              <data>SERFRg==</data>
          </dict>
      </array>
</dict>
Also, a Devices section needed to be added to config.plist:
Code:
<key>Devices</key>
<dict>
      <key>Audio</key>
      <dict>
            <key>Inject</key>
            <integer>1</integer>
      </dict>
</dict>2. CPU Power Management
To enable CPU power management, I used RehabMan's [Guide] Native Power Management for Laptops.
So, I simply added this to my config.plist:
Code:
<key>SSDT</key>
<dict>
   <key>Generate</key>
   <dict>
       <key>PluginType</key>
       <true/>
   </dict>
</dict>
And now power management seems to be working for me. I also used an iMac17,1 SMBIOS for my PC, as this real-life Mac uses a similar Skylake processor to my own system (a black-screen patch is needed though - see the following section).
3. Black Screen fix for MacPro6,1 Definition
WhateverGreen.kext (the successor to NvidiaGraphicsFixup.kext & IntelGraphicsFixup.kext - combining the functionality of both) was used in conjunction with Lilu.kext, as this seemed the best way to prevent my Nvidia GPU's black-screen on startup issue.
4. Nvidia Web Drivers
For High Sierra Nvidia Web Drivers, you can download the latest ones from Nvidia Web Driver updates for macOS High Sierra.
Before installing them in High Sierra, you need to enable SIP, by changing CsrActiveConfig=0x67 to CsrActiveConfig=0x00 in your config.plist. After installation, SIP can be disabled again, by setting CsrActiveConfig=0x67. However, I've found High Sierra works fine with SIP enabled.
5. Onboard Intel Graphics
If you prefer to use onboard Intel Graphics under High Sierra, these can work, with no edits needed to config.plist.
The same WhateverGreen.kext can now be used to enable your Intel Onboard GPU - great! Before using, reboot into BIOS, and set IGFX to Primary (BIOS: Advanced -> System Agent (SA) Configuration -> Primary Display -> IGFX).
6. Sleep
In Sierra, I needed a patched DSDT.aml for sleep to work. I'm happy to report that in High Sierra, I have no issues with sleep in macOS, and can even wake my system using my PC's keyboard and mouse.
The only fixes I have in my config.plist regarding sleep are the darkwake=10 boot-arg and ACPI/DSDT/HaltEnabler=true. I'm not sure these still are needed, but sleep works on my system, so I'm keeping them in my config.plist for the time being
7. ASMedia USB 3.1 support
Starting with Sierra, macOS now has native support for my motherboard's ASMedia 3.1 USB port.
What works
- Sleep (and resume from sleep).
- CPU Power Management.
- Onboard Realtek ALC1150 sound. Audio works after resuming from sleep, with AppleALC.kext.
- ASMedia USB 3.1 Port.
- Nvidia GTX 1070 Graphics Card
- Onboard Intel Graphics.
MacOS High Sierra was released to the public on 25th September 2017. Apart from having to update Clover to the latest High Sierra-compatible version, only a few other changes were needed to get this working on my machine. As mentioned earlier, initially apfs.efi was needed for the file-system conversion when you first install High Sierra. Now Clover includes ApfsDriverLoader-64.efi, so apfs.efi doesn't need to be updated after every macOS update.
I also had to wait for new Nvidia Web Drivers to be released, along with High Sierra versions of Lilu.kext, NvidiaGraphicsFixup.kext and AppleALC.kext (although these could be made to work with the -xxxbeta boot-arg). Some software also needed time to become High Sierra compatible (like Paragon NTFS for Mac & MacDrive). Now it's 11.09.2018, and the whole upgrade cycle is starting again with the new macOS Mojave Beta ;-)
02.09.2016 - Updated Black Screen fix section, and uploaded new SSDT-USB.aml as previous version was incorrect - this file is still a work in progress.
20.09.2016 - Added Sierra section, and info about Pike's freqVectorsEdit script.
19/10/2016 - Added Port Limit Patch link for Sierra, updated Sierra section and added Sierra information for ASMedia 3.1 USB port.
16/10/2017 - Guide updated for macOS High Sierra. Removed most files except for Power Management screenshot.
16.10.2017 - This is probably my final update to this guide - hope some of you found it useful
10.11.2017 - Clean-up of many mistakes.
11.09.2018 - Guide refactoring ;-)
Attachments
Last edited: