- Joined
- Sep 21, 2010
- Messages
- 13,411
- Motherboard
- HP 17" 17-by3053cl
- CPU
- i5-1035G1
- Graphics
- Intel UHD Graphics, 1920x1080
- Mac
- Classic Mac
- Mobile Phone
Contents
Introduction
Hector (as I named my Gigabyte H97N-WIFI system) is using an i5-4690 Haswell Refresh processor, driving two monitors using the motherboard's DVI and bottom HDMI ports. (Apple has not supported VGA natively in OS X for years. So don't use the on-board VGA connector. Instead, use either the DVI and/or the HDMI connectors.) Although I wrote and tested this guide to use the on-board HD4600 graphics, I am using a Gigabyte GTX 750 Ti card in Hector for everyday use now. Consequently, I have written this guide for either using HD4600 or with a nVidia GTX 750/750Ti and 900 series, marked as optional steps.
Additionally, this installation procedure will work for a Z97N-WIFI as the two motherboards are very similar; similar enough to share the same motherboard User's Manual. Any Intel i3/i5/i7 4000 series processor, which supports HD4600 Intel Integrated Graphics, will work with either motherboard. See also the Hector build description for more information (link in signature block) as this guide assumes that you have read it.
In El Capitan, Apple change the way it does the USB 3/2 port assignments which meant we had to jump through our Hula Hoops to get the USB ports working. The good news is that RehabMan was on it, and we finally have a fix in MultiBeast for El Capitan v8.2 that allow the USB ports use.
According to the H/Z-97N User Manual, the motherboard has
Unlike my previous installation guide for the Gigabyte H/Z97N-WIFI motherboard based systems, I am not going repeat most of the steps in the tonymacx86 https://www.tonymacx86.com/threads/...-capitan-any-supported-intel-based-pc.172672/ because the 9-series motherboards are now old enough to be supported by an iMac System Definition. So, I will only highlight those installation items and procedures that are unique to the Gigabyte H/Z97N WIFI motherboard.
As in the past, I've written this guide with as a detailed installation procedure with the check boxes so you can copy & paste into a document for printing and checking off each step as you accomplish the step so as not to miss a step.
Preparation
Now is a good time to check and see if you have the latest version of the BIOS.
 Prepare the UniBeast USB thumb drive in accordance with the tonymacx86 guide https://www.tonymacx86.com/threads/...-capitan-any-supported-intel-based-pc.172672/. Steps 1-2, using the UEFI Boot Mode.
Power down the computer;
Disconnect all drives except for the drive onto which Yosemite will be installed;
Connect you monitor to either the DVI or HMDI Back Panel connector; and
Put the UniBeast USB thumb drive in an USB 2.0 socket on the motherboard Back Panel.
BIOS Set-up
Rather than clutter up this guide, I won't show a lot of BIOS screen snapshots, just the actual BIOS parameters that I changed to start the Installation of El Capitan. (Note: the BIOS set-up below is the same as my previous guides. So you can skip the BIOS set-up if you followed my guides in the past.)
Boot into the BIOS by holding down the DELETE key on your keyboard's numeric keypad. (Also see Step 3 in the tonymacx86x 10.11 El Capitan Installation Guide.)
Load the Optimized Defaults (F7);
M.I.T. > Advanced Memory Settings > X.M.P. > Profile 1 for memory not recognized with the Default setting;
BIOS Features > Boot Options Priorities <--- set this to the UEFI version of the UniBeast USB thumb drive
BIOS Features > VT-d > Disable <--- for non K processors and the new Haswell Refresh "K" and non "K" processors
BIOS Features > Windows Features > Other OS <--- should be the default, but make sure
BIOS Features > Boot Mode Selection > UEFI only
Peripherals > Initial Display Output > IGFX <--- make sure on-board graphics is enabled
Peripherals > Intel Processor Graphics > Enable <--- likewise, make sure this is enabled
Peripherals > XHCI Mode > Auto <--- Smart Auto gives you problems with USB peripherals
Peripherals > EHCI Hand-off > Enable
Power Management > Wake on LAN > Disable
Save & Exit > Save & Exit Setup (and the computer will reboot)
Installation of OS X
At the Clover screen, choose the External icon (UniBeast USB thumb drive) to execute and follow Steps 4 & 5 in the tonymacx86 guide. But,
(Optional) If you have a current nVidia graphics card, then Boot with nv_disable=1 until you install the nVidia web drivers
Important. When the Part 2 install process ask you to log into iCloud, do not log in - skip it - as it messes up Messages. Open up the Applications folder and create a new folder by Finder > File > New Folder (or just type Command-Shift-N), and name it Hackintosh (or whatever);
Copy the MultiBeast and other files you copied to the UniBeast thumb drive above into this new folder;
Un-zip the files and put the zipped files into the Trash;
Run MultiBeast and selection the following:
Quick Start > UEFI Boot Mode
Drivers > Audio > Realtek ALC892
(Optional) Drivers > Disk > 3rd Party SATA
(Optional) Drivers > Misc > FakeSMC Plugins
(Optional) Drivers > Misc > FakeSMC HWMonitor Application
Drivers > Network > Atheros > AtherosE2200Ethernet <----If you're using the Atheros Ethernet port and/or
Drivers > Network > Intel > AppleIntelE1000e <----If you're using the Intel Ethernet port
Drivers > USB > 7/8/9 Series USB Support <----Rehabman's two FakePCIID kexts
Drivers > USB > Increase Max Port Limit
Customize > System Definitions > iMac > iMac 14,2
Build <--- To see your full configuration Save <--- Save your MultiBeast configuration file somewhere convenient
(Optional) If you have a current nVidia graphics card, install the driver now.
Restart the computer.
Boot into the BIOS.
Change BIOS Features > Boot Options Priorities > set this to the UEFI setting for the El Capitan drive.
F10 to save the BIOS update and reboot.
To make sleep/wake-up work, go to the Energy Saver pane in the System Preferences and uncheck the "Wake for network access" box. If you're running SSDs, uncheck the "Put hard disks to sleep when possible" box, too.
Comments
Hector is running El Capitan as good as it did with Yosemite. USB 3/2 ports work at their appropriate speeds. Bluetooth works for the keyboard and mouse in the BIOS (tapping the Delete key on the keyboard several times as the computer boots).
Updates
October 25, 2016. Updated the Nvidia driver link for the current version of the web driver.
April 23, 2016. Add the last step to change the System Preference's Energy pane's options.
April 20, 2016. MultiBeast for El Capitan v8.2 does away with the need to manually modify the config.plist with the "Increase in USB Port Limit" patch.
March 21, 2016. Updated to 10.11.4 without any problems. See Post #2 in the OS X 10.11.4 Update sticky thread.
January 19, 2016. Updated to 10.11.3 without any problems.
December 13, 2015. Initial posting.
References
https://www.tonymacx86.com/threads/...-capitan-any-supported-intel-based-pc.172672/
http://www.tonymacx86.com/user-buil...ga-h97n-wifi-i5-4690-hd4600-two-monitors.html
http://www.tonymacx86.com/el-capitan-laptop-support/173616-guide-10-11-usb-changes-solutions.html
http://www.tonymacx86.com/basics/171680-clover-basics-switching-advice.html
http://www.tonymacx86.com/yosemite-...i-using-hd4600-chimera-multibeast-method.html
http://www.tonymacx86.com/mavericks...ifi-using-hd4600-no-graphics-card-needed.html
Introduction
Hector (as I named my Gigabyte H97N-WIFI system) is using an i5-4690 Haswell Refresh processor, driving two monitors using the motherboard's DVI and bottom HDMI ports. (Apple has not supported VGA natively in OS X for years. So don't use the on-board VGA connector. Instead, use either the DVI and/or the HDMI connectors.) Although I wrote and tested this guide to use the on-board HD4600 graphics, I am using a Gigabyte GTX 750 Ti card in Hector for everyday use now. Consequently, I have written this guide for either using HD4600 or with a nVidia GTX 750/750Ti and 900 series, marked as optional steps.
Additionally, this installation procedure will work for a Z97N-WIFI as the two motherboards are very similar; similar enough to share the same motherboard User's Manual. Any Intel i3/i5/i7 4000 series processor, which supports HD4600 Intel Integrated Graphics, will work with either motherboard. See also the Hector build description for more information (link in signature block) as this guide assumes that you have read it.
In El Capitan, Apple change the way it does the USB 3/2 port assignments which meant we had to jump through our Hula Hoops to get the USB ports working. The good news is that RehabMan was on it, and we finally have a fix in MultiBeast for El Capitan v8.2 that allow the USB ports use.
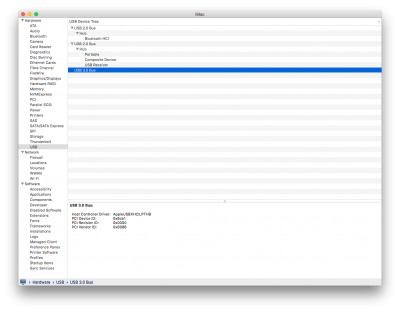
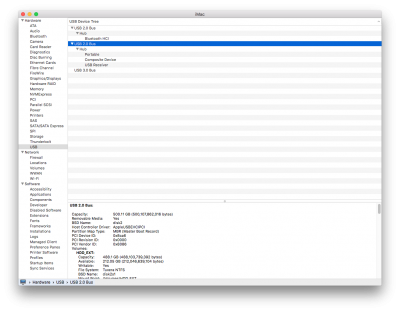
According to the H/Z-97N User Manual, the motherboard has
Chipset: [Intel 9-series chipset]
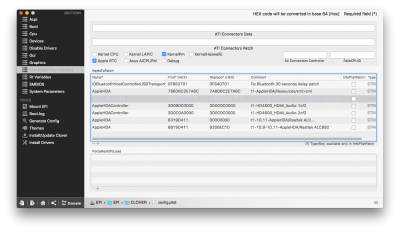
Using the formula for counting USB ports (USB 3 count as 2 ports), the H97N has 16 ports, one over the Apple max of 15. The good news is that all the ports are part of Intel 9-series chipset; no 3rd party USB chipset. So, we'll use a Clover config.plist file kernel patch to increase the number greater than 15 ports.- 4 x USB 2.0/1.1 ports (2 ports on the back panel, 2 ports available through the internal USB header)
- 6 x USB 3.0/2.0 ports (4 ports on the back panel, 2 ports available through the internal USB header)
- 6 x USB 3.0/2.0 ports (4 ports on the back panel, 2 ports available through the internal USB header)
Unlike my previous installation guide for the Gigabyte H/Z97N-WIFI motherboard based systems, I am not going repeat most of the steps in the tonymacx86 https://www.tonymacx86.com/threads/...-capitan-any-supported-intel-based-pc.172672/ because the 9-series motherboards are now old enough to be supported by an iMac System Definition. So, I will only highlight those installation items and procedures that are unique to the Gigabyte H/Z97N WIFI motherboard.
As in the past, I've written this guide with as a detailed installation procedure with the check boxes so you can copy & paste into a document for printing and checking off each step as you accomplish the step so as not to miss a step.
Preparation
Now is a good time to check and see if you have the latest version of the BIOS.
H97N BIOS: http://www.gigabyte.com/products/product-page.aspx?pid=4992#bios
Z97N BIOS: http://www.gigabyte.com/products/product-page.aspx?pid=4993#bios
To update to the latest BIOS version, see How to Update Your Gigabyte Motherboard's BIOS.Z97N BIOS: http://www.gigabyte.com/products/product-page.aspx?pid=4993#bios
Prepare the UniBeast USB thumb drive in accordance with the tonymacx86 guide https://www.tonymacx86.com/threads/...-capitan-any-supported-intel-based-pc.172672/. Steps 1-2, using the UEFI Boot Mode.Note:Your USB Thumb drive needs to have 7.63 GB of free space to build the UniBeast installation thumb drive. Otherwise, you'll need a 16GB USB thumb drive (or two 8GB thumb drives) which is a better size so you can load the following applications for use in the post installation phase:
MultiBeast for El Capitan which you can probably put on a 8GB USB thumb drive, but that's about it
EFI Mounter V3
Clover Configurator
(Optional) the nVidia Web drivers for the Maxwell chipset cards (750, 750 Ti, 950, 960, etc). See NVIDIA Releases Alternate Graphics Drivers for OS X 10.11.6 (346.03.15) or MacVidCards driver list
MultiBeast for El Capitan which you can probably put on a 8GB USB thumb drive, but that's about it EFI Mounter V3 Clover Configurator (Optional) the nVidia Web drivers for the Maxwell chipset cards (750, 750 Ti, 950, 960, etc). See NVIDIA Releases Alternate Graphics Drivers for OS X 10.11.6 (346.03.15) or MacVidCards driver list Power down the computer; Disconnect all drives except for the drive onto which Yosemite will be installed; Connect you monitor to either the DVI or HMDI Back Panel connector; and Put the UniBeast USB thumb drive in an USB 2.0 socket on the motherboard Back Panel.BIOS Set-up
Rather than clutter up this guide, I won't show a lot of BIOS screen snapshots, just the actual BIOS parameters that I changed to start the Installation of El Capitan. (Note: the BIOS set-up below is the same as my previous guides. So you can skip the BIOS set-up if you followed my guides in the past.)
Boot into the BIOS by holding down the DELETE key on your keyboard's numeric keypad. (Also see Step 3 in the tonymacx86x 10.11 El Capitan Installation Guide.) Load the Optimized Defaults (F7); M.I.T. > Advanced Memory Settings > X.M.P. > Profile 1 for memory not recognized with the Default setting; BIOS Features > Boot Options Priorities <--- set this to the UEFI version of the UniBeast USB thumb drive BIOS Features > VT-d > Disable <--- for non K processors and the new Haswell Refresh "K" and non "K" processors BIOS Features > Windows Features > Other OS <--- should be the default, but make sure BIOS Features > Boot Mode Selection > UEFI only Peripherals > Initial Display Output > IGFX <--- make sure on-board graphics is enabled Peripherals > Intel Processor Graphics > Enable <--- likewise, make sure this is enabled Peripherals > XHCI Mode > Auto <--- Smart Auto gives you problems with USB peripherals Peripherals > EHCI Hand-off > Enable Power Management > Wake on LAN > Disable Save & Exit > Save & Exit Setup (and the computer will reboot)Installation of OS X
At the Clover screen, choose the External icon (UniBeast USB thumb drive) to execute and follow Steps 4 & 5 in the tonymacx86 guide. But, (Optional) If you have a current nVidia graphics card, then Boot with nv_disable=1 until you install the nVidia web drivers Important. When the Part 2 install process ask you to log into iCloud, do not log in - skip it - as it messes up Messages. Open up the Applications folder and create a new folder by Finder > File > New Folder (or just type Command-Shift-N), and name it Hackintosh (or whatever); Copy the MultiBeast and other files you copied to the UniBeast thumb drive above into this new folder; Un-zip the files and put the zipped files into the Trash; Run MultiBeast and selection the following: Quick Start > UEFI Boot Mode Drivers > Audio > Realtek ALC892 (Optional) Drivers > Disk > 3rd Party SATA (Optional) Drivers > Misc > FakeSMC Plugins (Optional) Drivers > Misc > FakeSMC HWMonitor Application Drivers > Network > Atheros > AtherosE2200Ethernet <----If you're using the Atheros Ethernet port and/or Drivers > Network > Intel > AppleIntelE1000e <----If you're using the Intel Ethernet port Drivers > USB > 7/8/9 Series USB Support <----Rehabman's two FakePCIID kexts Drivers > USB > Increase Max Port Limit Customize > System Definitions > iMac > iMac 14,2 Build <--- To see your full configurationMultiBeast for El Capitan
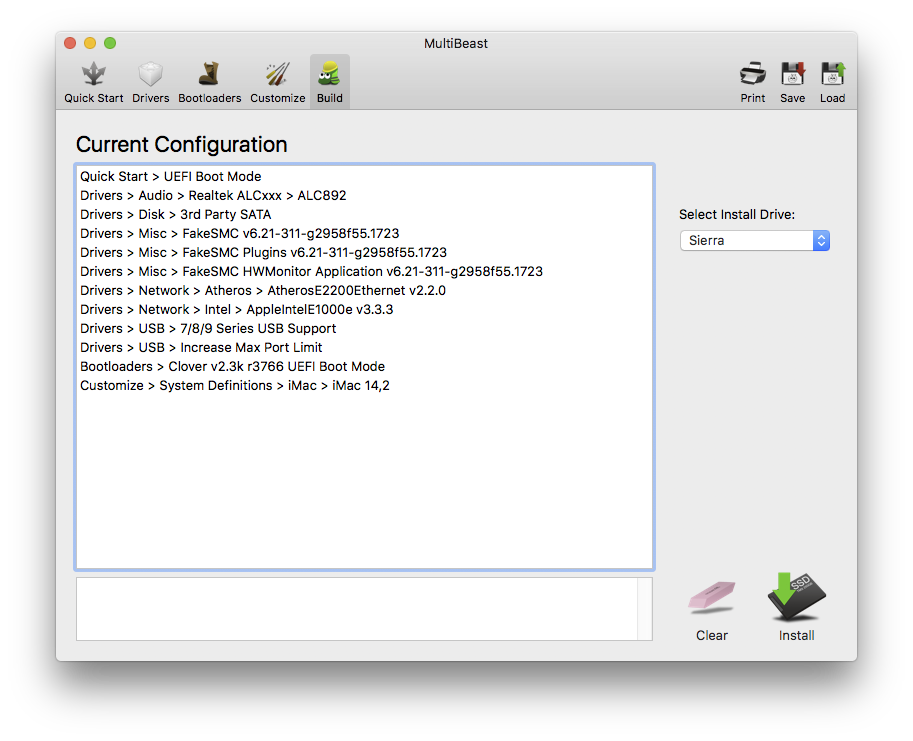
Note: While the MultiBeast Configuration snapshot above may reflect earlier versions of some of the drivers/kexts, the .mb file will automatically be updated by MultiBeast to the current MultiBeast versions.
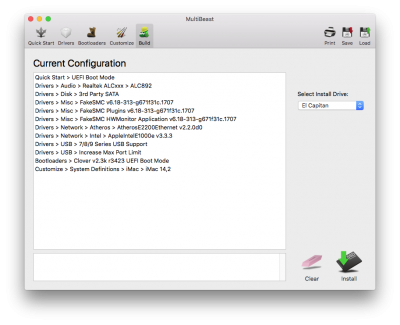
Save <--- Save your MultiBeast configuration file somewhere convenientHere's my MultiBeast configuration file: View attachment Hector El Capitan.mb
To use it
Download it;
Run MultiBeast and click on the Load button and select the downloaded .mb file; and
Click on the Install button in the MultiBeast window bottom right hand corner.
To use it
Download it; Run MultiBeast and click on the Load button and select the downloaded .mb file; and Click on the Install button in the MultiBeast window bottom right hand corner. (Optional) If you have a current nVidia graphics card, install the driver now. Restart the computer. Boot into the BIOS. Change BIOS Features > Boot Options Priorities > set this to the UEFI setting for the El Capitan drive. F10 to save the BIOS update and reboot. To make sleep/wake-up work, go to the Energy Saver pane in the System Preferences and uncheck the "Wake for network access" box. If you're running SSDs, uncheck the "Put hard disks to sleep when possible" box, too.Comments
Hector is running El Capitan as good as it did with Yosemite. USB 3/2 ports work at their appropriate speeds. Bluetooth works for the keyboard and mouse in the BIOS (tapping the Delete key on the keyboard several times as the computer boots).
Updates
October 25, 2016. Updated the Nvidia driver link for the current version of the web driver.
April 23, 2016. Add the last step to change the System Preference's Energy pane's options.
April 20, 2016. MultiBeast for El Capitan v8.2 does away with the need to manually modify the config.plist with the "Increase in USB Port Limit" patch.
March 21, 2016. Updated to 10.11.4 without any problems. See Post #2 in the OS X 10.11.4 Update sticky thread.
January 19, 2016. Updated to 10.11.3 without any problems.
December 13, 2015. Initial posting.
References
https://www.tonymacx86.com/threads/...-capitan-any-supported-intel-based-pc.172672/
http://www.tonymacx86.com/user-buil...ga-h97n-wifi-i5-4690-hd4600-two-monitors.html
http://www.tonymacx86.com/el-capitan-laptop-support/173616-guide-10-11-usb-changes-solutions.html
http://www.tonymacx86.com/basics/171680-clover-basics-switching-advice.html
http://www.tonymacx86.com/yosemite-...i-using-hd4600-chimera-multibeast-method.html
http://www.tonymacx86.com/mavericks...ifi-using-hd4600-no-graphics-card-needed.html
Attachments
Last edited:
 . And a merry christmas to you, but it comes with a few woes.