- Joined
- Mar 1, 2013
- Messages
- 943
- Motherboard
- GA-Z77X-UD5H
- CPU
- i7-3770K
- Graphics
- 2x GEFORCE GT 640
- Mac
- Mobile Phone
n3oN's Build: Z97MX-Gaming 5 | i7 4790K | GTX 970 G1 | 32GB DDR3

ComponentsGA-Z97MX-Gaming 5 - Killer E2200 network - Realtek ALC1150 HD Audio[/SIZE] - Amazon || Newegg
Gigabyte GTX 970 G1 Gaming - 4GB GDDR5 memory - Amazon || Newegg
Crucial Ballistix Tactical Elite (16GB) x 2 - 1866 MHz DDR3 - Amazon || Newegg
Samsung 850 EVO 250GB SSD - Amazon || Newegg
Samsung 850 EVO 1TB SSD - Amazon || Newegg
Western Digital Red 1TB 2.5" Internal Hard Drive (WD10JFCX) - Amazon || Newegg
Seagate 2TB 2.5" Internal Hard Drive (STBD2000102) - Amazon || Newegg
SeaSonic G-750 750W 80 PLUS GOLD Modular Power Supply (SSR-750RM) - Amazon || Newegg
Noctua D-Type Premium CPU Cooler (NH-D15S) - Amazon || Newegg
Noctua NF-F12 PWM 120mm Case Fan - Amazon || Newegg
Noctua NF-B9 PWM 92mm Case Fan x 2 - Amazon || Newegg
Already Owned
Apple Power Macintosh G5[/SIZE] - Ebay Search Power Mac G5
Dell S2340M Black 23" Widescreen LED Backlight LCD Monitor x 3 - Amazon || Newegg
Apple Bluetooth Wireless Keyboard - Amazon || Newegg
Apple Bluetooth TrackPad - Amazon || Newegg
SteelSeries Sensei Wireless Laser Gaming Mouse - Amazon || Newegg
GMYLE Bluetooth 4.0 USB Dongle - Amazon
Comments
Contents
The Build
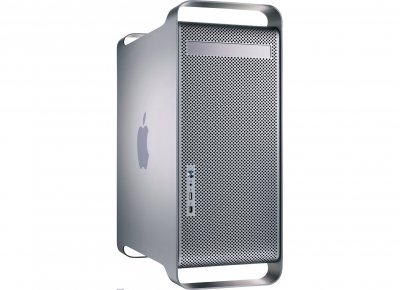
I have always loved the look of the Power Mac G5, since its initial release. Being a long time Mac user, maybe I was a little partial to Apple's most recent release, but, to me, the design is amazingly sleek and quite pleasing to admire. Since finding tonymacx86.com and building my first Hackintosh, I have wanted to mod a G5 and have my own. There are some amazing things other members are doing with original Apple cases. If you haven't ventured into the Case Mods section of the forums here, you owe it to yourself to take a look around and see what potential the original Apple designs have to become Hackintoshes. Who knows, you may even find yourself building your own Apple case mod.
For the past 3 years, I have been on a Z77X-UD5H, which proved to be an amazing machine for my use, but decided it was time for a full upgrade. To keep the main features of the Apple Power Mac G5 case, it requires the use of an mATX motherboard. I went in search of the most powerful board I could find to fit the bill. My first requirement was that it had to be a Gigabyte board. I have had multiple successes with this manufacturer and did not want to venture off to another companies motherboard. For the purpose of finding a motherboard that would work, I used the tonymacx86 Building a CustoMac Buyers Guide.
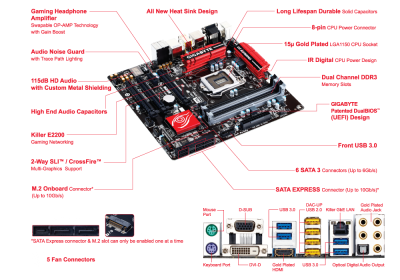
Wanting to take advantage of the Z97 chipset, there were only two options listed. I chose the Z97MX-Gaming 5, over the GA-Z97M-D3H for several reasons. First, for its use of SATA Express, and its on-board M.2 slot, both with data transfer rates of up to 10Gb/s. I also liked its use of the Killer™ E2200 Gaming Network, providing a "high-performance, adaptive gigabit Ethernet controller that offers better online gaming and online media performance compared to standard solutions." The Z97MX-Gaming 5 also utilizes Realtek ALC1150 HD Audio and provides four additional USB 2.0 ports on the rear I/O.
Choosing a processor for this build was quite simple. I wanted the most powerful CPU available, with the ability to OC. For this I chose the i7 4790K. This processor provides for a base clock of 4 GHz with a max turbo of 4.4 GHz. The Haswell, Devil’s Canyon Quad-Core 4.0 GHz LGA 1150 4790K processor utilizes Intel® Hyper-Threading and uses Intel HD 4600 Graphics.
When it came to selection of a discrete GPU, I wanted the maximum amount of performance, for the best price. I feel that the GTX 970 provides this. I have normally used EVGA GPU's, but this time I went with a Gigabyte GTX 970 G1 Gaming. Gigabytes G1 outperforms the EVGA FTW+ GAMING, with its higher base and boost clock speeds and use of 4GB of 256-Bit GDDR5. The G1 provides an additional Dual-link DVI-D port, and also IMO has better cooling, albeit it is over 1.5" longer. The G1 is also slightly cheaper.
For memory I selected 32GB's of 1866 MHz Crucial Ballistix Tactical Elite DDR3. Ballistix Elite modules utilize integrated heat spreaders to showcase one of the best DRAM features available. The Ballistix Tactical Elite is designed for extreme enthusiasts, demanding gamers, and overclockers who want to squeeze every ounce of performance out of their systems. I have always had good luck with Crucial memory, and it comes straight out of the tonymacx86 buyers guide, so I knew compatibility would not be an issue.
For installation of OS X, I chose a 250GB Samsung 850 EVO SSD. I always move my Macs home folder to a larger SSD to provide more room for data and music/video storage, while allowing for quick access to these items. For this purpose, I chose a 1TB Samsung 850 EVO SSD. SSD's have come down significantly in price over the last couple of years; however, the 1TB is still roughly $350, so it may not be for everyone. I have moved to all 2.5" drives for this build, as using the ICY DOCK Dual 2.5" SSD/HDD Mounting Kit allows me to place 4 SSD/HDD drives in just two 3.5" drive bays. I chose the Seagate 2TB 2.5" Internal HDD for Time Machine, while the additional 1TB HDD will be used for extra storage.
Originally I went with a Corsair H80iGT liquid CPU cooler. The H80iGT was not providing me with idle temperatures lower than 37°C and under load it would reach 65°C. Corsairs response was that, since OS X is not supported, I should install WinBlows and their Corsair Link software, to adjust the fan curve. This was not something I was wanting/willing to do, so I looked for a better solution. I chose the Noctua NH-D15S. My temperatures now idle at sub 25°C a reach a maximum of 35°C under load. I found this to be much more to my liking. For this motherboard, you do need the S-version of the NH-D15, as the standard version extends over the first PCI-E x16 slot, while the S-version uses an off-set, asymmetrical layout and a single instead of dual NF-A15 fans. The NH-D15S does provide extra fan clips for installation of a 120mm NF-F12 fan, which when installed provides adequate room for extended height memory modules. I chose to install the NF-F12 for a second fan.
For modification of the Power Mac G5, all parts were purchased through The Laser Hive. I used a G5 mATX 120 kit, Front Panel Conversion, and a custom wiring plate. I used the original Power Mac's PSU housing so the power supply had to be modded to fit. The mods are not for the faint of heart, and you need to be familiar with a Dremel Tool in order to accomplish all the work that is needed.
This was the most expensive system I have ever built, as I have about $500 into the case alone. This includes the purchase of the case $50 plus shipping off of eBay, the parts from The Laser Hive were $235, and all of the custom wiring, sleeving and tools necessary to perform the work rounded out the rest. The cost for all of the hardware came to roughly $2000. So while not cheap, I have a system that will last me for many years and a case that I can use for as long as they continue producing mATX motherboards. I really enjoyed building this, and I am quite proud of how it turned out. I have recently obtained a Mac Pro to mod next.
I plan on using this CustoMac for a host of things. I play a fair amount of CS:GO, do some photo editing for my wife using PhotoShop and edit the occasional video. The Z97 is a real delight to work with and boots to desktop extremely fast, blowing my Z77 out of the water.
Installation
The installation was really straightforward with the latest UniBeast and MultiBeast. They provided me with a quick easy solution, that presented no issues. I have been using Clover for some time and am happy that tonymacx86 has moved to Clover as its standard bootloader. This was the fastest, easiest install that I have ever performed. No boot arguments were needed and I was up and running in under 30 minutes.
Pre Install
After downloading El Capitan from the App Store, you are going to create your UniBeast install media. I recommend the use of a 16GB USB drive. Alternatively you could use an 8GB drive, as long as, after formatting it has the required 7.61GB of free space. Download the latest UniBeast and run the application. Follow tonymacx86's install Guide for El Capitan for instruction on how to create your UniBeast drive.
Bios Settings
First you want to load Optimized Defaults. Here are the highlights of the settings: BIOS is F5. X.M.P is set to Profile 1 (I am using 1866 MHz DDR3, if you are using standard 1600 MHz then this is not needed). SATA is set to AHCI and XHCI is set to Smart Auto. The latter is essential in fixing USB 3.0. XHCI and EHCI Hand-off are both Enabled. Lastly, Intel Processor Graphics are enabled. For non K processors, disable Vt-d.
Installation of OS X
I have written a separate, detailed El Capitan install guide [Guide] Z97MX-Gaming 5, where I outline the exact steps it takes to install and setup El Capitan. If you experience issues with install or need troubleshooting, I recommend posting to that thread. In general you are going to want to follow tonymacx86's install Guide for El Capitan.
Post Install
Post Install procedures will get all of the kexts/drivers installed and get USB 3.0 working properly.
Run MultiBeast 8 for El Capitan and make the following selections:
Drivers > Audio > Realtek ALCxxx > ALC1150
Drivers > Misc > FakeSMC
Drivers > Misc > FakeSMC Plugins
Drivers > Misc > HWMonitor Application
Drivers > Network > Atheros > AtherosE2200Ethernet
Bootloaders > Clover UEFI Boot Mode
Customize > System Definitions > iMac > iMac 14,2
Drivers > Misc > FakeSMC
Drivers > Misc > FakeSMC Plugins
Drivers > Misc > HWMonitor Application
Drivers > Network > Atheros > AtherosE2200Ethernet
Bootloaders > Clover UEFI Boot Mode
Customize > System Definitions > iMac > iMac 14,2

For those of you that want to take the easy route, I have included the El Capitan .mb file, to facilitate that purpose.
While the above MultiBeast screenshot outlines specific versions of kexts/drivers, the .mb file will automatically be updated by MultiBeast to current MultiBeast versions.
For USB 3.0 functionality, you are going to want to download RehabMans, latest FakePCID package here: OS X FakePCID. From that download, you want FakePCIID.kext and FakePCIID_XHCIMux.kext. These can either be installed to Library/Extensions by use of KextBeast, or to your Clover kext folder.
To install the GPU, you need to first install the correct nvidia drivers for your build of OS X. Once you have installed the nvidia drivers, you can then install the GTX 970 and boot into OS X normally.
You may also wish to install AHCI_Intel_Generic_SATA.kext to allow for OS X to properly recognize your Intel 9 series chipset. This is just a cosmetic fix and has no affect on functionality...
One final note for Post installation; If you are installing memory with speeds above the standard 1600 MHz, you are going to want to use Clover Configurator and set the XMPDetection=Yes.
Summary
As I previously mentioned, the installation was very straightforward and quite a breeze. Modding the original Apple G5 case was very rewarding seeing the final product, and David at The Laser Hive, is wonderful to work with. Here is a list of whats working:
- All USB 2.0/3.0 ports. This includes the two USB 3.0 ports from the internal header
- Native PM through use of a generated SSDT, Native CPU/IGPU Power Management
- iMessage/FaceTime
- Sleep/Wake
- Triple Monitors


 Updates
I am currently awaiting delivery of a BCM94360CD Wifi/Bluetooth card and PCI-E adapter. I really have no use for Wifi, as I sit directly next to the router and switch, but I do however desire better Bluetooth functionality than the GMYLE dongle provides.
|
Updated to OS X 10.11.2
December 9, 2015 - Successful update via MAS. Update did not affect USB 2.0/3.0. Audio remained after update |
 |