
- Joined
- Aug 31, 2010
- Messages
- 3,888
- Motherboard
- Asrock Z87E-ITX
- CPU
- i7-4770S
- Graphics
- GTX 760
- Mac
- Mobile Phone
WonkeyDonkey's Reboot Build - Steambox Pro MkII : Asrock Z87E-ITX - Core i7-4790K - 16GB RAM - Sapphire R9 380 Compact ITX (iMac15,1)
Intel Haswell Core i7 4790K LGA1150 84W 4.0 Ghz Processor
http://www.amazon.com/dp/B00KPRWAX8
Sapphire AMD R9 380 Compact ITX Graphics Card
http://www.amazon.com/dp/B00ZGL8EBK
Noctua NH-L9x65 Low Profile CPU Cooler
http://www.amazon.com/dp/B00VB3Y89E
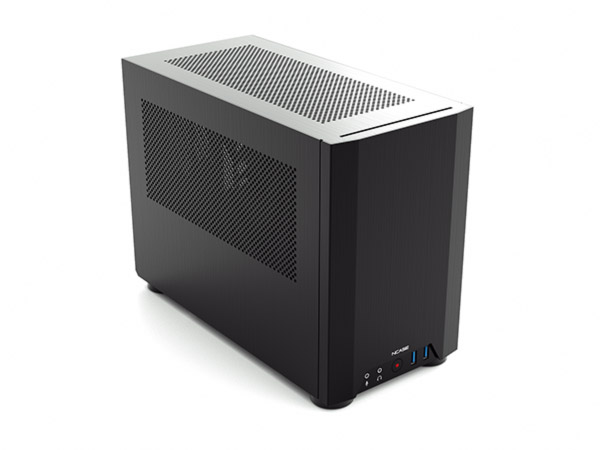
NCase M1 V3 Mini-ITX Chassis
www.ncases.com (Not available on Amazon)
Silverstone 500W SFX-L Fully Modular SFX Power Supply
http://www.amazon.com/dp/B00SD9IORQ
Already Owned
Asrock Z87E-ITX LGA1150 Mini-ITX Motherboard
http://www.amazon.com/dp/B00DPOHIK8
G.Skill Ripjaws Series (2x8GB) F3-2133C9D-16GXH 240-Pin DDR3 SDRAM PC3-17066 (2133)
http://www.amazon.com/dp/B007CZDS64
Sony Optiarc AD-7690H Slot Loading Slimline Optical DVD+/-RW
http://www.amazon.com/dp/B0046YENWM
Samsung 1 Tb EVO Series mSata SSD Drive
http://www.amazon.com/dp/B00HWHVNUU
Apple 27" LED Cinema Display (DisplayPort Version)
http://www.amazon.com/dp/B0043GCBU4
Dell DW1510 Wireless Network Adapter AGN (Broadcom 4322 Chipset)
http://www.amazon.com/dp/B009VX418E
Logitech K750 Wireless Solar Keyboard
http://www.amazon.com/dp/B005L38VRU
Logitech MX518 High Performance Optical Gaming Mouse
http://www.amazon.com/dp/B0007Z1M50
Comments
This system is an update to my original Steambox build, details of which can be found here. I have posted this as a different build due to the number of core components which have now been updated.
For those who looked at my original Steambox build linked above, you will know how much a fan I am of the Steambox as a concept in general. Small, powerful, can be used as a gaming system as well as a regular PC, and not look out of place in your living room. This is a concept I am still very much in favour of, but I decided it was finally time to update the original.
My design goals were identical; that is small, quiet, powerful, and rock solid as a hackintosh build.
First thing to update was the CPU. Apple have released the 5K iMac systems with those beautiful retina screens, and of course the 4790K processor as an option. I always try and match my hardware as closely as possible to the chosen mac hardware profile; the 4790K was the obvious choice here and with a stock speed of 4 Ghz and a reduced TDP of 84W this was a clear winner.
On the back of this I next needed to think about the CPU cooler. My original Noctua low profile model did a great job on the 4770S, but it was only rated for a maximum TDP of 65 watts so wasn't suitable for the new processor. I've always had good experiences from using Noctua coolers, so I turned to their product line again.
This time I found a brand new low profile cooler which had only just been released; the NH-L9x65. This is 65 mm tall so whilst it is low profile, it will not fit in all itx cases. This keeps the new CPU cooled with ease and once again has a very slow moving and completely silent fan. The average RPM at idle is around 900 on this build; very quiet indeed!
My new graphics card was a step outside of my normal comfort zone. I've always preferred nVidia because in my experience they run much cooler, give good solid performance and as hackintoshers, we have the added benefit of nVidia releasing regular updates to their graphics driver package for the mac.
This created an issue because the iMac15,1, which this build is modelled after, switched to AMD for its graphics and that meant hunting for a suitable replacement. There is a hack detailed on the forum where you can make an nVidia card work with this build, but I didn't want to go down that route.
After reading lots of reviews of AMD cards, I opted for the R9 380 Compact ITX from Sapphire. The reviews on it were ok but not spectacular, so this was a gamble. The key points for this GPU is that it is clearly aimed at itx builds with its diminuitive size. It uses just a single 8 pin power connector located on the end of the card instead of the top edge which helps with internal cabling. The outputs include 2 x mini-displayport connectors and 1 x HDMI; perfect for my Apple Cinema Display without using adaptor cables.
Much to my relief this card works OOB, no special boot flags or exotic setup requirements, and it is absolutely whisper quiet. The fan rotates all the time, but at such a slow speed, you have to physically look at it to check it is on. I'm also pleased to find this card runs very cool. There is a small blue led on the edge of the card; which signals it is powered up I found out this is a dual bios card, legacy & UEFI/GOP; the blue led is actually a switch to enable one or the other. The gamble had paid off.
The chassis was the next challenge. I swapped my original a couple of times in the end but never found one I was 100% satisfied with. Having looked at lots of forums again, I saw time after time of folks discussing the NCase and how good it was. This made sense when I looked into it because the original design was done by community members and then sent for production. It has gone through a couple of revisions and is now on Version 3. The size of this case is good for a mini itx build. It is just under 25cms tall, around 30cms deep and at 16cms wide, the dimensions looked ideal for what I wanted. Even at this size, it accommodates a slimline optical drive, loads of SSD's if you need them, space for lots of fans, and enough room for a full size PSU with all of its cabling. In hindsight the only thing I would change is to get the silver one instead of the black one I ordered. It has a very neat and understated appearance; great for its intended living room location.
The final part of the jigsaw was a power supply. I could have used my original Corsair AX model, but that would have left much less room inside the chassis, which was designed for SFX power supplies. The new kid on the block here is the Silverstone 500W SFX-L. This was highly anticipated by the community for some time; it is slightly bigger than SFX but this allowed Silverstone to fit it with a quiet 120mm fan instead of the 80mm fan you would find on a standard SFX unit. Silverstone did a great job with this; the fan is whisper quiet, and much like my older Corsair, it only spins up when a certain load point is passed. This rarely happens on this build so the fan is all but silent.
The remaining parts of the build; motherboard, ram, wifi chip, optical drive etc are all well tested components that work 100% with OSX.
The only consideration I have not progressed is the possibility of a much higher resolution display. My cinema display has a brand new replacement LCD panel which I fitted myself, having sourced it from overseas at a good price; it is the original LG IPS panel used by Apple.
MultiBeast Configuration (OSX Yosemite)

The setup is simplicity using Unibeast/Chimera/Multibeast. Internal HD graphics are disabled, and both IGPEnabler and GraphicsEnabler are both set to No.
As with all my builds, I took some time to put together org.chameleon.boot.plist and smbios.plist. These were optimized for the iMac15,1 profile and my hardware; I then copied these to the USB install key prior to booting into the installation.
Once the install is complete, we then follow this simple guide to setup the boot files in the EFI partition. This is needed so that the AMD graphics card operates correctly at boot time.
I then completed the install configuration with correctly edited DSDT and SSDT files.
Following the install, I tweaked a little to change the machine name, memory, and added the correct SMC version in System Profiler.
iMac15,1, DSDT, SSDT, Configuration
This aspect of the setup deserves a little extra explanation. The iMac15,1 (Retina iMac) with the 4790K has its power management in native firmware instead of in OSX itself. We can get all the P-States and C-States working though. To do this I looked at every aspect of the system configuration :
DSDT
Although not strictly necessary in newer builds, I always setup a fully working DSDT. That involves extracting the native DSDT using MacIASL, cleaning up the initial error messages, patching it to make HDMI audio work, patching it for USB power and to correctly show the 8 Series USB Controller, and a minor tweak to prevent unnecessary sound assertions in the system log.
SSDT
This is created using ssdtPRGen.sh. You can do it in one of two ways; let it automatically detect your CPU type and system definition using auto detection -or- specify the exact settings using command line flags with the tool. I used the first option having set my system definition to 15,1. You can then open the SSDT file using MacIASL; you will see the all important information regarding CPU type, frequency, TDP, turbo states and frequency. This is all important stuff; check yours and make sure it matches correctly for your CPU. If you dont get this bit right, you will struggle with power management and cpu detection. If it doesn't look right, then ask for advice in the forums.
smbios.plist
This is a small file where you can define your system definition; you can select from several in Multibeast and it will install an smbios that reflects the chosen defintion. I created my own for this build; you can find a copy attached but without my serial number. You can use this for a 15,1 build, but you will need to add your own serial number first. An easy way to do this is to search for and download 'Clover Configurator' which can generate one for you. In the attached smbios file, simply replace 'SOMESRLNUMBR' with your newly generated serial and you're good to go.
org.chameleon.boot.plist
My advice here : less is more. Don't needlessly add option after option unless you are sure it is needed. Do not add anything relating to P or C state generation. You can see mine in the attached zip file. Make sure you have the DropSSDT option set in here too.
AppleIntelCPUPowerManagementInfo.kext
This is a great tool for checking current power management on your system. It does this by reporting the necessary information in your system log, which you can then look at to confirm whats happening. Make sure to download version 4, which can be found in the first post of this thread. Its towards the bottom. Example output is shown in the images below. Note that you may need to leave your system booted for a while to get all of the P-States to show.
System Bios
This is another key area you must get right. Turbo states should of course be available, as well as EIST (SpeedStepping), Turbo Boost, Multi Core Enhancement. XMP should also be enabled. A single setting missed in your bios could mean power management not working at all, so take your time to get the optimum settings. A lot of modern bios provide an option to save your current settings as a profile, so use this once you have optimal working settings. Then if something should go wrong you can go back to a known working setup.
If you get all of the above configuration items right, then you should be able to get power management working.
One final point of note : I am using an AMD graphics card, since that is what Apple uses in the Retina iMacs. If you want to do a 15,1 build with an nVidia GPU, it will probably not work correctly. You can find a possible workaround here.
System Images
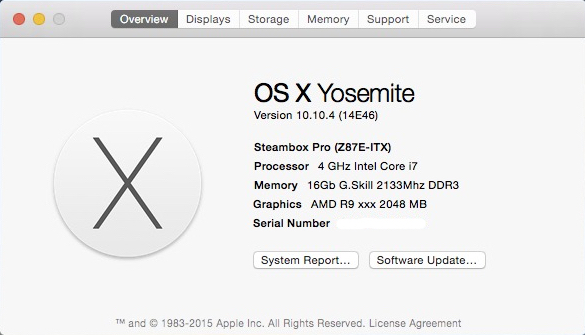
About This Mac :
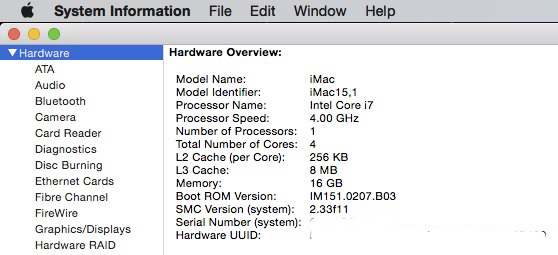
System Profiler :
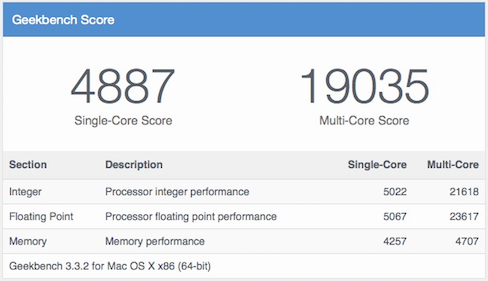
Without overclock :
With overclock :
Power Management :

About This Mac :
System Profiler :
Without overclock :
With overclock :
Power Management :
Final Considerations
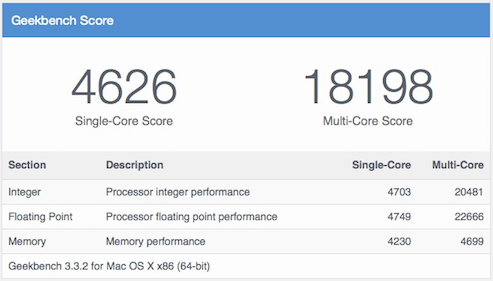
Despite being a 'K' model processor, I have no plans to overclock it in the long term. I favour stability over performance. The geekbench figures show good performance though.
The system bios is now tweaked to power sipping levels.
The overall sound of the system is completely silent; I'm very pleased about the end result this way as this system sits in my living room.
Thanks to resident mod Toleda for the helping hand to get power management sorted out.
Attachments
Last edited by a moderator:
")