
- Joined
- Nov 17, 2009
- Messages
- 7,366
- Motherboard
- Z370N WIFI
- CPU
- i7 8700K
- Graphics
- HD 630
- Mac
- Classic Mac
- Mobile Phone
CustoMac Mini 2013
GA-H87N-WIFI - Core i3-4340 - Intel HD 4600

ComponentsGA-H87N-WIFI - Core i3-4340 - Intel HD 4600
Gigabyte GA-H87N-WIFI
http://www.amazon.com/dp/B00D94X4DO/
http://www.newegg.com/Product/Product.aspx?Item=N82E16813128626
Intel Core i3-4340
http://www.amazon.com/dp/B00EUUPKB0/
http://www.newegg.com/Product/Product.aspx?Item=N82E16819116944
Apex MI-008 Case (w/ 250W Power Supply)
http://www.amazon.com/dp/product/B001H0BA24/
http://www.newegg.com/Product/Product.aspx?Item=N82E16811154091
Comments
History of the CustoMac Mini.
Every year we spec out a mini-ITX hackintosh with a Core i3 and working HDMI audio. They're great for any uses- mini server, desktop workhorse, HTPC, the list goes on. First it was the CustoMac Mini 2010, with a Gigabyte H55N-USB3 motherboard and NVIDIA GT 240. Next, the Sandy Bridge CustoMac Mini 2011 had a Gigabyte H67N-USB3 motherboard and fully functional Intel HD 3000 graphics. Last year's Ivy Bridge CustoMac Mini 2012 was built using a Gigabyte H77N-WIFI or Z77N-WIFI and ran the integrated Intel HD 4000 graphics.

This year's Haswell CustoMac Mini 2013 is almost identical to last year's motherboard. The H87N-WIFI and Z87N-WIFI contain Realtek ALC 892 audio, dual Atheros and Intel ethernet jacks, and HDMI, HDMI, DVI video port layout. Four sata ports onboard makes it far more expandable than the NUC or the BRIX. It's also got a desktop cpu instead of a mobile one.

Installation Notes
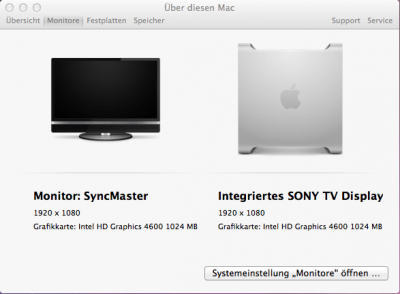
As of Chimera 2.2.1, all ports work independently and in tandem. HDMI/HDMI/DVI. Bluetooth 4.0 works great, all USB3 ports function. All audio ports function.
For Haswell, you MUST update your Mountain Lion App to 10.8.5 before attempting the UniBeast 10.8 Installation Guide. Procedure was exactly the same as Ivy Bridge. I used a SSD connected to SATA0 and a HDMI cable connected to LG 1080p monitor. OS X Mavericks 10.9 Installation is the same as any other system- no flags necessary.
Note on Mini PCIe card:
Although the board contains a dual bluetooth/WIFI card, WIFI does not work in OS X. There are not any drivers for it. Bluetooth 4.0 portion of the card works perfectly. To view some replacement mini-PCI cards that do work, check this post out: http://www.tonymacx86.com/network/104850-guide-airport-pcie-half-mini-v2.html
Note on HDMI Audio:
HDMI Audio is now achievable using the method discovered by Piker Alpha and documented by toleda. It's necessary to apply a patch to the Azul framebuffer kext, use SSDT or DSDT injection, and use one of the most recent AppleHDAs from MultiBeast 5.5.3 or newer. Full details here: Haswell HDMI Audio
EDIT: IF YOU HAVE ISSUES BOOTING UNIBEAST INSTALLER USING CORSAIR VENGEANCE RAM, REMOVE ONE RAM STICK FOR INSTALLATION PROCESS. THIS IS AN INCOMPATIBILITY WITH OLDER RAM.
UEFI Settings
1. To access UEFI Setup, press and hold Delete on a USB Keyboard while the system is booting up
2. Set to Optimized Defaults.
3. (Optional) Set X.M.P. Memory Profile to Profile1
4. If your CPU supports VT-d, disable it
5. Save and exit.
MultiBeast Settings
This board is very simple to setup as there is no need for a DSDT. Here are the simplest settings for MultiBeast post-installation.
For OS X 10.9 Mavericks: MultiBeast 6.0
MB Config File: View attachment CustoMacMini-DSDT-Free.mb

Screenshots and Benchmarks

10.9 Mavericks


10.8.5 Mountain Lion


Helpful Links:
Gigabyte GA-H87N-WIFI Product Page
Intel Core i3-4340 Spec Page
Simplest OS X Installation Guide
Install Mac OS X 10.6 Snow Leopard on Haswell Based PCs
Install OS X 10.8 Mountain Lion on any Supported Intel Based PC
Install OS X 10.9 Mavericks on any Supported Intel Based PC
Haswell HDMI Audio
Thanks for reading my build description!
Just wanted to quickly write that first of all this might be the simplest setup of this particular build, and by no means is it the only way it can be done.
Feel free to make general comments here, but please note that I will most likely not be able to keep up with specific questions. If you have problems using this setup, please create a topic in the Installation section of the forum.
")