jaymonkey
Moderator
- Joined
- Aug 27, 2011
- Messages
- 4,080
- Motherboard
- GB Z490 Vision D
- CPU
- i9-10850K OC @ 5.2 GHz
- Graphics
- RX6800-XT+UHD630
- Mac
- Mobile Phone
| Sony Vaio SE-2 Laptop / MonkeyBook Pro Clover and OS X - Yosemite Update Guide |
|
|
 |
 |
Overview
This guide is a follow on to my previous Mavericks Install Guide and although specifically written for use on a Sony Vaio SE2 (VPCSE2C5E) laptop (see my original guide), it should work on Sony SA / SB & SC VAIO S series laptops as long as you have a stable DSDT and a working kext for your trackpad if it is not a Synaptics one.
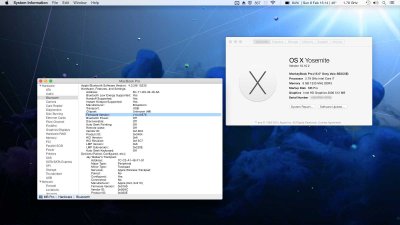
There are many guides on installing Clover and Yosemite on this and other forums, however I found none of them worked with the Sony SE2 laptop, most of the issues seem to be down to limitations imposed by the Insyde-H20 BIOS which the first and second generation Sony S series laptops use.
I was not able to get Clover to work correctly in legacy mode no matter what boot and disk configuration I used, the only way I was able to get Clover working correctly was in a hybrid EFI mode, unfortunately almost all official Sony S series BIOS's do not support UEFI booting and those that do will only boot white-listed EFI files. In order to negate these problems you must flash your BIOS with a modified BIOS that allows for Hybrid EFI boot support and access to the normally hidden ‘Advanced’ menu.
It's possible that this method of installing Clover may help others with laptops other than Sony Vaio 'S' that use the Insyde H20 BIOS - as long as you can find an updated/modded BIOS that enables UEFI booting it should work (the attached BIOS utilities and ROMS are for Sony S series only !!) however there are no guaranties and i'm not responsible for any data loss or hardware problems you may encounter by using this guide.
Objective
My main goal for this new build was to switch to using Clover as the boot-loader, primarily because it has much better support for injecting NVRAM values over legacy based boot-loaders, however Clover offers many other useful features such as dynamic kext patching at boot time allowing the use of Native / Vanilla Apple kexts which means that you can update the OS and all the laptop devices should continue to work without having to re-installing custom or modified Kexts.
 |
 |
I recommend starting with a working Mavericks build (as detailed in my first guide). Getting the system to boot via Clover is one of the hardest parts of this new build and took me a long time to find a working solution. As such it's easer to start with a OS X version that is stable rather than fighting/debugging multiple problems caused by a new boot loader and a new version of OS X.
You should be aware that if you switch to using Clover in EFI mode you will no longer be able to boot other OS’s such as Windows and Unix without first converting them to EFI booting, After a fair bit of research (and trail and error) i have a reasonably straight forward method of converting MBR partitioed drives to GPT without having to reinstall Windows which i will document in a later step, for the moment if you need to boot Windows or Linux you can access them via booting your laptop in legacy boot mode with a Unibeast/Chimaera based USB drive and selecting the legacy partition/entry.
Before starting ensure you have full backups of all your OS’s and data. As per my Mavericks guide I recommend installing OS X on a SSD connected to the primary SATA connector (replacing the factory fitted HDD). I replaced my optical drive with a caddy containing a 750GB Hybrid (HDD/SDD) for running Windows (7 & 8.1), Linux and storing large amounts of data. If you have a similar setup I recommend removing the secondary drive during this update process - just to be safe.
If you find this guide useful please be sure to click on the 'Recommended' button at the top of this page which should help others to find it.
Method
This is an in-place update to a working Mavericks build (see Original Guide) Since the Mavericks install is so solid I opted for an OS X update rather than a clean install - some purists may say that a clean install is better with a major version change but in the case of Yosemite I found the update to be more stable than a clean install.
It's already been established that there can be issues with a clean install of OS X 10.10.0 especially with wifi and bluetooth - Since the Mavericks build on the Sony was so stable (IMO) I believe that some of these Yosemite issues can be avoid by updating Mavericks rather than a clean install. Most of the OS X configuration plist files it will updated rather than creating them with default values.
I'm sure there are plenty of other ways to get Yosemite working on the Sony S series laptops , this is my method which has resulted in a very stable and usable build, If you choose to follow my method and have issue's i'll do my best to help you, however I can not provide help if you choose to use another method, that said you may find some of the steps and configuration's useful in getting your own build to work.
Tony & MacMan have released Yosemite specific versions of Unibeast and Multibeast and recently a new version of FileNVRAM has been released which also works with Yosemite (see the iMessage guide for news) so if you don't want to go the Clover route you may want to try that - it should work using the same method as the Mavericks install and result in a basic build of OS X Yosemite working - after that you'll have to do your own investigations it to fixing and enabling the remaining device issues (Audio, frame-buffer, BT, WiFi ..etc). It was for this reason I choose to the Clover route and use dynamic kernel/kext patching ensuring longevity of the build - it survived the 10.10.1 Combo update intact so it should be good for the life of Yosemite.
Note: If you have been attempting to install Yosemite on a Sony 'S' Laptop and want to follow this guide step for step then I recommended restoring your Time Machine or clone backup of your Mavericks build and starting from scratch.
Tools & Software Required
- BIOS Flashing and Backup Tools (Attached)
- iMessage Debug V2 (Attached)
- A working Windows install for BIOS programming
- A Working OSX Mavericks Install (See Main Guide - Post #1)
- Semulov Disk Utility (Download Link)
- OS X Yosemite 10.0.0 Installer (downloaded from the App Store)
- Unibeast USB OS X Yosemite Installer (see step 2 of Tony's guide)
- Show all Files Utility (Download Link)
- Text Wrangler (Download Link)
- Latest Standalone Clover Installer (Download Link)
- Latest Clover Configurator Installer (Download Link)
- Sony S Series - Basic Clover Config.plist (Attached) - Updated !
If you do not do this you will be unable to boot OS X from the Yosemite Unibeast USB Installer.
Status of this Build
Whats Working:-
- Internal Intel HD3000 GPU and Display (QI/CE)
- Internal ALC275 Audio (Internal Speakers & Microphone, Line-Out)
- Volume and brightness control keys
- Gigabit Ethernet
- HDMI Video & Audio
- VGA Output
- Sleep & Wake - including lid close and power button support
- Touchpad (Synaptics)
- Intel CPU Speedstep
- 2Ghz & 5Ghz A/B/G/N/AC WiFi (using AW-CE123H mPCIe Card)
- Bluetooth 4 LT (using AW-CE123H mPCIe Card)
- Yosemite Handoff & Continuity
- USB 2 & USB 3 ports
- Internal Webcam (Fixable)
- Dual Battery Monitoring (Maybe fixable)
- Internal SD Card Reader (Fix not Possible)
- AMD GPU (Fix not Possible)
Multi-Battery Support: Apple seems to have dropped kernel support for monitoring multiple batteries in Yosemite, its not really an issue and can be worked around (will be detailed later in this guide) - It maybe possible to get batter multi-battery monitoring via some custom DSDT code but again its not a priority or me.
SD/Memory Stick reader: Unfortunately this is a PCI device that is currently unsupported, a working Linux driver does exist so in theory it would be possible to port it over but it requires good programming knowledge of OS X IOkit - something i don't have time to delve into right now.
AMD/ATI GPU: Sony have implemented a hybrid GPU switching mechanism using a physical switch and windows drivers as such OS X is unable to use the discrete GPU - this should be disabled in your DSDT which was covered in my Mavericks guide.
Caveats/On-Going Issues:-
Occasionally the system will suffer display corruption (blocking) on the internal display - this appears to be a common issue with all laptop systems that have a Intel HD3000 GPU and running OS X Yosemite. A reboot or SMC reset resolve's the issue - Update: Seems to be much improved with 10.10.2.
Very rarely the system will fail to wake up from sleep, maybe 1 in 50 times resulting in a black screen and the fan running flat-out - the only resolution is to hold the power button down until it powers off and then restart the system - Update: Appears to have been fixed in 10.10.2 (RTC Alarm issue).
Despite the above two issues the system is very stable and usable, and neither cause any real problems other than the in-convenance of having to reboot the system
As with the Mavericks build, battery life is much shorter than when running windows and the fan may kick in more often when performing CPU intensive tasks however this can be reduced somewhat by using a custom SSDT and adding the Sony 'Sheet Battery'.
Pre-requisites:-
This guide assumes that you are booting OSX Mavericks from a SSD/HHD connected to the primary SATA port of the laptop, and that the drive is using a GUID/GPT partition scheme and has a EFI partition.
Additionally this method will migrate your existing OS X System ID's such as S/N, SmUUID, MLB & ROM from injection via FileNVRAM and your legacy boot-loader to Clover's superior built-in NVRAM support. If you've never used iMessage then you've probably never setup your MLB & ROM ... if so then you may first want to read Part-1, Step-5 of my iMessage Guide and set the MLB and ROM values as outlined in Step-5d of the same guide. Once you've done this make a new system backup ... doing this it will ensure that if you decide to go back to Mavericks and a legacy Boot-loader your system ID's will be consistent.
Before starting you must update the following 3rd party kexts to the latest versions :-
- Touchpad/Keyboard (Download Link)
- Battery Monitor (Download Link)
- Fake SMC (Download Link)
Note: If your system has a touchpad that is not Synaptics such as Alps then you'll have to do a bit of internet searching and find a compatible kext, there seem to be many Alps variants/versions so be sure to know what yours is and ensure that any new kext supports it.
You should also update any kexts that are needed for your WiFi and Bluetooth devices, if your using the AW-CE123H then ensure you have the latest versions of :-
- Toleda's Airport enablers (GitHib Link)
- EMlyDinEsH's Bluetooth Firmware Uploader (Link)
Update - 27th Feb 2014: I have created and attached a Zip archive containing all the updated additional 3rd party kexts that i am using on my Yosemite build. If you are starting with a clean build or don't know which 3rd party kexts and/or versions to use then this may help you. The 'Common' folder contains everything except the WiFi & BT kexts, the folder 'AW-CE123H' contains all the kexts you need if your using AW-CE123H WiFi 7 BT card.
Always install/update kexts using 'Kext Utility' or 'Kext Wizard'
| Step-1: Updating the BIOS |
Warning: If you decide to follow this step and perform the BIOS update, under no circumstances should you alter any of the GPU settings in the Advanced menu - specifically the option to set the GPU to PEG, if you do, you run a very high risk of bricking your Sony Laptop for good - this is a well documented issue (see Sony SE forum here), however as long as you heed this warning and follow this guide carefully you should be fine - but I take no responsibility for any damage you may incur to your hardware and/or software and/or data by using this guide.
Flashing a BIOS can always be risky - especial on laptops so only continue if your confident. The attached archive ‘Sony Laptop BIOS Tools' contains all of the tools, scripts and ROM binaries you will need.
Unfortunately these BIOS utilities can only be run under Windows (7 or 8.0/8.1), if you don't have a multi-boot system then hopefully you still have a clone or backup of the factory installed Windows system - if not you'll have to use the recovery disks and install it on a temporary drive.
Once booted into windows download and extract the attached archive, navigate to the extracted archive and open the file 'ROMS_info.txt' in notepad - scroll down to the compatibility list and ensure that your laptop model is in the list ...
Once your happy that your Laptop is supported then you should disconnect from the internet and temporally disable any antivirus software that may interfere with the BIOS flashing procedures, close all un-necessary programs and make sure your running on AC power - you don’t want your battery running out while performing any of these BIOS procedures.
Before we flash the new BIOS I recommend that you make a backup of your existing BIOS ...
Open Windows explorer at the location you extracted the archive ‘Sony Laptop BIOS Tools' archive and navigate to the sub-folder called ‘BIOS Backup’ - right click on ‘dump_BIOS.bat’ and select 'Run as Administrator’ - follow the on screen instructions to make a backup of your current BIOS, although it should be unnecessary it's always good practice to have a backup plan if things don't work out later. Once you have a backup of your BIOS (named XXXXX.ROM) copy it into the 'ROMS' sub-folder in the Muti-BIOS-Flash folder so you can easily access it via the flashing tool should you need to.
Now your ready to flash the BIOS, navigate to the sub-folder ‘Multi-BIOS-Flash’, right click on the file ‘_LOAD-BIOS.cmd’ and select 'Run as Administrator' and follow the on screen instructions.
Important: The only BIOS version that supports all the features we need is 'R2087H4-HACK' - enter this file name (without quotes and a extension) when prompted and let the flashing utility do its job, do not interrupt the system during in the BIOS programming procedure.
If all goes to plan you should get a success prompt from the flashing utility and a message to reboot.
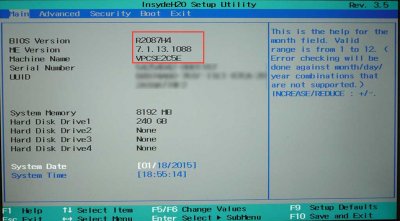
Reboot your laptop and enter the BIOS (press F2 at the VAIO boot screen) and check that the BIOS version is R2087H4 and the ME is version 7.1.13 (1088) as below.
If all looks correct with the version numbers, navigate to the 'Advanced' menu and move down to the 'IDE Configuration' sub-menu, ensure that the 'IDE Controller' is 'Enabled' and set 'HDC Configure As' to 'AHCI'.
Note: My previous OS X builds used a legacy boot-loader (Chimera or Chameleon) which was able to switch the disk controller to AHCI mode using a DSDT patch but that only worked once the OS X boot-loader kicked in. Sine we're booting Clover as a EFI tool, we need the disk controller in AHCI mode prior to loading Clover so it can see/access all EFI booted OS's.
Optional: If you have replaced your optical CD/DVD drive with a caddy containing a HDD or SSD you can disable the secondary SATA Port 'HotPlug' Option - this is not a requirement but it helps to identify the HDD/SSD in the caddy as a built-in drive rather than a removable one to Clover and OS's.
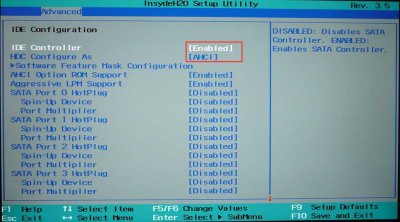
BIOS - Disk Controller Settings
Leave all other BIOS settings as they are for now and navigate to the 'Exit' menu and Save/Exit the BIOS, boot back into OS X and any other OS's you have installed and check functionality, you may notice Windows updates a few low level kernel drivers which is normal ... but other than that, the new BIOS should not effect anything else and your existing OS X Mavericks, Windows and Linux install's should all continue to work as normal.
| Step-2: Installing Clover |
Important: If you have moved your /Extra folder and legacy Boot-loader to the EFI partition then you must move them back to the Root of your OS X startup drive before continuing, since we will be replacing the EFI Partition with the Clover boot-loader, If you want to have a recoverable backup that will not get in the way of Clover then i suggest you do this first and make a new, clean backup.
Important: Ensure that you have a working/bootable UniBeast USB installer before continuing - either Mavericks or Yosemite will do - since we will be removing the existing Legacy boot loader you need to make sure you can boot your laptop if things go wrong during the Clover install and configuration. Remember - this is your Get-Out-of-Jail card - if anything goes wrong this will be your fail-safe solution for booting your laptop.
Once you've completed all the prep work, boot into your existing Mavericks install .... you should first make a backup/copy of all your critical System ID's - the easiest way to do this is to download and run iMessage Debug V2 (attached) - If you want to know more about this utility see my iMessage Guide and jump to Part-1, Step-5d :-
http://www.tonymacx86.com/general-help/110471-how-fix-imessage.html
Although there are currently issues with running iMessage its still worth using the same system ID's for Clover's configuration so that any licensed software and existing iCloud accounts remain working without issues - simply run iMessage Debug V2 (double click on it in Finder) from from the location you extracted it to and answer 'Y' to the option to create a output file :-
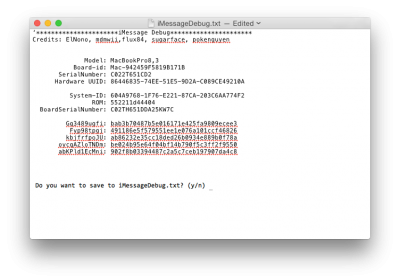 We'll need these ID's a little bit later, but for now just remember the location of the output file (iMessageDebug.txt), now using the links in the 'Tools & Software’ section do the following :-
- Download and install the Semulov utility
- Download and install Clover Configurator
- Download and extract the Standalone Clover installer
- Download and extract iMessage Debug V2 (Attached)
- Download and extract the archive 'Config (sony_basic).zip' (Attached)
- Download and extract the optional Clover MonkyBook Theme (Attached)
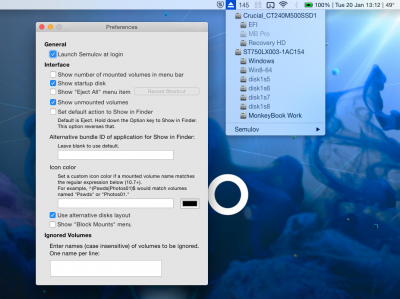
If you want you can remove the default OS X 'Eject' icon by simply holding down your command key and dragging it off the menu bar - Semulov has the ability to eject an optical drive if you have one (even if its USB attached) so there really is no need for the OS X Eject icon to be on the menu bar and having two just looks odd and confusing.
NOTE: It's not essential to install/use Semulov but we will be mounting and dismounting volumes quite a few times during the update procedure so its really handy to have that feature available on the menu bar and you wont need to keep entering your admin password each time you do it. Alternatively you can mount and dismount volumes using terminal commands or you can use Clover Configurator's 'Mount EFI' option in the 'TOOLS' section but you'll need to enter your admin password each time:-

Before we can install Clover we need to prepare the EFI Partition, Open terminal and list your disk volumes by entering ‘diskutil list’ and press enter, double check the disk number and partition number of the EFI Volume on your OS X Startup Disk, in almost all cases it should be ‘disk0s1’ :-

Re-format the EFI Partition to FAT32 by entering the following command and pressing Enter :-
Code:
sudo newfs_msdos -v EFI -F 32 /dev/rdisk0s1 [COLOR=#ff0000]<— Replace with correct ID[/COLOR] Now we're ready to install Clover, navigate to the folder you extracted the Clover installer to and double click on the installer (Clover_v2k_rxxxx.pkg), click on Continue until you get to the Following Screen :-
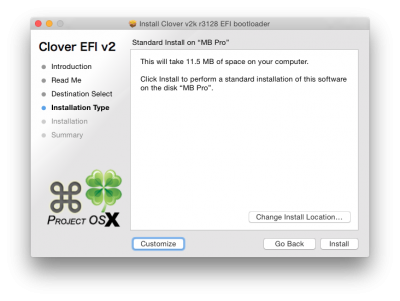
Click on 'Change Install Location' and select your OS X Volume / Startup Drive :-
 As you can see from the above image, my OS X Startup Disk is called 'MB Pro', you should select / highlighted the correct drive on your system and click on 'Continue' which will take you back to the previous screen. Click on the 'Customize' button and set the install options, take your time and ensure that only the options below are checked :-
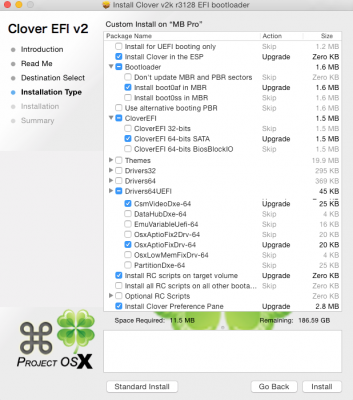
If this is the first time you've run the Clover installer then the 'Action' against each option will be 'Install', subsequent running of the Clover installer will show 'Upgrade' - as in the above image. The Clover Installer usefully remembers all your selections in a plist so next time you run it everything should already be selected for you.
Note: This configuration is known as a Hybrid EFI install, Clover is installed on to the EFI Partition of your OS X Startup drive and is booted by the updated BIOS - note that this is not a pure UEFI install as the Insyde H20 BIOS does not fully support it., take particular care that the following OS X Boot-loader file is selected :-

This was the only Clover install configuration that worked for me, if your system is a 7 series chipset with Ivy bridge CPU then you may have better luck using one of the alternative Clover/Boot-loader install methods but none worked for me and if you do i can not advise/help on any Clover issues you may encounter .... once your happy that your selections are correct click on 'Install' and accept any requests to continue, once the installer has finished you can close it - Do Not Reboot your system.
Now we need to make a few changes to the basic Clover install, first mount the new EFI Partition by clicking on the Semulov 'Eject' icon in the menu bar, you should see all the disks and volumes in your laptop. click on the 'EFI' partition on your startup drive:-
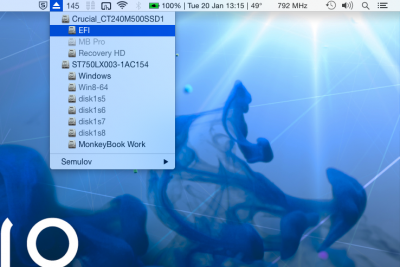
Note: Any disk that is formatted as GUID (GPT) will always have a hidden EFI partition on it, not just the OS X Startup disk, its part of the GUID standard so don't be alarmed if you see more than one, its normal.
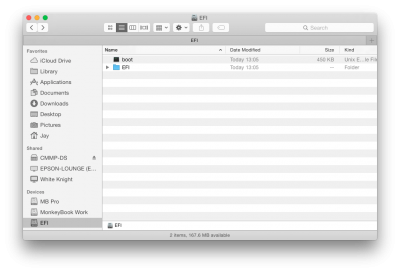
The EFI Partition will be mounted and now show up in Finder, Select the 'EFI' Volume :-
 |
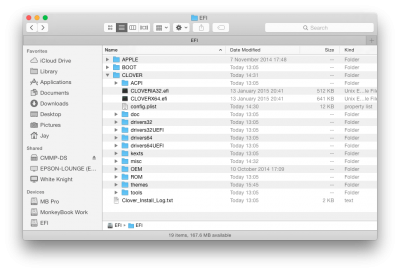 |
You should see a file called 'boot' and a folder called 'EFI' (see Left image above) if you don't see the 'boot' file then you've made a mistake during installing Clover, go back and check your selections. Open the 'EFI' folder and you should see a 'Clover' folder - this is were we will be doing most of the manual changes (see Right image above).
If the folder/file structure looks ok copy your existing DSDT.aml from the /Extra folder in the root of your OS X Startup drive to the following location on the mounted EFI Partition :-
Code:
[B]Folder Location:[/B] /EFI/CLOVER/ACPI/patched WARNING: Do not copy/use your existing SSDT if you have one, I found that using my existing SSDT caused boot KP issues, once you have your system running well using Clover to generate the SSDT, you can try generating a custom one using the latest SSDT generator scripts, although i've seen no benefit from doing so and have gone back to Clover.
In finder go to the sub-folder at the location where you extract the attached archive 'Sony S Series - Basic Clover Config.zip' and copy the file called 'config.plist' to the following location of the mounted EFI Partition - replace/overwrite the existing/default config.plist :-
Code:
[B]Folder Location[/B]: /EFI/CLOVER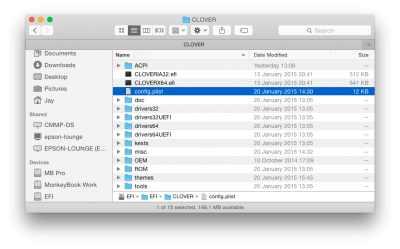
Replacing the existing config.plist file with the one from this guide
If you want to use my MonkeyBook Clover Theme (see the image at the top of the guide) then copy the entire sub-folder called 'MonkeyBook' from the location you expected the attached archive 'MonkeyBook-Clover-Theme.zip' to the following location :-
Code:
[B]Folder Location:[/B] /EFI/CLOVER/themes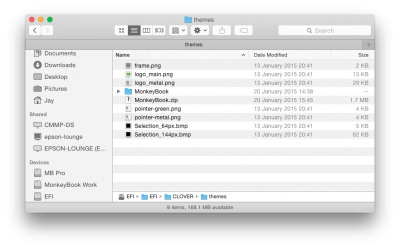
Adding the MonkyBook Clover theme
It seems each time you run any recent version of the Clover installer it automatically installs two fairly awful looking seasonal themes called 'christmas' and 'new-year' in addition to the default 'green' one, since file space is at a premium on the EFI partition I recommend that you delete these and any other unwanted themes by moving each themes sub-folder to the trash - do not delete any files in the themes folder.
Now it's time to make the first set of customisations to the Clover Config file, first open the iMessage debug file you created earlier in Text Edit :-
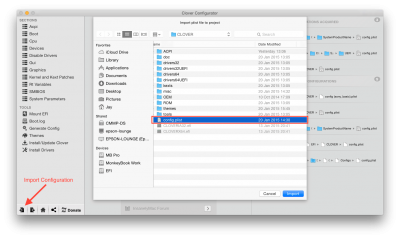
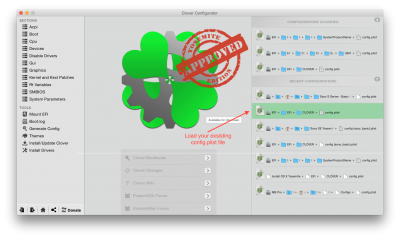
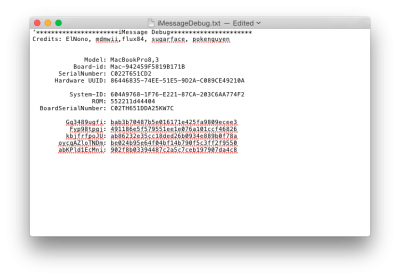 Start Clover Configurator, since we already have the 'EFI' Partition mounted we can go straight ahead and import the new config file. Click on the 'Import' icon (Lower left corner) and select 'config.plist' - the one you just moved/replaced on the mounted EFI Partition :-
Code:
[B]Folder Location:[/B] /EFI/CLOVERClick on the blue 'Import' button ..... Clover Configurator will load the config file and then display the first Clover options page (AHCI) of the 'SECTIONS' list.... don't change anything here for now.
Note: On subsequent running of Clover Configurator you'll be presented with a list of recent configuration files on the Home' screen, so you can simply select that in the future. Remember - the 'EFI' Partition must always be mounted when working with Clover Configurator. If you don't use the Semulov menu utility Clover Configurator will warn you that there is no 'EFI' Volume accessible and offer to run it's own 'Mount EFI Partition' tool which will require you to enter your admin password.
Next select the 'Boot' options page and enter the name of your OS X Volume in the field 'Default Boot Volume', mines is called 'MB Pro'. This config file is set to automatically start/load OS X after a 3 second pause on the Clover Menu .... for the moment we want to temporally disable that option so we get a chance to check Clover on the next boot so also check/select the option '-1' next to 'Timeout' value.
Later, once your happy that Clover is booting correctly and OS X is working, you can uncheck this option and adjust the 'Timeout' value to whatever you want :-
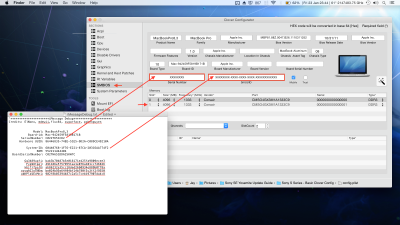
Next select the 'SMBIOS' page and set 'Serial Number' and 'SmUUID' to the values 'SerialNumber' and 'System ID' in your iMessage Debug output file - ensure that all letters are entered as capitals :-
The config file is set for a total of 8GB of RAM made up of 4GB soldered on to the motherboard (Slot-0) and an additional 4GB SoDIMM (Slot-1) :-

Clover Configurator - Set RAM Size
If you only have the factory fitted 4GB of RAM then highlight 'Slot 1' on the 'Memory' list and click on the '-' (remove) button directly below. If you have 12GB of RAM change the 'size' of 'Slot-1' to 8192 (MB)
Next select the 'RT Variables' options page. Copy the values for ROM and MLB from the iMessage Debug log-file. For MLB use the 'Board Serial Number' value Ensure that any letters are entered as capitals (eg: a65d = A65D) :-
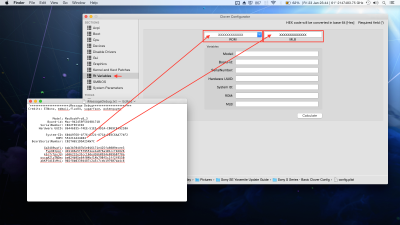
Clover Configurator - Set ROM & MLB values
If you've never set the MLB & ROM value on your Mavericks build then these values my be blank, Null or all zero's ..... If you do not intend to go back to Mavericks then you can generate a new and unique value for the MLB & ROM values - see Part-1, Step-5d of my iMessage Guide, ensure that all letters are entered as capitals. If you want to ensure that you can go back to Mavericks without MLB & ROM issues then see the pre-requisites section of this guide.
Once your happy with all the info you've entered into Clover Configurator's 'Boot', 'SMBIOS' & 'RT Variables' pages , hold down the 'Command' key and press 'S' to save the config and quit Clover Configurator.
Now we need to remove the remnants of the existing legacy Boot-Loader, first run the 'Show all Files' utility and select 'Show', open Finder in the root of your OS X Volume, you should see one or more files called 'boot' or 'bootXXX' select them all and move them to the trash:-
Code:
[B]Folder Location:[/B] / (root of OS X Start-Up drive)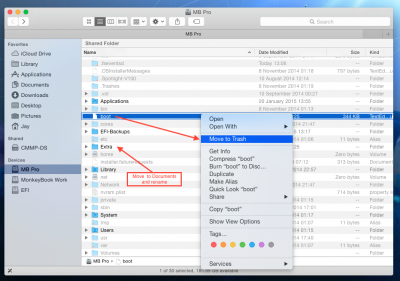
Removing the old boot-loader files
Note: The Clover installer creates the folder 'EFI-Backups', each time you update the Clover boot-loader the installer archives the entire EFI folder to this location, this can be handy if you need to back-out a version of Clover or reference an old config.plist. You can simply select the files in the appropriate backup folder and copy them over the existing ones in the 'Clover' folder on your EFI Partition.
Important: If you have a folder called 'EFI' above the 'EFI-Backups" folder in the root of your OS X Volume (same location as above image) then this is an indication that you have installed Clover in legacy mode. If this is the first time you've tried to install Clover then you've made a mistake in the install process, delete the EFI folder in the root of your OS X Volume and try again paying careful attention to the install options. If you've installed Clover in the past in legacy mode then this can cause confusion so I recommend that you move it somewhere else or delete it completely.
Optional: To keep the root of your OS X Volume clean it's worth moving the /Extra folder to somewhere else as Documents and rename it 'Backup of Extra Folder' or something similar. Clover does not use the /Extra folder but it may be useful to keep a backup of it for future reference or if you decide to go back to a legacy boot-loader.
Once you've performed the above file management operations in the root of your OS X Volume you can quit Folder and disable 'Show all Files'.
Ok, we're almost done for this step, take a moment to check over what you've just done .... if your happy with everything go ahead and shutdown the laptop so we can cold boot Clover.
Power up your laptop and press the 'F2' key when you see the 'VIAO' logo and go into the BIOS, navigate to the 'Boot' menu and set the following options :-
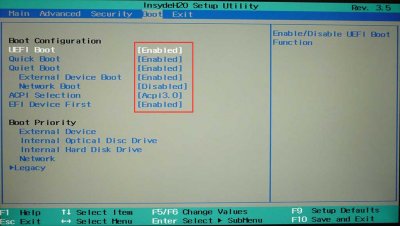
BIOS - Change boot to UEFI and enable EFI Device
Note: These we're the only settings that worked for Clover when it's installed on the 'EFI' Partition, if you have a later generation Sony S series laptop then you may need to alter these settings - but they work for me just fine.
Navigate to the 'Exit' menu - select the option to Save and Quit the BIOS ... if everything is correct then the system should reboot and load the Clover boot-loader, at this time the only option that will probably work is your OSX Mavericks, ensure its selected (using the cursor keys) and press the space bar, you should be presented with the boot options for the OS X entry. Cursor down to 'Boot without Caches' and press enter/return.
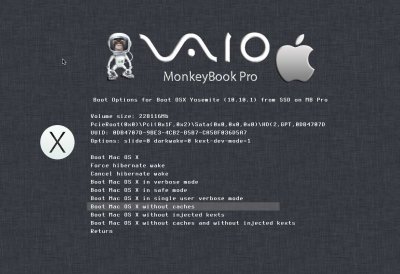
Clover - OS X Boot Options
If you didn't install the MonkyBook Clover theme then your Clover boot and option screens will look slightly different but the options and methods are exactly the same :-
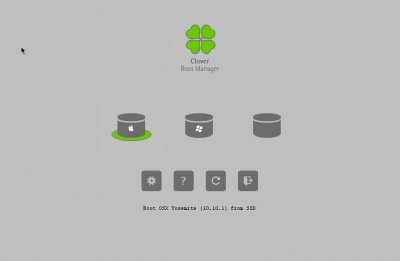
Your OS X Mavericks build should boot/load as if you were using your old boot-loader with the -v and -f boot-flags. You should only need to do this the once, if all goes well OS X Mavericks should load and run as well as it did before. We haven't changed any of OS X's configuration or kext's so Mavericks should be working exactly as it was before except we're now booting via Clover which opens up a whole lot of new possibilities ...
Note: As I warned at the start of the guide if you have Windows and/or Linux installed on your secondary drive you will not be able to access them via Clover (just yet) even if you get one or more entries for them in Clovers Boot menu. For now be patent, if you need to boot Windows or Linux simply boot your laptop with your Unibeast USB Stick and boot the required OS in legacy mode. If the system does not find your USB, ensure that 'USB Legacy' mode is enabled in the BIOS.
If things are not working for you then first check that you can get back to OS X using the Unibeast USB. Check the root of the OS X Startup disk and the EFI Partition and ensure that they are as in the guide.
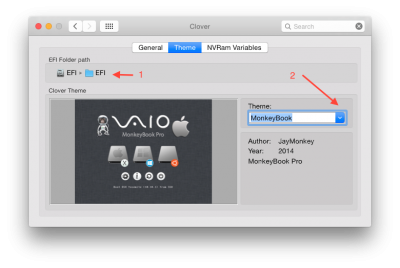
If all looks good we just need to make a couple changes to the NVRAM settings, first mount your Startup 'EFI' Partition using Semulov and then open 'System Preferences', you should see a 'Clover' icon on the bottom row :-

Click on it and select the 'Theme' tab, Click where it says 'EFI Folder Path' and navigate to your mounted EFI partition and select the 'EFI' folder and click on 'Set EFI directory', now click on the 'Theme' drop-drop menu and set the theme to 'MonkeyBook' or a theme of your choice :-
 Click on the System Prefs 'Home' icon and then click on the 'Start-Up Disk' icon, select your OS X Startup disk (mines called MB Pro) and click on Restart:-
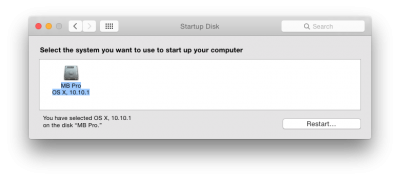 These last two operations set the startup options in OS X's NVRAM which Clover uses by default (you can override them in the config file if you want), it's something we didn't need to do with Legacy Boot-Loaders and although it's not strictly necessary it helps to keep the install and OS X experience as native/vanilla as possible.
Your system should reboot back into Clover with your OS X Volume now selected as the default entry - press Enter/Return and let OS X load.
If you want Clover to load OS X automatically remount the Startup Drive 'EFI' Partition using Semulov and run Clover Configurator, select the 'Boot' page and uncheck the '-1' option, change the 'Timeout' value to whatever you want. If you want Clover to load OS X without displaying the boot menu set the 'Timeout' value to '0'.
| Step-3: Updating to OS X Yosemite |
If you started the update process with a working Mavericks build based on my previous guide and have followed steps 1 & 2 in this new guide your laptop should be working as it was before but booting via Clover. If all looks good and your ready to proceed I recommend making a new system backup before continuing.
You should have already downloaded the Yosemite installer and prepared a UniBeast USB Install that includes your DSDT as detailed in the 'Tools & Software’ section.
Important: Ensure you have updated the 3rd party kexts (see the 'Pre-Requisites' section.)
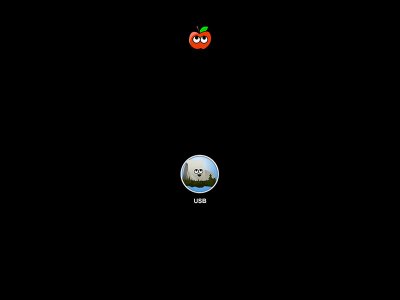
Shutdown/power down your laptop, insert the UniBeast USB and power back up and boot from the USB, at the Chimera/TMX boot page select the USB installer, after a minute or so the OS X Yosemite Installer should start:-
 |
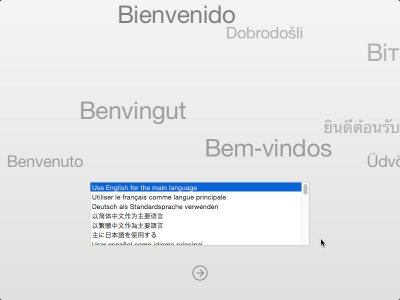 |
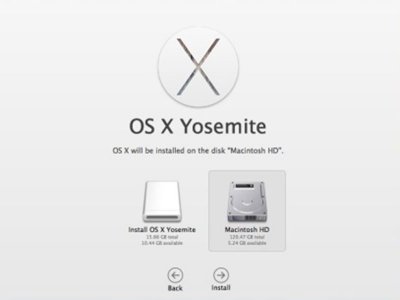
Once the OS X Installer welcome page loads, click on the start button/arrow at the bottom of the page, since we are going to migrate our existing Mavericks install to Yosemite do not erase the target drive as you would normal do when performing a clean install. Simply click on Continue, select you existing Mavericks OS X drive as the install target and confirm the selection, let the installer do it's job.
 |
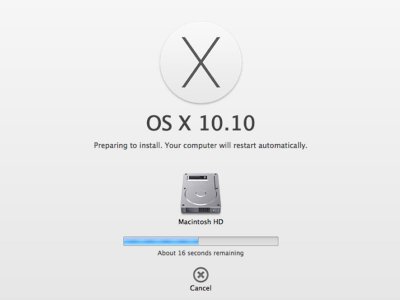 |
After the installer has finished your laptop should automatically re-boot, at this point it's best to power off, remove the USB Installer and boot-up with Clover, select your existing OS X drive and let Yosemite boot for the first time, you may notice some screen corruption during the boot .... that's ok we're going to fix all that in the next step.
If all goes well Yosemite will boot and go through it's initial setup phase, just follow the on-screen prompts .... once thats done you should notice the following notification in the top right of the screen.
 I suggest you go and make a cup of tea and wait until the optimisations are complete .... it's best not to work on the systems config with this process is running.
The OS X installer disables the use of Apps not download from the App store so first re-enable the option on the Security & Privacy page in System Preferences :-
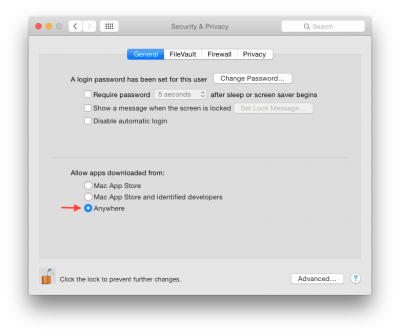 Close System Preferences and open Finder, navigate to the System extensions folder and delete the old Generic USB-3 driver/kext if it exists - depending upon which kext version you have installed it maybe called something different like GenericUSB3 or something similar, you should also delete EvOreboot.kext if it is installed.
Code:
[B]Folder Location:[/B] /System/Library/Extensions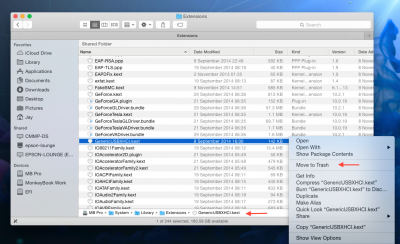
Download, extract and install the new ALC275 audio injection kext in the attached archive (ALC275Codec.zip) using Kext Utility, once done you can exit Kext Utility.
Do not reboot ....
| Step-4: Configure Clover for OS X Yosemite |
Download and extract the attached archive 'Sony S - Clover binary patches.zip', navigate to the extracted file and open it in Text Wrangler:-
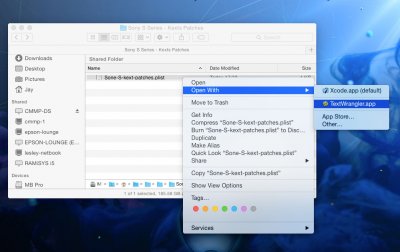
Re-mount your startup 'EFI' partition using Semulov :-

Back in Finder navigate to the Clover folder on the EFI Partition, right click on the Config.Plist and open it for editing in Text Wrangler :-
Code:
[B]Folder Location:[/B] /EFI/EFI/Clover
Cursor down to around line number 218, it should be the start of the 'Kexts to Patch' section, insert a new line after '<array>' definition.
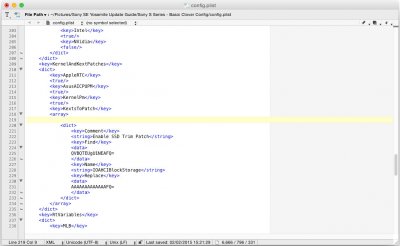
We now going to insert all of the Clover binary patches for Yosemite as a block after which we'll fine tune them for your configuration in Clover Configurator.
In Text Wrangler switch to the open 'Sony S Series - Kexts Patches.plist', select the entire file (CMD-A) and copy the contents (CMD-C) switch to the open config.plist and paste (CMD-V) the contents at the new line you just created. Save the config.plist file and quit Text Wrangler.
Start Clover Configurator and load your existing config file:-
 Select the Kernel & Kext Patches page, you should now see all of the binary patches that Clover will apply at when loading OS X Yosemite.
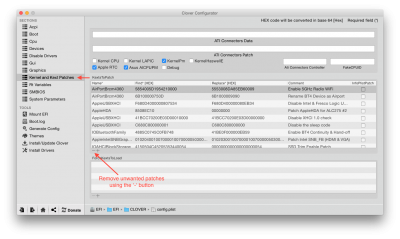 These patches enable some OS X's features such as handoff, correct issues with the USB3 port, fix the GPU/Video frame buffer to allow VGA output & HDMI Audio and patches AppleHDA (must be used with attached ALC275Codec.kext).
If you have installed a AW-CE123H mPCIe WiFi/BT4 card or derivative then you should not need to do anything here, however if you have a different WiFi and/or Bluetooth card then you should remove the patches with the Name 'AirPortBrcm4360' - there are two of them in the list :-
- Enable 5GHz Radio WiFi
- Rename BT4 Device as Airport
The ability to patch the OS X kernel and kext's on the fly is one of Clover greatest features over legacy based boot-loaders, once set-up correctly your Hack should work much like a real Mac allowing OS X updates to be installed via the App store with out any issues or the need to re-apply manually modified patches.
Once you get proficient with Clover you will not want to use anything else, it extremely customisable and flexible allowing you to centralise everything you need to do in order to run OS X on non-Apple hardware.
Once everything looks good save the file by holding down the 'Command' key and pressing 'S' - you can now quit Clover Configurator.
Reboot your laptop and enter the BIOS by pressing 'F2' at the VAIO Logo, navigate to the Advanced menu and down to the USB configuration page. Disable USB Legacy mode.
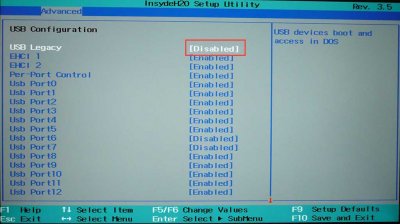
This is necessary to enable low-level access to the USB3 port in OS X Yosemite, if you ever need to boot your laptop from a USB Installer or run a Linux Live USB .. etc then you must re-enable 'USB Legacy'. Be sure to disable it again before going back into OS X.
Save and quit the BIOS, let your system reboot and load OS X, if all has gone well then you should now have a fully working Yosemite build running on your MonkeyBook
You may find after changing the USB mode in the BIOS, Clover goes into Reboot-Loop, if so select your OS X Yosemite build and press <space>, select the option 'Boot Without Caches' :-
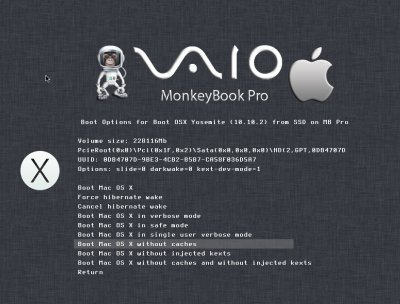
Important: The included binary patches are optimised for OS X Yosemite 10.10.2. If you installed a earlier version then you will now need to apply the OS X 10.10.2 Update.
| Step-5: Applying Yosemite Combo Updates |
This step is real easy, since Clover is now patching the kernel and kexts each time you boot, you can simply install OS X updates via the App Store like you would on a genuine Mac. Before you start it's always worth running a backup just in case ....
When your ready, open the App Store and select the 'Updates' page, select the OS X Update as you would any other application update.
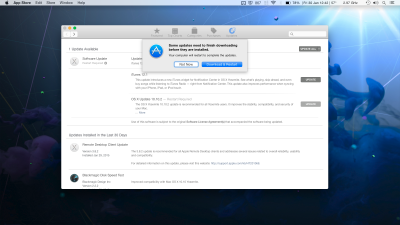
You'll be warned that installing the update requires a re-start, continue and enter your password if prompted. The Update will download and self-install, the update process continues once is OS X shutdown and completes on the next restart. Once the update is finished you should have a fully working Yosemite 10.10.2 system. Check functionality .. if all looks good make a new backup.
It is possible that after a future combo update some of the Clover patches will need updating in order to continue working - If this is this proves to be the case I will post any changes required as amendment to this guide.
Always keep a separate backup of the EFI folder on your startup EFI partition, if anything ever goes wrong you can simply re-format the EFI partition using the following console command (see Step 1)
Code:
sudo newfs_msdos -v EFI -F 32 /dev/rdisk0s1 [COLOR=#ff0000]<— Replace with correct ID[/COLOR]If you have an older or alternative WiFi and/or BT card then you may have to add additional patches to get them working correctly, you should be able to find the solution on this or other OS X hackingtosh websites.
For more examples of Clover binary patches try ReHabMans gitHub where he maintains many example config files for different systems. Use them as a reference, do not replace your own config.plist with any that you download as they are not working configs. If you use any of the example patches be sure to remove 'disabled:' from the Name string.
| Step-6: Convert Windows for EFI Boot |
WARNING: This section of the guide assumes that you have replaced the factory installed HDD with a SSD connected to the primary SATA-II port laptop and have replaced your CD/DVD optical drive with a caddy that has HDD or SSD drive fitted which is connected to the secondary SATA-II port. As detailed in my original Mavericks guide, I recommend only running OS X from the primary drive and run all other OS's such as Windows, Linux ... etc from the secondary drive. In my case I have a 250GB SSD for OS X as my primary drive and a Hybrid 750GB HDD/SDD (Seagate Momentous XT) as my secondary drive ( in caddy).
If your existing Windows installation was installed in BIOS boot mode such as the factory Sony install of Windows 7 then you will be unable to boot Windows from Clover whilst the laptop is in Hybrid EFI mode. The reasons for this are complex but can mainly be blamed on the legacy drive/partition format (MBR) Microsoft adopted before EFI & UEFI became widespread.
In order to remedy this we need to convert the MBR drive to a GPT one, create a EFI Partition and modify/install the Windows boot-manger to to boot in EFI mode.
I have successfully used the following method on both my laptop (Sony Vaio MonkeyBook) and desktop systems and it has always worked perfectly, this method will maintain your existing Windows install and all data, however you should be aware that any procedure that changes or moves data on a drive will always carry a risk no matter what method is used. Before starting try to clone or backup your Windows drive - I use the latest version of Acronis which supports MBR & GPT/GUID partitions allowing the backup of most Windows and Linux installs.
Software / Tools required:-
- Bootable Windows 8.1 install or recovery media (USB or CD/DVD)
- AOMEI Partition Assistant Professional (Link) - NOTE Must be Pro version
- Another PC running Windows either 7 or 8/8.1
1. You must have Windows 8.1 install/recovery media available even if you are moving /converting a Windows 7 system, this is because Windows 8/8.1 includes the necessary tools to create a EFI based boot manager were-as Windows 7 install/recovery media does not. I recommend creating a Windows 8.1 USB installer.
2. There are many Windows based partition editors and utilities available, however not many support the conversion of a Windows MBR drive to a GPT one. I've used AOMEI Partition Assistant for many years for both work and personal use - it is the only program of it's type I trust under Windows to do this operation.
3. Since we will be modifying the partition table, boot sector and boot manager on the Windows drive it is best to do this with the drive attached to another PC, once you start the conversion process it is quite likey that you will have to reboot windows in order for some ops to complete, however since we've deleted/modified the boot sectors it's unlikely you would be able to reboot. Performing the operation on another Windows system negates many of these limitations.
If you don't have access to these tools then you may want to try one of the many alternate methods listed on this or other websites - however be warned that some of these methods may carry a higher risk of data loss.
Attachments
-
Sony Laptop BIOS Tools.zip12.6 MB · Views: 1,053
-
MonkeyBook-Clover-Theme.zip1.6 MB · Views: 429
-
iMessage Debug V2.zip6.4 KB · Views: 434
-
ALC275Codec.zip17.3 KB · Views: 489
-
Sony S Series - Kexts Patches.zip1.2 KB · Views: 610
-
Sony S Series - Basic Clover Config.zip2.6 KB · Views: 634
-
Sony S Series 3rd Party Kexts.zip1.5 MB · Views: 620
Last edited:

