
- Joined
- Apr 15, 2013
- Messages
- 3
- Mac
- Classic Mac
- Mobile Phone
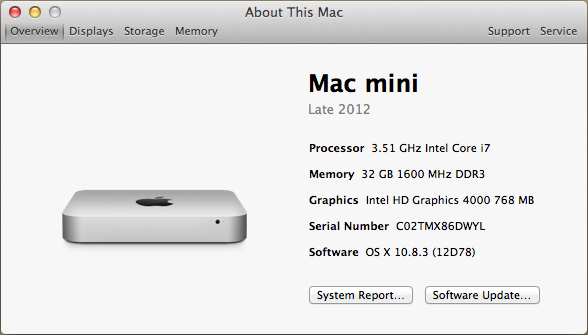
Asus P8Z77-V LK - Core i7-3770K - Intel HD 4000 - Mac OS X 10.8.3 - BIOS 1001
Components
Motherboard: Asus P8Z77-V LK
http://www.newegg.com/Product/Product.aspx?Item=N82E16813131837
CPU: Intel i7-3770K
http://www.newegg.com/Product/Product.aspx?Item=N82E16819116501
RAM: 32GB Corsair Vengeance 1600MHz DDR3
http://www.newegg.com/Product/Product.aspx?Item=N82E16820233246
SSD: Samsung 830 Series 512GB
http://www.newegg.com/Product/Product.aspx?Item=20-147-165&Tpk=N82E16820147165
HDD: Western Digital Green 2TB
http://www.newegg.com/Product/Product.aspx?Item=N82E16822136891
Case: Corsair Carbide 300R
http://www.newegg.com/Product/Product.aspx?Item=N82E16811139011
PSU: Corsair TX650M
http://www.newegg.com/Product/Product.aspx?Item=N82E16817139031
Optical: Asus DRW-24B3LT
http://www.newegg.com/Product/Product.aspx?Item=N82E16827135240
Keyboard/Mouse:
Old Power Mac G5 (Late 2005) Keyboard & Mighty Mouse
Software
Mac OS X 10.8.3 Mountain Lion from the Apple App Store
http://itunes.apple.com/us/app/os-x-mountain-lion/id537386512?ls=1&mt=12
UniBeast-MountainLion-1.7.0 from tonymacx86 Downloads
MultiBeast-Mountain-Lion-Edition-5.3.0 from tonymacx86 Downloads
Asus 1001 BIOS from Asus
PMPatch_0.5.12_win referenced in BiosRepo's Wordpress
FTK_0.9.5_DOS referenced in BiosRepo's Wordpress
USBDriveCreator referenced in BiosRepo's Wordpress
Miscellaneous Items
Machine running Mac OS X 10.6.6+ to create UniBeast + Mountain Lion installation USB.
Machine running Windows to create the patched BIOS USB installation.
1x 8GB+ USB stick for UniBeast + MountainLion installation.
1x smaller USB stick for BIOS flashing.
Comments
I didn't buy all these parts at once, rather I had most of it sitting around in a Windows 7 build already, then I happened across chad78's build [link], and it inspired me to try this too. (Thanks chad78!)
This is my first Hackintosh build, and so far it's turned out wonderful. Spent about 3 days installing, re-installing, and configuring. But I think I've gotten it down now.
I've included references to most links at the end, as well as throughout when they occur in the text.
Installation
A: Setup UniBeast-MountainLion-1.7.0 USB Stick
I followed the steps outlines by tonymacx86 here [link].
I also created a new folder on the USB root called "Stuff". I put Chimera-2.0.1 & MultiBeast-5.2.1 into this folder. It will still boot and install perfectly, this way you can save on preparing another USB with the initial software that you'll need to install kexts.
B: Patch Asus 1001 BIOS
NOTE: if you are unsure about my links, just Google Asus and download BIOS from there. For other 3 links, just go directly to the guides to get the links [link #1] [link #2].
Download official 1001 BIOS from Asus [link].
Download PMPatch [link].
Download FTK for DOS [link].
Download USBDriveCreator [link]
Did this all on a system running Windows 7.
Patch the BIOS [link].
Prepare the USB stick with patched BIOS, and flash the BIOS [link].
C: Setup BIOS
I followed various guides on the internet, and played around with my settings. I suppose these worked best for me:
Start up the computer, press "Delete" to enter BIOS.
Click on the "Advanced Mode" button to go into advanced mode.
F5 to "Load Optimized Defaults".
Main -> Security -> Administrator Password (I set it to prevent others from tampering)
Advanced -> SATA Configuration -> SATA Mode Selection: AHCI
Advanced -> System Agent Configuration -> Graphics Configuration -> Primary Display: iGPU
Advanced -> System Agent Configuration -> Graphics Configuration -> iGPU Memory: 96M
Advanced -> USB Configuration -> Intel xHCI Mode: Auto (not smart)
Advanced -> USB Configuration -> EHCI Hand-off: Enabled
Boot -> Fast Boot: Disabled
Boot -> Full Screen Logo: Disabled
Boot -> Setup Mode: Advanced Mode
Boot -> Secure Boot -> OS Type: Other OS
D: Install Mountain Lion from UniBeast created USB.
Plug-in USB stick.
Press delete to enter BIOS.
BIOS -> Boot -> Boot Override: USB (option #2 for me)
I think the first time I did this, I followed tonymacx86's guide exactly (step 3) [link]. However, I've re-installed so many times, that the last time I just did the following:
When it starts, keep going until you see a menu bar up top. Select Utilities and choose Disk Utility...
Select SSD -> Erase -> Mac OS (journaled)
Close and continue with installation
E: Configuration of kexts and Extras folder
Reboot into the USB again (BIOS -> Boot -> Boot Override: USB (option #2 for me))
Use arrow keys to highlight the newly created Mac OS installation (Default name: Untitled)
type "-x" (without quotes). You should see these characters pop up in a box. Then press enter.
Copy MultiBeast-Mountain-Lion-Edition-5.3.0 to desktop, eject USB.
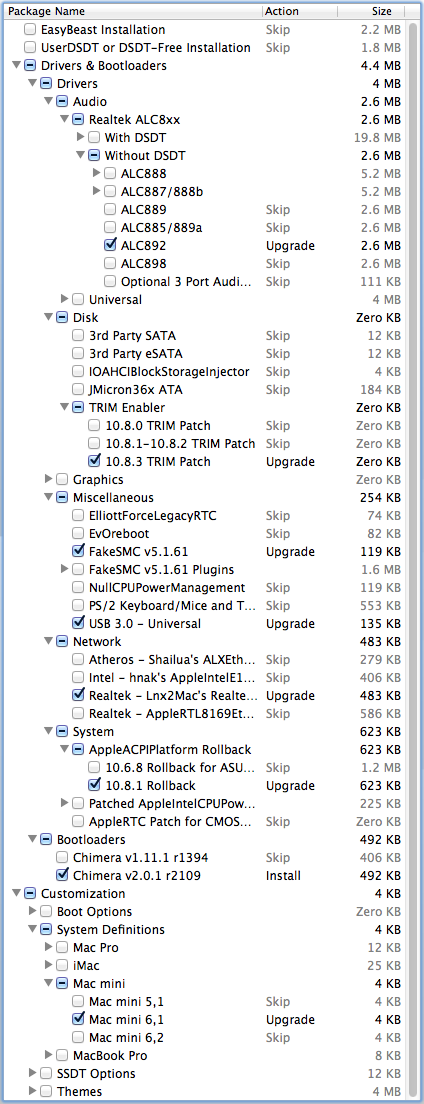
Run MultiBeast-Mountain-Lion-Edition-5.3.0, I chose the following options:
Drivers & Bootloaders -> Drivers -> Audio -> Realtek ALC8xx -> Without DSDT: ALC892
Drivers & Bootloaders -> Drivers -> Disk -> TRIM Enabler: 10.8.3 TRIM Patch
Drivers & Bootloaders -> Drivers -> Miscellaneous: FakeSMC v5.1.61
Drivers & Bootloaders -> Drivers -> Miscellaneous: USB 3.0 - Universal
Drivers & Bootloaders -> Drivers -> Network: Realtek - Lnx2Mac's Realtek RTL81xxx Driver "Release" version
Drivers & Bootloaders -> Drivers -> System -> AppleACPIPlatform Rollback: 10.8.1 Rollback
Drivers & Bootloaders -> Bootloaders: Chimera v2.0.1 r2109
Customization -> System Definitions -> Mac mini: Mac mini 6,1
Wait a moment before clicking "Reboot" on the "Lnx2Mac's Realtek RTL81xxx Driver" Installer. We have to create one more file in /Extra.
Navigate to /Extra, you will see a file called "smbios.plist" there. Duplicate it.
Rename the duplicate to "org.chameleon.Boot.plist"
Open "org.chameleon.Boot.plist" in the text editor, and replace the contents with the following section between the lines:
NOTE: Change the red section to your monitor's native resolution. Mine has a resolution of 1680x1050x32, so that's why I have those numbers in there. I found that if I remove this section, then my system will boot looking all garbled.
NOTE 2: The green section can be changed to what you like. I chose "0x01620000" based off of this thread [link]. You have several other options to choose, if you choose something else, then you may have to change your BIOS iGPU Memory to match the option you pick. "0x01620000" has a "Stolen RAM for FB" as 96M, which is why I chose that in the BIOS. Not sure if that's how it works, but the system seems to work so far. *shrug*
<?xml version="1.0" encoding="UTF-8"?>
<!DOCTYPE plist PUBLIC "-//Apple//DTD PLIST 1.0//EN" "http://www.apple.com/DTDs/PropertyList-1.0.dtd">
<plist version="1.0">
<dict>
<key>EthernetBuiltIn</key>
<string>Yes</string>
<key>GenerateCStates</key>
<string>Yes</string>
<key>GeneratePStates</key>
<string>Yes</string>
<key>GraphicsEnabler</key>
<string>Yes</string>
<key>Kernel</key>
<string>mach_kernel</string>
<key>Kernel Flags</key>
<string>darkwake=0</string>
<key>Legacy Logo</key>
<string>Yes</string>
<key>Timeout</key>
<string>2</string>
<key>UseKernelCache</key>
<string>Yes</string>
<key>HD4000PlatformId</key>
<string>0</string>
<key>Graphics Mode</key>
<string>1680x1050x32</string>
<key>AAPL,ig-platform-id</key>
<string>0x01620000</string>
</dict><string>Yes</string>
<key>GenerateCStates</key>
<string>Yes</string>
<key>GeneratePStates</key>
<string>Yes</string>
<key>GraphicsEnabler</key>
<string>Yes</string>
<key>Kernel</key>
<string>mach_kernel</string>
<key>Kernel Flags</key>
<string>darkwake=0</string>
<key>Legacy Logo</key>
<string>Yes</string>
<key>Timeout</key>
<string>2</string>
<key>UseKernelCache</key>
<string>Yes</string>
<key>HD4000PlatformId</key>
<string>0</string>
<key>Graphics Mode</key>
<string>1680x1050x32</string>
<key>AAPL,ig-platform-id</key>
<string>0x01620000</string>
</plist>
Now let "Lnx2Mac's Realtek RTL81xxx Driver" reboot the system.
If you accidentally let the system reboot before creating the "org.chameleon.Boot.plist" file, then just boot back into your system with the flag "-x" (safe mode). Then create the file and reboot.
Post-Installation Comments
The system seems to work great so far. Sound, video, AirPlay, etc. works! Just so's you know, a few things don't quite work flawlessly, but it's not really a bother.
1) HDMI outputs video, but no audio: This requires working with DSDT files I believe, and since this is my first hackintosh, I decided to let it just be. I don't even use HDMI to be honest, so it's of no consequence to me.
2) When using AirPlay, and picking the AppleTV as the "Match Desktop Size To:", the Hackintosh looks all garbled: I find that the TV looks just fine, just not my Hackintosh. Solution? Let the computer "Sleep" at least once. I've set my power button to sleep the computer when pressed. So I press the power button, let it sleep, then wake it back up and then AirPlay works without garbling up the screen. I'm not sure why it does this, but after just a single sleep, it works just fine.
3) When waking the computer from sleep, sometimes there is nothing on the display: I've found that this usually occurs if I wake the computer up too quickly. i.e. I hit the sleep button, and then accidentally hit a button on the mouse or keyboard. It'll wake back up, but the screen will be off. I just have to hit the power button again (set to sleep) and let it sleep for a good 3-5 seconds before waking it back up.
Well, hope this helps out anybody looking to build a Hackintosh! Thanks to all the resources I've found and used in rekindling my love affair with Apple's Macintosh, and a huge thanks to tonymacx86 and community.


References
chad78's Build:
http://www.tonymacx86.com/user-builds/61510-chad78s-build-asus-p8z77-v-lk-core-i5-3570k.html
tonymacx86's guide to Install OS X Mountain Lion on Any Supported Intel-based PC:
http://www.tonymacx86.com/61-unibeast-install-os-x-mountain-lion-any-supported-intel-based-pc.html
Asus P8Z77-V LK Downloads:
http://usa.asus.com/Motherboards/Intel_Socket_1155/P8Z77V_LK/#download
Patching BIOS at Bios Repo:
https://biosrepo.wordpress.com/2013/01/19/simple-way-to-patch-your-own-bios/
Flashing BIOS at Bios Repo:
https://biosrepo.wordpress.com/2013/02/20/how-to-flash-unsupported-motherboards-via-ftk-and-dos/
PMPatch Download:
http://www.insanelymac.com/forum/topic/285444-pmpatch-uefi-patching-utility/
FTK for DOS from Dropbox:
https://www.dropbox.com/s/3skebqje38a6e44/FTK_0.9.5_DOS.zip?m
USBDriveCreator from Dropbox:
https://www.dropbox.com/s/lvwjrlj4spzwmf8/USBDriveCreator.zip?m
How to enable HD4000 Thread at tonymacx86:
http://www.tonymacx86.com/mountain-...ad-fyi-only-guide-10-8-how-enable-hd4000.html
Last edited:

