
- Joined
- Nov 13, 2011
- Messages
- 10
- Motherboard
- Ga-x79s-up5-wifi Mountain Lion
- CPU
- i7 3930k
- Graphics
- Gtx 670
- Mac
- Classic Mac
- Mobile Phone
Dingleberry's Content Creator Build:
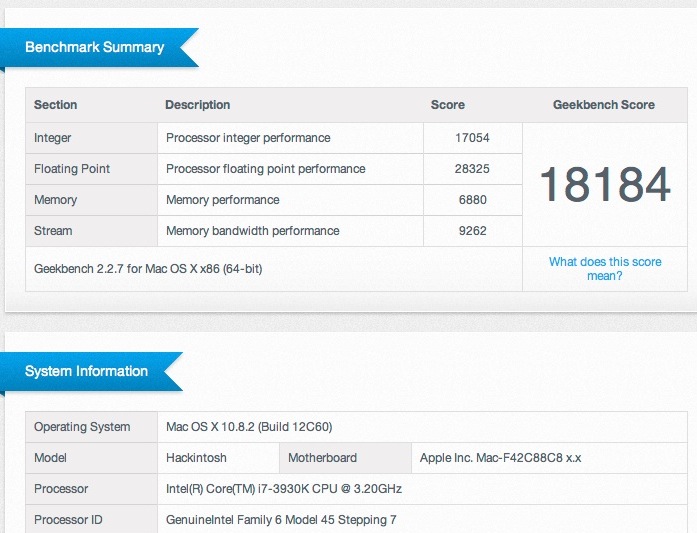
GA-X79S-UP5-WiFi X79/C606 Chipset Socket 2011 | Intel i7-3930K Sandy Bridge -e | GTX 670 FTW | Geekbench: 21745
GA-X79S-UP5-WiFi X79/C606 Chipset Socket 2011 | Intel i7-3930K Sandy Bridge -e | GTX 670 FTW | Geekbench: 21745
Components
Apple Mac OS X Mountain Lion (Read line 2 under Installation Notes below)
https://itunes.apple.com/us/app/os-x-mountain-lion/id537386512?ls=1&mt=12
Any 8gb or larger USB thumb drive, here's one... (I used a 32 gb Sandisk Cruzer...overkill)
http://www.amazon.com/dp/B0044XTJ4C/
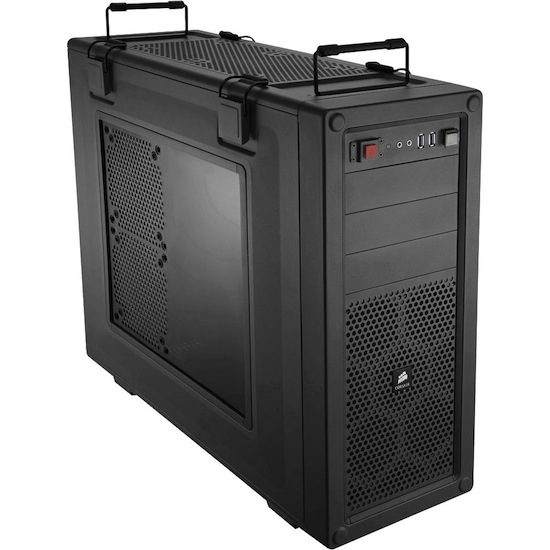
Corsair c70 Atx Case
http://www.newegg.com/Product/Product.aspx?Item=N82E16811139013
Gigabyte Ga-x79s-up5-wifi x79/c606 Chipset Socket 2011 Designed for Overclocking and water cooling.
http://www.newegg.com/Product/Product.aspx?Item=N82E16813128563
Intel i7 3930k 3.2ghz (Up to 3.8ghz Turbo mode) hexa-core (6-cores/12-threads) Sandy Bridge -e
http://www.amazon.com/dp/B00603QXPM
Corsair Vengeance 32gb 1866mhz kit
http://www.amazon.com/Corsair-Vengeance-Desktop-Memory-CMZ32GX3M4X1866C10/dp/B006507Q88
EVGA Nvidia Geforce Gtx 670 FTW 2gb
http://www.newegg.com/Product/Product.aspx?Item=N82E16814130787
Lepa G series (Gold Rated) 1000w Great PSU/Good price, Made by Enermax.
http://www.newegg.com/Product/Product.aspx?Item=N82E16817494010
Already Owned
2x Intel 520 SSD's 120gb/ea
http://www.newegg.com/Product/Product.aspx?Item=N82E16820167093
Trendnet USB WIFI N Dongle - Fully compatible with Mountain Lion.
http://www.amazon.com/gp/product/B00272NHOK/
Dell U2713h (rev A01) 27 inch 2560x1440 Wide Gamut AH-IPS with 14 bit LUT
http://www.amazon.com/dp/B005FR9PI6
IBM M Keyboard....Discontinued
MS Sidewinder x5 Mouse...Discontinued
What works:
Almost Everything.
4 rear USB 3.0 ports working now.
What doesn't work:
I haven't tried to get the included Wifi/Bluetooth PCI card working yet. As far as I know Bluetooth may work, I believe Wifi does not though. I just us a USB wifi dongle.
Power Management (sleep, speedstep) Not an issue for me.
Comments
I didn't find a guide for this motherboard when I did my build so I wrote one. Looks like it was perfect timing as TonyMAC just updated the "CustoMac Pro Socket 2011" buyers guide with this Motherboard. I'll be updating this guide over the next few days, may add a few more pictures. I will try to shorten and simplify it too if possible. I just wanted to be thorough. This process will be similar to other x79 boards.
I've been putting this build together over the last month. I had been thinking about building a new Hackintosh for a few months now, specifically a new desktop, but my i7 laptop running Snow leopard was still getting me by ok. Then I purchased a Dell U2713h Wide Gamut IPS display for photography, just to realize I couldn’t easily get 1440p working over my HDMI port on my laptop, and it was that or VGA...brilliant decision by Lenovo on a 2012 laptop. So with that the new build began.
I built this Hackintosh to run the entire Adobe Master Collection, along with FCP, Ableton amongst other music software, and Windows for gaming.
I chose the i7-3930k since it has plenty of power, and even though I can afford it I couldn't bring myself to spend $1k on a CPU/s.
I initially built an 1155 3770k system which was a great system, but returned it as I really liked this newer Gigabyte board and I may want the option to upgrade to 64gb of ram down the road and possibly Ivy-e. I'm not banking on haswell being anything spectacular.
IMO, and others on the Internets, The Dell U2713h (Not U2713hm) Display is every bit as good as the Apple 27" thunderbolt Display, maybe better. It has a matte screen which is something I prefer, and the Anti Glare coating was improved (Thinner) over the older Dell U2711, and the U2711 was the one being compared to the Apple 27" TB Display.
The Corsair c70 case may not be your cup of tea. Obviously you can use just about any case you want. I like the industrial look myself. I like my PC to look like machinery. I'd love a case that when turned on would shake briefly and blow out steam...that would be sweet. I got the black c70 version which looks more like spy gear than a military ammo box. The space-ship case look just never did it for me.
First thing before we get started. I want to thank the entire OSx86 Hackintosh community for all the hard work over the years to get this project to where it is now. I have been in this scene since the beginning, and it has really come a long way. A special thanks to MacMan and TonyMACx86 for all the great software and awesome website.
Installation Notes:
This is a "Without DSDT Installation". I may work on a DSDT for this board, but everything is running fine for now without it. I will post it here if/when I do. Unless I find one or someone points me to one that will already work.
Having access to a computer already running MAC OS is required to use the "Install OS X Mountain Lion.app" purchased from the app store. My Lenovo i7 Laptop is running Snow leopard and so I used that to purchase Mountain Lion and prepare my USB thumb drive and do a few other things.
The Ga-x79s-up5-wifi Motherboard is an "E-ATX" Mobo, but it fits perfectly in the Corsair c70 "ATX" case, with room to spare.
Only "modification" to my case was taking out the hard drive bays I wasn't using for more airflow. Which may have not been needed, I haven't run any test yet.
I have the Corsair h100i mounted on top in a push exhaust configuration, I will be adding 2 more fans soon for a push/pull configuration. Stock Idle temps average -30*c. Overclock idle temps average -32*c @4.4Ghz. Overclock Prime95 temps average -60*c @4.4Ghz. After 2 hours of intense FPS gaming @4.2Ghz average temps were 48*c. More on overclocking later.
If you get this 1866Mhz Ram then you need to enable X.M.P Profile 1 in Bios to get ram running at 1866mhz. Otherwise it will default to 1333mhz. More on that later. I actually got these 1866Mhz for a good deal but 1600Mhz is plenty.
Getting audio working is tricky on this board, I will save it for last.
With that said let's Begin...
Installation Preparation:
Step 1)
Before you begin you will need to prepare a USB thumb drive with the mountain Lion installer. Follow this easy guide by TonyMac.
http://www.tonymacx86.com/61-unibeast-install-os-x-mountain-lion-any-supported-intel-based-pc.html
After you have your thumb drive ready, follow these steps.
Step 2)
BIOS Setup:
Go ahead and plug your USB thumb drive into a free USB slot. (Do not use the blue 4 port USB slots.)
Start the computer
When you see the POST splash screen, press the Delete key to access the BIOS.
Once in the BIOS, Press F7 to load system defaults.
Under "M.I.T.\Advanced Frequency Settings" - Change "Extreme Memory Profile(X.M.P.)" to "Profile 1" to get ram running at 1866mhz. It defaults to 1333mhz.
Under "M.I.T \Advanced Frequency Settings\Advanced CPU Core Features" - Disable "EIST" (this is related to Power Management, and also gives a low Geekbench score if left on auto).
Under "Bios Settings", change "Boot Option #1" to your USB thumb drive, alternatively you can leave your HD/SSD as Boot Option #1 and press f12 on start up to boot from the USB Thumb drive (This is what I do).
Press F10 to save the BIOS settings and the computer will restart. Don't forget to boot from the Thumb drive when the computer restarts.
In the next section we will prepare the hard drive/SSD for MAC OS X.
Hard Drive/SSD Preparation:
Step 1)
After the computer restarts boot from your Thumb drive. I press F12 to bring up the boot menu, then select my USB Thumb drive from the list and hit enter. (You do not have to do this if you set your Thumb drive as Boot Option #1.)
Step 2)
When you see the Chimera boot loader, select the thumb drive that you prepared with the Mac OS Mountian Lion installer, mine is titled "Mountain Lion Install" Yours will be titled whatever you picked during the creation of the USB Thumb drive in step 1 of the section titled "Installation preparation" above.
Press the space bar to bring up the Boot command line, this is where we will enter our boot flags.
Move to step 3.
Step 3)
In the Boot command line, enter these boot flags exactly as I have written them.
-v -x GraphicsEnabler=No npci=0x3000 cpus=1
hit enter...
Once the installer loads, select your language and press the arrow button. On the "Install OS X" window, don’t press anything else just yet. We are going to prepare your Hard Drive or SSD for MAC OS in step 4.
Step 4)
On the top of the screen you will see the menu bar, select the tools tab, then in the drop down list select "disk utility".
NOTE: I will be choosing single partition as I will only be installing MAC OS on this SSD. I will install windows on a separate SSD.
Disk Utility settings:
Once disk utility is open, select your Hard Drive/SSD from the list on the left, and then select "Partition" on the right.
Part 1)
Under Partition Layout:
Select 1 partition, you can make more if you like but for simplicity I'll use 1 partition.
Now click the "Options" button and Select "GUID Partition table".
press ok.
Part 2)
Under Partition Information:
It should look like this.
Name: Choose a name for your Partition. (This will be the name of your main installation partition in Mountain Lion.)
Format: Mac OS extended journeled.
Size: Leave as default if you chose 1 partition. (If you chose multiple Partitions you can re-size them here.
Press Apply and wait for it to finish, it doesn't take long.
Once the partitioning is complete your HD/SSD is ready for mountain lion. Close Disk Utility and move on to the next task "Installation of Mountain Lion".
Installation of Mountain Lion:
After closing disk utility, You should be back on the "install OS X" window.
Step 1)
Click Continue.
Select your Hard Drive/SSD with the partition you just created, and click install.
Installation will be about 15-20 minutes.
NOTE: after the install finishes the computer will restart automatically. We will need to boot from the USB thumb drive one more time using the boot flags. So If you walk away during the install and it restarts You may get stuck at "Reboot and select a proper boot device " or you may receive a "Kernel Panic" and the computer may freeze. This is ok. Just restart again and move to the next step.
Step 2)
After the Mountain Lion installation finishes and restarts. Boot from your thumb drive again.
This time when the Chimera boot loader menu appears, select your HD/SSD with your Mountain Lion installation, not the Thumb drive with the installer. Press space bar to bring up the Boot command line and enter these boot flags exactly as I have written them.
-v GraphicsEnabler=No npci=0x3000 cpus=1 -Notice this time we left out the (-x) flag, you should no longer need it.
Hopefully all goes well and you are presented with the MAC OS X setup wizard. Go ahead and setup your user settings...time zone, user name, keyboard etc.
Once that is complete you should see the Mountain Lion Desktop...
Congratulations you have Installed Mac OS X on your PC, but we aren't done yet.
Post Installation and MultiBeast
")
Once you are done with user setup, you will be presented with the Mountain Lion desktop. At this time you will have instant network access, including internet. Follow these next steps to complete the Installation.
Step 1)
Download the latest version of Mulitbeast here,
http://www.tonymacx86.com/downloads.php?do=file&id=155
I used Multibeast 5.2.1 when I wrote this. If you use a different version your results may be different.
Also download Kextbeast from here,
http://www.tonymacx86.com/downloads.php?do=file&id=32
Step 2)
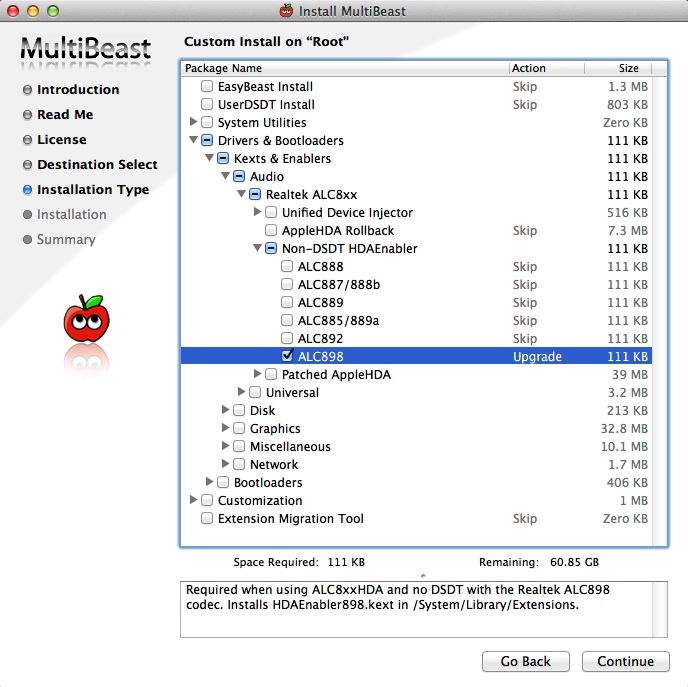
Run Multibeast and select these options.
MultiBeast Configuration

Step 3)
Download VoodooTSCSync.kext, Download Link --> View attachment Edited VoodooTSCSYNC.zip ( This adds support for all 6 cores and Hyper-threading). I have already pre-edited this file for the 3930k "IOCPUNumber=11". Unzip this file and place it on the desktop.
Step 4)
Run KextBeast and follow the instructions to install the VoodooTSCSync.kext file. Don't restart after.
Updating:
If you used Mountain Lion 10.8.2 for your installation, or even 10.8.3 Then you can ignore this. NOTE: I haven't updated to 10.8.3 yet so I cannot verify anything, or recommend it just yet. If you try it and are successful please post a comment below.
I used Mountain Lion 10.8.0 to do my install. So I had to update to 10.8.2 . If you're in the same situation, download and Install OSXUpdCombo10.8.2.dmg from here http://support.apple.com/kb/DL1581
This will update you to MAC OS X 10.8.2 and add support for our 3rd party USB controller.
Afterwards open disk utility and repair permissions.
USB 3.0
This will get the 4 rear (VIA) USB 3.0 ports working.
Step 1)
Go here to download the zip file http://www.osx86.net/view/3745-genericusbxhci_usb_3.0.html
Step 2)
Unzip to desktop, use kextbeast to install.
Restart.
Audio:
Do this after updating to avoid having to re-do it. The update will change the AppleHDA.kext. So if you do this before the update you may have no audio again.
Step 1)
Download the "Interim Realtek Ivy Bridge Lion AppleHDA.kext" at the bottom of the main post here http://www.tonymacx86.com/audio/55638-interim-realtek-ivy-bridge-lion-applehda.html
Un-zip the modified AppleHDA.kext and place it on the desktop.
Step 2)
Download Multibeast 4.6.1, It says it's for Lion but it will work with Mountain Lion as well.
Download link --> View attachment 49494
Step 3)
Run MultiBeast 4.6.1 and select these settings
When that is finished installing close MultiBeast
Step 4)
Run KextBeast to install the AppleHDA.kext that is on the desktop.
close KextBeast
Step 5)
Open disk utility and repair permissions.
App store
Close App store if open.
Then navigate to... Library/Preferences/SystemConfiguration and delete NetworkInterfaces.plist
Launch App store and you should be able to sign in and download.
You can remove the USB thumb drive at this time...
Restart to make sure everything is golden. (Don't forget to go in the BIOS and change Boot Option #1 back to your Hard Drive/SSD if you changed it.)
Enjoy
Hopefully soon we can get support for the VIA 4 port USB 3.0 slots on the back and sleep.
Overclocking:
If you want a guide to overclocking, this is the one to start with.
http://www.overclock.net/t/1189242/...anations-and-support-for-all-x79-overclockers
With that said, this Motherboard was designed for Water cooling and Overclocking (says so right on the front of the box). And of course the 3930k is also intended to be overclocked, and frankly it would be offensive if you didn't.
NOTE: You may see different results with the same settings.
Before Overclocking (Stock 3.2 ghz | Average Temps: Idle= 30*c)
After Overclocking (4.4 ghz @1.390 vcore Average Temps: Idle= 31*c Prime95 61*c)
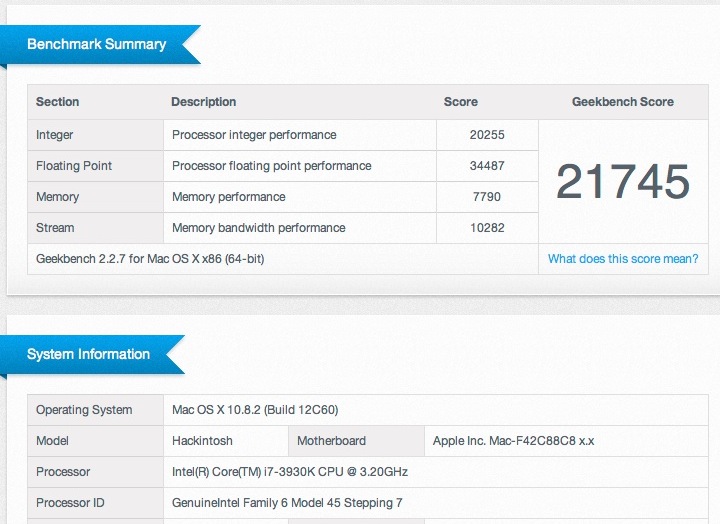
After Overclocking (4.4 ghz @1.390 vcore Average Temps: Idle= 31*c Prime95 61*c)
I actually run it at 4.2 ghz normally @1.290 vcore, BIOS = Intel Turbo Boot Disabled
EDITS:
Added instructions to get App store working below Audio section.
4 Port USB 3.0 working now, added below Updating section.
Last edited by a moderator: