Contribute
Register

Giacomoleopardo Build - ZOTAC Z77-ITX WiFi - Core i7-3770T - MacMini 6,2

Status
Not open for further replies.
Joined
Apr 28, 2011
Messages
909
Motherboard
Asus Prime Z690M-Plus D4
CPU
i7-12700KF
Graphics
RX 6600
Mac
  1. MacBook Pro
Mobile Phone
  1. iOS
Giacomoleopardo's Build - ZOTAC Z77-ITX WiFi - Core i7-3770T - MacMini 6,2

Giacomoleopardo Build - ZOTAC Z77-ITX WiFi - Core i7-3770T - MacMini 6,2

Attention! New thread opened with full install guide based on OS Mavericks!

Giacomoleopardo Build - ZOTAC Z77-ITX WiFi - Core i7-3770T - MacMini 6,2 on Mavericks

This build description is now closed


54596-streacom.jpg
Components


Intel® Core™ i7-3770T Processor 8M Cache, up to 3.70 GHz
[AMAZON-uk]http://www.amazon.co.uk/dp/B008ACVF9A/[/AMAZON-uk]
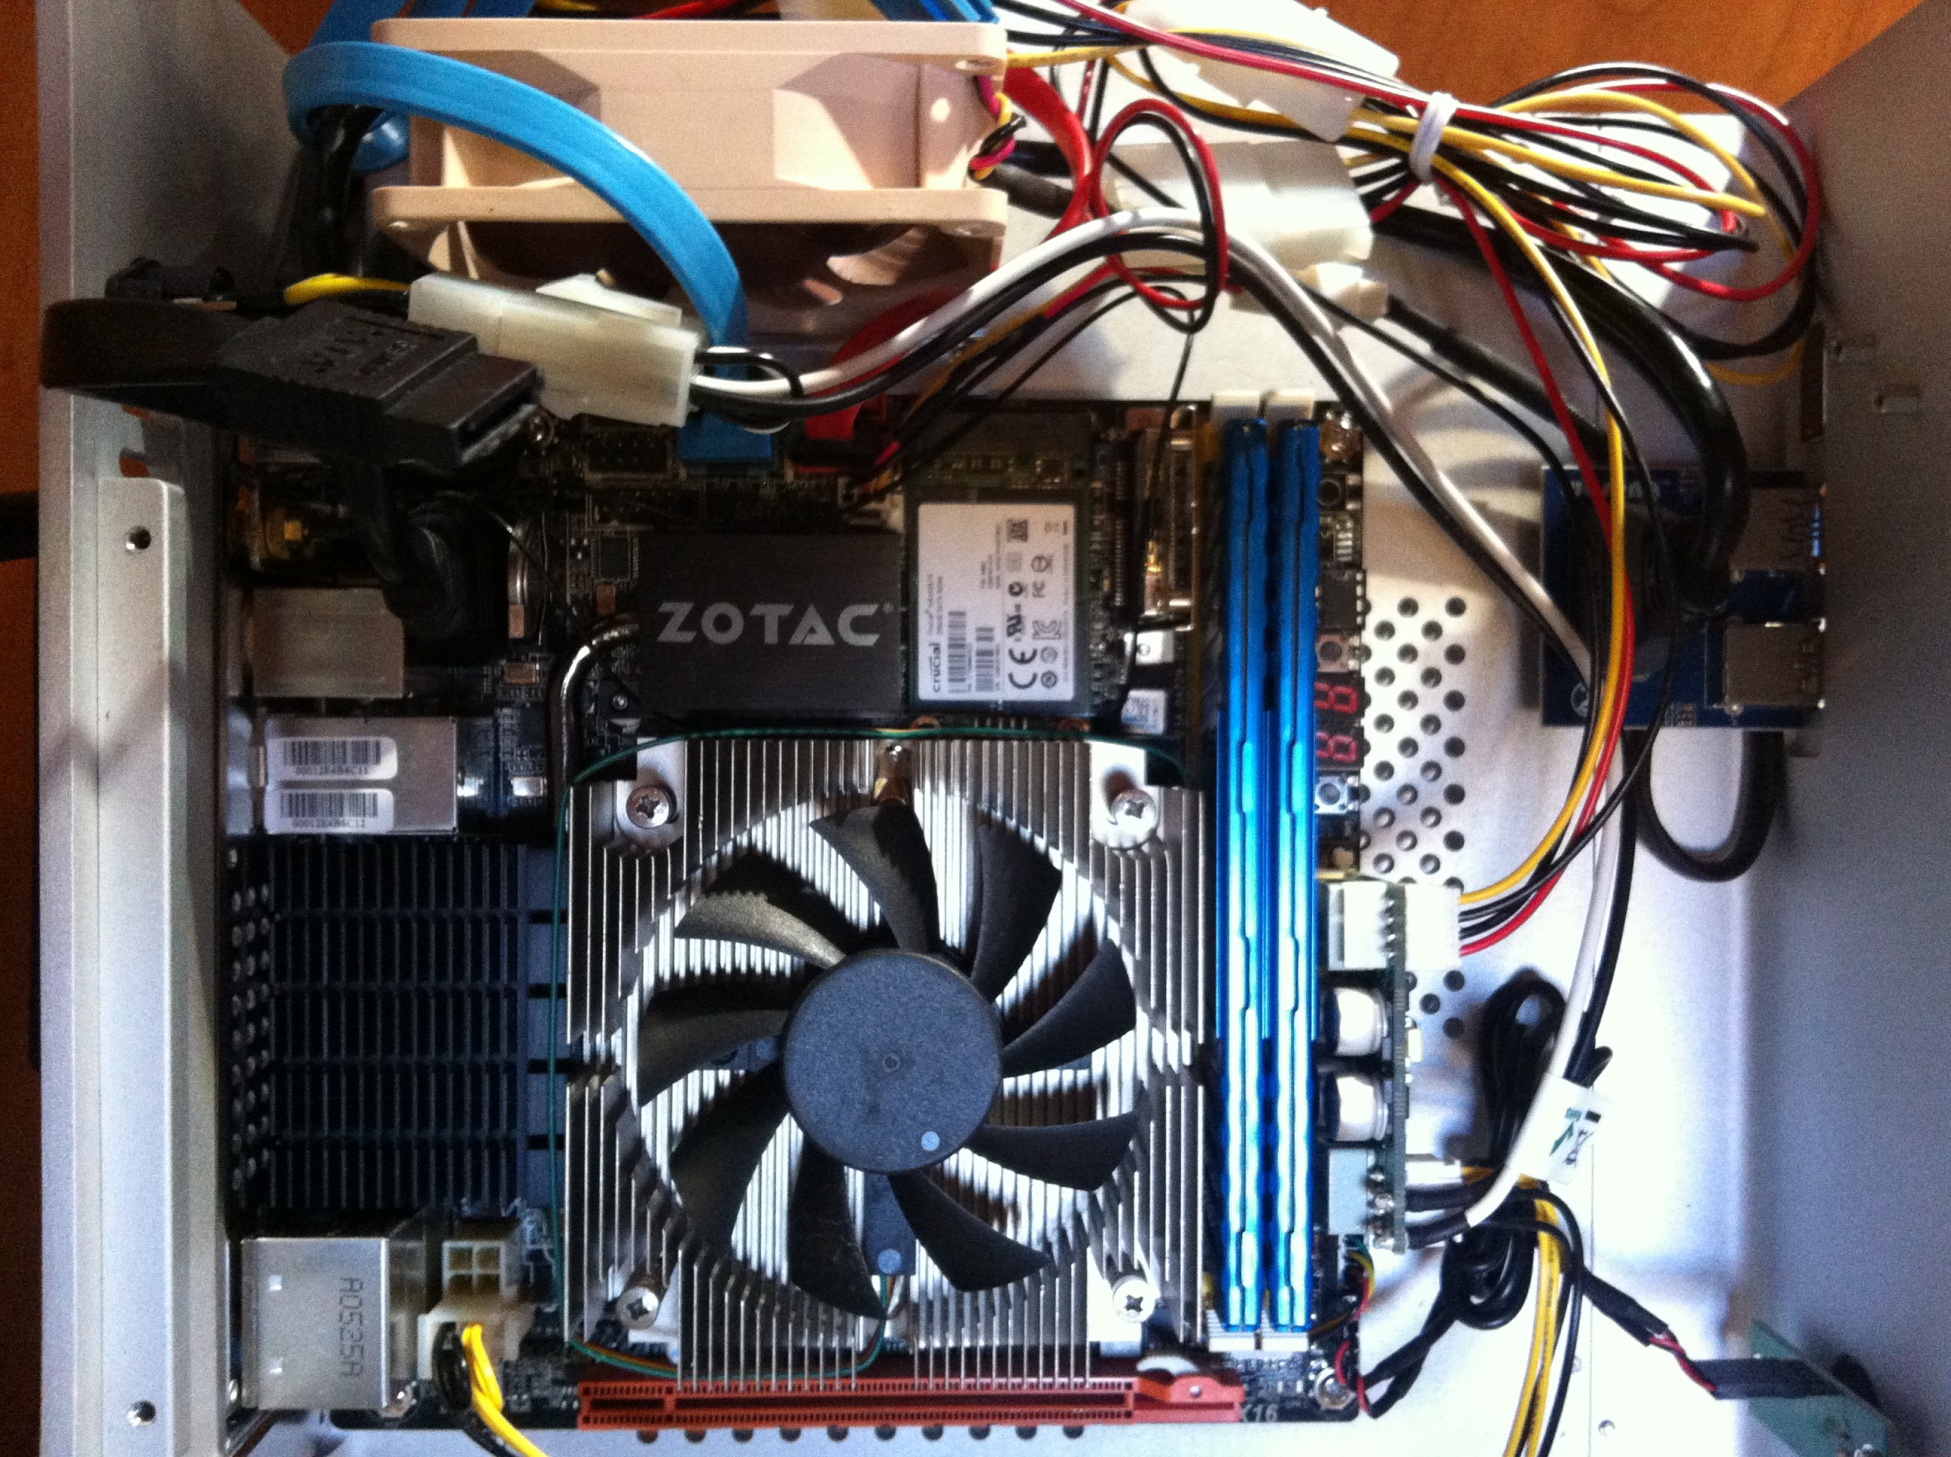
Zotac Z77 ITX WiFi
http://www.amazon.com/dp/B0089OJHBW/

Corsair Vengeance LP Blue 16 GB (2x8 GB) DDR3 1600MHz
http://www.amazon.com/dp/B009M0TCHQ/

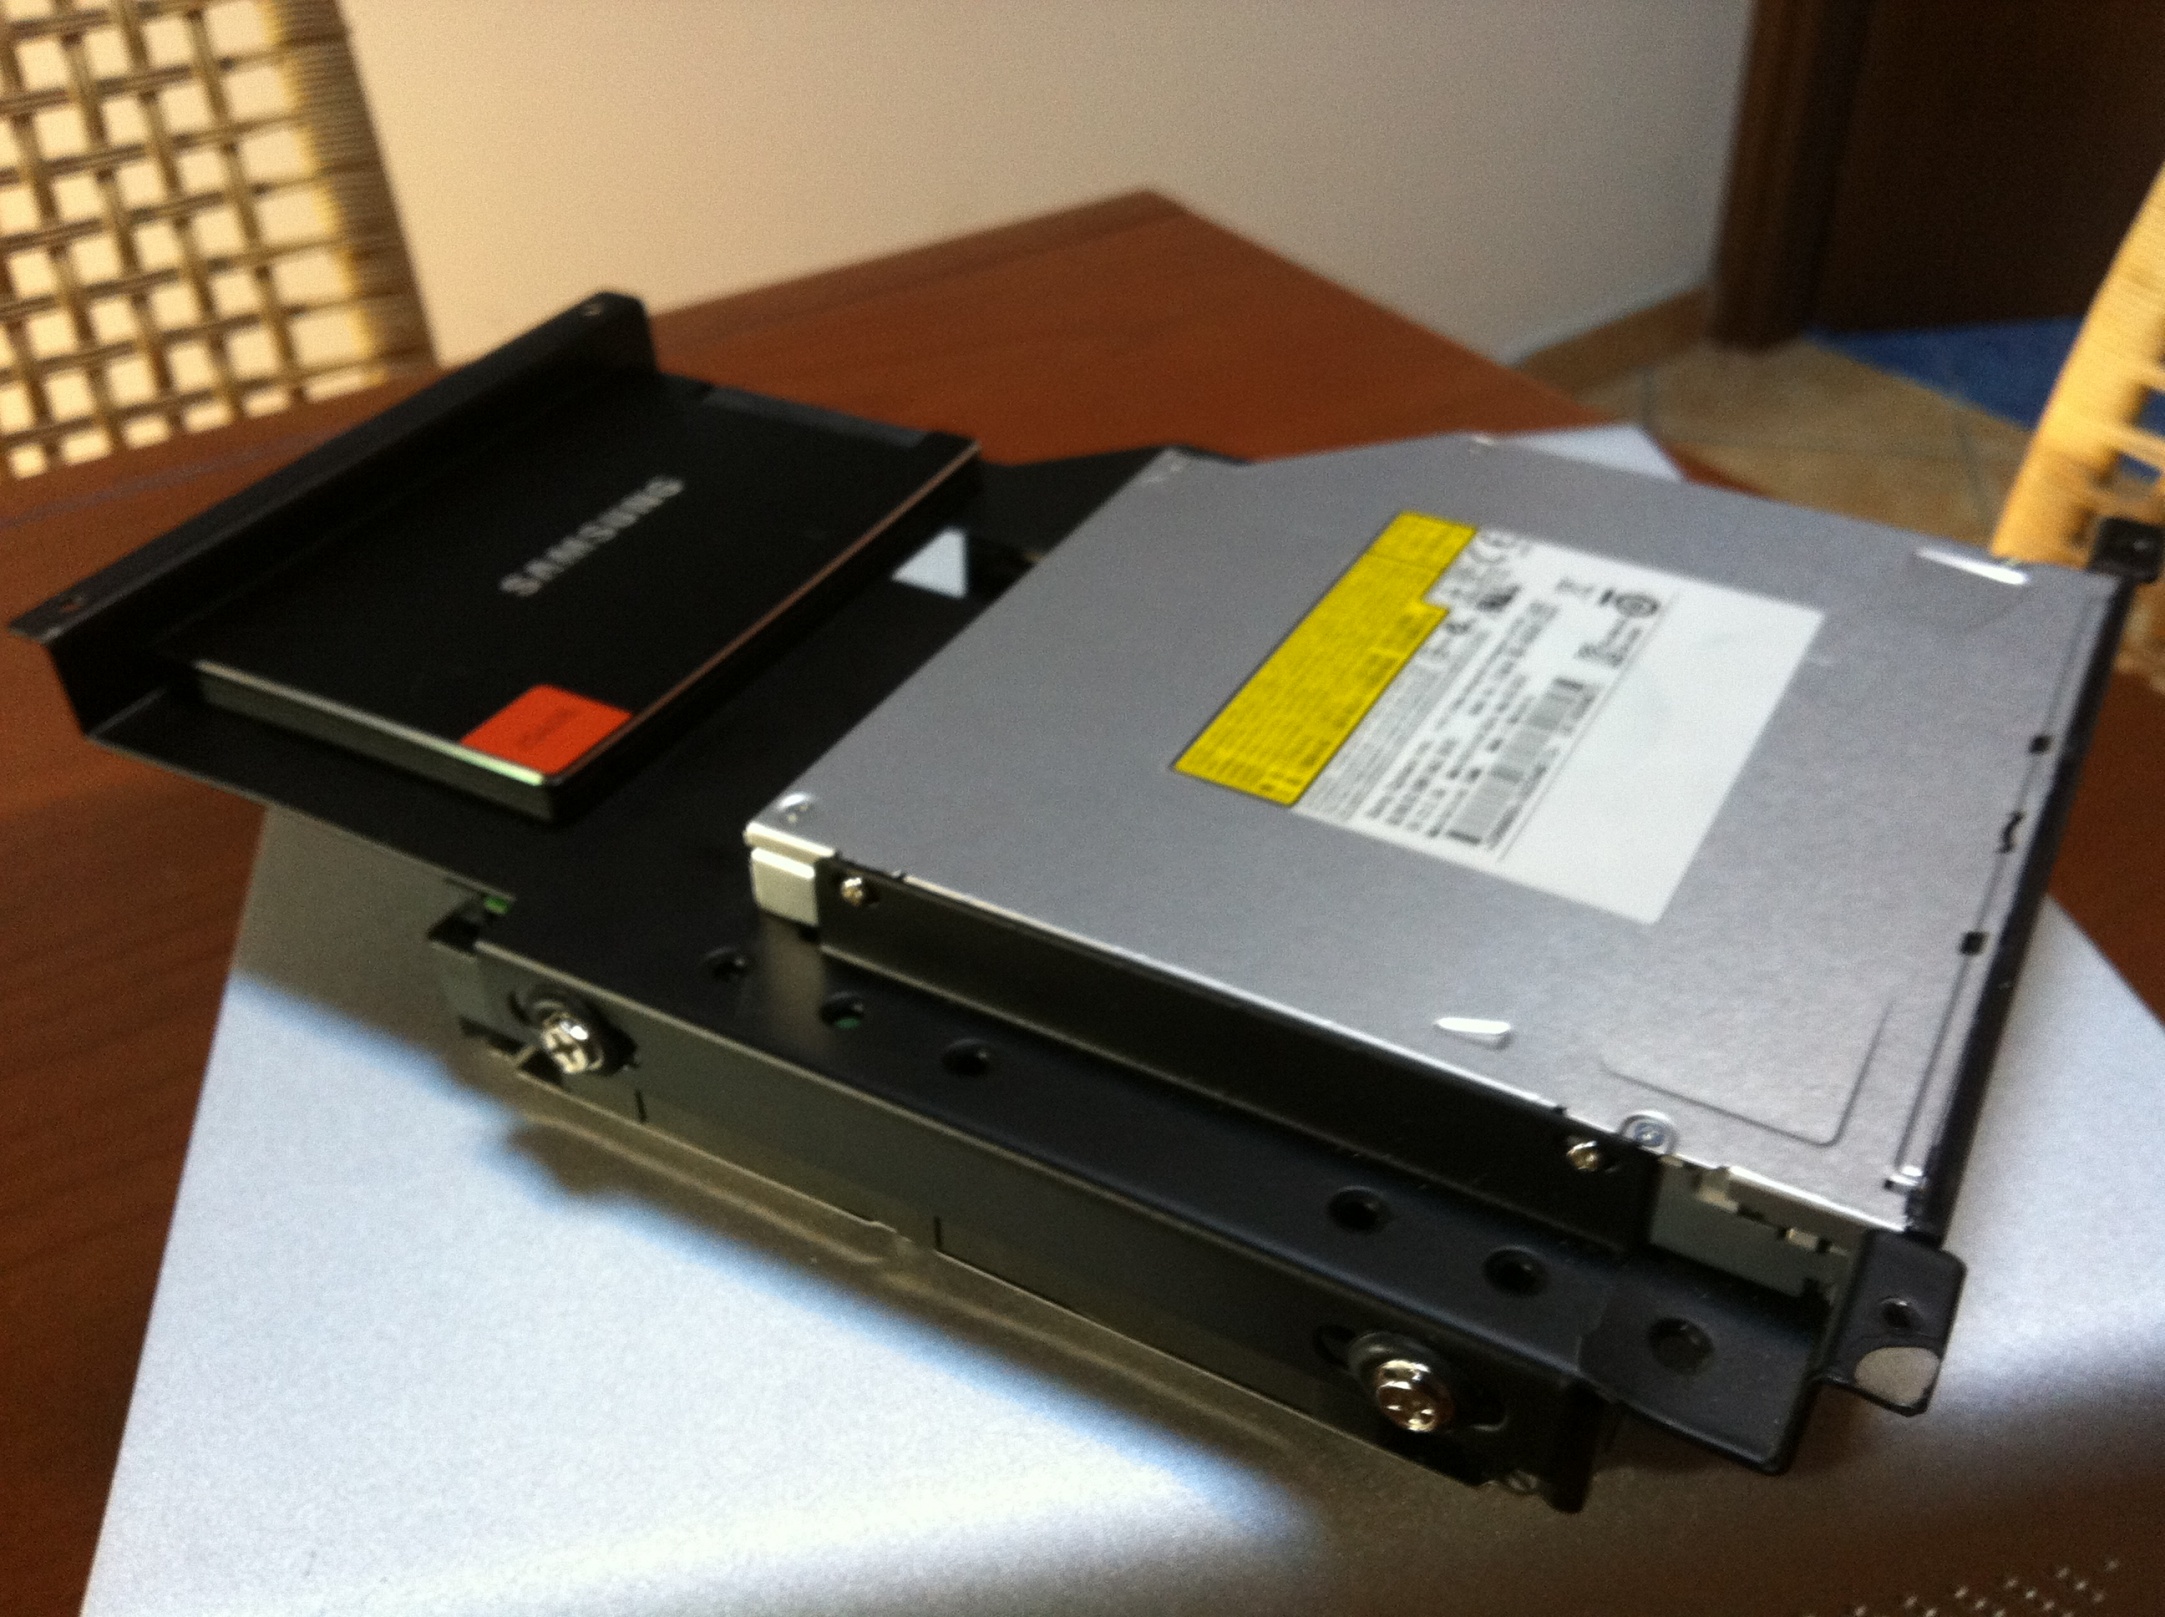
SAMSUNG 830 Series 2.5-Inch 256GB
http://www.amazon.com/dp/B0077CR66A/

Crucial m4 256GB mSATA Internal Solid State Drive
http://www.amazon.com/dp/B0085J17UA/

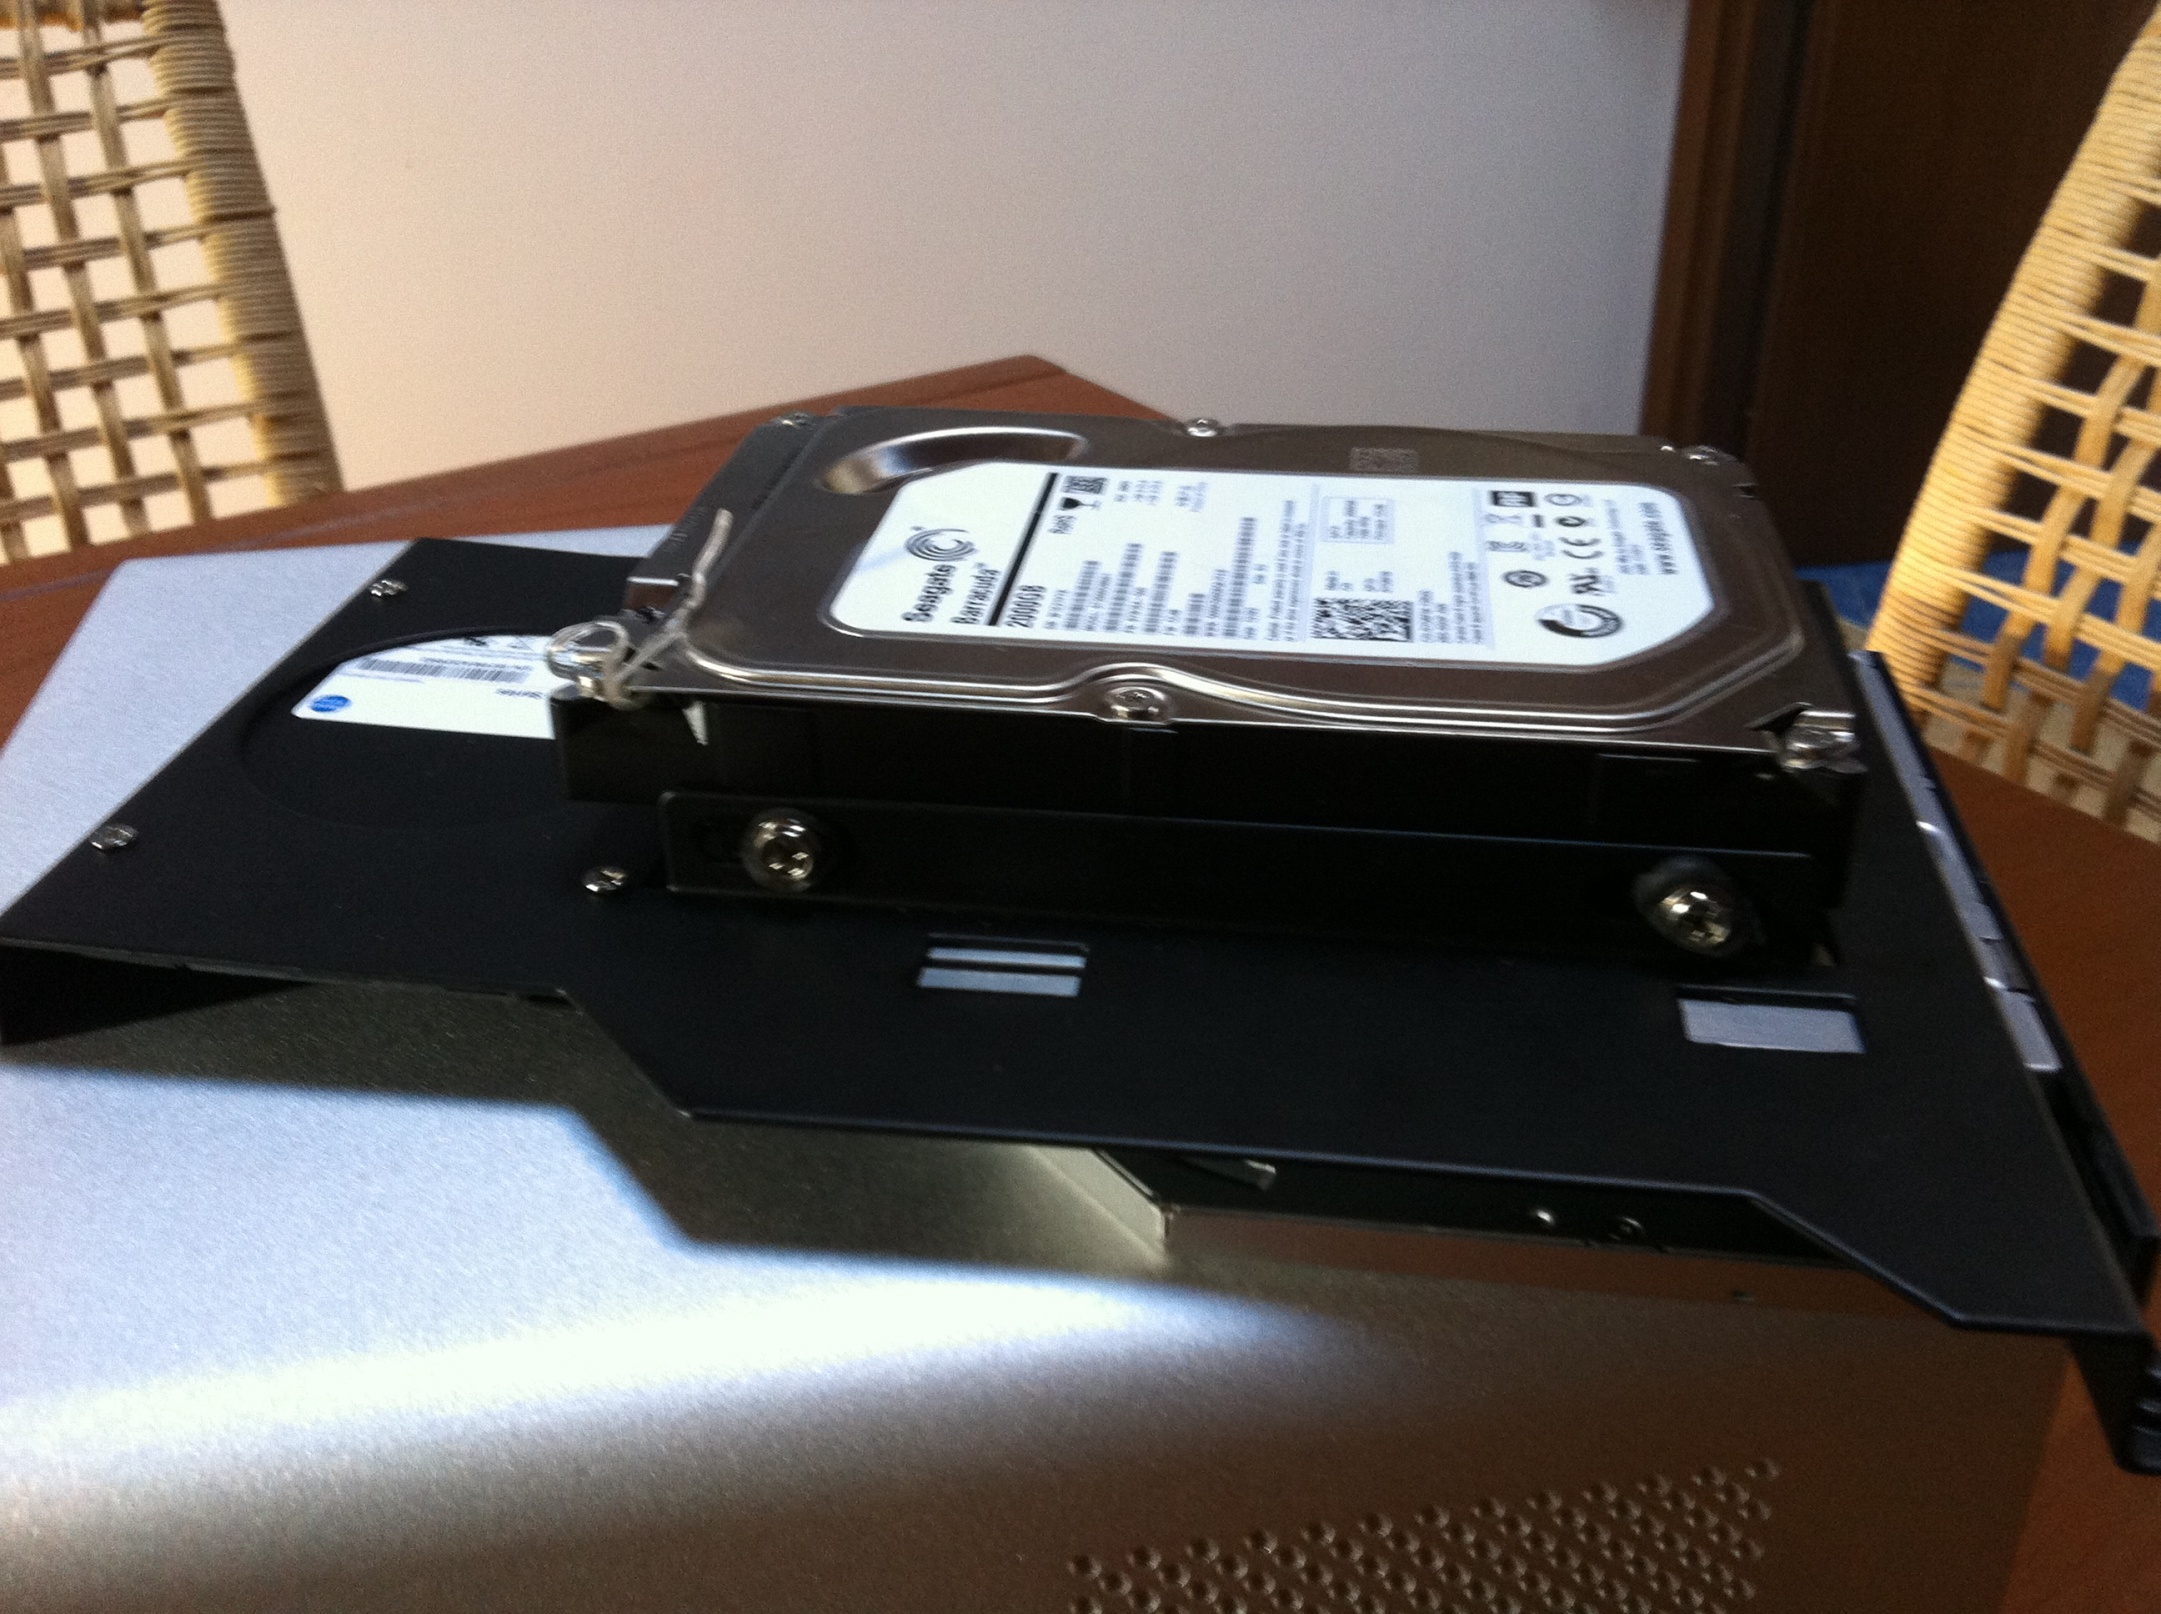
Seagate ST2000DM001 Barracuda 7200RPM 2 TB SATA 6 GB/s
http://www.amazon.com/dp/B005T3GRN2/

Gelid Slim Silence I-Plus CPU Cooler
http://www.amazon.com/dp/B0058W3IUO/

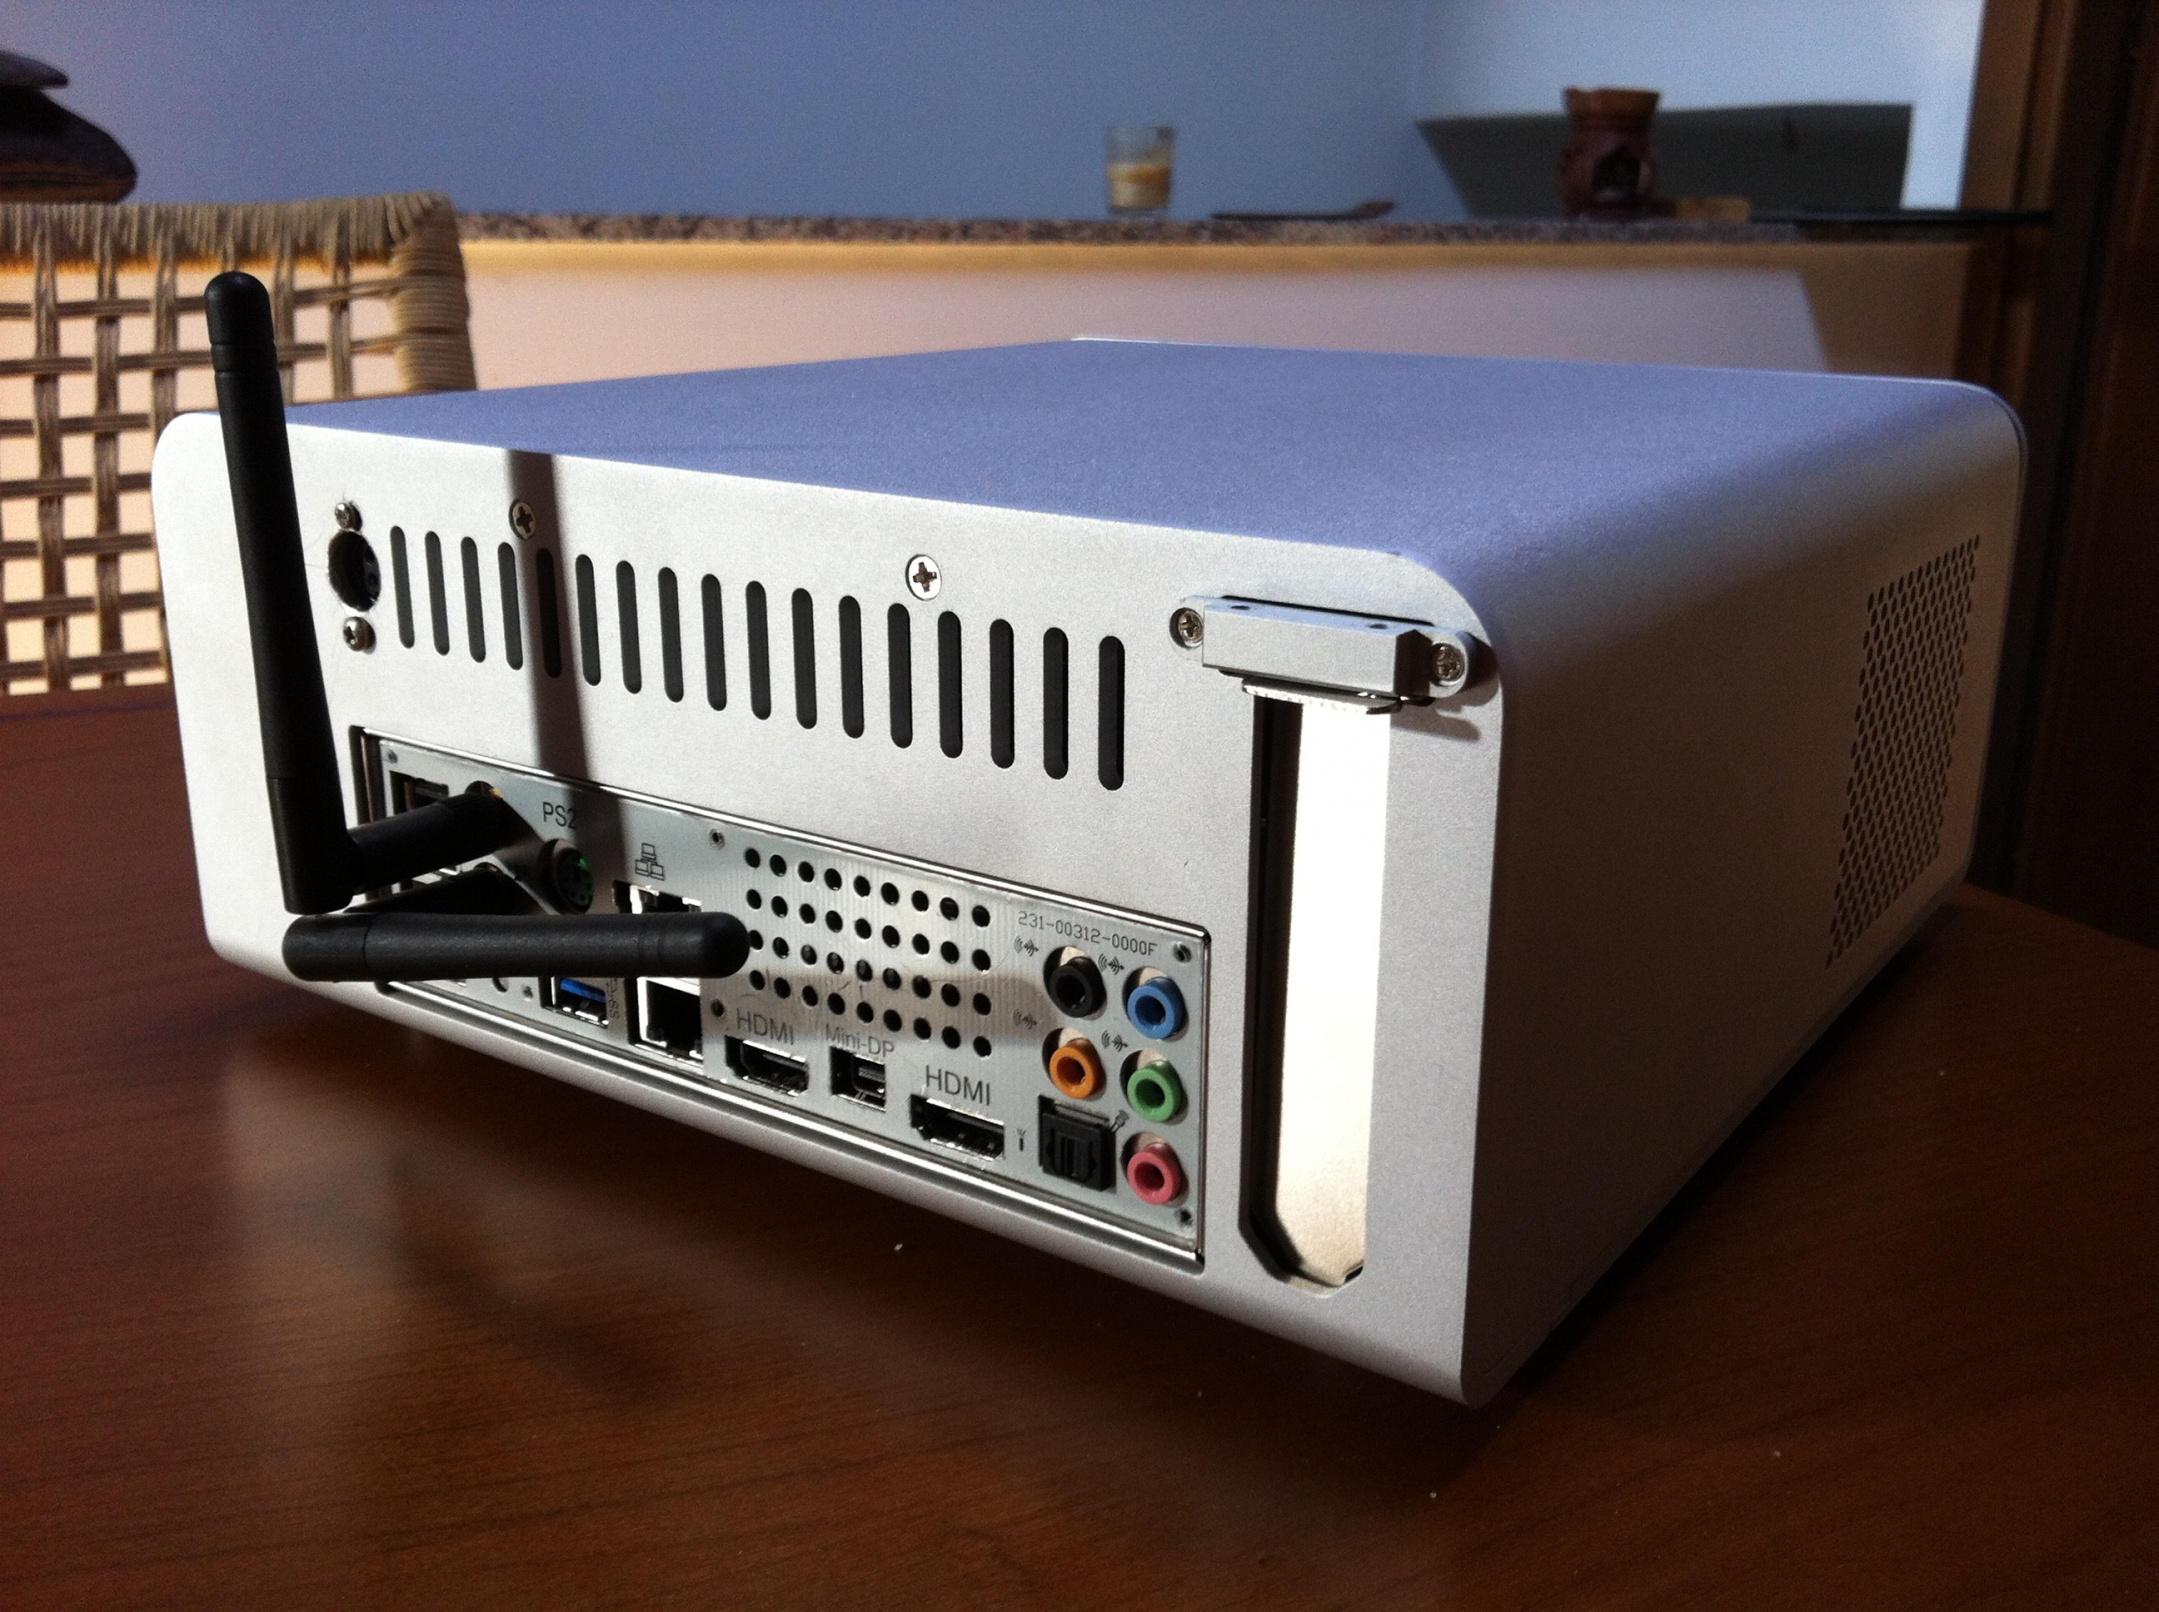
Streacom F7C EVO Chassis
[AMAZON-uk]http://www.amazon.co.uk/dp/B00958DA5K/[/AMAZON-uk]

PicoPSU-160-XT High Power 24 Pin Mini-ITX Power Supply
http://www.amazon.com/gp/product/B005TWE6B8/

192w AC-DC Power Adapter, 12v 16A
http://www.amazon.com/dp/B00905I1TI/

Sony Optiarc Blu Ray Slim RW BD5850H
http://www.newegg.com/Product/Product.aspx?Item=N82E16827118072

Belkin F8T016 Mini Bluetooth Adapter
http://www.amazon.com/dp/B001E96JBK/

Noctua NF-R8 PWM Cooling Fan
http://www.amazon.com/dp/B006GD30UC/

Apple Wireless Keyboard
http://www.amazon.com/dp/B005DLDO4U/

Apple Magic Mouse
http://www.amazon.com/dp/B002TLTGM6/

Apple Infrared Remote Control
http://www.amazon.com/dp/B002TPFNXS/

MacBook Pro Infrared board
http://www.powerbookmedic.com/MacBook-Pro-Infrared-board-p-18041.html

nVidia Quadro NVS 295 PCIe x16 (Optional - see Comments)
http://www.amazon.com/dp/B008RY5LO6/

OSX Mountain Lion 10.8.5
http://www.apple.com/osx/


Comments

This machine was assembled for HTPC use and audio editing. No need powerful graphic card, HD 4000 is totally enough to me.
This board is really amazing, it has all the stuff I need, except:
- MiniDisplay Port: it doesn't support 27" Apple Cinema Display (non thunderbolt). This explain nVidia Quadro NVS 295 gfx card.
- DVI port: not there!
- USB 3.0: don't recognize usb 2.0 sticks see UPDATE #5 and #7​

Beside that, everything is working fine:
- Full native Ivy Bridge Power Management with custom SSDT ---> see UPDATE #3
- Auto and manual sleep
- HDMI audio (all video ports)
- WiFi on board (Atheros AR9285, DSDT editing required - onboard AR3001 Bluetooth not working)
- Both Ethernet fully functional
- Belkin 2.0 Bluetooth dongle (either in usb 2.0 and 3.0) Working in BIOS and Chimera bootloader
- Wake on LAN ---> see UPDATE #4​

I've tried to make this guide as simple and detailed as possible. Please feel free to make it better with tips and tricks I've missed.


Installation

Tools:
- PMPatch and FPT for patching and flashing Bios (registration required) by CodeRush
- Latest Zotac bios
- UniBeast for Mountain Lion and MultiBeast for Mountain Lion
- MaciASL Open Beta for editing .aml files (registration required)
- HexEdit
- KextBeast
- IORegistryExplorer attached by toleda in his post#1
- Trim Enabler by Groths
- Combo Update to Mountain Lion 10.8.5
- A working Mac or Hackintosh machine​

Step 1 - Bios patch
- Place PMPatch and the original latest bios on the desktop
- Open up Terminal (from Applications>Utilities folder)
- Drag the bios into the terminal window twice (for the input and output locations). Type PATCHED to the end of the second bios filename. This isn’t necessary but it helps to identify whether or not the bios has been patched.
- Hit enter, and your patched bios will be generated on desktop
- Rename patched bios with original bios name and replace it into the flash utility.
- I patched my bios using Zotac utility for Windows. It seems to be safer if you use FPT by CodeRush as it involves no OS, just a bootable dos USB: your choice.
- Reboot and set the new patched bios as below reported​
Bios patching is no longer needed - see UPDATE 11

Step 2 - Bios configuration
- Press Del key to gain bios settings
- Press F9 to load Optimized Defaults
- Leave Main section by default
- X-Settings main window​
bios 1.jpg
- X-Settings/CPU Configuration - Core Ratio Limits as default​
bios 2.jpg
- X-Settings/CPU Configuration - Core Ratio Limits modified ---> see SSDT script​
bios 2a.jpg
- X-Settings/Gpu Boost: leave default
- X-Settings/Memory Configuration: Load XMP-Profile 1 if supported by your RAM
- Advanced/onBoard Device​
bios 3.jpg
- Advanced/onBoard Device/Serial Port 0 Configuration​
bios 4.jpg
- Advanced/Storage Configuration​
bios 5.jpg
- Advanced/Cpu Configuration​
bios 6.jpg
- Advanced/USB Configuration​
bios 7.jpg
- Advanced/Display Configuration ----> Note: this config is for HD4000 integrated graphics, for discrete graphics set Primary Display [PEG]​
bios 8.jpg
- PcHealt: leave default
- PowerManage​
bios 9.jpg
- Boot: set this section at your convenience.
- Press F10 key to Save and Reboot​

Step 3 - Mountain Lion Installation
- Install Mountain Lion with UniBeast method as explained in Tonymac's guide Note: at step #4 you'll probably have to type -x before hitting enter, otherwise you won't reach installation screen. Take your time, install process will take 15-20 minutes.
- Reboot from Unibeast and at Chimera screen choose your new OSX installed partition (still typing -x)
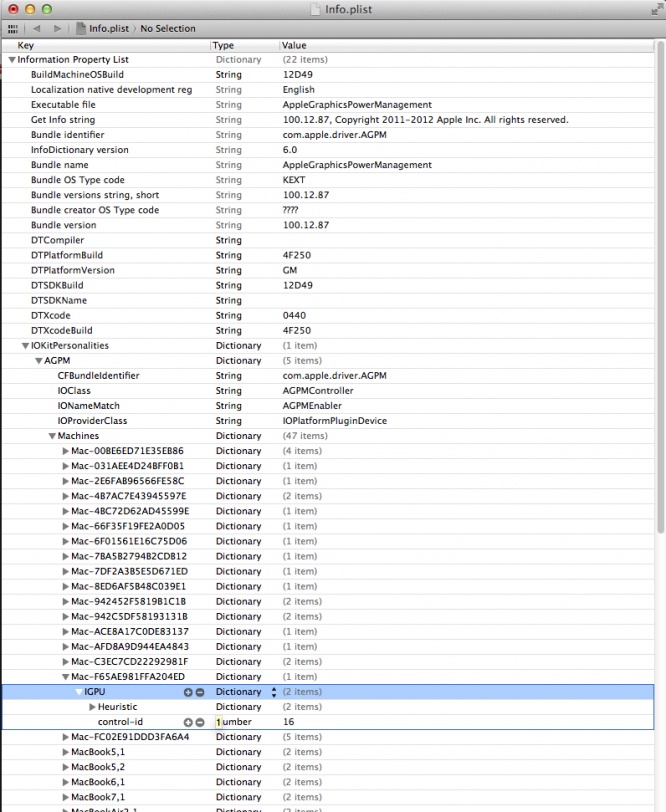
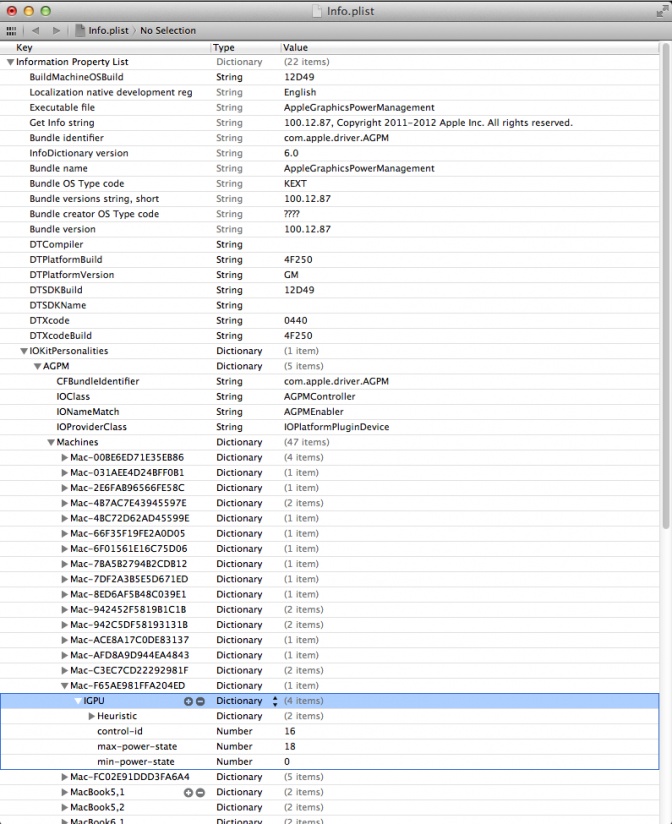
- Now it's time to edit DSDT

UPDATE 8
Thanks to the massive work of forum moderator PJALM, and the support of forum moderator SJ_Underwater, now only two patches are necessary to make this board fully functional. Simply follow these steps (the red ones are not necessary anymore, but basically are the same job that PJALM patch does).
- Download MaciASL from here, unzip it and open it. It automatically will open a "clean" DSDT. It's important to know that these patches can be applied just one time, so if you want re-patch dsdt you'll have to start from a clean dsdt.aml again. So my advice is: save a backup copy of this file just in case you need to re-patch it. To do that just go to MaciASL menu bar click on File/Save as, choose the directory where you want to keep your backup clean dsdt, select Disassembled ASL file as File Format and name it "clean dsdt".
- in Menu bar open MaciASL\Preferences and select Sources in Preferences window
- set iASL as ACPI 5.0 as in the following picture
57590-maciasl-1.png
- select sources icon, click on "+" to add Name and URL of the patches that you need: in my case they are

- Close completely MaciASL and re-open it: again a clean DSDT will appear as before, click on Patch command: now in the left side of the Patch window you should see all the patches we've just added like this
58363-zotac-dsdt-patches.png
- Under PJALM Zotac choose your motherboard's patch, click on Apply, then Close. Now click on Compile command: no Errors, Warnings nor Remarks should appear, but some Warnings may stay: they won't affect your installation; the mandatory thing is NOT TO HAVE ERRORS when compiling a DSDT! Go on
- Re-open patch windows and under PJALM Graphics select
  • Generic Discrete Graphics (AMD/nVidia) to enable HDMI Audio if you have a discrete graphic card or
  • Intel HD4000 to enable HDMI Audio if you have ONLY Intel HD 4000 onboard graphic)
- Apply your right patch and check compile: now you should have 0 Errors, 0 Warnings, 0 Remarks, XX Optimizations.
- Go to MaciASL menu bar click on File/Save as, choose desktop as directory, select ACPI Machine Language Binary as File Format and name it "dsdt.aml" (add extension manually).

The next red steps are not necessary anymore. I leave them in the thread 'cause they're still valuable infos.

END UPDATE 8

The next red steps are not necessary anymore. I leave it here çause they're still valuable infos.
-Maybe 1 Warning will appear, probably concerning (GDSV); if so, find
Code:
Method (GDSV, 1, Serialized)
and below that you'll see this
Code:
                    Return (Package (0x01)
                    {
                        One
                    })
That must be replaced with this
Code:
                    }
                    Else
                    {
                    Return (One)
- Compile again, and the Warning should disappear
- Re-open patch windows and under Audio HDMI Ivy Bridge/HD4000/7 Series select
  • AMI-AMD-Nvidia-7_Series-A1 (to enable HDMI Audio if you have a discrete graphic card) or
  • AMI-HD4000-7_Series-A3 (to enable HDMI Audio if you have ONLY Intel HD 4000 onboard graphic)
The difference is at the bottom of the patch
Code:
Buffer (0x04)\n
                {\n
                    0x01, 0x00, 0x00, 0x00\n
                }, \n
rather than
Code:
Buffer (0x04)\n
                {\n
                    0x03, 0x00, 0x00, 0x00\n
                }, \n
- Apply your right patch and check compile: now you should have 0 Errors, 0 Warnings, 0 Remarks, XX Optimizations.
- If you have Ralink WiFi card on your board, you have to change it with a OSX friendly WiFi card such as Atheros AR9280 (OOB). If Atheros AR9285 is on your board, to make it work (only the WiFi part - Bluetooth doesn't work) you have to find in DSDT Device (RP01) wich should look like this
Code:
Device (RP01)
            {
                Name (_ADR, 0x001C0000)
                Name (_HPP, Package (0x04)
                {
                    0x08, 
                    0x40, 
                    One, 
                    Zero
                })
                OperationRegion (PXCS, PCI_Config, 0x40, 0xC0)
                Field (PXCS, AnyAcc, NoLock, Preserve)
                {
                            Offset (0x10), 
                    L0SE,   1, 
                            Offset (0x11), 
                            Offset (0x12), 
                        ,   13, 
                    LASX,   1, 
                            Offset (0x14), 
                        ,   6, 
                    HPCE,   1, 
                            Offset (0x1A), 
                    ABPX,   1, 
                        ,   2, 
                    PDCX,   1, 
                        ,   2, 
                    PDSX,   1, 
                            Offset (0x1B), 
                            Offset (0x20), 
                            Offset (0x22), 
                    PSPX,   1, 
                            Offset (0x98), 
                        ,   30, 
                    HPEX,   1, 
                    PMEX,   1
                }

                Field (PXCS, AnyAcc, NoLock, WriteAsZeros)
                {
                            Offset (0x94), 
                        ,   1, 
                    EIFD,   1, 
                            Offset (0x95), 
                            Offset (0x9C), 
                        ,   30, 
                    HPSX,   1, 
                    PMSX,   1
                }

                Device (PXSX)
                {
                    Name (_ADR, Zero)
                    Name (_PRW, Package (0x02)
                    {
                        0x09, 
                        0x04
                    })
and add this part
Code:
Method (_DSM, 4, NotSerialized)
                    {
                        Store (Package (0x0B)
                            {
                                "AAPL,slot-name", 
                                Buffer (0x08)
                                {
                                    "AirPort"
                                }, 

                                "device-id", 
                                Unicode ("0"), 
                                Buffer (0x08)
                                {
                                    "AirPort"
                                }, 

                                "model", 
                                Buffer (0x35)
                                {
                                    "Atheros 928x 802.11 a/b/g/n Wireless Network Adapter"
                                }, 

                                "subsystem-id", 
                                Buffer (0x04)
                                {
                                    0x8F, 0x00, 0x00, 0x00
                                }, 

                                "subsystem-vendor-id", 
                                Buffer (0x04)
                                {
                                    0x6B, 0x10, 0x00, 0x00
                                }
                            }, Local0)
                        DTGP (Arg0, Arg1, Arg2, Arg3, RefOf (Local0))
                        Return (Local0)
                    }
                }

and the risults will be
Code:
Device (RP01)
            {
                Name (_ADR, 0x001C0000)
                Name (_HPP, Package (0x04)
                {
                    0x08, 
                    0x40, 
                    One, 
                    Zero
                })
                OperationRegion (PXCS, PCI_Config, 0x40, 0xC0)
                Field (PXCS, AnyAcc, NoLock, Preserve)
                {
                            Offset (0x10), 
                    L0SE,   1, 
                            Offset (0x11), 
                            Offset (0x12), 
                        ,   13, 
                    LASX,   1, 
                            Offset (0x14), 
                        ,   6, 
                    HPCE,   1, 
                            Offset (0x1A), 
                    ABPX,   1, 
                        ,   2, 
                    PDCX,   1, 
                        ,   2, 
                    PDSX,   1, 
                            Offset (0x1B), 
                            Offset (0x20), 
                            Offset (0x22), 
                    PSPX,   1, 
                            Offset (0x98), 
                        ,   30, 
                    HPEX,   1, 
                    PMEX,   1
                }

                Field (PXCS, AnyAcc, NoLock, WriteAsZeros)
                {
                            Offset (0x94), 
                        ,   1, 
                    EIFD,   1, 
                            Offset (0x95), 
                            Offset (0x9C), 
                        ,   30, 
                    HPSX,   1, 
                    PMSX,   1
                }

                Device (PXSX)
                {
                    Name (_ADR, Zero)
                    Name (_PRW, Package (0x02)
                    {
                        0x09, 
                        0x04
                    })
                    Method (_DSM, 4, NotSerialized)
                    {
                        Store (Package (0x0B)
                            {
                                "AAPL,slot-name", 
                                Buffer (0x08)
                                {
                                    "AirPort"
                                }, 

                                "device-id", 
                                Unicode ("0"), 
                                Buffer (0x08)
                                {
                                    "AirPort"
                                }, 

                                "model", 
                                Buffer (0x35)
                                {
                                    "Atheros 928x 802.11 a/b/g/n Wireless Network Adapter"
                                }, 

                                "subsystem-id", 
                                Buffer (0x04)
                                {
                                    0x8F, 0x00, 0x00, 0x00
                                }, 

                                "subsystem-vendor-id", 
                                Buffer (0x04)
                                {
                                    0x6B, 0x10, 0x00, 0x00
                                }
                            }, Local0)
                        DTGP (Arg0, Arg1, Arg2, Arg3, RefOf (Local0))
                        Return (Local0)
                    }
                }

                Method (HPME, 0, Serialized)


- Compile DSDT as usual (checking 0 Errors, 0 Warnings, 0 Remarks, XX Optimization) and this editing will make Atheros AR9285 working.
- to fix the "Unknown SATA controller" in system profiler find

Code:
Device (SAT0)
        {
            Name (_ADR, 0x001F0002)
        }

Change it to this:

Code:
Device (SAT0)
        {
            Name (_ADR, 0x001F0002)
            Method (_DSM, 4, NotSerialized)
            {
                Store (Package (0x02)
                    {
                        "device-id", 
                        Buffer (0x04)
                        {
                            0x03, 0x1E, 0x00, 0x00
                        }
                    }, Local0)
                DTGP (Arg0, Arg1, Arg2, Arg3, RefOf (Local0))
                Return (Local0)
            }
        }
- later (when post-installation will be done) if for some reason System Profiler won't show the right Intel 7 Series Chipset, take a look at this thread (post #9) to make it work.

UPDATE #7 ---> see post #16 and #17 for reference
- this patch allows Intel USB 3.0 Controller to work properly with ANY Usb devices (3.0, 2.0, 1.0). Apply USB Multiplex from PJALM Intel7 patch, this method is based on Forum member Mieze's work
This method will work for any Ivy Bridge System Definition. /end UPDATE #7.


MultiBeast configuration​

54595-multibeast.jpg

- Restart from HD and Type again -x (last time!)
- Open org.chameleon.Boot.plist in HD/Extra and add this
Code:
<key>Kernel Flags</key>
<string>dart=0</string>
to avoid AppleACPIPlatform.kext Rollback installation and save it.
- Restart and the system will boot properly.​

We're not done yet! See you in post #4 :ugeek:
 
Last edited by a moderator:
Very nice build :thumbup: Have any pictures of the internal layout ?
 
Of course! It will take me some days to complete this guide, I'll post everything. Sorry for taking so long, but I don't have much time right now :thumbup:
 
Welcome back! Let's continue this guide.

Step 4 - Post Installation
- Update your system with Apple Software Update
UPDATE #2 - If you created UniBeast flash drive with osx install 10.8.3 or newer, skip this step, otherwise, after Software Update you'll have to run Multibeast and install AppleHDA.kext again
- Now you have to check the right mappature of physical connectors: probably they will be wrong, so you'll need to edit hex codes of AppleIntelFramebufferCapri.kext/Contents/MacOS/AppleIntelFramebufferCapri
- Open IORegistryExplorer, type display0 in search field, delete display0 in the same field and scroll up the left side of the window to see where actually your monitor is plugged in. This board has three port: two hdmi (port 0x05 AppleIntelFramebuffer@0, and port 0x06 AppleIntelFramebuffer@1) and a Mini DisplayPort (port 0x07 AppleIntelFramebuffer@2).
As you can see in the picture below, my display is plugged in the first hdmi port (near the Ethernet port) showing display0 in AppleIntelFramebuffer@1. Click on that and in the right side of the window check these values
av-signal-type
connector-type
For both HDMI ports correct values are
av-signal-type ----->08 00 00 00
connector-type ---->00 08 00 00
Of course to check the second hdmi port you have to plug your monitor in it and look for AppleIntelFramebuffer@0 and for Mini DisplayPort find AppleIntelFramebuffer@2
For MiniDisplayPort correct values are
av-signal-type ----->08 00 00 00
connector-type ---->00 04 00 00
To check port number scroll down the right side and you'll find it.
46598-ioreg-connectors.jpg

If those values are not as posted above proceed as following:

UPDATE #9
Thanks to Forum Moderator SJ_UnderWater, who made this, attached to this post you'll find zotacz77hd4k.zip, a hex binary patcher based on SJ's open source Patcho, that automatically turn the wrong hex values of AppleIntelFramebufferCapri.kext into the right ones. It uses a self-elevating process, that means no need for terminal nor sudo typing. Simply do the next steps:
- Download zotacz77hd4k.zip from attached files down here
- Unzip zotacz77hd4k.zip
- Double click to unzipped zotacz77hd4k (exec dark grey icon)
- Type your password, press Enter...done!
Something like this
58026-capry-bynary-patcher.png
- Repair Permissions with Disk Utility and rebuild cache with Kext Wizard
- Reboot
Note 1: If Gatekeeper is on you won't be able to double-click, just right-click and choose Open.
Note 2: Save somewhere your edited AppleIntelFramebufferCapri.kext in case of System Update, it could be useful to avoid editing it again!
- Open IORegistryExplorer and check connectors av-signal-type and connector-type as explained above or even better, check directly in AppleIntelFramebufferCapri.kext/Contents/MacOS/AppleIntelFramebufferCapri the second code block (the edited one, stated as "Final Result" down here, I mean) as explained in the red following steps. Now your values should be correct.
The next red steps are basically what zotacz77hd4k did, if you want to do it manually!

- Copy AppleIntelFramebufferCapri.kext from System/Library/Extensions to Desktop
- Show package contents and open AppleIntelFramebufferCapri from AppleIntelFramebufferCapri.kext/Contents/MacOS/AppleIntelFramebufferCapri with HexEdit.
- In Menu bar click on Find/Find & Replace
for port 0x6 DP>HDMI
Find:
03 04 00 00 00 04 00 00 07 01 00 00
Replace:
03 04 00 00 00 08 00 00 06 00 00 00

for port 0x7 HDMI>DP
Find:
04 06 00 00 00 08 00 00 06 00 00 00
Replace:
04 06 00 00 00 04 00 00 07 01 00 00

for port 0x5 DP>HDMI
Find:
02 05 00 00 00 04 00 00 07 01 00 00
Replace
02 05 00 00 00 08 00 00 06 00 00 00

Pay attention! Find command will find several lines "03 04 00 00 00 04 00 00 07 01 00 00" or "04 06 00 00 00 08 00 00 06 00 00 00" and "02 05 00 00 00 04 00 00 07 01 00 00". You have to replace the ones that you find in this block

0A 00 66 01 00 02 03 02 00 00 00 02
00 00 00 01 00 00 00 20 10 07 00 00
10 07 00 00 00 00 00 00 00 00 00 00
00 00 00 00 00 00 00 00 00 00 00 00
02 05 00 00 00 04 00 00 07 01 00 00
03 04 00 00 00 04 00 00 07 01 00 00
04 06 00 00 00 08 00 00 06 00 00 00

00 00 00 00 01 00 00 00 40 00 00 00

So in order to find it, go to IOReg, search IGPU@2/AAPL,ig-platform-id and you will see 0A 00 66 01 (at least in my case!), those are exactly the first eight numbers of the right block to edit. So in HexEdit Find: 0A006601 and under that you will see the codes to edit.

And the final result will be like this:

0A 00 66 01 00 02 03 02 00 00 00 02
00 00 00 01 00 00 00 20 10 07 00 00
10 07 00 00 00 00 00 00 00 00 00 00
00 00 00 00 00 00 00 00 00 00 00 00
02 05 00 00 00 08 00 00 06 00 00 00
03 04 00 00 00 08 00 00 06 00 00 00
04 06 00 00 00 04 00 00 07 01 00 00

00 00 00 00 01 00 00 00 40 00 00 00

- Save in HexEdit, check in AppleIntelFramebufferCapri.kext/Contents/MacOS/AppleIntelFramebufferCapri (there must be only the one you just edited!)
- Delete AppleIntelFramebufferCapri.kext from System/Library/Extensions
- Run KextBeast (with edited AppleIntelFramebufferCapri.kext placed on Desktop)
- Repair Permissions with Disk Utility
- Reboot


END UPDATE #9

Now let's take a look at native power management.
- As toleda posted in the linked credits, native power management for Ivy Bridge systems works with certain system definitions: in my case with i7 3770T cpu, the right sysdef is MacMini 6,2, so open Chameleon Wizard, select SMBios/Edit and choose Mac Mini (6,2) as SMBios and save it.

UPDATE #3: the following instruction to generate SSDT for optimized Ivy Bridge Power Management are optional if you have stock CPU Core Ratio Limits in bios (see Bios Settings Section in post #1) and already installed Combo Update 10.8.3 or fresh install 10.8.3. But if you want to customize your Power Management, then keep reading :)
- Download the latest SSDT generation script here attached in post #1(click on RAW and save it on desktop without further extensions)
- Open the file (ssdtPRGen.sh) with text edit and change gBaseFrequency=1100 from default gBaseFrequency=1600, then save
- Open a terminal window and type chmod +x ~/Desktop/ssdtPRGen.sh then hit enter
- Drag ssdtPRGen.sh into the terminal window and hit enter to generate SSDT_PR.dsl on desktop
- Open SSDT_PR.dsl with MaciASL, compile (0 errors, 0 warnings, 0 remarks, 0 optimizations) and save as SSDT.aml (adding extension) File Format: ACPI Machine Language Binary.
- Drag the new SSDT.aml in Extra folder
- Go to Download folder and unzip ssdtPRGen.zip
- In Download folder click on unzipped ssdtPRGen icon JUST ONE TIME, in User folder you'll see ssdtPRGen.command and ssdtPRGen.sh
- Open a Terminal window and type
Code:
~/ssdtPRGen.sh 4100 40
those numbers are the frequency you set in bios (default max turbo frequency for i7 3770T is 3700) and TDP that you want. Check on intel web site for your cpu values. As PikeRAlpha stated, Ivy Bridge Power Management optimization allows CPU to run with less TDP (i7 3770T default TDP is 45) keeping pretty much the same performance level with lower temperature.
- Now ssdtPRGen will create your custom SSDT and will ask if you want to copy to Extra Folder: type Y (for yes) and you're done. This is pretty much what you'll see in terminal:
Code:
sdtPRGen.sh v5.6 Copyright (c) 2013 by Pike R. Alpha
----------------------------------------------------------------
Generating SSDT_PR.dsl for a Macmini6,2 [Mac-F65AE981FFA204ED]
Ivy Bridge Core i7-3770T processor [0x0701] setup
With a maximum TDP of 45 Watt, as specified by Intel
Override value: Max Turbo Frequency, now using: 4100 MHz!
Override value: Max TDP, now using: 40 Watt!
Number logical CPU's: 8 (Core Frequency: 2500 MHz)
Number of Turbo States: 16 (2600-4100 MHz)
Number of P-States: 26 (1600-4100 MHz)
Injected C-States for CPU0 (C1,C3,C6)
Injected C-States for CPU1 (C1,C2,C3)
Warning: Model identifier [Macmini6,2] is missing from: /S*/L*/CoreServices/PlatformSupport.plist

Intel ACPI Component Architecture
ASL Optimizing Compiler version 20130117-64 [Jan 19 2013]
Copyright (c) 2000 - 2013 Intel Corporation

ASL Input:     /Users/gio/Desktop/SSDT_PR.dsl - 262 lines, 8482 bytes, 56 keywords
AML Output:    /Users/gio/Desktop/SSDT_PR.aml - 1620 bytes, 27 named objects, 29 executable opcodes

Compilation complete. 0 Errors, 0 Warnings, 0 Remarks, 0 Optimizations

Do you want to copy /Users/gio/Desktop/SSDT_PR.aml to /Extra/SSDT.aml? (y/n)?
- If you have generated custom SSDT you'll have to add
<key>DropSSDT</key>
<string>Yes</string>
to org.chameleon.Boot.plist, otherwise skip this step
- Reboot
- Run MSRDumper, this is my result
Code:
11/02/13 12:29:40,000 kernel[0]: MSRDumper CoreMulti(11) 
11/02/13 12:29:40,000 kernel[0]: MSRDumper PStatesReached: 11 16 17 21 25 30 31 32 33 34 35 36 37
Code:
Mar 28 20:45:29 localhost kernel[0]: MSRDumper CoreMulti(16) 
Mar 28 20:45:29 localhost kernel[0]: MSRDumper PStatesReached: 16 17 21 25 30 31 32 33 34 35 36 37 38 39 40

UPDATE #6 Graphics Power Management
Once achieved CPU Ivy Bridge Power Management, let's optimize GPU Ivy Bridge Power Management.
As Toleda stated, AppleGraphicsPowerManagement.kext is used for product specific graphics power management. So here it is:
- copy AppleGraphicsPowerManagement.kext from S/L/E to the Desktop, then you need to edit AppleGraphicsPowerManagement.kext/Contents/Info.plist. I recommend not to use text edit, but a plist editor; as for me, I find myself confortable with Xcode, from Apple Developer site
- If you have (like me) SysDef Macmini 6,2, find in Info.plist "Mac-F65AE981FFA204ED" following this path Information Property List/IOKitPersonalities/AGPM/Machines (as that's Board-ID for Macmini6,2) and change from this

50269-agpm-before.jpg

to this
50270-agpm-after.jpg

- save the file, delete AppleGraphicsPowerManagement.kext from S/L/E, run KextBeast (with the edited AppleGraphicsPowerManagement.kext placed on desktop), repair permission, rebuilt cache and reboot.
- Check IOReg/igpu@2/AGPM, and you'll find min and max values just inserted (in AppleGraphicsPowerManagement.kext/Contents/Info.plist we added decimal - 18 and 0 - and in IOReg we find hexadecimal - 0x12 and 0x0)
NOTE: in my IOReg AGPM shows max value=0x10 and min value=0x0. Now, hex 0x10 correspond to dec 16 (not 18 as inserted in plist, I don't know why it happens, maybe CPU i7 3770T doesn't reach hex 12, that is a mistery to me!)

50279-agpm-ioreg.png

- If you have another SysDef (e.g. imac13 or macbookpro9/10) you'll have to edit AppleGraphicsPowerManagement.kext/Contents/Info.plist finding the right board ID. If you have a discrete graphic card, follow toleda's instruction on Mountain Lion: Native Ivy Bridge CPU and GPU Power Management - part B ------ end UPDATE #6

- To fix iMessage follow the instruction posted here but in config.plist you'll need to change the original one from
Code:
<?xml version="1.0" encoding="UTF-8"?>
<!DOCTYPE plist PUBLIC "-//Apple//DTD PLIST 1.0//EN" "http://www.apple.com/DTDs/PropertyList-1.0.dtd">
<plist version="1.0">
<dict>
	<key>Graphics</key>
	<dict>
		<key>GraphicsInjector</key>
		<string>Yes</string>
		<key>PatchVBiosBytes</key>
		<dict>
			<key>Find</key>
			<data>
			gAeoAqAF
			</data>
			<key>Replace</key>
			<data>
			gAeoAjgE
			</data>
		</dict>
	</dict>
	<key>Pointer</key>
	<dict>
		<key>Speed</key>
		<string>8</string>
	</dict>
	<key>RtVariables</key>
	<dict>
		<key>MLB</key>
		<string>C02JK967DHJT21412</string>
	</dict>
	<key>SMBIOS</key>
	<dict>
		<key>ProductName</key>
		<string>iMac12,1</string>
	</dict>
	<key>SystemParameters</key>
	<dict>
		<key>InjectSystemID</key>
		<string>Yes</string>
		<key>LegacyBoot</key>
		<string>PBR</string>
		<key>prev-lang:kbd</key>
		<string>en:0</string>
	</dict>
</dict>
</plist>

to

Code:
<?xml version="1.0" encoding="UTF-8"?>
<!DOCTYPE plist PUBLIC "-//Apple//DTD PLIST 1.0//EN" "http://www.apple.com/DTDs/PropertyList-1.0.dtd">
<plist version="1.0">
<dict>
	<key>Graphics</key>
	<dict>
		<key>GraphicsInjector</key>
		<string>Yes</string>
		<key>PatchVBiosBytes</key>
		<dict>
			<key>Find</key>
			<data>
			gAeoAqAF
			</data>
			<key>Replace</key>
			<data>
			gAeoAjgE
			</data>
		</dict>
	</dict>
	<key>Pointer</key>
	<dict>
		<key>Speed</key>
		<string>8</string>
	</dict>
	<key>RtVariables</key>
	<dict>
		<key>MLB</key>
		<string>[B]C02JK967DHJT21412[/B]</string>
	</dict>
	<key>SMBIOS</key>
	<dict>
		<key>ProductName</key>
		<string>[B]Macmini6,2[/B]</string>
	</dict>
	<key>SystemParameters</key>
	<dict>
		<key>InjectSystemID</key>
		<string>Yes</string>
		<key>LegacyBoot</key>
		<string>PBR</string>
		<key>prev-lang:kbd</key>
		<string>en:0</string>
	</dict>
</dict>
</plist>

Note: You have to insert your actual SMserial (it has 12 digits, add five more digits randomly, as Clover needs a 17 digit code) and System Definition. Those info are available in smbios.plist placed in Extra folder.
UPDATE 1 - Install Chimera 2.0.0 or newer to fix iMessage log in issue ---> Not necessary anymore (new Chimera included in latest MultiBeast)
- If Auto Sleep doesn't work follow this steps:
- open terminal and type "pmset -g assertions" (no quotes)
- if you see something like that
Code:
Assertion status system-wide:
PreventUserIdleDisplaySleep 0
PreventSystemSleep 0
PreventUserIdleSystemSleep 0
ExternalMedia 0
DisableLowPowerBatteryWarnings 0
UserIsActive 0
ApplePushServiceTask 0
BackgroundTask 1

lmediamounted" 
pid 192(helpd): [0x0000000c00000133] 00:03:06 BackgroundTask named: "com.apple.helpd.sdmbuilding"

you just have to type "launchctl unload -w /System/Library/LaunchAgents/com.apple.helpd.plist".
- type again "pmset -g assertions", and when all numbers are 0 you go on
- in org.chameleon.Boot.plist change DarkWake to =8
- Reboot.
That worked for me.
- Editing DSDT for HD4000 graphics makes GraphicsEnabler Key-string in org.chameleon.Boot.plist unnecessary, so you can delete it​

UPDATE 2 - Installed Combo Update 10.8.3: no need SSDT for Ivy Bridge Power Management (optional, SSDT generated with SSDTScript By PikeRAlpha ---> see above). After the update, remember to re-install AppleHDA.kext ('ALC892 With DSDT') from MultiBeast and edited AppleIntelFramebufferCapri.kext with Kextbeast

UPDATE 3 - Changed CPU Core Ratio Limit to 41 and created custom SSDT (see above, again :))

UPDATE 4 - Enable Wake on Lan in bios and tested with Log me in iNet WOL app from iPhone 4: works like a charm!

UPDATE 10 - Updated the system with Combo Update 10.8.4, reboot, then run Multibeast selecting just the audio option, run zotacz77hd4k as stated in this post, Run trim enabler, repair permission, rebuild cache and reboot. Done!

UPDATE 11 - Flashed BIOS using Zotac Windows utility with new Zotac BIOS release. Thanks to CodeRush whom worked with Zotac developers, the unlocking process of bios is no longer needed! Everything is working as expected on Mountain Lion 10.8.4! Here's what I did:
  • Booted the system into Windows
  • downloaded new Zotac bios
  • flashed BIOS following Zotac instructions (put the content of the unzipped folder into a new folder C:BIOS, then run the update command)
  • loaded optimized default and set bios as stated in op
  • rebooted into OSX typing DSDT=Null flag in Chimera screen
  • opened MaciASL and patched the dsdt with Z77-ITX patch under PJALM Zotac + toleda's AMI-HD4000-7_Series-A3 patch under Audio HDMI Ivy Bridge/HD4000/7 Series
  • compiled (0 Errors, 0 Warnings, 0 Remarks, XX Optimizations) DSDT
  • saved DSDT.aml (added extension manually) on desktop (File Format: ACPI Machine Language Binary)
  • made a backup of the old /Extra/dsdt.aml
  • replaced the old dsdt.aml with the new one in /Extra
  • rebooted
END UPDATE 11

UPDATE 12 --- Fixed Safari/Firefox crashes on Flash Player plug-in YouTube videos, mostly with discrete card

For some reason, YouTube (and others) videos make the system crash, showing flickering images just before the issue, no video at all. I've noticed that happens with discrete card only (most nVidia, can't really say for ATI/AMD), while with onboard HD4000 that doesn't happen. Here's the fix:
  • Choose a web video that gives you this issue (not all videos do that, I believe just tose ones that require Flash Player plug-in)
  • Don't play it, otherwise the system will probably crash (but you already know that, don't you?)
  • Right click on the video and choose settings
  • A window like this will appear
    58866-hw-flash-player.png
  • Simply uncheck Enable Hardware Acceleration (my pic is in italian, I guess you'll find it in your system language)
  • Close and re-open the browser (Safari/Firefox) and check: hopefully that will do the trick.
Done!
Thanks to this post, zuzudom and my friend PL for testing
END UPDATE 12

UPDATE 13 --- Updated the system with Combo Update 10.8.5.
  • Make a backup of your Mountain Lion Partition (you'll never know)
  • Download 10.8.5 Combo update from here
  • Run Combo Update
  • When update has finished run Multibeast selecting just the audio option (see MultiBeast screenshot, above)
  • Run zotacz77hd4k (see attachments down here) as stated in this post
  • Run trim enabler
  • Download toledaARPT.kext from here (click on View Raw) to make WiFi card AR9285 working
  • Unzip toledaARPT.kext.zip and place toledaARPT.kext on desktop
  • Run KextBeast to install toledaARPT.kext in S/L/E
  • Repair permission, rebuild cache and reboot. Done!
Note: The entire Install process can be done with Mountain Lion 10.8.5
END UPDATE 13

Attachments

giacomoleopardo Zotac files folder with
- Edited AppleIntelFramebufferCapri.kext (invisible, show all files to see it!)
- dsdt.aml
- org.chameleon.Boot.plist
- smbios.plist
- SSDT.aml (with custom CPU values 3700 MHz)​


Updates log

UPDATE 1 - [February, 19 2013] Install Chimera 2.0.0 or newer to fix iMessage log in issue in post #4
UPDATE 2 - [March, 18 2013] Updated to Combo 10.8.3
UPDATE 3 - [March, 19 2013] Uploaded bios picture 2a (with optional CPU core ratio limits) and updated SSDT generation procedure in post #4
UPDATE 4 - [March, 19 2013] Successfully tested Wake on Lan (enabled from bios) and and uploaded bios picture 9 in post #1
UPDATE 5 - [March, 19 2013] Improved USB 3.0 Multiplex via DSDT editing, working as USB 2.0 as well ----> see post #16
UPDATE 6 - [March, 21 2013] Updated Ivy Bridge Graphics Power Management in post #4
UPDATE 7 - [April, 28 2013] updated guide with MultiBeast 5.3.0 and MaciASL patches for DSDT
UPDATE 8 - [May, 31st 2013] Replaced all the DSDT editing with ALL-IN-ONE + Graphics DSDT patches by PJALM
UPDATE 9 - [June, 4th 2013] Added binary patch zotacz77hd4k in Attachments to automatically patch AppleIntelFramebufferCapri.kext
UPDATE 10 - [June, 5th 2013] Updated to Mountain Lion 10.8.4 with Combo Update
UPDATE 11 - [June, 7th 2013] Updated bios ----> No more unlocking process is needed!
UPDATE 12 - [June, 16th 2013] Fixed Safari/Firefox crashes on Flash Player plug-in YouTube videos, mostly with discrete card
UPDATE 13 - [September, 22nd 2013] Updated to Mountain Lion 10.8.5 with Combo Update

Enjoy your fully functional Mini Hackintosh!:lol:

49866-geekbench.jpg


Credits

Tonymac for Unibeast method
MacMan for MSRDumper
SJ_UnderWater for MaciASL, Patcho and DPCI Manager
PJALM for the great support and his DSDT patches
samisnake for patched bios info
samisnake for auto sleep info
CodeRush for patched bios
toleda for HDMI audio here and here
toleda for Hex editing work
toleda for SSDT support
flytiger for auto sleep info
rcork for system profiler info
PikeRAlpha and Jeroen for SSDT script
minihack for info and DSDTSE patches
miramar for info and patch
Groths for Trim Enabler
Hilbe for IR Receiver installation
Cassio and pernacabeluda for DSDT edits GFX0
misterleekub for iMessage fix
MacintoshHealer for great support
 

Attachments

  • zotacz77hd4k.zip
    2.8 KB · Views: 217
  • giacomoleopardo Zotac files.zip
    215.6 KB · Views: 205
Last edited by a moderator:
Hey Giacomo!
Great guide! Just some remarks,

a) the chimera DisplayMode=1920x1080 and GE=Yes is not necessary anymore when enabling HD4000 via DSDT.
b) The tool "ChamelionWizard" lets you choose MacMini6,2 SMbios comfortably (and change chimera boot options) with a GUI.

Some bad and some good news:
bad news first: unfortunately, according to toleda it is not possible to do framebuffer patching via DSDT because the tables are hardcoded in the AppleIntelFramebufferCapri binary and via DSDT insertion you can only pick the right one from existing tables. So there is no other way than hexediting the capri binary.

and the good news, i got BT from the Atheros card working! The problem is that the bluetooth device on the mini PCIex card has no flash for the firmware like usb bt adaptors. So the firmware has to be uploaded to the device by the OS on every startup (on every cold boot). When you boot into windows first with BT drivers installed and then you boot to os x, BT will work! For OS X i found 2 solutions to upload the firmware - with an uploader binary joined from this post:http://www.tonymacx86.com/general-help/16474-enabling-bluetooth-p8p67-boards-bt-211-a.html <- this solution is working, but i am looking for the firmware from the zotac atheros drivers to make it working better (magic mouse is freezing with the old firmware).
another more elegant solution is to upload the firmware with a kext. The kext IOAth3kfrmwr.kext from Mac4Mat is not working with our card, Mac4Mat has disappeared from these forums but there are another people continuing his work, i have contacted them to public their work and eventually to make a version with a firmware from zotac drivers. You can find this thread here: http://www.tonymacx86.com/general-help/16474-enabling-bluetooth-p8p67-boards-bt-211-a-3.html As soon as i get some news i will post it here...

With bluetooth working we can say that this mainboard is 100% hackintoshable!!!
 
Hey Giacomo!
Great guide! Just some remarks,

a) the chimera DisplayMode=1920x1080 and GE=Yes is not necessary anymore when enabling HD4000 via DSDT.
b) The tool "ChamelionWizard" lets you choose MacMini6,2 SMbios comfortably (and change chimera boot options) with a GUI.

Hi M!
Thank you!
DisplayMode=1920x1080 makes my boot screen properly defined, furthermore without it I need to unplug and plug monitor when osx start due to glitches and artifacts.
As for GE=Yes, you're right: it's not necessary anymore -----> GUIDE UPDATED
I agree on chameleon Wizard (maybe you missed in the guide).
Great work on bluetooth, keep it on! We're almost there! :headbang:
 
Thanks a lot Giacomo for your patience!!
Grazie mille!!!
Everything works fine!
 
Status
Not open for further replies.
Back
Top