
P1LGRIM
Moderator
- Joined
- Mar 2, 2012
- Messages
- 26,461
- Motherboard
- Lenovo ThinkStation p700
- CPU
- 2x E5-2620 V3
- Graphics
- RX 560
- Mac
- Classic Mac
- Mobile Phone
Lenovo ThinkServer TS140 - i3 4330 - HD4600 - Yosemite - Clover
Components
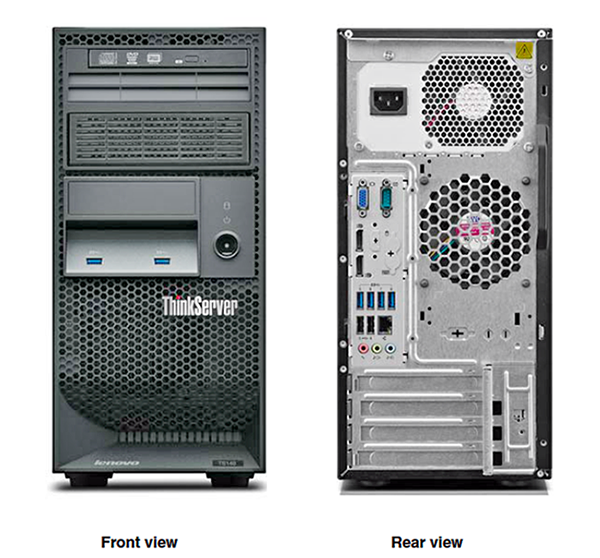
Lenovo ThinkServer TS140 70A4
http://www.amazon.co.uk/Lenovo-70A4000SUK-ThinkServer-DVD-Writer-Graphics/dp/B00NFU53HW
Already Owned
Cherry Initial G82-27020 PC / Mac, Keyboard - White
http://www.amazon.co.uk/Cherry-Initial-G82-27020-Mac-Keyboard/dp/B00565991A
Microsoft IntelliMouse Optical - Mouse - optical - 5 button(s) - wired - PS/2, USB - OEM
http://www.amazon.co.uk/Microsoft-IntelliMouse-Optical-optical-button/dp/B000093SB5
Acer AL1913 Monitor - No longer available
Comments
This the second of my ‘Off the shelf’ builds came about when I had the opportunity to purchase a ThinkServer at a very reasonable price on eBay. I had it in mind to replace my ageing Compaq Proliant ML370 server which is SCSI based, uses an inordinate quantity of disks to achieve a relatively small amount of storage and on a sunny day it’s like sharing a room with a hovercraft.
I also want to run it as an OS X Workstation, an OS X Server and a Windows 7 Workstation with a view to upgrading to Windows 10 at a later date.
The TS140 is remarkably quiet, has easy access and needs no tools to install / replace (most) components.
This guide will cover the installation process for the OS X workstation portion of my plans.
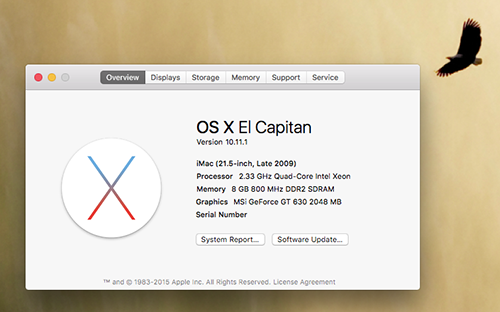
The OS X version is 10.10.5 build (14F27).
Clover version is r3259.
Installation Notes
Preparation
I unpacked my shiny new server and started to connect my peripherals when I noticed the first potential problem as the only spare monitor that I had available was my vintage Acer AL1913 which is VGA only and we all know of the compatibility problems with VGA and OS X. The TS140 onboard graphics ports are 1 x VGA and 2 x DisplayPort, so I plugged the monitor cable into the (top) DisplayPort connector with a DP to VGA adapter and pressed on regardless.
The server came with two 500GB hard drives and to reduce the risk of confusion I removed the spare one before starting the installation.
I downloaded the latest BIOS (B3A) from the Lenovo website and created a USB flash drive on a Windows Laptop by following the instructions.
Upgrade the BIOS by inserting the USB flash drive (I used the front left port), power on then press F12 for the boot menu and select the flash drive. Follow the instructions.
Download the IntelMausiEthernet 2.0.0 driver - Registration required.
Download FakeSMC.kext.
Prepare a Clover installation USB flash drive by following the guide :
How To Install OS X Yosemite Using Clover
For clarity the Clover settings are reproduced here :
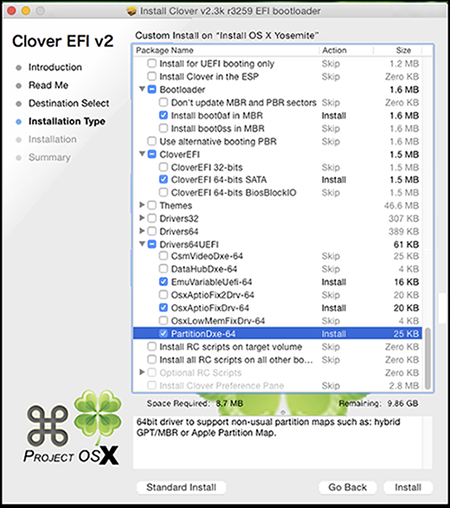
At the end of STEP 2 :
20. Navigate to /EFI/CLOVER/ and replace default config.plist with config.plist from this post.
21. There is no need to create a folder called 10.10 - Clover now includes this feature.
22. Navigate to /EFI/CLOVER/kexts/10.10/ and add FakeSMC.kext.
23. Navigate to /EFI/CLOVER/kexts/10.10/ and add IntelMausiEthernet.kext .
24. NullCPUPowerManagement.kext is not required for this build.
25. Navigate to /EFI/CLOVER/drivers64UEFI/ remove VBoxHfs-64.efi and add HFSPlus.efi.
26. Not required for this build.
Create a Utilities folder on your USB installer and add these apps / kexts / drivers to it :
Clover - Clover Configurator - KextBeast - MultiBeast - FakeSMC.kext - IntelMausiEthernet.kext
HFSPlus.efi - DPCIManager - iMessageDebugv2 - MLBGen17V3 - VoodooHDA For ALC 662v2
and config.plist (from the attachment at the bottom of this post).
BIOS Settings
Power on
Press F1 to enter Setup
In the Exit tab enable OS Optimized defaults then Load Optimal Defaults.
Main
System Time & Date - Adjust if necessary.
Devices
Serial Port Setup - Disabled
Network Setup - Boot Agent - Disabled
Power
After Power Loss - Power Off
Enhanced Power Saving Mode - Enabled
Security
Secure Boot - Disabled
Startup
Primary Boot Sequence - Excluded from boot order : Remove all from Excluded (if present)
Primary Boot Sequence - USB KEY : Move to top of list
Automatic Boot Sequence - Excluded from boot order : Remove all from Excluded (if present)
Error Boot Sequence - Excluded from boot order : Remove all from Excluded (if present)
Error Boot Sequence : Move Network 1 down (If at top of list)
CSM - Enabled
F10 to Save & Exit
Installation
Place your USB flash drive in the front left socket.
Power on.
Press F12 for the Boot Menu.
Boot from USB KEY : (Clover USB flash drive)
Follow the guide from STEP 3: Install OS X Yosemite :
How To Install OS X Yosemite Using Clover
Note : The system may stay on “About a second remaining” for considerably longer than a second.
If this happens have patience and you will be rewarded.
When you have jumped through all of the hoops and arrived at the desktop you may proceed to the post installation phase.
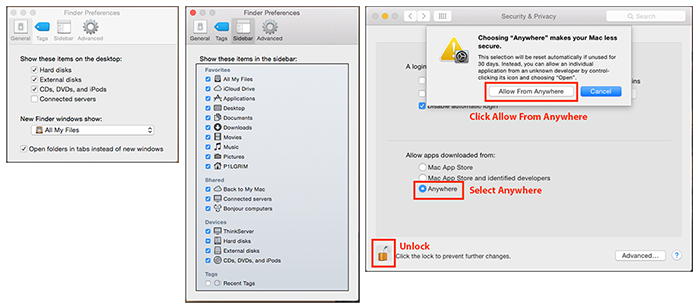
Some changes to preferences that may make progress a little easier (Purely Optional) :
Post-Installation
Copy your Utilities folder from your USB installer to the desktop.
Open the Utilities folder and copy FakeSMC.kext and IntelMausiEthernet.kext to the desktop then run KextBeast.
Once KextBeast has completed you may move FakeSMC.kext and IntelMausiEthernet.kext from the Desktop to the Trash.
From the Utilities folder run the Clover installer package using these settings :
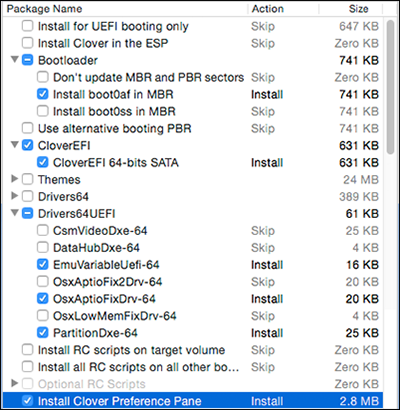
When Clover has completed copy HFSPlus.efi from your Utilities folder to YourHardDrive/EFI/CLOVER/drivers64UEFI.
Delete VBoxHFS-64.efi from YourHardDrive/EFI/CLOVER/drivers64UEFI.
Navigate to YourHardDrive/EFI/CLOVER/ and move config.plist to the Trash.
Copy the config.plist file from your Utilities folder to YourHardDrive/EFI/CLOVER/.
From the Utilities folder run DPCIManager and confirm that your Network Interface is set to
“en0” and “Builtin”.
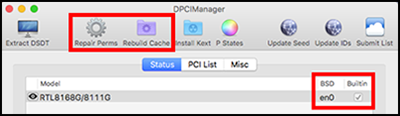
While you have DPCIManager open it’s a good idea to ‘Repair Perms’ and ‘Rebuild Cache’.
When complete quit DPCIManager.
Copy Clover Configurator from your Utilities folder to the /Applications folder on your hard drive.
Run Clover Configurator,
Select File - Open - YourHardDrive/EFI/CLOVER/config.plist - Open
Once your config.plist file has loaded into Clover Configurator, select the Boot Section :
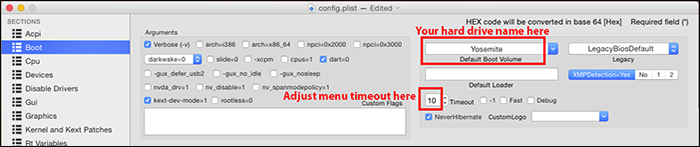
Type the name of your hard drive into the Default Boot Volume box.
Adjust the menu timeout value in the Timeout box if required.
Select the SMBIOS Section :
Click on the ‘Magic Wand’

Click on the iMac picture.
From the dropdown list Select iMac 14,2
then click the two Shake buttons (as many times as you like) to generate a Serial Number.
Click OK.
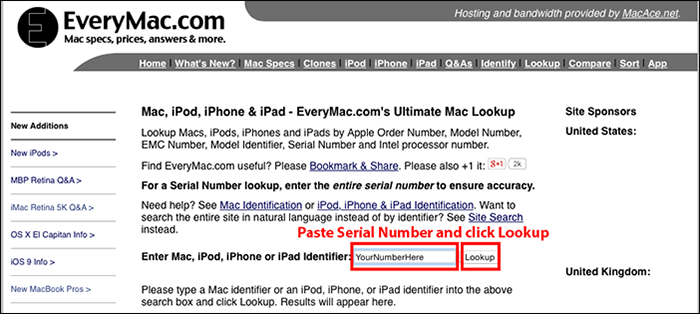
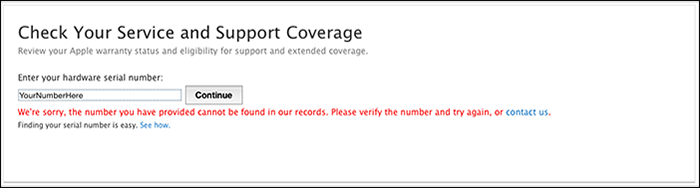
Once you have a Serial Number open the EveryMac.com site in Safari and paste your Serial Number into the box
Click Lookup.
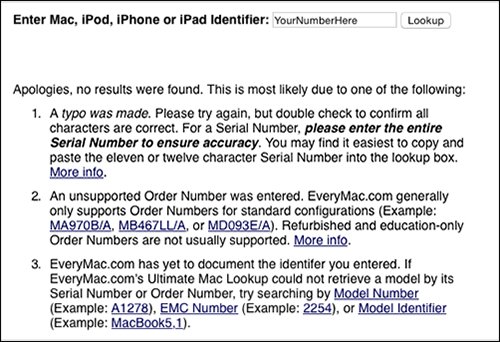
If you see this message then something is wrong and you should go back to the Clover Configurator
magic wand and generate another Serial Number.

If you see this message then everything is ok and you can proceed to the next step.
Open the Apple Self Solve site in Safari.
Enter your Serial Number and click Continue.
Note : Since this guide was published Apple have changed the format of their Self Solve site but it is still possible to determine if a serial number is in Apple’s database or not.
If you see this message (and the number has passed validation at EveryMac.com) then all is OK.
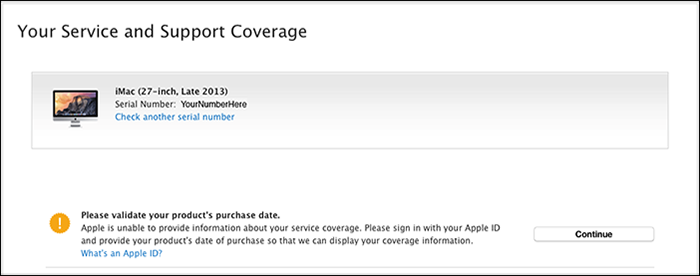
If you see this message it means that you have generated the Serial Number of a Genuine Mac
that is already in Apple’s database - Do NOT use this Serial Number.
Go back to the Clover Configurator magic wand a generate a new Serial number.
Quit Safari.
Open a Terminal window and type uuidgen several times to generate some random UUIDs.
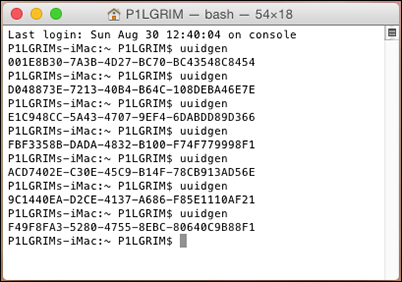
Copy one of your random UUID numbers from the Terminal window and paste it into the SmUUID box
in Clover Configurator.

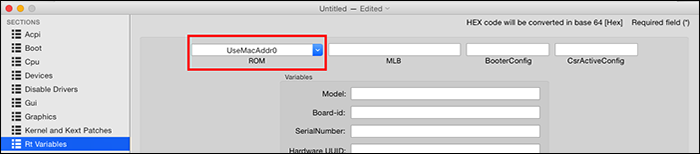
Click the Rt Variables Section
From the ROM dropdown list select UseMacAddr0.
Select File - Save
Quit Clover Configurator.
Eject your USB installer.
Restart
From your /Applications folder run Clover Configurator,
Select File - Open - YourHardDrive/EFI/CLOVER/config.plist - Open
Once your config.plist file has loaded into Clover Configurator
Open the Utilities folder and run MLBGen17V3.
Type iM and press Return.
You will see a box with S/N, MLB and MAC.
Copy the generated MLB number.
In Clover Configurator select the SMBIOS Section.
Paste the MLB number generated by MLBGen17V3 into the Board Serial Number box.
Select File - Save
Quit Clover Configurator and Terminal.
Restart
Note : simpleMLB.sh is an alternative tool to MLBGen17V3 - They both serve the same purpose.
Open the Utilities folder and run iMessageDebug.
Press y and Return to save a copy called iMessageDebug.txt to your Utilities folder.
Restart
Open the Utilities folder and run iMessageDebug.
Compare the output with the saved copy in the Utilities folder.
If the two copies are the same you may go ahead and set up iMessage.
Audio
Open the Utilities folder and run the VoodooHDA For ALC 662v2 installer package.
Install
When the installer has completed close it.
Open Terminal and type
Code:
sudo touch /System/Library/ExtensionsAfter a minute or so quit Terminal.
Restart
Open System Preferences and configure Sound.
The initial build process is now complete and you may begin to tailor things to your specific requirements.
References
How To Install OS X Yosemite Using Clover
How to Fix iMessage
Clover Wiki
TS140 User Guide
TS140 Hardware Maintenance Manual
TS140 Service Parts Listing
View attachment config.plist.zip
Last edited:


.jpg")


