
- Joined
- Feb 7, 2012
- Messages
- 57
- Motherboard
- GA-Z77-DS3H
- CPU
- i7 3700K
- Graphics
- Radeon 6870 2GB
- Mac
- Classic Mac
- Mobile Phone
The Beast Yosemite Edition: i7 3770K | Z77-DS3H | GTX 970 | OSX Yosemite
Components
Apple OSX 10.10 Yosemite
https://itunes.apple.com/WebObjects/MZStore.woa/wa/viewSoftware?id=915041082&mt=12
GIGABYTE GA-Z77-DS3H LGA 1155 ATX Intel Motherboard
http://www.amazon.com/Gigabyte-Intel-1155-Motherboard-GA-Z77-DS3H/dp/B007R21JWC
XFX HD-6870-CNFC Radeon HD 6870 2GB 256-Bit GDDR5 PCI Express 2.1 x16 HDCP Ready CrossFireX Support Video Card
http://www.newegg.com/Product/Product.aspx?Item=N82E16814150563
SWAPPED OUT FOR INTEL 4000 GRAPHICS BECAUSE OF BROKEN FAN ** Replaced as of 6/16/15 **
MSI GTX 970 GAMING 4G GeForce GTX 970 4GB 256-Bit GDDR5 PCI Express 3.0 x16 HDCP Ready SLI Support G-SYNC Support Video Card
http://www.newegg.com/Product/Product.aspx?Item=N82E16814127832
Intel Core i7-3770K Quad-Core Processor 3.5 GHz 8 MB Cache LGA 1155
http://www.amazon.com/Intel-i7-3770K-Quad-Core-Processor-Cache/dp/B007SZ0EOW
Asus 24x DVD-RW Serial-ATA Internal OEM Optical Drive DRW-24B1ST (Black)
http://www.amazon.com/Asus-Serial-ATA-Internal-Optical-DRW-24B1ST/dp/B0033Z2BAQ
Corsair Vengeance Blue 16GB (4x4GB) DDR3 1600 MHz (PC3 12800) Desktop Memory
http://www.amazon.com/Corsair-Vengeance-Desktop-Memory-CML16GX3M4A1600C9B/dp/B0058J1QYC
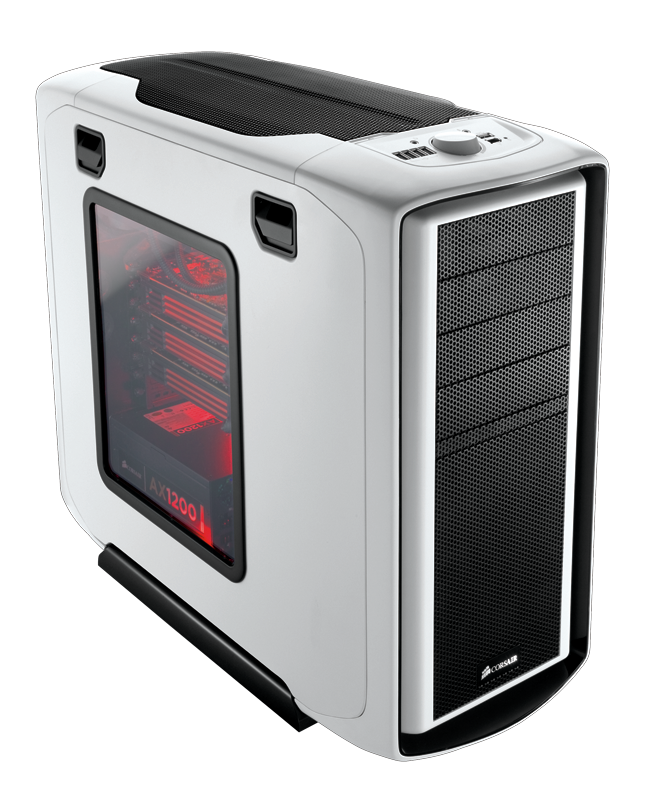
Corsair Graphite Series 600T Arctic White Steel / Plastic ATX Mid Tower Computer Case
http://www.newegg.com/Product/Product.aspx?Item=N82E16811139005
Crucial m4 256GB 2.5-Inch (9.5mm) SATA 6Gb/s Solid State Drive CT256M4SSD2
http://www.amazon.com/Crucial-256GB-2-5-Inch-9-5mm-CT256M4SSD2/dp/B004W2JL2A
Western Digital Caviar Black 2 TB SATA III 7200 RPM 64 MB Cache Bulk/OEM Internal Desktop Hard Drive
http://www.amazon.com/Western-Digital-Caviar-Internal-Desktop/dp/B004CSIG1G
Noctua 6 Dual Heatpipe with 140mm/130mm Dual SSO Bearing Fans CPU Cooler NH-D14
http://www.amazon.com/Noctua-Heatpipe-Bearing-Cooler-NH-D14/dp/B002VKVZ1A
Corsair Builder Series CX600 600 watt 80 Plus Certified Power Supply Compatible with Intel and AMD Platforms
http://www.amazon.com/Corsair-Certified-Compatible-Platforms-CMPSU-600CXV2/dp/B004W2T2UQ
TP-LINK TL-WDN4800 Dual Band Wireless N900 PCI Express Adapter, 2.4GHz 450Mbps/5Ghz 450Mbps
http://www.amazon.com/gp/product/B007GMPZ0A/ref=oh_aui_detailpage_o01_s01?ie=UTF8&psc=1
ASUS VH238H 23-Inch 1080P LED Monitor with Integrated Speakers
http://www.amazon.com/VH238H-23-Inch-Monitor-Integrated-Speakers/dp/B004J6BIJ8
Already Owned
Hitachi 500GB Hard Drive (Discontinued)
http://www.newegg.com/Product/Product.aspx?Item=N82E16822145299
Audioengine D1 24-bit Digital-to-Analog Converter
http://www.amazon.com/Audioengine-D1-24-bit-Digital-to-Analog-Converter/dp/B006IPH5H2
2x Yamaha HS5 Powered Studio Monitor
http://www.amazon.com/Yamaha-HS5-Powered-Studio-Monitor/dp/B00CFOX420
Blue Jeans Cable LC-1 Stereo Audio Cables
http://www.bluejeanscable.com/store/audio/index.htm
Logitech Wireless Combo MK260 with Keyboard and Mouse
http://www.amazon.com/Logitech-Wireless-Combo-Keyboard-920-002950/dp/B004KSQANO
Apple Wireless Keyboard
http://www.amazon.com/gp/product/B002TMRZOQ?ie=UTF8
Apple Magic Mouse
http://www.amazon.com/gp/product/B002TLTGM6?ie=UTF8
IOGEAR Bluetooth 4.0 USB Micro Adapter
http://www.amazon.com/IOGEAR-Bluetooth-Micro-Adapter-GBU521/dp/B007GFX0PY/ref=dp_ob_title_ce
Comments
This build has been solid for me for over two years now. Looking back, however, I would have been better off with a different motherboard and graphics card. The motherboard, while fine for a beginner, does not include certain settings needed for real overlocking (vcore) and limits me to a 3.9 GHz stable clock speed. The graphics card is fine, but the fan broke a while back, so it is incredibly loud. I hope to upgrade soon to an Nvidia card.
I use this build mostly for software development (Android AOSP builds, app builds), but also use it as my daily computer for homework, studying, and doing unproductive things. I occasionally do some light gaming, but nothing too intense.
The 3770K is amazing. It is a workhorse, and has never failed me when I needed to get something done. It is insanely fast, and I have no reason to upgrade for several more years.
Cooling the CPU, the DH14 is a beast of a cooler. It might just be the best air cooler available right now. At first, I wanted to go with water cooling, but decided to buy the cheaper Noctua fan. It is extremely quiet, and keeps my i7 nice and cool. The only drawback is the size of the heatsink, which limits me to use low profile ram.
Power supply is good, but I’d like to upgrade to a modular at some point just to get things cleaner.
The case is huge, which is a good thing. It gives me ample space to work. It has several fans, which keep everything cool. The case has a weird system for USB 3.0 on the front panel, and you have to run a USB cord through a back port. Strange solution but works well enough. If this really bugs you, you can pick up one of these adapters to run it through inside the case.
The hard drive system I use is having all system files (boot files, applications) on the solid state drive, and all user files (documents, downloads) on the 2TB drive. Both drives are screaming fast, and I have never had a problem with either. The 256 GB SSD might be overkill, but it is better to overkill than to come up short on space.
Pre-Install Notes
Before describing the install process, let me just say this: This was my first time building a computer. When the time came to build, I was terrified. Everything I did, I thought I was doing something wrong. After I was finished though, I realized just how simple it really was. If you take your time, and are careful, you will do just fine! Even though building a computer and installing OS X on it seems daunting, it is a great learning experience, and the folks on this forum make things so much easier. With MultiBeast and UniBeast, it really is as simple as following a guide. Thanks to Tony, MacMan, and everyone else who makes it possible for us to build awesome machines.
Installation
I am currently running Clover as my boot loader, but built the system with UniBeast, and have upgraded through UniBeast. This guide will start with UniBeast and switch to Clover, and will also have additional steps for those who wish to use Chimera or Chameleon.
Installing OS X was easy and mostly painless, but updating to Yosemite gave me some hassle, including botched installs and kernel panics. I will try to make this guide as detailed as possible as to eliminate these issues for others.
To start, follow the Unibeast Guide here to install Yosemite to a USB Drive.
Secondly, make sure your BIOS is updated to the latest firmware. On a Mac, the easiest way to do this is to obtain a copy of the latest BIOS installer from the manufacturer site, and extract the BIOS file from the .exe file using some sort of expansion program. I used the Unarchiver, which is free on the Mac App Store. Another good solution is Free Stuffit Expander. Place this file on a FAT32 formatted USB drive, and install it in the BIOS using Q-Flash.
Third, change a few BIOS settings to work for OS X.
Fourth, install Yosemite following the UniBeast Guide. The install will finish, and ask you to reboot. Upon reboot, boot back into UniBeast Drive using the BIOS.
Fifth, boot up into Yosemite by selecting your install drive as the boot drive. If this boot fails or ends up in a kernel panic, that’s ok. If this happens, use the kernel flag -k to boot into safe mode. To do this, just type -k in the UniBeast Drive before selecting the boot drive.
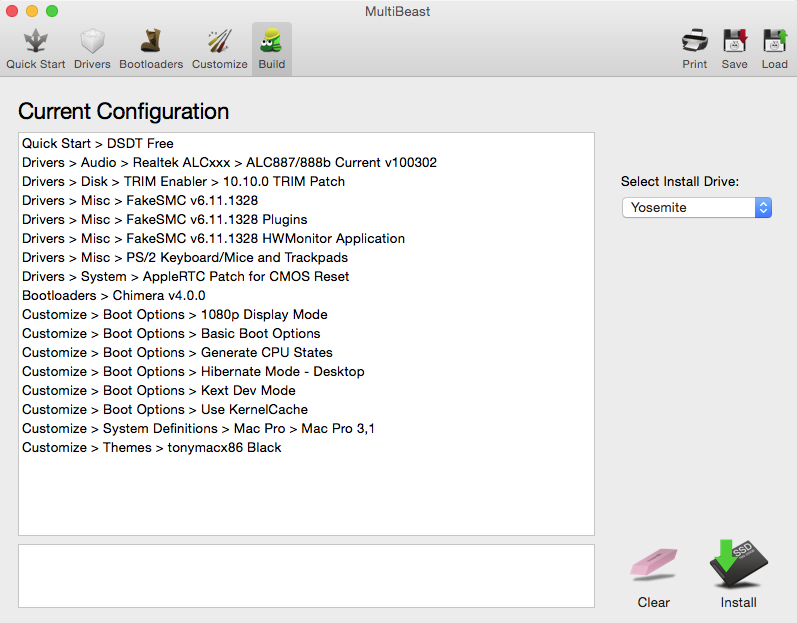
Sixth, setup Yosemite and run MultiBeast on your new machine. Install using the settings from the following image, or by using the MultiBeast configuration file attached to this post. Do not select an ethernet driver. We will install this later. The MultiBeast Ethernet drives currently cause kernel panics on DS3H boards.
Seventh, once the installer finishes, reboot into your new OS X installation. Now it’s time to install Clover!
Installing Clover
If you want to use Chimera, skip to the next section
I use Clover because it allows me to create an OS X recovery partition, and it allows UEFI booting (Faster boot times). Also, when I update the software for minor revisions, the kexts stay installed, so there are no steps to install drivers post upgrade. In addition, Clover is installed to the EFI partition, so there is no need to reinstall the bootloader after a major upgrade. To upgrade to OS X 10.11, for example, one would just need to download and run the updater from the Mac App Store. Easy peasy! This is how I installed it.
First, reformat the EFI partition on your hard drive. This won’t erase any data that you have on your computer. To do this:
Third, install Clover with the following settings:

Fourth, follow these steps to get Clover working:
Once you have done these, you should be ready to go! Just reboot your computer, and you should be good.
If Using Chimera
If you installed Clover, disregard this part of the guide.
First, go to this link and download the kext, and then place it on the Desktop. As of right now, the current ALXEthernet.kext causes a kernel panic, so we have to use this one
Second, download KextBeast from here
Third, run KextBeast, which will automatically install the kext that is on your Desktop.
Finally, reboot, and you should have working ethernet.
Benchmarks
Here is the Geekbench score for Geekbench 2:
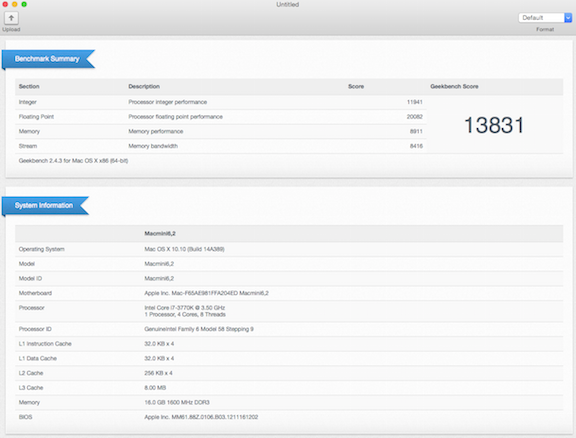
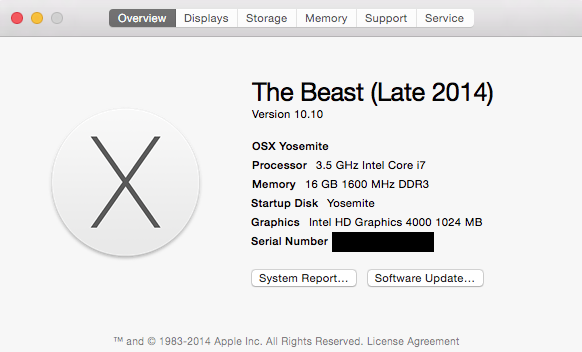
You now have a working Hackintosh! Everything should work, although I haven’t tested iMessage or FaceTime. However, Yosemite is running great with no problems. I will continue to update this as new updates come out, or as I upgrade my machine.
UPDATE 6/16/15:
After a few months of neglecting this post, I am back with an update.
Several months ago, I finally ditched the inlet graphics and picked up a GTX 970 built by MSI. After installing the latest Nvidia web drivers, it works perfectly!
The Beast Pro: Core i7-3770K - GA—Z77-DS3H - 16GB RAM - GTX 970
Components
Apple OSX 10.10 Yosemite
https://itunes.apple.com/WebObjects/MZStore.woa/wa/viewSoftware?id=915041082&mt=12
GIGABYTE GA-Z77-DS3H LGA 1155 ATX Intel Motherboard
http://www.amazon.com/Gigabyte-Intel-1155-Motherboard-GA-Z77-DS3H/dp/B007R21JWC
XFX HD-6870-CNFC Radeon HD 6870 2GB 256-Bit GDDR5 PCI Express 2.1 x16 HDCP Ready CrossFireX Support Video Card
http://www.newegg.com/Product/Product.aspx?Item=N82E16814150563
SWAPPED OUT FOR INTEL 4000 GRAPHICS BECAUSE OF BROKEN FAN ** Replaced as of 6/16/15 **
MSI GTX 970 GAMING 4G GeForce GTX 970 4GB 256-Bit GDDR5 PCI Express 3.0 x16 HDCP Ready SLI Support G-SYNC Support Video Card
http://www.newegg.com/Product/Product.aspx?Item=N82E16814127832
Intel Core i7-3770K Quad-Core Processor 3.5 GHz 8 MB Cache LGA 1155
http://www.amazon.com/Intel-i7-3770K-Quad-Core-Processor-Cache/dp/B007SZ0EOW
Asus 24x DVD-RW Serial-ATA Internal OEM Optical Drive DRW-24B1ST (Black)
http://www.amazon.com/Asus-Serial-ATA-Internal-Optical-DRW-24B1ST/dp/B0033Z2BAQ
Corsair Vengeance Blue 16GB (4x4GB) DDR3 1600 MHz (PC3 12800) Desktop Memory
http://www.amazon.com/Corsair-Vengeance-Desktop-Memory-CML16GX3M4A1600C9B/dp/B0058J1QYC
Corsair Graphite Series 600T Arctic White Steel / Plastic ATX Mid Tower Computer Case
http://www.newegg.com/Product/Product.aspx?Item=N82E16811139005
Crucial m4 256GB 2.5-Inch (9.5mm) SATA 6Gb/s Solid State Drive CT256M4SSD2
http://www.amazon.com/Crucial-256GB-2-5-Inch-9-5mm-CT256M4SSD2/dp/B004W2JL2A
Western Digital Caviar Black 2 TB SATA III 7200 RPM 64 MB Cache Bulk/OEM Internal Desktop Hard Drive
http://www.amazon.com/Western-Digital-Caviar-Internal-Desktop/dp/B004CSIG1G
Noctua 6 Dual Heatpipe with 140mm/130mm Dual SSO Bearing Fans CPU Cooler NH-D14
http://www.amazon.com/Noctua-Heatpipe-Bearing-Cooler-NH-D14/dp/B002VKVZ1A
Corsair Builder Series CX600 600 watt 80 Plus Certified Power Supply Compatible with Intel and AMD Platforms
http://www.amazon.com/Corsair-Certified-Compatible-Platforms-CMPSU-600CXV2/dp/B004W2T2UQ
TP-LINK TL-WDN4800 Dual Band Wireless N900 PCI Express Adapter, 2.4GHz 450Mbps/5Ghz 450Mbps
http://www.amazon.com/gp/product/B007GMPZ0A/ref=oh_aui_detailpage_o01_s01?ie=UTF8&psc=1
ASUS VH238H 23-Inch 1080P LED Monitor with Integrated Speakers
http://www.amazon.com/VH238H-23-Inch-Monitor-Integrated-Speakers/dp/B004J6BIJ8
Already Owned
Hitachi 500GB Hard Drive (Discontinued)
http://www.newegg.com/Product/Product.aspx?Item=N82E16822145299
Audioengine D1 24-bit Digital-to-Analog Converter
http://www.amazon.com/Audioengine-D1-24-bit-Digital-to-Analog-Converter/dp/B006IPH5H2
2x Yamaha HS5 Powered Studio Monitor
http://www.amazon.com/Yamaha-HS5-Powered-Studio-Monitor/dp/B00CFOX420
Blue Jeans Cable LC-1 Stereo Audio Cables
http://www.bluejeanscable.com/store/audio/index.htm
Logitech Wireless Combo MK260 with Keyboard and Mouse
http://www.amazon.com/Logitech-Wireless-Combo-Keyboard-920-002950/dp/B004KSQANO
Apple Wireless Keyboard
http://www.amazon.com/gp/product/B002TMRZOQ?ie=UTF8
Apple Magic Mouse
http://www.amazon.com/gp/product/B002TLTGM6?ie=UTF8
IOGEAR Bluetooth 4.0 USB Micro Adapter
http://www.amazon.com/IOGEAR-Bluetooth-Micro-Adapter-GBU521/dp/B007GFX0PY/ref=dp_ob_title_ce
Comments
This build has been solid for me for over two years now. Looking back, however, I would have been better off with a different motherboard and graphics card. The motherboard, while fine for a beginner, does not include certain settings needed for real overlocking (vcore) and limits me to a 3.9 GHz stable clock speed. The graphics card is fine, but the fan broke a while back, so it is incredibly loud. I hope to upgrade soon to an Nvidia card.
I use this build mostly for software development (Android AOSP builds, app builds), but also use it as my daily computer for homework, studying, and doing unproductive things. I occasionally do some light gaming, but nothing too intense.
The 3770K is amazing. It is a workhorse, and has never failed me when I needed to get something done. It is insanely fast, and I have no reason to upgrade for several more years.
Cooling the CPU, the DH14 is a beast of a cooler. It might just be the best air cooler available right now. At first, I wanted to go with water cooling, but decided to buy the cheaper Noctua fan. It is extremely quiet, and keeps my i7 nice and cool. The only drawback is the size of the heatsink, which limits me to use low profile ram.
Power supply is good, but I’d like to upgrade to a modular at some point just to get things cleaner.
The case is huge, which is a good thing. It gives me ample space to work. It has several fans, which keep everything cool. The case has a weird system for USB 3.0 on the front panel, and you have to run a USB cord through a back port. Strange solution but works well enough. If this really bugs you, you can pick up one of these adapters to run it through inside the case.
The hard drive system I use is having all system files (boot files, applications) on the solid state drive, and all user files (documents, downloads) on the 2TB drive. Both drives are screaming fast, and I have never had a problem with either. The 256 GB SSD might be overkill, but it is better to overkill than to come up short on space.
Pre-Install Notes
Before describing the install process, let me just say this: This was my first time building a computer. When the time came to build, I was terrified. Everything I did, I thought I was doing something wrong. After I was finished though, I realized just how simple it really was. If you take your time, and are careful, you will do just fine! Even though building a computer and installing OS X on it seems daunting, it is a great learning experience, and the folks on this forum make things so much easier. With MultiBeast and UniBeast, it really is as simple as following a guide. Thanks to Tony, MacMan, and everyone else who makes it possible for us to build awesome machines.
Installation
I am currently running Clover as my boot loader, but built the system with UniBeast, and have upgraded through UniBeast. This guide will start with UniBeast and switch to Clover, and will also have additional steps for those who wish to use Chimera or Chameleon.
Installing OS X was easy and mostly painless, but updating to Yosemite gave me some hassle, including botched installs and kernel panics. I will try to make this guide as detailed as possible as to eliminate these issues for others.
To start, follow the Unibeast Guide here to install Yosemite to a USB Drive.
Secondly, make sure your BIOS is updated to the latest firmware. On a Mac, the easiest way to do this is to obtain a copy of the latest BIOS installer from the manufacturer site, and extract the BIOS file from the .exe file using some sort of expansion program. I used the Unarchiver, which is free on the Mac App Store. Another good solution is Free Stuffit Expander. Place this file on a FAT32 formatted USB drive, and install it in the BIOS using Q-Flash.
Third, change a few BIOS settings to work for OS X.
- Load the Optimized Defaults
- In the BIOS Features menu, set the drive format from IDE to AHCI
- If you use XMP supported memory, set the XMP to Profile 1 in M.I.T > Advanced Memory Settings
- Follow the steps to change the settings listed in this article by thelostswede
- Save these settings and reboot to your Unibeast Drive MAKE SURE THIS DRIVE IS IN A USB 2.0 PORT
Fourth, install Yosemite following the UniBeast Guide. The install will finish, and ask you to reboot. Upon reboot, boot back into UniBeast Drive using the BIOS.
Fifth, boot up into Yosemite by selecting your install drive as the boot drive. If this boot fails or ends up in a kernel panic, that’s ok. If this happens, use the kernel flag -k to boot into safe mode. To do this, just type -k in the UniBeast Drive before selecting the boot drive.
Sixth, setup Yosemite and run MultiBeast on your new machine. Install using the settings from the following image, or by using the MultiBeast configuration file attached to this post. Do not select an ethernet driver. We will install this later. The MultiBeast Ethernet drives currently cause kernel panics on DS3H boards.
Seventh, once the installer finishes, reboot into your new OS X installation. Now it’s time to install Clover!
Installing Clover
If you want to use Chimera, skip to the next section
I use Clover because it allows me to create an OS X recovery partition, and it allows UEFI booting (Faster boot times). Also, when I update the software for minor revisions, the kexts stay installed, so there are no steps to install drivers post upgrade. In addition, Clover is installed to the EFI partition, so there is no need to reinstall the bootloader after a major upgrade. To upgrade to OS X 10.11, for example, one would just need to download and run the updater from the Mac App Store. Easy peasy! This is how I installed it.
First, reformat the EFI partition on your hard drive. This won’t erase any data that you have on your computer. To do this:
- Open /Applications/Utilities/Terminal
- Type: diskutil list to list your partitions. Find the EFI partition, which is on your boot drive. For me, this was disk0s1.
- Type the following, making sure to replace disk0s1 with your EFI identifier found in step 2, enter password, and hit return:
Code:sudo newfs_msdos -v EFI -F 32 /dev/rdisk0s1
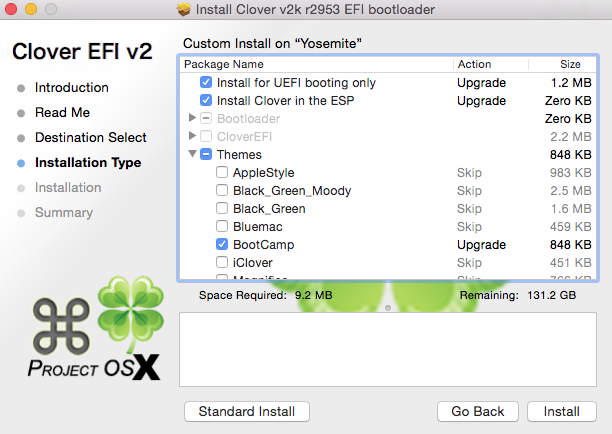
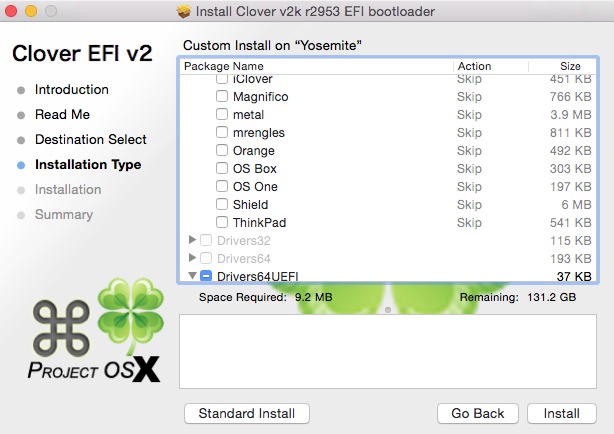
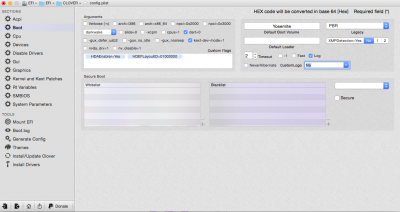
Third, install Clover with the following settings:
Fourth, follow these steps to get Clover working:
- Navigate to /Volumes/EFI/EFI/CLOVER/ and replace the config.plist file with the one attached to this post. This is a custom built configuration file for this build.
- Copy /System/Library/Extensions/FakeSMC.kext to /Volumes/EFI/EFI/CLOVER/kexts/10.10/ (You will probably have to create the 10.10 folder, as Clover has not been updated for Yosemite at the time of this post. It still works fine though)
- Copy /System/Library/Extensions/AppleHDA.kext to /Volumes/EFI/EFI/CLOVER/kexts/10.10/
- Go to this link and download the kext. As of right now, the current ALXEthernet.kext causes a kernel panic, so we have to use this one
- Copy the ALXEthernet.kext file you just downloaded to /Volumes/EFI/EFI/CLOVER/kexts/10.10/
Once you have done these, you should be ready to go! Just reboot your computer, and you should be good.
If Using Chimera
If you installed Clover, disregard this part of the guide.
First, go to this link and download the kext, and then place it on the Desktop. As of right now, the current ALXEthernet.kext causes a kernel panic, so we have to use this one
Second, download KextBeast from here
Third, run KextBeast, which will automatically install the kext that is on your Desktop.
Finally, reboot, and you should have working ethernet.
Benchmarks
Here is the Geekbench score for Geekbench 2:
You now have a working Hackintosh! Everything should work, although I haven’t tested iMessage or FaceTime. However, Yosemite is running great with no problems. I will continue to update this as new updates come out, or as I upgrade my machine.
UPDATE 6/16/15:
After a few months of neglecting this post, I am back with an update.
Several months ago, I finally ditched the inlet graphics and picked up a GTX 970 built by MSI. After installing the latest Nvidia web drivers, it works perfectly!
Attachments
Last edited by a moderator:
") I'll have a play this weekend using a spare disk.
I'll have a play this weekend using a spare disk.