
- Joined
- Jan 3, 2012
- Messages
- 76
- Motherboard
- Gigabyte Z97N Gaming 5
- CPU
- i5-4460
- Graphics
- HD 4600
- Mac
- Classic Mac
- Mobile Phone
Z97N-Gaming 5 - i5-4460 - HD4600 (Clover)
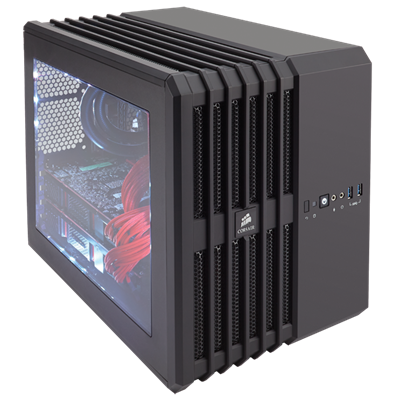
Fig. 1: Corsair Carbide Air 240 case
Fig. 1: Corsair Carbide Air 240 case
Components
- Corsair Carbide Air 240 case (Amazon, Newegg)
- Gigabyte GA-Z97N-Gaming 5 motherboard (Amazon, Newegg)
- Intel Core i5-4460 3.2 GHz processor (Amazon, Newegg)
- Crucial Ballistix Sport XT 2 x 8 GB RAM (Amazon, Newegg)
- Samsung 850 Pro 256 GB SSD (Amazon, Newegg)
- Be Quiet! E10 400W PSU (Amazon, Newegg)
- 3 x Noctua NF-S12A FLX 120 mm fans (Amazon, Newegg)
- 2 x Noctua NF-A8 FLX 80 fans (Amazon)
Already Owned
Comments
I wanted to build a hackintosh to use as a file server, and for general work. I somehow tried to create a low-power system which would be capable of handling some demanding tasks, such as running MATLAB scripts, music production and editing. I have yet to borrow equipment for measuring the power consumption. I will post an update once I get it done.
I got the system up and running fairly quickly using the Chimera bootloader, and the Yosemite guide here. Since I had another hard drive laying around I decided to experiment with Clover.
So far the system is running fine. I had to replace the included Intel 7260 wi-fi/BT card in order to get wi-fi working (Bluetooth worked, but was buggy). I ordered a BCM94360CD card, an adapter and some internal antennas, all on eBay. Wi-fi and Bluetooth works great now, and by using the MLB from my MacBook Air, Messages, FaceTime, Continuity, iCloud etc. are all working. One thing that is not working properly (yet) is sleep. I need to do some more experimenting with the darkwake settings. If the machine sleeps for a longer period of time, it will reboot. Also, audio does not work when waking the machine from sleep, but that will be solved once I figure out which audio interface to get (was looking at the RME Babyface, now waiting for more info about Arturia’s new interface).
BIOS Settings
Here are the BIOS settings that I am currently using.
I started by loading Optimized Defaults (F7), see Fig. 2. Notice that I’m running BIOS version F3 (updated using the instructions on Gigabyte’s website).
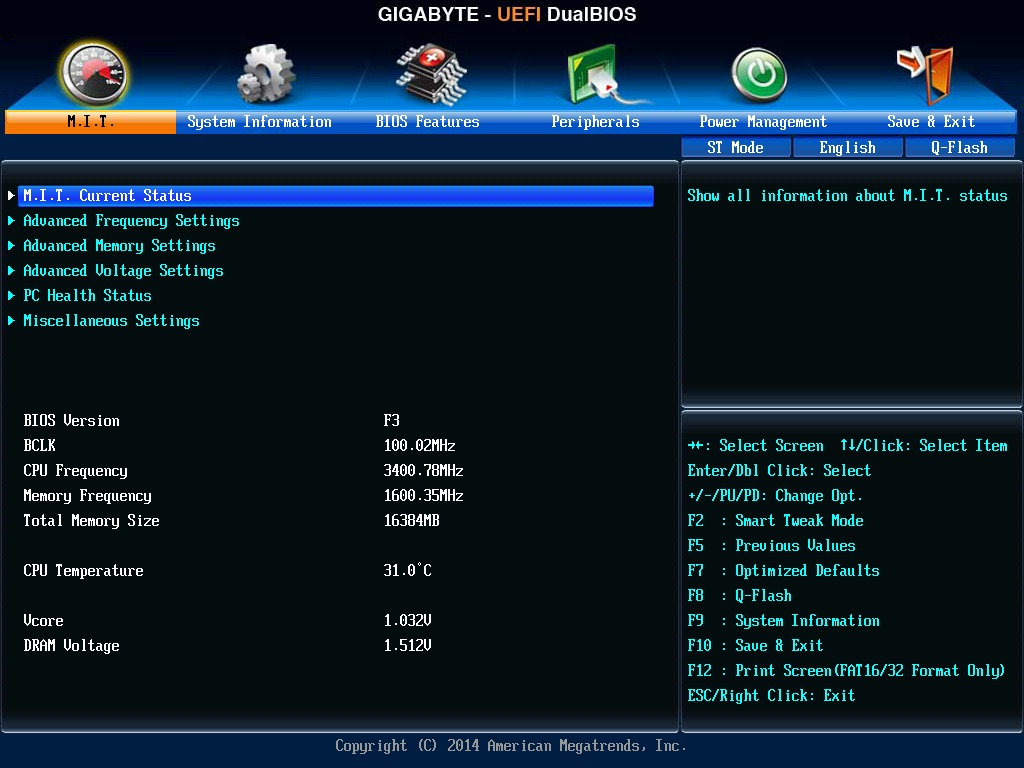
Fig. 2: Load Optimized Defaults by pressing F7.
I then disabled Extreme Memory Profile, see Fig. 3.

Fig. 3: Disable Extreme Memory Profile.
Next, I diabled VT-d, and chose Other OS under Windows 8 Features. See Fig. 4.

Fig. 4: Disable VT-d and choose Other OS under Windows 8 Features.
Finally, I set XHCI Mode to Auto, and enabled Legacy USB Support, XHCI Hand-off and EHCI Hand-off. See Fig. 5.
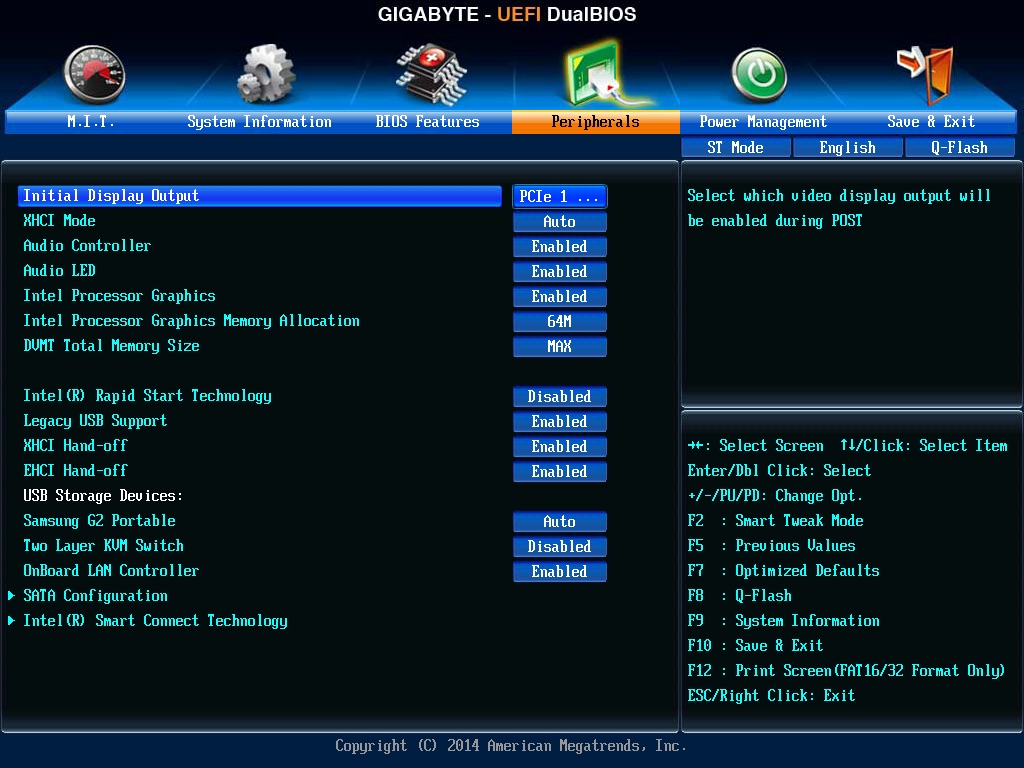
Fig. 5: Set XHCI Mode to Auto, enable Legacy USB Support, XHCI Hand-off and EHCI Hand-off.
Chimera Setup
I first installed OS X using tonymacx86's guide UniBeast: Install OS X Yosemite on Any Supported Intel-based PC (see BIOS settings above). Downloading OS X and creating a bootable USB drive with UniBeast is easy. My MultiBeast setup is shown in Fig. 6.

Fig. 6: MultiBeast options.
Clover Setup
I ran into some problems using Clover. Here I will describe some of them, and how I solved them for this particular system.
Using an 8GB USB thumb drive I created a bootable USB drive with Yosemite. First I prepared the USB drive by partitioning it (Partition Layout: 1 Partition, Options: GUID Partition Table, Name: Install). Then I copied the OS X installer to the drive. In Terminal.app, I typed
Code:
sudo /Applications/Install\ OS\ X\ Mavericks.app/Contents/Resources/createinstallmedia --volume /Volumes/Install --applicationpath /Applications/Install\ OS\ X\ Mavericks.app --no interactionI then installed Clover onto the USB drive. Launch the Clover installer by double-clicking it. Click Continue, Continue, Customize. I then chose the options “Install for UEFI booting only”, “Install Clover in the ESP” and under Drivers64UEFI I chose “OsxAptioFixDrv-64.efi”. See Fig. 7 and 8.

Fig. 7: Choose “Install for UEFI booting only” and “Install Clover in the ESP”.
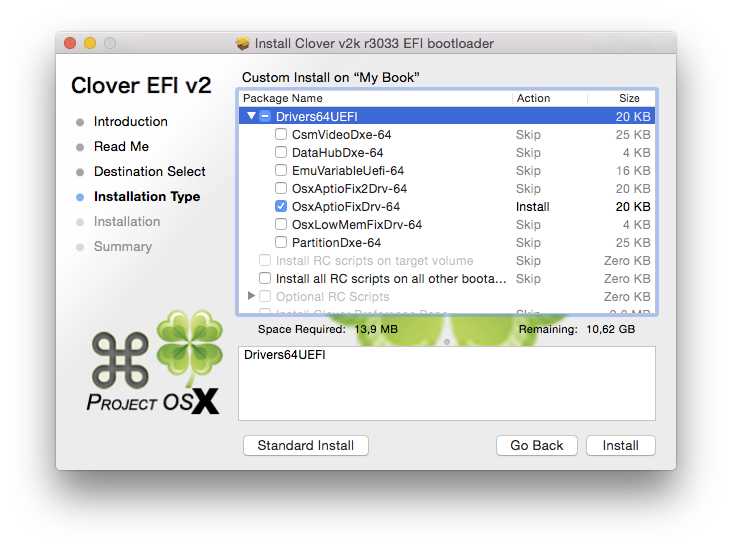
Fig. 8: Choose “OsxAptioFixDrv-64.efi” under Drivers64UEFI.
Next up I removed “VBoxHfs-64.efi” from EFI/CLOVER/drivers64UEFI, and added “HFSPlus.efi”. I also added to following kexts to EFI/CLOVER/kexts/10.10:
- AHCI_3rdParty_SATA.kext
- AtherosE2200Ethernet.kext
- FakeSMC.kext
- IOAHCIFamily.kext
At first I did not even reach the OS X installer. When I pressed enter to install OS X at the Clover boot screen I received the message "root device uuid is...+++”. I managed to solve this problem by carefully re-installing Clover and re-creating the bootable USB drive, and following the guide at [13, or another source]. The next problem was that I got the message "Unable to find driver for this platform: \"ACPI\"...". I solved this problem by unchecking all the boxes in the Acpi section in the config.plist file (using Clover Configurator), see Fig. 7.
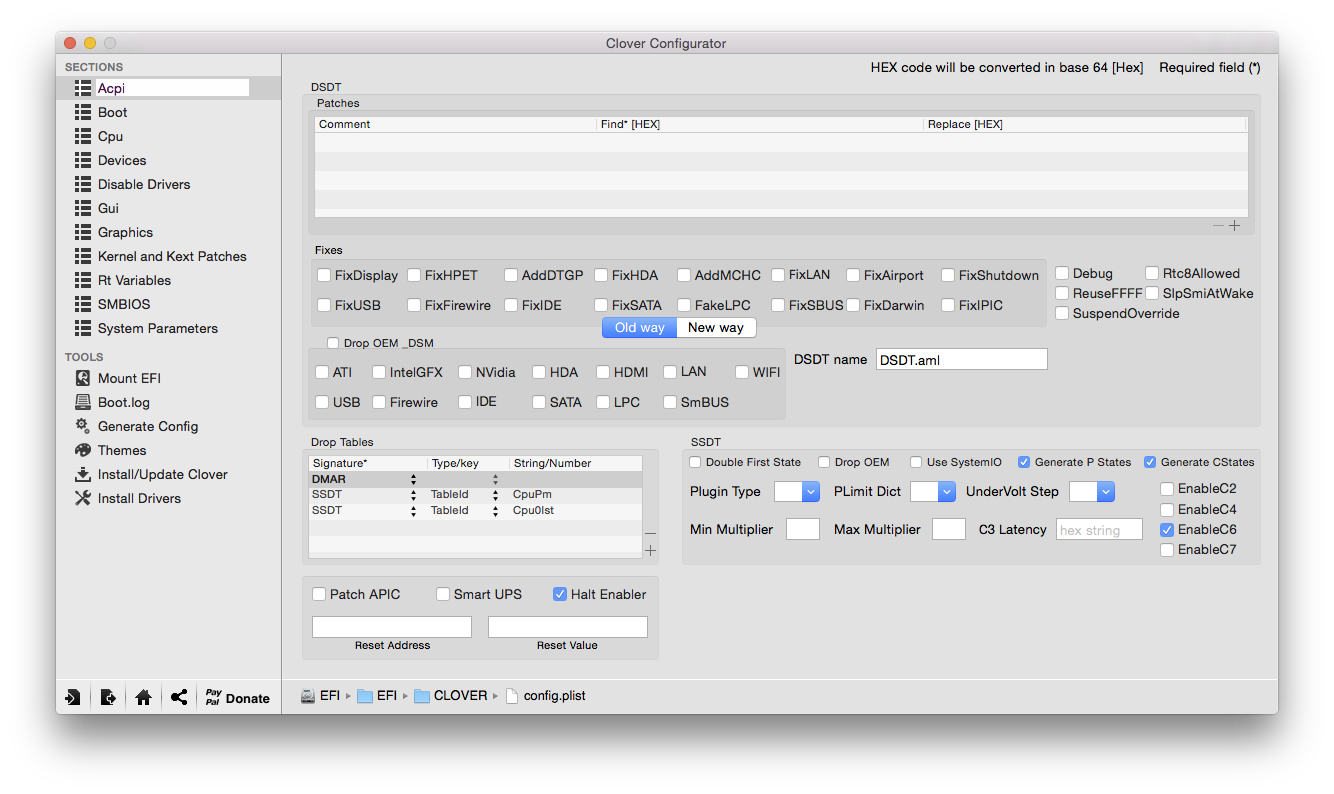
Fig. 9: Uncheck all boxes in the Acpi section in the config.plist file using Clover Configurator.
When I finally reached the installer from the USB drive, I went into Disk Utility and chose Partition Layout: 1 Partition, Options: GUID Partition Table and Name: Macintosh HD. I quit Disk Utility and clicked “Continue” to install OS X on the SSD. When the computer rebooted I booted Clover again, and selected Install OS X, and the installation process continued. When OS X was installed, I installed Clover onto the SSD using the Clover installer (I booted using the USB drive). I chose the same options as when installing on the USB drive (remember to choose the SSD/HDD as the target drive), but this time I also chose “Install RC scripts on target volume”. Furthermore, I chose “Install Clover Preference Pane”. See Fig. 10. I copied the same kexts, removed VBoxHfs-64.efi from EFI/CLOVER/drivers64UEFI and added HFSPlus.efi to the same folder.
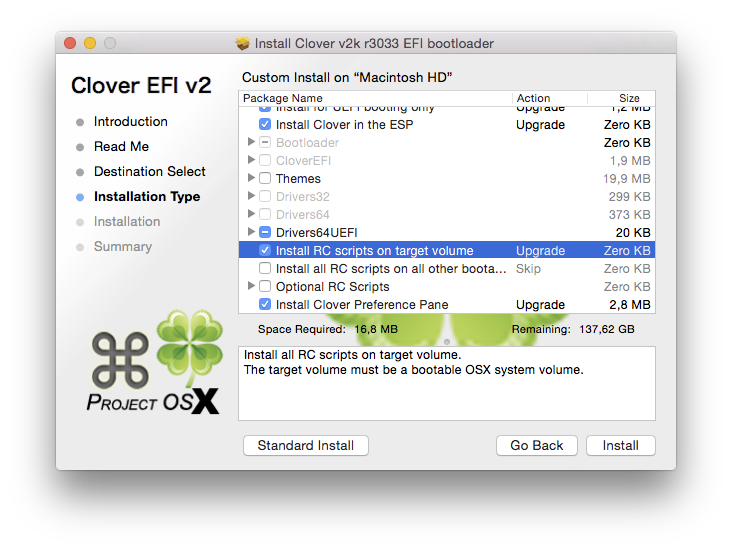
Fig. 10: Choose “Install RC scripts on target volume” and “Install Clover Preference Pane”.
One thing that did not work was audio. I used toleda’s Clover Patched Realtek ALC method [2], and followed the instructions. However, the implemented ALC1150 codec caused me a bit of a headache, and it did not work at first. I missed the part where I should have replaced <09ec10> with <0009ec10> in the config.plist, see Fig. 11 (Note F. 1. in [2]).
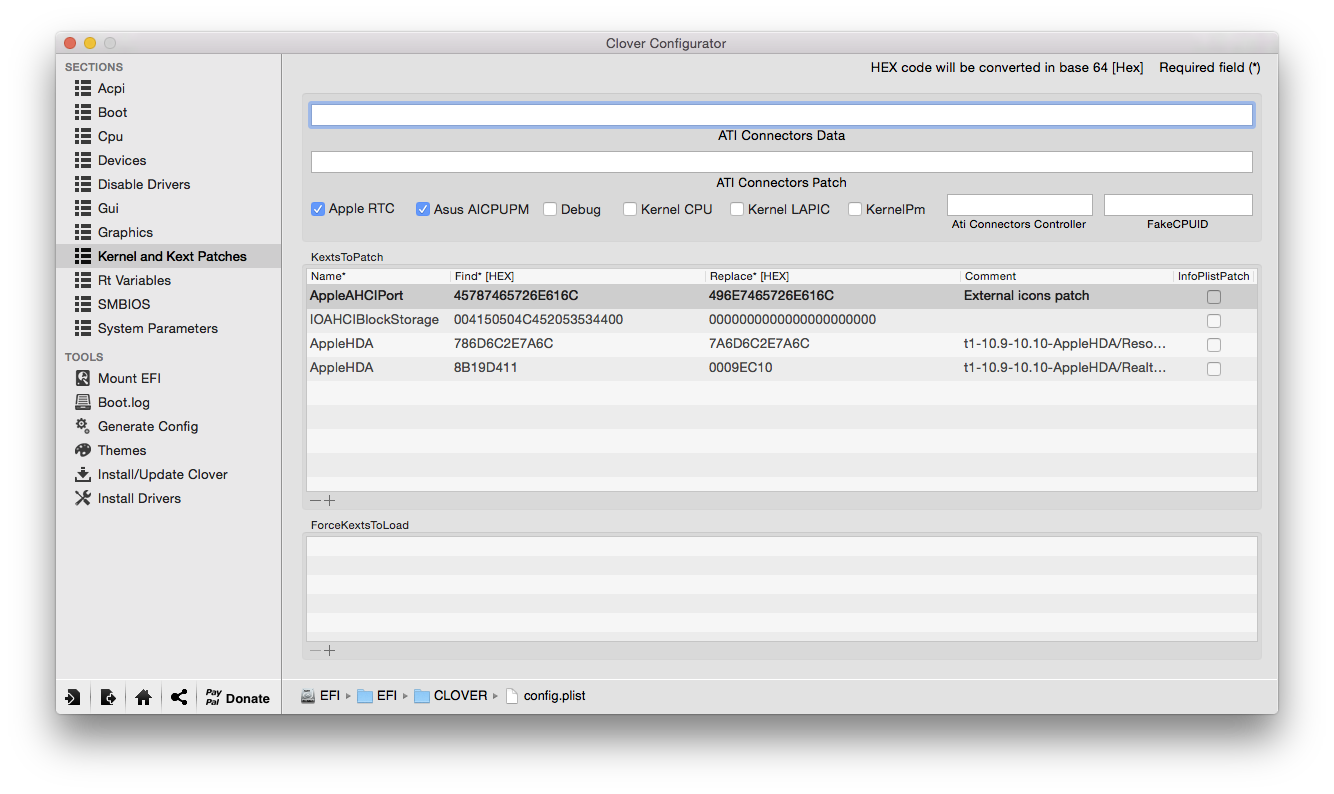
Fig. 11: Replace <09ec10> with <0009ec10> in the config.plist.
I tried to run audio_cloverALC-100-v1.0.1.command, but I got the error: No audio codec detected. When I open IORegistryExplorer and did a search for HDEF, it said layout id: <00 00 00 00>. In System Report under Audio, I could also see "Intel High Definition Audio. Audio ID: 0". I managed to fix this problem using the info at [3], particularly the file "[Guide] Add HDEF-Clover.pdf". I discovered that the reason audio did not work was that I had Inject=No instead of Inject=1 in my config.plist under Devices/Audio. I manually edited the file, and ran audio_cloverALC-100-v1.0.1.command again. I then edited replaced <09ec10> with <0009ec10> in the config.plist, restarted, and then it worked.
References
[1] http://www.corsair.com/de-de/carbide-series-air-240-high-airflow-micro-atx-and-mini-itx-pc-case
[2] https://github.com/toleda/audio_CloverALC
[3] https://github.com/toleda/audio_ALCInjection
Log
28/12-14: I am currently running 10.10.1 (updated without problems), and I have successfully updated the BIOS to version F3, which should improve SSD performance. I am running Clover v2k r3033.
Last edited by a moderator:
") Give it a go and let me know how it went.
Give it a go and let me know how it went.