- Joined
- Dec 26, 2012
- Messages
- 18
- Motherboard
- MSI Z97 Gaming 7
- CPU
- 4.0GHz i7 4790K
- Graphics
- Geforce GTX 780 (GV-N780OC-3GD rev. 2.0)
- Mac
- Classic Mac
- Mobile Phone
[Guide] El Cspitan on the MSI Z97 Gaming 7 with Clover | i7 4790K | GTX 780
Dear all,
Since Mavericks, I have had great success with this motherboard, thanks to a combination of guides from other users on tonymacx86, and across the web.
Please find below my guide to installing El Capitan with Clover on an MSI Z97 Gaming 7 motherboard.
Components
MSI Z97-Gaming 7 LGA 1150 Motherboard
Intel Core i7 4790K Processor
Gigabyte GeForce GTX 780 (GV-N780OC-3GD REV2.0)
Samsung 840 EVO 250GB SSD
16GB Crucial (2 x 4GB + 1 x 8GB) DDR3-1600 Memory
Corsair CX 750W Power Supply
WiFi + Bluetooth:[/B] Apple Broadcom BCM94331CD 802.11N WIFI+Bluetooth 4.0 PCI-Express Combo Card For Hackintosh Computers - This card requires a spare USB header and if you're using another device with the same requirement (e.g. Corsair H110 Liquid CPU Cooler), there aren't enough headers on the MB. For this reason, I have (and recommend) a StarTech 2 Port USB Motherboard Header Adapter.
Corsair 780T ATX Full Tower Case
I am running OS X El Capitan 10.11.4 with everything working fully. So let’s begin.
Creating our Clover USB Installer
Get hold of a USB flash drive with at least 8GB capacity. I use a SanDisk Ultra USB 3.0 32GB flash drive. When installing OS X, it's better to plug the drive into a USB 2 port, but when creating the installer, USB 3 allows for a faster write speed.
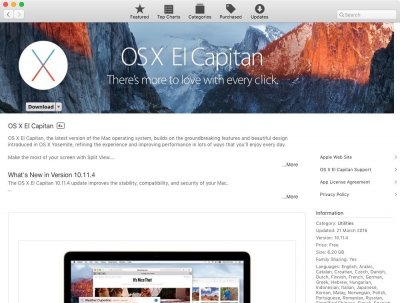
Step 1: Access a Mac and launch the App Store, then create an account (or login with your Apple ID) and download OS X El Capitan 10.11.4.
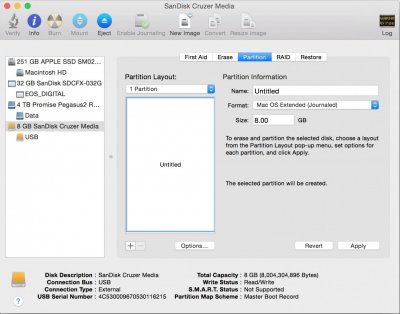
Step 2: Launch the Disk Utility and partition your USB drive.
If you’re using Yosemite (or earlier) to create the USB installer, select the USB drive on the left hand side.
On the right hand side select the Partition Layout drop down (where it says ‘Current’) and choose ‘1 Partition’.
Make sure the format is Mac OS X Extended (Journaled). Click ‘Options’ and make sure the partition scheme is set to ‘GUID Partition Table’. Leave the partition name as ‘Untitled’. Click ‘Apply’.

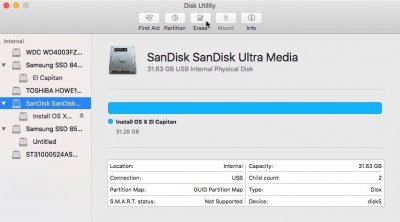
If you're using El Capitan to create the USB installer, Disk Utility works the same but now looks a little different.
Select the USB drive on the left hand side, then click Erase. Leave the partition name as ‘Untitled’. The format should be set to Mac OS X Extended (Journaled) and the scheme set to GUID Partition Map.

Step 3: Launch Terminal and paste in the following:
Hit the return key and you’ll be prompted to enter your password. Hit return again and wait for files to copy.

You’ll notice the volume is now named “Install OS X El Capitan”.
Step 4: Install Clover onto the USB
Download Clover Bootloader here. Run the Clover_v***.pkg.
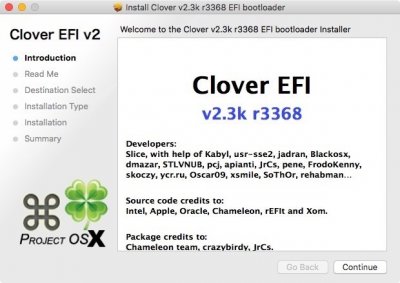
Click through the screens and then choose to ‘Change Install Location’.
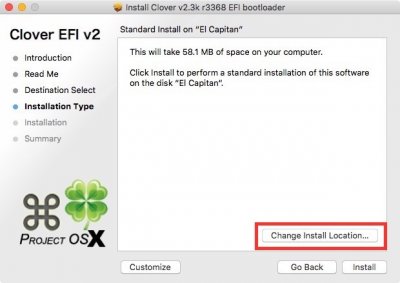
Select your USB disk, which should now be called “Install OS X El Capitan”. Click Continue, and now select Customize.
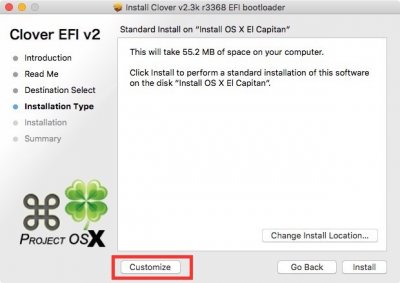
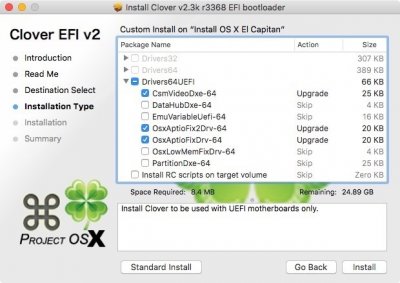
We’re going for UEFI only and your options should look like this:

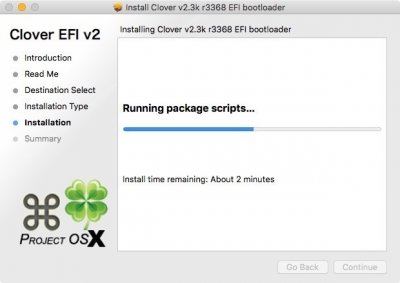
Press Install. You’ll be prompted to type your password. Now wait for files to copy.
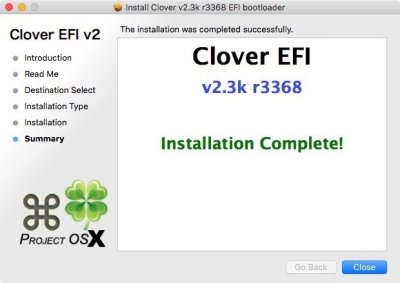
Okay, so now your USB disk has been created, we need to make some important modifications.
Step 6: Clover Kexts and Config
The USB’s EFI volume should now be mounted in Finder. You are going to need to copy two kexts into EFI/CLOVER/kexts/10.11:
FakeSMC.kext
AtherosE2200Ethernet.kext
I have attached my config.plist for you to copy into EFI/CLOVER, or to use as a guide for your own. Be sure to make the appropriate modifications to the SMBIOS settings in Clover Configurator, if you want to get iMessage working.
Note that RtVariables BooterConfig and CsrActiveConfig should be configured (to "0x28" and "0x67" respectively) to ensure that El Capitan’s SIP is disabled. If you’re using my config.plist they are already configured.
Now your USB Installer should be ready to use. However, before ejecting it and booting up your machine with it, I first recommend downloading Toleda’s cloverALC110 script. You are going to need this to enable audio and it is easier to download it now.
Download audio_cloverALC-110.command.zip, unzip the file and drag the script (audio_cloverALC-110_v***.command) into the Install OS X El Capitan USB volume (not the USB EFI volume!)
Likewise, it is also easier to copy over some other files at this stage. Copy over the Clover package installer (Clover_v***.pkg) as well as your config.plist, FakeSMC.kext and AtherosE2200Ethernet.kext. If you’ve downloaded Clover Configurator, you may also want to place it on the USB. I recommend putting these files in a folder (as below).
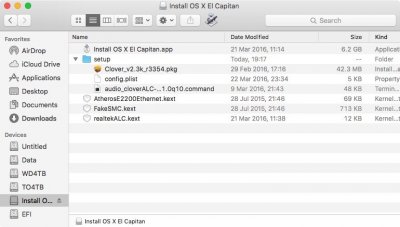
You can now eject the USB (choose Eject All when prompted). Your USB installer is now ready to go.
BIOS Settings
Before we can boot from the USB, we are going to need to boot up our machine and go to BIOS.
First, Load Optimized Defaults
Next, go to OC->CPU Features->VT-d, and set it to Disabled.
Scroll down to select CFG Lock (still under CPU Features), and set it to Disabled.
I dual boot with Windows and so I have saved these settings as an Overclocking profile. You may wish to do the same.
Anyway, you should now hit F10 to save configuration and reset.
When booting, hit F11 to go to the boot menu. You should see your USB disk there. Choose the USB disk and hit enter. With any luck Clover will boot.
El Capitan Installation
Now you have (hopefully!) booted into your Clover USB, choose to Boot OS X Install from Install OS X El Capitan.
Step 1: Erase our target disk
The target disk (where we are going to install OS X) must be erased, so choose to open Disk Utility. Once again, choose your target disk on the left hand side, then click Erase. You can pick a name for the new volume, but El Capitan should suffice. Once again, the format should be set to Mac OS X Extended (Journaled) and the scheme set to GUID Partition Map. Click Erase and then close Disk Utility.
Step 2: Installation
Now choose “Install OS X”. Choose your language, and choose to install on your target disk (named El Capitan by default). Files will copy and the machine will reboot.
When your machine reboots, hit F11 again and boot from the USB. At Clover, again choose to Boot OS X Install from Install OS X El Capitan. The installation will now complete and the machine will reboot a second time.
Step 3: Initial boot
Once again, hit F11 and boot from our Clover USB. You should now (hopefully!) see an option to Boot OS X El Capitan.
Hopefully you’ll get to the point of a welcome screen, where you’ll be prompted to create a login, set up iCloud, etc. Once you’re logged in and on the El Capitan desktop, open the Install OS X El Capitan USB volume in Finder and go to your setup folder.

El Capitan - Installing Clover
We now need to install Clover onto our El Capitan system disk. Run Clover package installer from the USB setup folder. Ensure that the Install Location is, this time, El Capitan (not the USB) and - once again - click Customize.
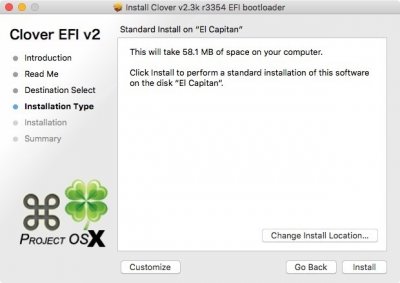
Your Clover options should look exactly the same as those used creating the USB.


This time you may want to install some Clover themes as well, although it is not necessary.
Click Install and wait for files to copy. Once the installation is complete, reboot your machine and load the boot menu.
If everything has been done correctly, you should now see an option to boot UEFI from your target (OS X) disk. Hit enter to boot Clover from your OS X system disk, and then choose to Boot OS X El Capitan. With any luck you’ll find that OS X boots. Login and then return to the setup folder on our USB installer.
Fixing Audio
You may notice that your nice new El Capitan installation is without system audio. We can fix that, but we first need to mount the system EFI partition. There are 3 ways to do this:
a) If you’ve placed Clover Configurator in the setup folder, this will be easy. Go to Clover Configurator->Mount EFI. If you have multiple disks, choose Check Partition to see a list of your disk partitions. Find the disk with Apple_HFS El Capitan on it (e.g. disk2). Choose to Mount EFI partition and select the El Capitan EFI (e.g. disk2s1) partition.
b) Alternatively, you may download Clover Configurator or EFI Mounter and follow the above steps.
c) Or if you don't want to download anything, launch terminal and type diskutil list to see a list of partitions. Find your OS X EFI partition (e.g. /dev/disk2s1) then:
Now the system EFI is mounted, return to the setup folder on our USB.
Run Toleda's cloverALC audio script by double clicking on audio_cloverALC-110_v***.command. Terminal will open and you will be asked to enter your password.
You should see:
Followed by the below prompts, which you should follow accordingly:
Confirm Realtek ALC1150 (y/n): y
Clover Audio ID Injection (y/n): y
Use Audio ID: 1 (y/n): y (clover’s config.plist should have been configured to inject audio ID 1, as mine is)
Patching will complete and you should now restart.
Reboot and (fingers crossed) audio should now be working! However…
Fixing Audio After Sleep
You will find that while audio works, there is one little problem: if your machine goes to sleep, upon resuming, audio is lost (in actual fact it isn’t lost but the volume is very very low). This was the source of much irritation for me ever since Yosemite. But at last, there is a swift and simple fix.
Tigersoul925, has compiled the CodecCommander kext for ALC1150 in a way that works without any complication. Simply download his customised CodecCommander kext (and don’t forget to thank him for his brilliance!) and install it with Kext Utility or another similar kext installer.
You don’t need to do anything else - no need to tinker with darkwake or anything. Reboot your machine, put it to sleep, wake it up and then try and play something. Sound should work just as normal - it does for me!
Complete!
If, like me, you're using an Nvidia GPU you'll need to download and install Web Drivers but that should be it. In my case (GTX 780), I only need to run the Web Driver installer and reboot.
I also use iMessage (and with a BCM wifi+bluetooth card handoff and SMS forwarding work brilliantly) and this requires generating an MLB and ROM. A useful setup (and debug) guide is available here (following steps 1-9 should get everything working).
And there we are. OS X should be installed and running beautifully. If there are any questions, or anyone is having trouble, be sure to comment!
Files:
View attachment config.plist
Dear all,
Since Mavericks, I have had great success with this motherboard, thanks to a combination of guides from other users on tonymacx86, and across the web.
Please find below my guide to installing El Capitan with Clover on an MSI Z97 Gaming 7 motherboard.
Components
MSI Z97-Gaming 7 LGA 1150 Motherboard
Intel Core i7 4790K Processor
Gigabyte GeForce GTX 780 (GV-N780OC-3GD REV2.0)
Samsung 840 EVO 250GB SSD
16GB Crucial (2 x 4GB + 1 x 8GB) DDR3-1600 Memory
Corsair CX 750W Power Supply
WiFi + Bluetooth:[/B] Apple Broadcom BCM94331CD 802.11N WIFI+Bluetooth 4.0 PCI-Express Combo Card For Hackintosh Computers - This card requires a spare USB header and if you're using another device with the same requirement (e.g. Corsair H110 Liquid CPU Cooler), there aren't enough headers on the MB. For this reason, I have (and recommend) a StarTech 2 Port USB Motherboard Header Adapter.
Corsair 780T ATX Full Tower Case
I am running OS X El Capitan 10.11.4 with everything working fully. So let’s begin.
Creating our Clover USB Installer
Get hold of a USB flash drive with at least 8GB capacity. I use a SanDisk Ultra USB 3.0 32GB flash drive. When installing OS X, it's better to plug the drive into a USB 2 port, but when creating the installer, USB 3 allows for a faster write speed.
Step 1: Access a Mac and launch the App Store, then create an account (or login with your Apple ID) and download OS X El Capitan 10.11.4.
Step 2: Launch the Disk Utility and partition your USB drive.
If you’re using Yosemite (or earlier) to create the USB installer, select the USB drive on the left hand side.
On the right hand side select the Partition Layout drop down (where it says ‘Current’) and choose ‘1 Partition’.
Make sure the format is Mac OS X Extended (Journaled). Click ‘Options’ and make sure the partition scheme is set to ‘GUID Partition Table’. Leave the partition name as ‘Untitled’. Click ‘Apply’.


If you're using El Capitan to create the USB installer, Disk Utility works the same but now looks a little different.
Select the USB drive on the left hand side, then click Erase. Leave the partition name as ‘Untitled’. The format should be set to Mac OS X Extended (Journaled) and the scheme set to GUID Partition Map.


Step 3: Launch Terminal and paste in the following:
Code:
sudo /Applications/Install\ OS\ X\ El\ Capitan.app/Contents/Resources/createinstallmedia --volume /Volumes/Untitled --applicationpath /Applications/Install\ OS\ X\ El\ Capitan.app --nointeractionHit the return key and you’ll be prompted to enter your password. Hit return again and wait for files to copy.

You’ll notice the volume is now named “Install OS X El Capitan”.
Step 4: Install Clover onto the USB
Download Clover Bootloader here. Run the Clover_v***.pkg.

Click through the screens and then choose to ‘Change Install Location’.

Select your USB disk, which should now be called “Install OS X El Capitan”. Click Continue, and now select Customize.

We’re going for UEFI only and your options should look like this:


Press Install. You’ll be prompted to type your password. Now wait for files to copy.


Okay, so now your USB disk has been created, we need to make some important modifications.
Step 6: Clover Kexts and Config
The USB’s EFI volume should now be mounted in Finder. You are going to need to copy two kexts into EFI/CLOVER/kexts/10.11:
FakeSMC.kext
AtherosE2200Ethernet.kext
I have attached my config.plist for you to copy into EFI/CLOVER, or to use as a guide for your own. Be sure to make the appropriate modifications to the SMBIOS settings in Clover Configurator, if you want to get iMessage working.
Note that RtVariables BooterConfig and CsrActiveConfig should be configured (to "0x28" and "0x67" respectively) to ensure that El Capitan’s SIP is disabled. If you’re using my config.plist they are already configured.
Now your USB Installer should be ready to use. However, before ejecting it and booting up your machine with it, I first recommend downloading Toleda’s cloverALC110 script. You are going to need this to enable audio and it is easier to download it now.
Download audio_cloverALC-110.command.zip, unzip the file and drag the script (audio_cloverALC-110_v***.command) into the Install OS X El Capitan USB volume (not the USB EFI volume!)
Likewise, it is also easier to copy over some other files at this stage. Copy over the Clover package installer (Clover_v***.pkg) as well as your config.plist, FakeSMC.kext and AtherosE2200Ethernet.kext. If you’ve downloaded Clover Configurator, you may also want to place it on the USB. I recommend putting these files in a folder (as below).

You can now eject the USB (choose Eject All when prompted). Your USB installer is now ready to go.
BIOS Settings
Before we can boot from the USB, we are going to need to boot up our machine and go to BIOS.
First, Load Optimized Defaults
Next, go to OC->CPU Features->VT-d, and set it to Disabled.
Scroll down to select CFG Lock (still under CPU Features), and set it to Disabled.
I dual boot with Windows and so I have saved these settings as an Overclocking profile. You may wish to do the same.
Anyway, you should now hit F10 to save configuration and reset.
When booting, hit F11 to go to the boot menu. You should see your USB disk there. Choose the USB disk and hit enter. With any luck Clover will boot.
El Capitan Installation
Now you have (hopefully!) booted into your Clover USB, choose to Boot OS X Install from Install OS X El Capitan.
Step 1: Erase our target disk
The target disk (where we are going to install OS X) must be erased, so choose to open Disk Utility. Once again, choose your target disk on the left hand side, then click Erase. You can pick a name for the new volume, but El Capitan should suffice. Once again, the format should be set to Mac OS X Extended (Journaled) and the scheme set to GUID Partition Map. Click Erase and then close Disk Utility.
Step 2: Installation
Now choose “Install OS X”. Choose your language, and choose to install on your target disk (named El Capitan by default). Files will copy and the machine will reboot.
When your machine reboots, hit F11 again and boot from the USB. At Clover, again choose to Boot OS X Install from Install OS X El Capitan. The installation will now complete and the machine will reboot a second time.
Step 3: Initial boot
Once again, hit F11 and boot from our Clover USB. You should now (hopefully!) see an option to Boot OS X El Capitan.
Hopefully you’ll get to the point of a welcome screen, where you’ll be prompted to create a login, set up iCloud, etc. Once you’re logged in and on the El Capitan desktop, open the Install OS X El Capitan USB volume in Finder and go to your setup folder.

El Capitan - Installing Clover
We now need to install Clover onto our El Capitan system disk. Run Clover package installer from the USB setup folder. Ensure that the Install Location is, this time, El Capitan (not the USB) and - once again - click Customize.

Your Clover options should look exactly the same as those used creating the USB.


This time you may want to install some Clover themes as well, although it is not necessary.
Click Install and wait for files to copy. Once the installation is complete, reboot your machine and load the boot menu.
If everything has been done correctly, you should now see an option to boot UEFI from your target (OS X) disk. Hit enter to boot Clover from your OS X system disk, and then choose to Boot OS X El Capitan. With any luck you’ll find that OS X boots. Login and then return to the setup folder on our USB installer.
Fixing Audio
You may notice that your nice new El Capitan installation is without system audio. We can fix that, but we first need to mount the system EFI partition. There are 3 ways to do this:
a) If you’ve placed Clover Configurator in the setup folder, this will be easy. Go to Clover Configurator->Mount EFI. If you have multiple disks, choose Check Partition to see a list of your disk partitions. Find the disk with Apple_HFS El Capitan on it (e.g. disk2). Choose to Mount EFI partition and select the El Capitan EFI (e.g. disk2s1) partition.
b) Alternatively, you may download Clover Configurator or EFI Mounter and follow the above steps.
c) Or if you don't want to download anything, launch terminal and type diskutil list to see a list of partitions. Find your OS X EFI partition (e.g. /dev/disk2s1) then:
Code:
mkdir /Volumes/EFI && sudo mount_msdos /dev/disk2s1 /Volumes/EFINow the system EFI is mounted, return to the setup folder on our USB.
Run Toleda's cloverALC audio script by double clicking on audio_cloverALC-110_v***.command. Terminal will open and you will be asked to enter your password.
You should see:
Code:
EFI partition is mounted
System Integrity Protection status: disabled.
Followed by the below prompts, which you should follow accordingly:
Confirm Realtek ALC1150 (y/n): y
Clover Audio ID Injection (y/n): y
Use Audio ID: 1 (y/n): y (clover’s config.plist should have been configured to inject audio ID 1, as mine is)
Patching will complete and you should now restart.
Reboot and (fingers crossed) audio should now be working! However…
Fixing Audio After Sleep
You will find that while audio works, there is one little problem: if your machine goes to sleep, upon resuming, audio is lost (in actual fact it isn’t lost but the volume is very very low). This was the source of much irritation for me ever since Yosemite. But at last, there is a swift and simple fix.
Tigersoul925, has compiled the CodecCommander kext for ALC1150 in a way that works without any complication. Simply download his customised CodecCommander kext (and don’t forget to thank him for his brilliance!) and install it with Kext Utility or another similar kext installer.
You don’t need to do anything else - no need to tinker with darkwake or anything. Reboot your machine, put it to sleep, wake it up and then try and play something. Sound should work just as normal - it does for me!
Complete!
If, like me, you're using an Nvidia GPU you'll need to download and install Web Drivers but that should be it. In my case (GTX 780), I only need to run the Web Driver installer and reboot.
I also use iMessage (and with a BCM wifi+bluetooth card handoff and SMS forwarding work brilliantly) and this requires generating an MLB and ROM. A useful setup (and debug) guide is available here (following steps 1-9 should get everything working).
And there we are. OS X should be installed and running beautifully. If there are any questions, or anyone is having trouble, be sure to comment!
Files:
View attachment config.plist
Last edited:


