
- Joined
- Sep 21, 2010
- Messages
- 13,416
- Motherboard
- HP 17" 17-by3053cl
- CPU
- i5-1035G1
- Graphics
- Intel UHD Graphics, 1920x1080
- Mac
- Classic Mac
- Mobile Phone
Stork's Hector Build: GA-H97N-WIFI - i5-4690 - HD4600 & GTX 750 Ti
Components
Gigabyte H97N-WIFI mini-ITX, dual LAN, 1-DVI & 2-HDMI Motherboard - Amazon || Newegg
Intel i5-4690 Processor with HD4600 Intel Integrated Graphics - Amazon || Newegg
Arctic Freezer 7 Pro v2 CPU Cooler - Amazon || Newegg
Samsung 840 EVO 256GB SSD - Amazon || Newegg
Broadcom BCM94360CD BCM4360CD 802.11ac mini PCI-E WiFi WLAN Bluetooth 4.0 Card for Apple - Amazon
Generic Mini Pci-e Adapter for Bcm94360cd Bcm94331cd - Amazon
Added Later
https://www.amazon.com/dp/B013WAL3AU/
http://www.newegg.com/Product/Product.aspx?Item=N82E16814125558
EVGA GTX 760 Graphics Card - Mojave Metal Compatible, Natively Supported
Already Owned
Edimax Wireless AC1200 Dual Band USB 3.0 Adapter (EW-7822UAC) - Amazon || Newegg
Used temporarily until the iMac WiFi/BT 4.0 LE card and adapter arrived.
Crucial Ballistix Tactical 16GB (2x8GB) Memory Kit (BLT2KIT8G3D1608DT1TX0) - Amazon || Newegg
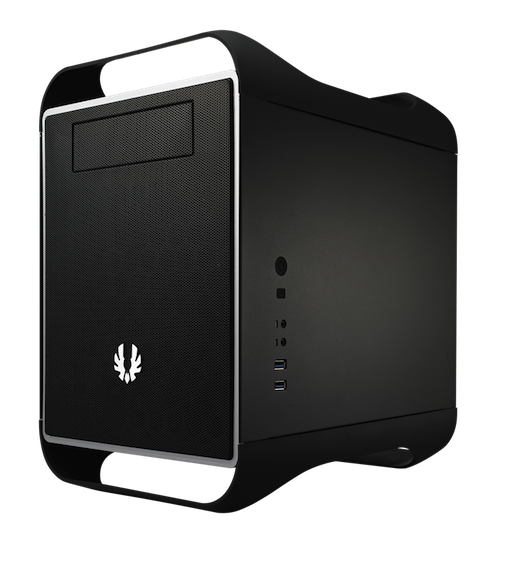
BitFenix Prodigy mini-ITX Black Case - Amazon || Newegg
Corsair CS550M 550 Watt (Partially) Modular, PLUS GOLD Power Supply - Amazon || Newegg
IOGEAR 4-Port Dual View Dual-Link DVI KVMP Switch with Audio GCS1644 - Amazon || Newegg
The following are connected to the IOGear KVM DVI Switch:
Dell UltraSharp U2711 27-inch Widescreen Monitor - Max Resolution 2560 x 1440 - Amazon
HP ZR24W 24" IPS Monitor with DVI, HDMI, DisplayPort and Sub-D Connectors and USB Hub (out of production; replaced by the HP ZR2440W Monitor) - Amazon
GMYLE Bluetooth 4.0 USB Dongle - Amazon
Logitech Unifying Wireless Receiver which comes with the Solar Keyboard K750 for Mac
Logitech Wireless Solar Keyboard K750 for Mac - Silver (920-003472) - Amazon
Apple Bluetooth Wireless Keyboard - Amazon || Newegg
Apple Bluetooth Magic Mouse - Amazon || Newegg
Apple Bluetooth TrackPad - Amazon || Newegg
Comments
Contents
Background & General Information
Background & General Information
This is my entry level, general purpose computer for my household use, including low (computer) stress games. Obviously, as you can see in my signature block, I have some middle of the line builds that more than adequate for most people's needs. But, I started to get curious about the capabilities of last year's crop of smaller mini-ITX size motherboards, such as the Gigabyte H/Z87N-WIFI motherboards although I have a GA-H67N-USB3 / i3-2125 / HD3000 system. So, since I'm not a gamer - GarageBand is the most "rigorous" application that I use - I decided to build the H97N-WIFI based system with getting back into some adventure games like Myst & Rivan.
Why a wireless equipped motherboard? Well, even though the Intel wireless is not compatible with OS X, and the Bluetooth (BT) is compatible, I planned to update the WiFi/BT card with a OS X compatible one as soon as the opportunity presented itself (see below). My systems are connected to dual monitors through a IOGear KVM switch. The Logitech Unified receiver for my Logitech K750 Mac Solar keyboard and the GMYLE BT 4.0 USB dongles are connected to one of the monitors USB hub which is connect to the KVM switch and shared with the computers when switched to that computer. So, I don't need the BT in a combo, but I do need wireless, and I'll like to have the wireless device to be 801.11ac compatible (AC1200+). Consequently, I have removed the Gigabyte miniPCIe wireless/BT card, and I temporarily used the an Edimax Wireless AC1200 Dual Band USB 3.0 Adapter (EW-7822UAC) which requires drivers from Eimax's website.
I have since replaced the Gigabyte H97N-WIFI motherboards WiFi/BT card with an Apple iMac Wifi/BT 4 card and a miniPCIe adapter which interfaces correctly with the Gigabyte H97N's motherboard WiFi/BT miniPCIe card slot. Both were purchased from Amazon as described in tonymacx86's guide: http://www.tonymacx86.com/network/1...apple-mini-cards-pcie-mini-pcie-adapters.html. I'm now transmitting 1300Mbps with the iMac Wifi/BT 4 card and adapter card when connected to my AC1750 wireless router. See Post #37 for more detailed information. My Bluetooth keyboard and Mighty Mouse will allow me to enter the BIOS, and I can use either the arrow keys or the mouse to move through the BIOS screens. BTW, the before mentioned Edimax wireless USB 3 dongle worked great providing a 857Mbps throughput; it's a good alternative at ~$30 USD.
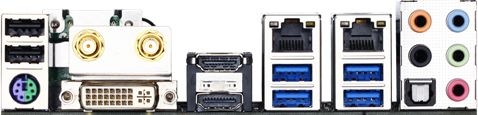
The Haswell Refreshed Intel Core i5-4690 provides HD 4600 graphics capability to the motherboard's one DVI connector and two HDMI connectors. (I have tested three monitors running, and, while it does support three monitors, I would only recommend running three monitors with an i5 or i7.) This processor has done well with everything I've thrown at it including GarageBand on one monitor and iMessages (sound turned off) on the other monitor. Web surfing is easily displayed quickly with YouTube videos running as if I was on a more powerful system. The Haswell Refreshed i5-4590 is a winner in my book.
The Crucial Ballistic Tactical memory is an overkill for this system, but I had picked up the 16GB set last fall when it was on sale in anticipation of using it in another Thunderbolt build (maybe later). The Buyer's Guide's Crucial Ballistic Budget 16GB memory set is more appropriate for this set-up.
I initially build this system without a graphics card. If you want to use the on-board graphics capability, then see the Mojave update required after the MultiBeast installation. Thanks to @hansik for this information. See his post #368 in this Build Description thread.
Even though the Logitech K750 Mac Solar (rechargeable) is a wireless keyboard with a numeric key pad, the keyboard is recognized by the BIOS so I don't need a USB wired keyboard to enter into the BIOS and navigate around. Great keyboard with a good feel to it...and I'm a touch typist, too.
The rest of the components including the case are not new, and you've read about them before. The BitFenix Prodigy case is fat > about 10 inches wide. Although the Prodigy is good looking, the motherboard sits horizontal in the case, instead of the usual vertical orientation in other cases. This results in a wider case (10 inches vs. other cases 7-8 inches) which takes up too much desk space. So, although it sits on a shelf next to the desk, it still gets compliments from those guests wanting to see my horde of computers.
Installation of OS X
I have upgraded to Mojave 10.14.4 from High Sierra 10.13.6, and Mojave works better than High Sierra. At least it appears to be quicker.
Preparation
Now is a good time to check and see if you have the latest version of the BIOS.
H97N BIOS: http://www.gigabyte.com/products/product-page.aspx?pid=4992#bios
Z97N BIOS: http://www.gigabyte.com/products/product-page.aspx?pid=4993#bios
To update to the latest BIOS version, see How to Update Your Gigabyte Motherboard's BIOS.
 Prepare the UniBeast USB thumb drive in accordance with the tonymacx86 guide UniBeast: Install macOS Mojave on Any Supported Intel-based PC. Steps 1-2, using the UEFI Boot Mode.
Note:Your USB Thumb drive needs to have 7.63 GB of free space to build the UniBeast installation thumb drive. Otherwise, you'll need a 16GB USB thumb drive which is a better size so you can load the following applications for use in the post installation phase:
MultiBeast for Mojave which you can probably put on a 8GB USB thumb drive, but that's about itEFI Mounter V3Clover Configurator Power down the computer (Optional) Disconnect all drives except for the drive onto which Mojave will be installed; and Put the UniBeast USB thumb drive in a USB 2 or 3 (not 3.1) socket on the motherboard Back Panel. (UniBeast for Mojave supports installation using a USB 3 port on the Back Panel.)BIOS Set-up
Rather than clutter up this guide, I won't show a lot of BIOS screen snapshots, just the actual BIOS parameters that I changed to start the Installation of macOS. (Note: the BIOS set-up below is the same as my previous guides. So you can skip the BIOS set-up if you followed my guides in the past.)
Boot into the BIOS by holding down the DELETE key on your keyboard's numeric keypad. Load the Optimized Defaults (F7); M.I.T. > Advanced Memory Settings > X.M.P. > Profile 1 for memory not recognized with the Default setting; BIOS Features > Boot Options Priorities <--- set this to the UEFI version of the UniBeast USB thumb drive BIOS Features > VT-d > Disable <--- for non K processors and the new Haswell Refresh "K" and non "K" processors BIOS Features > Windows Features > Other OS <--- should be the default, but make sure BIOS Features > Boot Mode Selection > UEFI only Peripherals > Initial Display Output >IGFX <--- make sure on-board graphics is enabled for using this graphics option or you're going to use both on-board graphics and a graphics card, or
PCIe 1 Slot <--- for graphics cards, make sure this setting is enabled
Peripherals > Intel Processor Graphics > Enable <--- likewise, make sure this is enabled Peripherals > XHCI Mode > Auto <--- Smart Auto gives you problems with USB peripherals Peripherals > EHCI Hand-off > Enable Power Management > Wake on LAN > Disable Save & Exit > Save & Exit Setup (and the computer will reboot)Installation of OS X
If you are installing Mojave over High Sierra, do the following before proceeding to the next steps:
Update all your apps so you are current with Sierra, and Use MultiBeast for Mojave to install the latest version of Clover:Bootloaders > Clover UEFI Boot Mode (optional > "...+Emulated NVRAM")
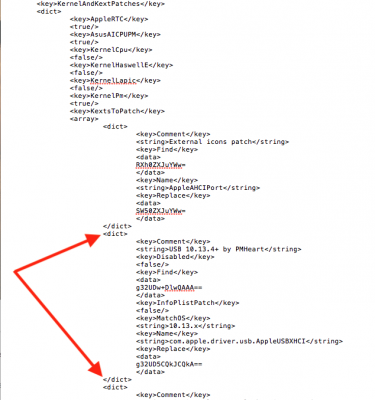
Backup your High Sierra installation disk. I use Carbon Copy Cloner. At the Clover Boot screen, choose the External icon (UniBeast USB thumb drive) to execute and follow Step 4 in the tonymacx86 guide, UniBeast: Install macOS Mojave on Any Supported Intel-based PC.Important. If you're doing a fresh installation, after the installer reboots several times and you start the final install steps, the install process asks you to log into iCloud. Do not log in - skip it - as it messes up Messages. Upon reaching the Desktop, do the following: Open up the Applications folder and create a new folder by Finder > File > New Folder (or just type Command-Shift-N), and name it Hackintosh (or what ever you desire); Copy the MultiBeast and other files you copied to the UniBeast thumb drive above into this new folder; Un-zip the files and put the zipped files into the Trash; Run MultiBeast and selection the following: Quick Start > UEFI Boot Mode Drivers > Audio > AppleALC (Optional) Drivers > Misc > FakeSMC Plugins (Optional) Drivers > Misc > FakeSMC HWMonitor Application Drivers > Network > Atheros > AtherosE2200Ethernet <----for the Atheros Ethernet port and Drivers > Network > Intel > AppleIntelE1000e <----for the Intel Ethernet port Drivers > USB > 7/8/9 Series USB Support <----Rehabman's two FakePCIID kexts Drivers > USB > Remove XHCI USB Port Limit <--- Adds PMHeart’s patch to remove XHCI USB Port Limit Drivers > USB > USBInjectAll (Optional) Bootloaders > Clover UEFI Boot Mod + Emulated NVRAM Build <--- To see your full configurationMultiBeast for High Sierra

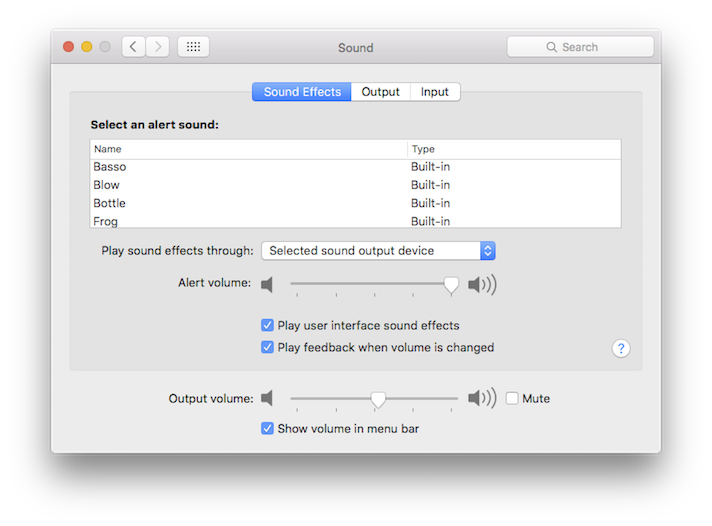
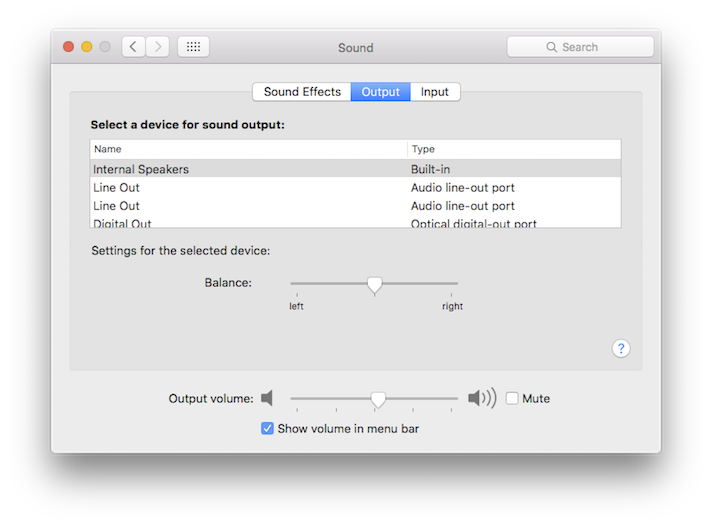
Save <--- Save your MultiBeast configuration file somewhere convenient, like in your hackintosh folder Now, click on Install. Reboo the computer. Boot into the BIOS. Change BIOS Features > Boot Options Priorities > set this to the UEFI setting for the Mojave drive. F10 to save the BIOS update and reboot.To get audio working you'll need to use the Green sound port on the Rear Panel with the System Preference's Sound pane set up as follows:
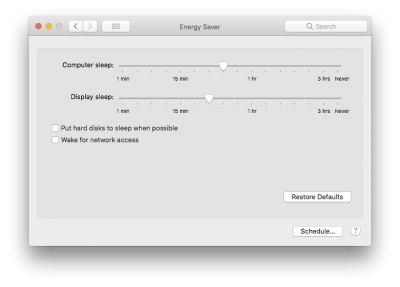
 To make sleep/wake-up work, go to the Energy Saver pane in the System Preferences and uncheck the "Wake for network access" box. If you're running SSDs, uncheck the "Put hard disks to sleep when possible" box, too.
What does work that I've tested so far:
- iMessage.
- iFaceTime.
- Sleep/wake-up.
- Tunes trailers playing causes system freeze. This is due to the 9-series not being recognized by the iTunes store. Additionally, the DRM iTunes movies and trailers haven't worked on a hackintosh since the Ivy Bridge motherboards.

Updates & Notices
May 07, 2019. Updated the build description for a Mojave installation.
March 18, 2019. Added on-board graphics information in post installation section. Thanks to @hansik for this information. See Post #368.
November 21, 2018. Updated the MultiBeast procedure to use AppleALC.kext which replaces the Realtek ALC8xx method.
September 27, 2018. Updated the installation procedure to add clarify. Thanks, @Singularity.
July 11, 2018. Corrected the BIOS setting for Graphics Cards. Thanks, @MacMattD for catching this needed change.
June 14, 2018. Upgraded to High Sierra 10.13.5. See Post #329.
May 21, 2018. Upgraded to High Sierra 10.13.4 and updated the installation procedures above.
May 16, 2017. Updated to Sierra 10.12.5. See Post #282.
April 12, 2017. I've updated the installation notes for Sierra.
April 19, 2016. I remove the abbreviated installation process for Mavericks, Yosemite and El Capitan since I have detailed, check list installation descriptions for those three versions of OS X. I did this to avoid confusion and to ensure that the installation updates, corrections and/or additions only needed to be in one place.
Update. I added aaands' method to get into the BIOS with the Apple wireless keyboard by pressing the Fn-Eject keys (hold down the Fn key and press the Eject key, located in the Apple wireless's keyboards top row, far right key).
Update. El Capitan information.
Update. I discovered that Wake-on-LAN does not have to be disabled for sleep/wake-up to work.
Update. I've updated this build with a Gigabyte GTX 750 TI graphics card. See my Guide here in the Forum's Graphics section. http://www.tonymacx86.com/graphics/...am-new-gigabyte-750-ti-2gb-graphics-card.html. However, this build description will reflect the build w/o the graphics card while the previously mention link with show how to update this build with a GTX 750 Ti (Maxwell) graphics card.
Update: I've created a SSDT to provide better processor power management for the iMac14,2 System Definition in Mavericks. You can see the procedure here. To check to see if your SSDTs are loading, use the following command in the Terminal:
Code:
bdmesg|grep -y amlAttachments
Last edited: