Contribute
Register

Setup Guide for Gigabyte BRIX and BRIX Pro using Clover

Status
Not open for further replies.
Congratulations! You seem to have a well working hackingtosh.

I am sorry for not being able to help you.

The internal speaker output might just be creepy from hardware point of view and not be isolated well. I think somewhere in the forum you find others complaining about the speaker port stopping to work after a while. Maybe I experienced this as well. But ignored it due to the next point: I don't use it. I have external speaker on my HDMI monitor. And this works very well and the HDMI sound driver does not make any problems at all.

The wireless devices not working at the boot might be a limitation of clover. A clover forum thread might help for negotiating possible solutions.
 
I successfully flashed my GB-BXi7-4770R with a modified bios today. Luckily, everything went well.

What process did you follow to flash the modified BIOS? I have tried using either the DOS or Windows flash utilities only to receive an error message of unable to enter secure flash. FWIW, your linked BIOS also throws the secure flash error.

There is a newer BIOS (version 7) that I'm attempting to modify as the thread suggests. I added the last extension letter "H" to indicate hacked.

Any suggestions or sample command line arguments will be appreciated.

Code:
DOS Examples that produce the error:
1) afudos HM87P.F7H /p /b /n
2) afudos HM87P.F7H /CAPSULE /p /b /n
3) afudos HM87P.F7H /RECOVERY /p /b /n

The below images are the proposed BIOS modification and the native maximum resolution without the modification.
 

Attachments

  • AMIBCP_HM97P.F7H.PNG
    AMIBCP_HM97P.F7H.PNG
    54.8 KB · Views: 468
  • 4KMonitorBefore.png
    4KMonitorBefore.png
    60 KB · Views: 356
There is a newer BIOS (version 7) that I'm attempting to modify as the thread suggests. I added the last extension letter "H" to indicate hacked.

As per the original thread you need to use the following call:

Code:
AUFDOS.exe HM85P.F6 /gan

The /gan switch allows you to flash the bios without secure sign check.

I would make sure you don't use the AMIBCP 4.53 which resulted in me bricking my Brix. Try AMIBCP 4.55.0070. I would like to know what version coobie used to successfully flash his machine.

Anyway remember you are taking a risk by flashing an unsigned BIOS. If you are successful please attach your BIOS here for others.
 
How to unlock 4k resolution - GB-BXi7-4770R BIOS patch and flash - configuration modifications

Code:
AUFDOS.exe HM85P.F6 /gan
The /gan switch allows you to flash the bios without secure sign check.
Disclaimer: I take no responsibility for the damage this process can cause to your computer. DO THIS AT YOUR OWN RISK!

BIOS Modification Processed followed:
Obtain the F7 BIOS from the Gigabyte support site.
Obtain AMIBCP from the link in post 117.
Patching instructions taken from post 195.
Lather, rinse and repeat to modify the DVMT Pre-Allocated value for 64M (A) and 128M (B) and save accordingly for later flashing.

IMPORTANT:
Note your current BIOS settings as they will be wiped out during the flash process. Failure to set the BIOS configuration correctly will surely prevent a successful boot into OS X.


This file is suitable for the GB-BXi7-4770R only.
F7_BIOS_Modifications.zip is attached to this post. Please validate MD5 values or create the patched BIOS yourself.

Code:
Application: AMIBCP.exe (Windows only)
Version: AMIBCP 4.53.0050 

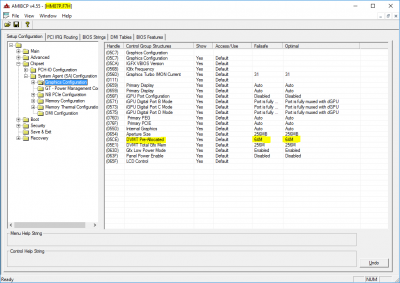
BIOS Modification Path Location Inside AMIBCP (see image AMIBCP_HM97P.F7A.PNG):
/Chipset/System Agent (SA) Configuration/Graphics Configuration/DVMT Pre-Allocated

Naming Convention:
HM87P.F7A = F7 BIOS with  64M setting for Failsafe & Optimal
HM87P.F7B = F7 BIOS with 128M setting for Failsafe & Optimal

From Terminal:
md5 F7_BIOS_Modifications.zip
Output:
MD5 (F7_BIOS_Modifications.zip) = 53fcbd18f98441fd3bf58cf6216fec47

Decompress the ZIP to obtain the two files listed below:

From Terminal:
md5 HM87P.F7A
Output:
MD5 (HM87P.F7A) = e7f87d0dc41543a9c030799b07b7de89

From Terminal:
md5 HM87P.F7B
Output:
MD5 (HM87P.F7B) = 6bacc402c75b3e3e6a48a92c373a0434
Follow the DOS flashing procedure listed in post AUFDOS.exe HM85P.F7? /gan. I actually started with the "A" letter (64M) and then followed with the "B" (128M). I have not noticed and differences and left the BIOS on the "B" version.

Configure the BIOS settings accordingly especially Advanced/Chipset/CFG Lock to OFF and Boot/CSM parameters.

Patch config.plist according to post 104 for "AppleIntelFramebufferAzul" and the "Graphics" section. Basically, you have to make all of the modifications listed in post 104 to make it work.

Obtain the "pixel clock limit unlock" perl script from post 104 and execute it. The perl script does create a backup should you need to revert (IOKit.bak). Caution is necessary when touching IOKit as the whole system has dependancies on it and it can prevent network communication as well as your local system from working correctly so having your own backup is highly recommended. What I did after completion of executing the perl script was copy the modified IOKit to IOKit.mod in terminal.
Code:
cd /System/Library/Frameworks/IOKit.framework/Versions/Current
sudo cp -av IOKit IOKit.mod
After execution of the "pixel clock limit unlock" a system Restart is required to enact the change.

Observations:
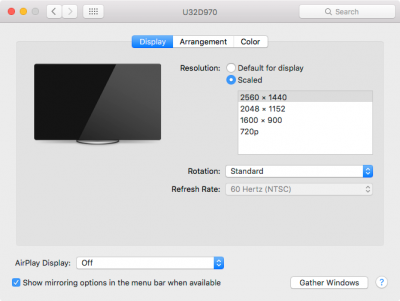
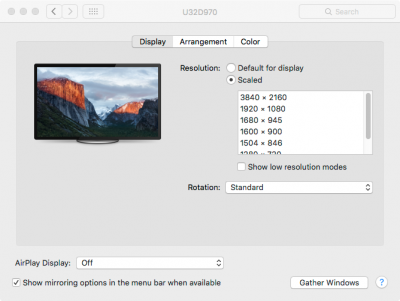
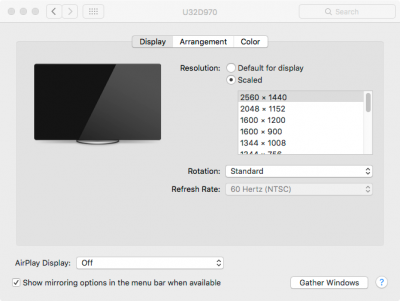
I went through all of this to obtain additional resolution for the Samsung 32" U32D970 that I own. The additional resolution is helpful when working in Lightroom editing 50MP images. To my dismay I was disappointed in the outcome. I was hoping for a native selection of typical resolutions like the ones available in Windows (yes I still need Windows for Visual Studio, Visio and RDP for work) yet they were not present. The images 2 -> 4 below demonstrate the native resolutions where the highest resolution 3840x2160 would only scale to 1920x1080 (Retina like). 1920x1080 is a waste for my normal usage, heck I don't even need to put on my reading glasses on a 32" monitor. The typical resolution for day to day things is the default 2560x1440 which is present without doing any of this. I previously looked at SwitchResX months ago but was unable to get the resolutions that are now available (I even emailed the developer). So I took the plunge and purchased SwitchResX at $15 US after downloading the trial and seeing what it could do which pretty much opens the door to set whatever fits for my workflows. I'm now pleased with the effort to unlock the resolutions and control them with SwitchResX (see image 5).

Gratitude:
Thanks to all that made this possible. I'm sure many hours were put forth by all participants on this thread.

Images:
1) OSX_Version.png
2) Native_Resolution_Option.png
3) Modified_Resolution_macPixelClockPatcher_Option_#1.png
4) Modified_Resolution_macPixelClockPatcher_Option_#2.png
5) SwitchResX_Post_Patching.png
6) AMIBCP_HM97P.F7A.PNG
 

Attachments

  • SwitchResX_Post_Patching.png
    SwitchResX_Post_Patching.png
    227.1 KB · Views: 445
  • Modified_Resolution_macPixelClockPatcher_Option_#2.png
    Modified_Resolution_macPixelClockPatcher_Option_#2.png
    109 KB · Views: 461
  • Modified_Resolution_macPixelClockPatcher_Option_#1.png
    Modified_Resolution_macPixelClockPatcher_Option_#1.png
    109.7 KB · Views: 465
  • Native_Resolution_Option.png
    Native_Resolution_Option.png
    60.3 KB · Views: 461
  • OSX_Version.png
    OSX_Version.png
    56.7 KB · Views: 499
  • AMIBCP_HM97P.F7A.PNG
    AMIBCP_HM97P.F7A.PNG
    54.8 KB · Views: 711
  • F7_BIOS_Modifications.zip
    10.1 MB · Views: 191
I had a few issues updating to El Capitan. Just going to list the steps I needed to do to get it working.

If you have an AzureWave AW-CE123H card to get Bluetooth working:
1. Replace the Handoff patch in your config.plist
2. Copy BrcmBluetoothInjector.kext to EFI/CLOVER/kexts/10.11
3. Copy FakePCIID_BCM94352Z_as_BCM94360CS2.kext to EFI/CLOVER/kexts/10.11
4. Copy FakePCIID_XHCIMux.kext to EFI/CLOVER/kexts/10.11
5. Copy FakePCIID.kext to EFI/CLOVER/kexts/10.11

headkaze,

Thanks for all of your effort on this thread.

I have the AW-CE123H card and have followed the above directions. The solution only provides partial support for the wireless where only 2G radios are detected. The bluetooth portion is flaky at best and the pairing is a bear. This will not pair with my iPhone. It felt like forever to get a trackpad to pair and it is unresponsive at times so reverting back to a mouse was necessary. I have used the latest files from github in the attempt. The github instructions state BrcmPatchRAM2.kext and BrcmFirmwareData.kext should be installed (EFI/Clover/kexts) yet stability or functionality is questionable; I have tried with and without the two aforementioned files and stability/connectivity is better without them. The handoff patch was also applied as instructed.

Code:
<dict>
    <key>Comment</key>
    <string>10.11.dp1+ BT4LE-Handoff-Hotspot, credit RehabMan based on Dokterdok original</string>
    <key>Find</key>
    <data>SIX/dEdIiwc=</data>
    <key>Name</key>
    <string>IOBluetoothFamily</string>
    <key>Replace</key>
    <data>Qb4PAAAA60Q=</data>
</dict>
Attached is my config.plist with RtVariables and SMBIOS removed. My config.plist will be slightly different than yours now that the "Increase buffer for 4K (64 MB RAM / 48 MB Framebuffer)" is applied, thanks for that too!

Are there any updated or additional instructions you can provide? If not, are there any other internal combination cards that might be more reliable? I own two BRIX units and two of the AW-CE123H cards so trying to get this working would be great. I am currently hardwired to Gigabit ethernet so the wireless is not a show stopper but is nice to have the wireless functional. I kind of miss the old days where you would change the branding on the card and then things were native. For example, I have an old days Dell 1511 card that was rebranded and it works flawlessly with the 2 & 5G radios (no patches required even in El Capitan) but there is no bluetooth support.

Thanks in advance.
 

Attachments

  • no_sensitive_data_config.plist
    4.2 KB · Views: 296
I was hoping for a native selection of typical resolutions like the ones available in Windows

I don't think you need SwitchResX. Do the extra resolutions show if you go into Display preferences, hold down the Option (alt) key and clicked Scaled?

Thanks for your detailed tutorial and putting all the scattered posts together into one. I personally have still not had the guts to flash my BIOS again after bricking my Brix last time. Maybe I will brave it again knowing that two people have performed the flash successfully.

As for your WiFi issues; please check out Post #132

The bluetooth is flaky indeed. I have not found a way to solve that yet.
 
BRIX 2807 Hackintosh Info

Hi everyone,

I'm new to the forums here and would like to know how to hackintosh my BRIX 2807. Also, is there anywhere I can get all the kexts I need for El Capitan?

Thanks, Aaron
 
Just a word of warning to anyone installing the OS X 10.11.4 Update

Make sure you install the latest version of Clover (r3354+) and select the OsxAptioFix2Drv option.

If you happen to miss this step you may see a circle with a cross through it when attempting the update. If this is the case you will need to finish the installation by pressing the space bar when selecting your OSX boot drive on the Clover startup menu and booting into Safe Mode. Once the installation is finished you can do a manual copy of the fix as per my instructions here

After that all I had to do was run audio_cloverALC-110_v1.0q10.command (just say 'yes' to all questions) to get audio back.
 
Thanks for posting. I thought I followed your instructions, but I thought I would clarify just in case others might make my mistake.

Very important to check OsxAptioFix2Drv. The 2 is very important. :banghead:

I used Ubuntu on a stick to load the EFI partition and had to use sudo to force deletion of the old file and force writing of the new driver. Once I did that, I got past the "No" screen. Here's what that looks like in the newest Clover Configurator with your EFI partition mounted and your config.plist loaded.
Screen Shot 2016-03-22 at 6.37.31 AM.png
 
Status
Not open for further replies.
Back
Top