Contribute
Register

Install Stalled - ASUS Z87 Deluxe/Dual

Status
Not open for further replies.
Joined
Jul 14, 2013
Messages
14
Motherboard
ASUS Z-87 Dual/Deluxe
CPU
Hazwell 3.5
Graphics
ASUS GTX770
Mac
  1. 0
Classic Mac
  1. 0
Mobile Phone
  1. 0
ASUS Z87 Deluxe/Dual Success

1.) ASUS Z87 Deluxe/Dual, LAG 1150 Motherboard
2.) Hazwell i7-4770K 3.5 GHz, LGA 1150
3.) Samsung 840 Pro 500 GB SSD - Windows 7 Ult (Up and Running again)
4.) Samsung 840 Pro 250 GB SSD - HACKINTOSH (Hung on Install)
5.) ASUS NVIDIA GTX770-DC20C-2GD5 GeoForce 2GB
6.) CORSAIR Hydro Series H110 CPU COOLER
7.) SeaSonic X-Series X-2050W Powersupply
8.) Cooler Master HAF X RC-942KKN1 CASE

Unibeast 3.0.0 Downloaded 10/22/2013
Multibeast 6.0 Downloaded 10/22/2013

I am having a little difficulty installing Mavericks on my Hackintosh.
I downloaded Mavericks Install.app and ran unibeast and it appeared to create it properly.
I copied multibeast to the flash drive.
I followed the Step 3 Instructions
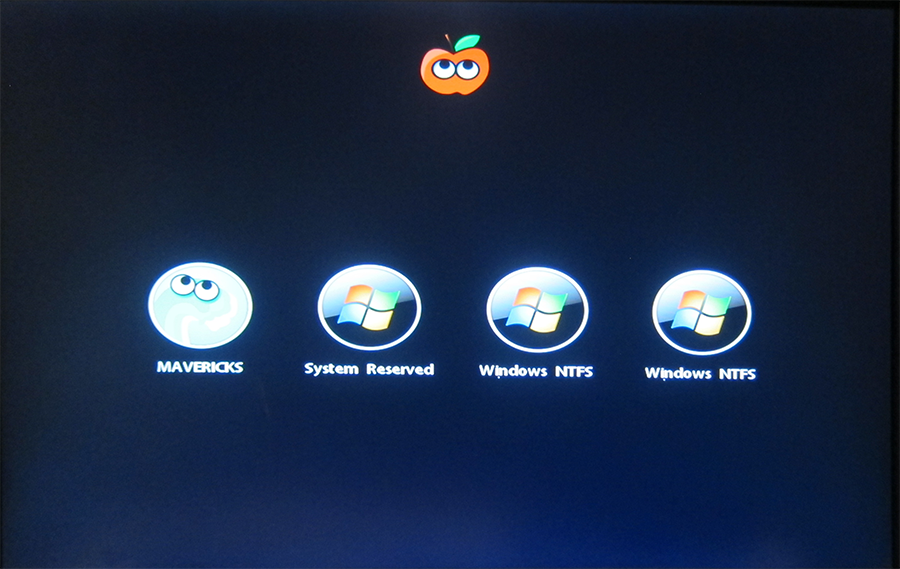
I booted the Unibeast and repartioned the 250 GB SSD GUID

I selected to install the to the MAVERICKS 250 GB SSD and it appears to install
but it never finishes (ever)-- the install circle just keeps spinning.
(I have tried several times, ie repartioning and reinstalling).

I booted back into Unibeast and used the Browse Image and there are 4 folders
Applications, Library, System, and Users and all have subdirectories.

The only idea I can think of is redownloading Mavericks, recreating using Unibeast 3.0.1, and then trying reinstall.

Any Ideas, thanks?

Dan
 
You should check out this post on your motherboard for answers > http://www.tonymacx86.com/general-h...dual-thunderbolt-4770k-1150-a.html#post672616

To get an Asus board going as a hackintosh, usually there are a number of things you have to change in the BIOS. First and foremost is the BIOS itself, by flashing it with a modded Asus BIOS from biosrepo.wordpress.com. Unfortunately the Z87 Deluxe Dual is still quite new so you may have to wait a bit. But as the board is UEFI compatible it should be easy to handle.

Make sure the following settings have been set:

HPET On
AHCI On
Hard drive mode > SATA
XHCI On
Intel VT-d Off
Intel Virtualisation Technology On
Internal Graphics Off
UEFI Booting from main drive
UEFI and legacy compatibility

Make sure (for Mavericks) you are using a HDMI cable to connect your monitor, and that it is connected to your installed Nvidia card, and that only essential items are attached to the PC ie. mouse & keyboard. Disconnect any USB devices attached including USB hubs in case they cause an error.

At the Chimera boot prompt, press up/down cursor keys and when the command line appears type in:

-v -x -f GraphicsEnabler=Yes PCIRootUID=1

This usually gets the installer going onto the next part and allow you to boot Mavericks and then eventually finalise your install with Multibeast drivers. If your machine is still stuck with the install, then it may be due to some BIOS setting that needs changing and/or updating.
 
Thank you Middleman for your post


RESPONSE-----------------------------------------------------------------
I did not flash the BIOS using PMPatch, I have the latest ASUS Bios 1405 for my board. I thought the PMPatch utility was to edit the bios with relation to Power Management for the Hazwell CPU’s that wasn’t present in the Developer Preview of the Mavericks MAC OS X. I am using the released version of MAVERICKS and I assume it has native support for Hazwell CPUs. Therefore I did not modify my current BIOS using PMPatch.


BIOS SETTINGS - YOU Mentioned
HPET = ON —> My BIOS does not have this option
AHCI = ON —> Mine is set to AHCI = ON
Hard Drive Mode = SATA —> Mine is SATA and is on the Intel Controller, I have tried the Asmedia controller (no difference)
XHCI = ON —> Mine is set to Intel xHCI Mode = Smart Auto
Intel VT-d = OFF —> I have the Intel I-7 4770K and the K version does not have the VT-d option
Internal Graphics = OFF —> Primary Display = PCIE, iGPU Multi-Monitor = Disabled
UEFI Booting from main drive —> In my BIOS I can select the drive I want to boot from, I do this because it does not boot off of my drive
UEFI and legacy compatibility —> Boot Device Control = UEFI and Legacy OPRom.


Down below I have a link to my google drive where I have images of my BIOS settings, if you like.


UPDATE-----------------------------------------------------------------
Since my first post I have downloaded Mavericks again and created the boot USB using Unibeast 3.0.1 (not 3.0.0) and reinstalled. I disabled the Integrated graphics in the bios and ran Multibeast 6.0. I do not have the Windows SSD connected. I can only boot using the USB Unibeast, but I do not need safe mode and OS X seems to work fine.


My current goal is to get the Mavericks OS X SSD hard drive to boot, it is formatted using GUID (should I have used MBR?). When I try to boot from my Mac OS SSD it gives me a black screen (couple of flickers) and then puts me back into my BIOS. It is like it isn’t recognizing my hard drive. I removed my Mac OS SSD and connected it to a USB to SATA cable and tried to boot to the hard drive that way, but that did not work.


I uploaded to my google drive some files relevant to this Installation that can be accessed with the following link.
https://drive.google.com/folderview?id=0B5k9JLcfAFgOSVRzNm0zOURrZ2c&usp=sharing


AboutThisMacImages.rtfd
BiosImages.zip (approximately 26 MB)
Boot Drive Information
Multibeast run2.pdf
org.chamelion.boot.plist


MultiBeast Configuration - 2013-10-31 06:34:18 -----------------------------------------------------------------
Quick Start > DSDT Free
Drivers > Audio > Realtek ALCxxx > Without DSDT > ALC1150 Drivers > Audio > Realtek ALCxxx > Without DSDT > HDAEnabler Drivers > Disk > 3rd Party SATA

Drivers > Disk > TRIM Enabler > 10.9.0 TRIM Patch
Drivers > Misc > EvOreboot
Drivers > Misc > FakeSMC v5.3.820
Drivers > Misc > FakeSMC v5.3.820 Plugins
Drivers > Misc > FakeSMC v5.3.820 HWMonitor Application Drivers > Misc > NullCPUPowerManagement

Drivers > Misc > USB 3.0 - Universal by Zenith432
Drivers > Network > Intel - hnak's AppleIntelE1000e v2.5.4d Drivers > Network > Realtek - AppleRTL8169Ethernet 2.0.6 Drivers > System > AppleRTC Patch for CMOS Reset Bootloaders > Chimera v2.2.1
Customize > Boot Options > Basic Boot Options
Customize > Boot Options > Generate CPU States Customize > Boot Options > Hibernate Mode - Desktop Customize > Boot Options > IGPEnabler=No
Customize > Boot Options > Use KernelCache
Customize > System Definitions > Mac Pro > Mac Pro 3,1 Customize > Themes > Chameleon 2.2 Default


org.chameleon.Boot.plist-----------------------------------------------------------------
<?xml version="1.0" encoding="UTF-8"?>
<!DOCTYPE plist PUBLIC "-//Apple//DTD PLIST 1.0//EN" "http://www.apple.com/DTDs/PropertyList-1.0.dtd">
<plist version="1.0">
<dict>
<key>EthernetBuiltIn</key>
<string>Yes</string>
<key>GraphicsEnabler</key>
<string>No</string>
<key>IGPEnabler</key>
<string>Yes</string>
<key>Kernel</key>
<string>mach_kernel</string>
<key>Kernel Flags</key>
<string></string>
<key>Legacy Logo</key>
<string>Yes</string>
<key>Timeout</key>
<string>2</string>
<key>GenerateCStates</key>
<string>Yes</string>
<key>GeneratePStates</key>
<string>Yes</string>
<key>UseKernelCache</key>
<string>Yes</string>
</dict>
</plist>


Thanks


Dan
 
I have figured out why my Hackintosh will not boot without the USB unibeast drive. I have the dreaded BOOT0 disease.
I followed the recommendations in the link below to fix the BOOT0 error, but unfortunately that did not resolve my issue.
http://www.tonymacx86.com/general-help/53295-boot0-error-official-guide-9.html


FIX BOOT ZERO ERROR - THIS DID NOT WORK FOR ME
1.) Boot to USB Unibeast flash Drive
2.) Use Disk Utilities and unmount the MAVERICKS drive
3.) Open terminal: enter the following command
dd if=/Volumes/USB/usrstandalone/i386/boot1h of=/dev/disk0s2
4.) Screen Showed this
2+0 records in
2+0 records out
1024 bytes transferred in 0.0019091 sec (938586 bytes/sec)
5.) Normally at this point your computer will reboot automatically into Mavericks without the USB.
Unfortunately this is not the normal situation. as this did not work for me (I tried numerous times).


I created a cloned version of my OS on my hard drive and tried the BootZero fix on both partitions, neither will
boot without the aid of the Unibeast USB flash drivel. If I can make a unibeast flash drive boot, why the hell can’t
I make a fricken GUID SSD drive boot—ARGH!#.
 
why can’t I make a GUID SSD drive boot
Not supported. The Z87 BIOS does not support legacy (Chimera) boot on GPT disks. Legacy boot is only supported on MBR disks; the reason the installer works. Asus/8 Series requires UEFI/GOP to boot GPT disks. Suggest installing Chimera on another USB/MBR and booting from the USB. The installer remains the last resort.
 
Thank you Toleda that is insightful.

Current Drives
Mac OS Boot - Name (MAVERICKS) - GUID Mac OS Extended (Journaled) - current(1 Partition 124 GB, 2 Partition - 124 GB)
Unibeast Drive - Name(USB) - Mac OS Extended (Journaled) --current Unibeast (1 Partition 61.91 GB)

Do I need to recreate my MAVERICKS disk using MBR (Can I copy my hard drive image to that new drive?)
Do I need the USB Unibeast to be MBR also?

In order for me to boot without USB, my Chimera has to be located on a internal Disk (Primary Partition) that is formatted MBR, is this correct?

Thanks
 
So I finally got it to dual boot Windows 7 and Mavericks without using the unibeast USB drive. I originally installed both Mac and Win on GUID EFI hard drives. This is the source of my difficulty. I tried briefly to install Clover EFI but I couldn't get that to work (did not try real hard). My solution was to make an image of the Mavericks installation that worked when booting from the USB. I then booted from the unibeast USB and deleted the GUID formatted Mavericks installation and created a MBR formatted hard drive. I then copied the Mavericks image file (DMG) to the new MBR formatted hard drive. I exited the unibeast and rebooted using unibeast and booted into the Mavericks installation. Then I installed Chimera 2.2.1 removed the unibeast USB and rebooted. I was then able to select (without booting from unibeast) between Mavericks, NTFS, and Windows.

So essentially I did get it to work. I haven't checked to see if every thing works yet. I did get the clock synchronized between Windows 7 and Mavericks.

Dan
 
ASUS Z87 DELUXE/DUAL HACKINTOSH GUIDE

The instructions here are based on the installation instructions created by tonymacx86 regarding the Unibeast and Multi beast installation of Mac OS X Mavericks on the PC.

Follow the instructions up to through Step 3: to create a Unibeast USB disk, follow the link below.

UniBeast GUIDE: Install OS X Mavericks on Any Supported Intel based PC
http://www.tonymacx86.com/374-unibeast-install-os-x-mavericks-any-supported-intel-based-pc.html

I used the following:
UniBeast 3.0.1
Multibeast 6.0.0
Chimera 2.2.1


STEP 3: Recommended UEFI BIOS SETTINGS
If you're installing on a recommended CustoMac desktop with AMI UEFI, the options are simple. For other systems make sure to set your BIOS or UEFI to Optimized Defaults, and your hard drive to AHCI mode. Award BIOS settings are listed here.

1. To access BIOS/UEFI Setup, press and hold Delete on a USB Keyboard while the system is booting up
2. Set to Optimized Defaults.
3. (Optional) Set X.M.P. Memory Profile to Profile1
4. If your CPU supports VT-d, disable it
Since I have the i7- 4770K CPU (The K does not have the VT-d in the BIOS) this isn’t necessary.
5. Save and exit.

These photographs are of my ASUS Z87 Dual/Deluxe BIOS
http://i642.photobucket.com/albums/uu149/fooswolf/Kawasaki KLX250SF/IMG_1873S_zps91411be3.png
http://i642.photobucket.com/albums/uu149/fooswolf/Kawasaki KLX250SF/IMG_1875S_zpsd97487d8.png
http://i642.photobucket.com/albums/uu149/fooswolf/Kawasaki KLX250SF/IMG_1876S_zps594817d4.png
http://i642.photobucket.com/albums/uu149/fooswolf/Kawasaki KLX250SF/IMG_1877S_zpse4acf305.png
http://i642.photobucket.com/albums/uu149/fooswolf/Kawasaki KLX250SF/IMG_1878S_zpsdef78de5.png
http://i642.photobucket.com/albums/uu149/fooswolf/Kawasaki KLX250SF/IMG_1879S_zpsb49e4196.png
http://i642.photobucket.com/albums/uu149/fooswolf/Kawasaki KLX250SF/IMG_1880S_zps4029568a.png
http://i642.photobucket.com/albums/uu149/fooswolf/Kawasaki KLX250SF/IMG_1881S_zps97e32912.png
http://i642.photobucket.com/albums/uu149/fooswolf/Kawasaki KLX250SF/IMG_1882S_zps0b273b74.png
The images below relate to the boot options that are in the BIOS/UEFI (You Evil Farking Interface).
http://i642.photobucket.com/albums/uu149/fooswolf/Kawasaki KLX250SF/IMG_1897s_zpsb5303f18.png
http://i642.photobucket.com/albums/uu149/fooswolf/Kawasaki KLX250SF/IMG_1898s_zps3071a572.png
http://i642.photobucket.com/albums/uu149/fooswolf/Kawasaki KLX250SF/IMG_1899s_zps5158c731.png
http://i642.photobucket.com/albums/uu149/fooswolf/Kawasaki KLX250SF/IMG_1900s_zps1a699d3f.png
http://i642.photobucket.com/albums/uu149/fooswolf/Kawasaki KLX250SF/IMG_1901s_zps88660770.png
http://i642.photobucket.com/albums/uu149/fooswolf/Kawasaki KLX250SF/IMG_1902s_zps75b6d2f8.png
http://i642.photobucket.com/albums/uu149/fooswolf/Kawasaki KLX250SF/IMG_1903s_zps0ccd795e.png

STEP 4: Install OS X Mavericks
Follow all of the steps listed in the UniBeast Install guide in step 4 except the following.

6.) For a new installation of OS X, you MUST erase and format the destination drive according to the following steps before continuing. If you are upgrading from Snow Leopard, Lion, or Mountain Lion and you want to keep your files and apps, skip steps a-j.
a. In the top menu bar choose Utilities, and open Disk Utility
b. Highlight your target hard drive for the Mavericks installation in left column.
c. Click Partition tab
d. Click Current and choose 1 Partition
e. Click Options...
f. Choose GUID Partition Method Choose MBR Partition Method
g. Under Name: type Mavericks (You can rename it later)
h. Under Format: choose Mac OS Extended (Journaled)
i. Click Apply then Partition
j. Close Disk Utility


7.) When the installer asks you where to install, choose Mavericks, or your existing install.
8.) Upon completion, restart the system.


Follow the rest of the instructions in the UniBeast guide.


If your computer will not boot without the UniBeast USB, then boot from the UniBeast USB into Mavericks and reinstall the latest version of Chimera.

This is my boot screen without UniBeast
IMG_1904s_zps3e4ee86a.png


Thanks to the people of this forum.

Dan
 
thank you for the guide mate.
i am wondering if your system running stable now? cos I am thinking to change to the same MOBO you have.

thanks
 
Yes it is running very stable. The only real problem I had was formatting the Mac partition GUID when I should have formatted it using MBR. I like the motherboard and the components so far, and the thunderbolt is nice. I haven't tested the thunderbolt on the Mac (works great in Windows) and I haven't tested the wifi on either operating system. I'm new to the Mac world so I'm still figuring it out.

The only outstanding issues I am having is with Thunderbolt and Bluetooth. I don't need bluetooth but I would rather have it working. The thunderbolt issue is annoying. I have not been able to find a kext for it yet (I haven't looked real hard - 20 min). However even if I do get it working I read that for hard drives you have to have it turned on and plugged in prior to turning on the computer. My Lacie 1 TB draws power from the Thunderbolt and the USB3 so that probably won't work for me. Under Windows that Lacie in TB copied 32 GB of photos in 5 minutes (wow). I don't think it is possible to use the Thunderbolt with this motherboard to drive displays (unless you use the integrated graphics) and even then I don't know if this is possible using Mavericks. I have two optical drives both LG: one older Super Multi-Blue DVD, and one new Blu-Ray. They are both recognized and seem to work. The only issue is with the older DVD. When booting to Mavericks it will eject the empty DVD tray, and I have to close it by hand (annoying).

Good luck with your build.

Dan
 
Status
Not open for further replies.
Back
Top