You are using an out of date browser. It may not display this or other websites correctly.
You should upgrade or use an alternative browser.
You should upgrade or use an alternative browser.
2013 Mac Pro - My variation
- Thread starter JuanLobo
- Start date
- Status
- Not open for further replies.
- Joined
- Feb 6, 2014
- Messages
- 17
- Mac
- Classic Mac
- Mobile Phone
This is neat!
You don´t even have to put the trashcan on it to make it nice looking
So what will be your cutting approach? I mean - I don´t believe it would be possible to measure it and than cut it ideally. My plan is to start with much smaller hole and than just put it on, check, adjust little bit, check again... it is just a plan, thought Also, do you want to cut it the whole way down, or do you think that it is possible to cut just the middle part? I will try the second option in my build, but I am really not sure about it.
You don´t even have to put the trashcan on it to make it nice looking
So what will be your cutting approach? I mean - I don´t believe it would be possible to measure it and than cut it ideally. My plan is to start with much smaller hole and than just put it on, check, adjust little bit, check again... it is just a plan, thought
- Joined
- Jan 22, 2014
- Messages
- 373
- Motherboard
- Gigabyte GA-Z87N-WIFI
- CPU
- i7-4770
- Graphics
- MSI GTX 760 ITX
- Mac
- Classic Mac
- Mobile Phone
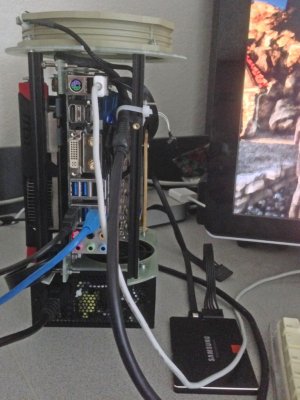
I would really like to avoid the slot all the way down, but not sure the bin will fit Maybe if the wifi plate is removed it will slide over. To answer your question Mr. Target I think I'll cut a hole the same size as the IO plate that came with the motherboard and then expand from there as needed. Most likely use the cutoff wheel in the dremel to do most of the work.
The top fan has a rattle at low speed that goes away if a little pressure is applied to the middle of the fan. Guess it is time to find out who will replace it.
Reinstalled everything on a partitioned drive after setting the bios to legacy. Installed Mavericks with Unibeast and it is working good. Blindly installed a network driver with Multibeast and killed my networking. Started over and this time have not installed anything from Multibeast yet. Need to do more research.
- Joined
- Nov 8, 2013
- Messages
- 233
- Motherboard
- "Power" Hack Pro (Custom System)
- CPU
- i7-4770k 3.5GHz Socket 1150
- Graphics
- GTX 780, GTX 970
- Mac
- Mobile Phone
#OPIsSmart
- Joined
- Jan 22, 2014
- Messages
- 373
- Motherboard
- Gigabyte GA-Z87N-WIFI
- CPU
- i7-4770
- Graphics
- MSI GTX 760 ITX
- Mac
- Classic Mac
- Mobile Phone
The ethernet stuff has been sorted. Just a permissions repair and kernel cache rebuild and it is happy. Everything works except Wifi, but an AW-CE123H half mini card is on order. That should fix that I hope. Setting X.M.P. Memory Profile to Profile1 has switched memory speed from 1333 to 1866 and it shows in About this Mac.
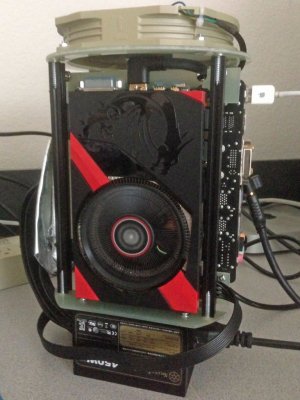
I think I'll call this "The 30th Anniversary Hack" ;-)
Now comes the drudgery of cutting a hole for IO and making a new back panel.
I think I'll call this "The 30th Anniversary Hack" ;-)
Now comes the drudgery of cutting a hole for IO and making a new back panel.
- Joined
- Jul 6, 2013
- Messages
- 176
- Motherboard
- Z170N-Gaming 5
- CPU
- i5 6600k
- Graphics
- GTX 950 Ti Boost
- Mac
- Mobile Phone
How is the slicing and dicing going on, John? I am ordering 2 cans on the 20th so I am excited to see what you come up with. Any tips you want to share about parts you should got that you haven't told us yet?
- Joined
- Jan 22, 2014
- Messages
- 373
- Motherboard
- Gigabyte GA-Z87N-WIFI
- CPU
- i7-4770
- Graphics
- MSI GTX 760 ITX
- Mac
- Classic Mac
- Mobile Phone
I've been working on the drive bracket for the sata drive. Not done anything on the IO yet. I don't have much time during the week, but I hope to make more progress this weekend.
- Joined
- Jan 22, 2014
- Messages
- 373
- Motherboard
- Gigabyte GA-Z87N-WIFI
- CPU
- i7-4770
- Graphics
- MSI GTX 760 ITX
- Mac
- Classic Mac
- Mobile Phone
Replaced the Thermalright 140mm case fan with a Noctua NF-A15 PWM fan. Ohh my the Noctua fan is quiet.
There was a problem with the Thermalright case fan, it wouldn't spin smoothly unless the BIOS PWM multiplier was enabled, and there is a bug in the Gigabyte BIOS where it doesn't enable the multiplier until after the first reboot after a cold boot. The Noctua runs fine with the default fan speed setting.
It comes with rubber mounts, and they popped right into my bracket, and further isolate the fan from the rest of the chassis. Not that it matters... the fan has no vibration at all.
The Thermalright CPU cooler fan has always been silent, so I have no interest in replacing it.
- Joined
- Jan 27, 2014
- Messages
- 5
- Motherboard
- HP Pavilion g7
- CPU
- Intel Core i3
- Mac
- Classic Mac
- Mobile Phone
Power Button?
I have a question that might have been already been answered,
Usually when building a computer you have a front panel or f_panel connector that goes to a power button. How do you plan on doing a power button or do you need one at all, like using the power button on the psu.
Looks great!, Brett
I have a question that might have been already been answered,
Usually when building a computer you have a front panel or f_panel connector that goes to a power button. How do you plan on doing a power button or do you need one at all, like using the power button on the psu.
Looks great!, Brett
- Status
- Not open for further replies.
Copyright © 2010 - 2024 tonymacx86 LLC


