
- Joined
- Mar 1, 2011
- Messages
- 11
- Motherboard
- Gigabyte GA-Z77X-UP5 TH
- CPU
- i7-3770K
- Graphics
- GTX 660 TI
- Mac
- Mobile Phone
[size=+1]Black and Silver PowerMac G5[/size]

[size=+1]Components[/size]
- Intel i7-3770K
- Gigabyte Z77X-UP5-TH
- Samsung 256GB 840 Pro SSD
- Corsair HX850
- Corsair 16GB RAM
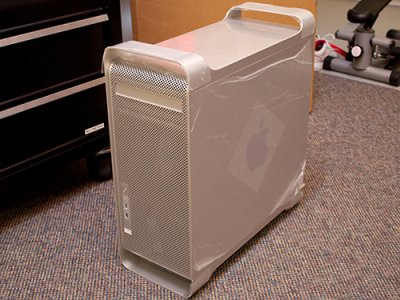
[size=+1]The Case Build[/size]
This case build was heavily inspired from brammee's PowerMac G5 mod. I have quite detailed steps on how I built the case with just over 80 pictures on dozuki. Dozuki is a site for making online manuals. This build did take me around 4 months, but I was busy with other projects during this one. I did put in around 60-80
Quick Case Details (Click images to see them larger)
I started with an empty PowerMac G5 case.


I removed all of the components to expose just the case.


After lots of cutting and use of epoxy...


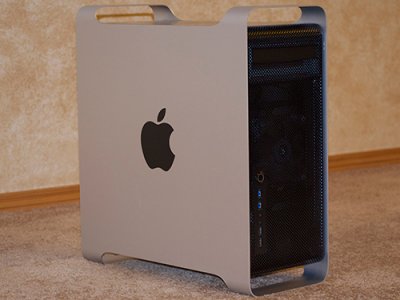
...it was ready for painting!


After letting it dry, the components went in, like an almost too small glove.


Full case mod details here.
[size=+1]The Software[/size]I started with an empty PowerMac G5 case.
I removed all of the components to expose just the case.
After lots of cutting and use of epoxy...
...it was ready for painting!
After letting it dry, the components went in, like an almost too small glove.
Full case mod details here.
BIOS Setup
This list assumes you want to use dedicated graphics instead of the onboard HD4000.
- BIOS firmware is F11
- BIOS Features > Intel Virtualization Technology > Enabled (I use Parallels to use Windows 8)
- Peripherals > XHCI Pre-Boot Driver > Enabled
- Peripherals > XHCI Mode > Auto (NOT Smart Auto!)
- Peripherals > Init Display First > PEG
- Peripherals > XHCI Hand-off > Enabled
- Peripherals > EHCI Hand-off > Enabled
- Power Management > Wake on LAN > Disabled
- Power Management > High Precision Event Timer > Enabled
To boot into the UniBeast USB Drive, tap F12 to get into the Boot Menu, then select your USB drive.
This guide helped with setting up the BIOS. It has some images to assist.
Install Mountain Lion
Following the UniBeast Installation Guide, install Mountain Lion. It took about 20 mins for it to install for me. Once it finishes, it will ask you to reboot. When you reboot, you MUST tap F12 again to select the USB Drive as your boot device. When the boot loader appears, select your freshly installed Mountain Lion drive.
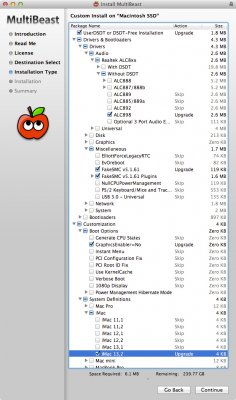
MultiBeast Install
Download MultiBeast, I used MultiBeast 5.3 to finish the install. See the image below for install details.
**The smbios NEEDS to be an iMac 12 or 13, as Thunderbolt didn't work when the smbios was MacPro xx.x. I selected an iMac 13.2 and it worked perfectly.
[size=+1]Final Thoughts[/size]
The computer works perfectly!
- Sleep - Works, I had the unit asleep all night and it woke up the next morning with no issues.
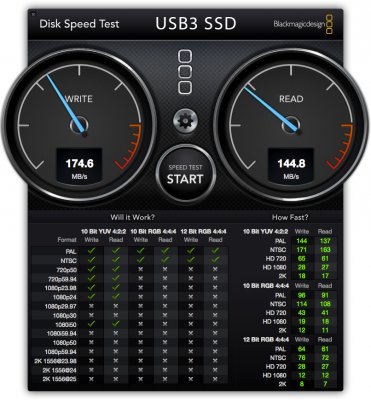
- USB3 - Works, I read somewhere that you should use the 2nd or 3rd USB3 headers NOT the 1st for front USB3. Tested with an external USB3 SSD enclosure. The enclosure was purchased from OWC and it was an OCZ Agility 3 240GB SSD.
- Thunderbolt - Works, Thunderbolt devices must be plugged in at boot, or the system freezes. I used an Apple Thunderbolt Ethernet adapter. Again, the smbios needs to be an iMac 12 or 13, as Thunderbolt didn't work when the smbios was MacPro xx.x.
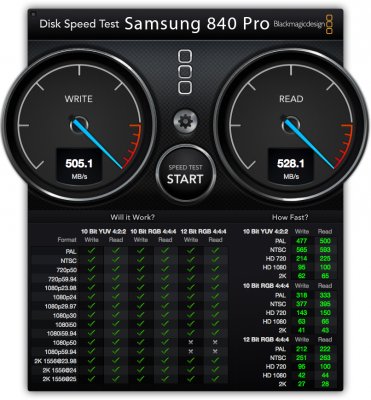
[size=+1]Benchmarks[/size]
Attachments
Last edited by a moderator: