Contribute
Register

First Powermac G5 (Late 2005) Project - Design According to Ive

Status
Not open for further replies.
Joined
May 27, 2012
Messages
759
Motherboard
DQ77KB
CPU
i7-3770S
Graphics
HD4000
Mac
  1. MacBook Air
  2. MacBook Pro
  3. Mac mini
Mobile Phone
  1. iOS
Powermac G5 (Late 2005) Complete - Design According to Ive

First Powermac G5 (Late 2005) Project - Design According to Ive

This is a project to convert a Powermac G5 (Late 2005) Case for use as modern Intel computer. My main aim in this project is to stay true to original design.

Back in 2005 I purchased the first Mac Mini (G4), and from that time I have been a convert and purchased many Mac machines. Problem was I had to give up interest in tinkering with hardware.

Recently I came across the Tonymac site, and decided to replace a 3-4 year old iMac with a Hackintosh, so built a Sandy bridge based system based on the 2011 recommended build. I didn’t document this build as there were many builds like it. But I caught the bug.

Since then I have spent many hours reading posts on G5 modding, all of which gave me a lot of inspiration. I think building a G5 is a much more of a unique thing I would like to bring some of the best I what I have seen, improve on it while introducing my own ideas. Hopefully in this process I will provide inspiration to other people.

However I would like to say thanks to everyone that has posted before me, I will credit the important posts as I go through each section of the build.

Objectives

The objectives are as follows:

  1. Keep as much of the exterior look with minimal cutting. While I think installing the MB tray and replacing the backplane is a good solution, I think it does detract from the look of the case.
  2. Keep the internal presentation of the case similar to before, with simple and uncluttered look. Alot of the look is due to the airflow (fans and panels) so want to keep this as part of the overall design
  3. Meet the needs of my current mATX & hd3000, but allowing for future upgradability to full ATX SLI if needed. I want this case to outlive the computer that is inside.
  4. Have fun :)
Skills

My skills are in electronics (handy with soldering iron) and computer sciences, but little experience with metal working, or painting. I currently only have access, to basic tools including an electric hand drill, but have never owned or used a Dremel. I don’t have access to metal working, or paint shops.

I figure with my skills the less cutting I have to do to the exterior case, the less the case will differ to the original, and the less I will mess it up. I don’t have any dedicated space, so have to use Kitchen / Dining room tables, and makeshift (wobbly) tables in my garage.

This project may take many weeks / months to complete as many of the parts take four weeks to be delivered (from eBay), and since I don’t have a dedicated workspace, so have to pack away after each bit of work, which does slow things down. Also family life with young children

Design

Some of the design elements are:

  • Install an ATX PSU into the apple PSU housing at the bottom of the chassis
  • Install mATX motherboard to use existing 4 port PCI mounting bracket
  • Build my own custom motherboard tray to accept mATX and ATX motherboards
  • Extend (the only exterior cutting) existing IO ports to allow direct access to motherboard IO ports.
  • Use a large Passive CPU heatsink and rely on all G5 ducting and air flow for CPU cooling
  • Replace all fans with modern silent fans.
  • Keep existing internal CPU fan mounting frame.
  • Keep existing rear exterior fan ports (depending on IO ports)
  • Keep existing Internal Speaker and PCI cooling fan mount
  • Keep existing PCI card support frame
  • Keep existing Optical drive bay, new SATA drive
  • Keep existing HDD cooling fan mounts
  • Keep existing 2 HDD drive bay.
  • Install additional HDD bay (2 drives not enough)

Initial Image of Computer

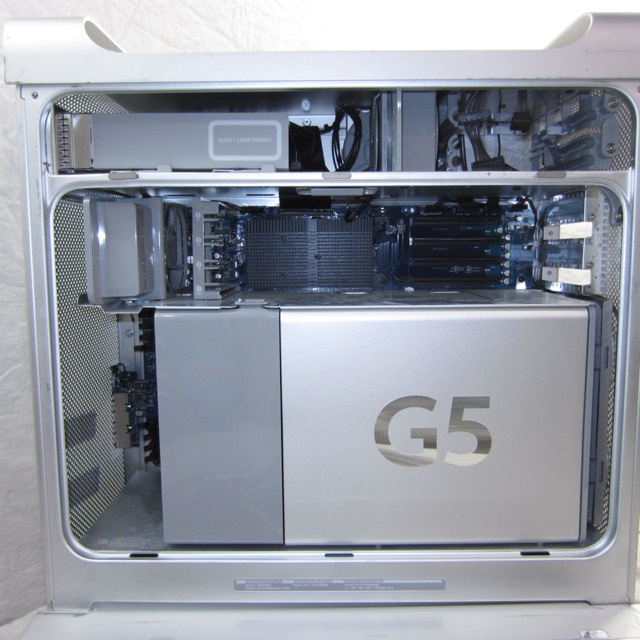
Not much to say really, this is the inside, compare it to the final images below
INITIAL.jpg


Final Image Gallery
I thought I would post the final images so you can see the result of the work.

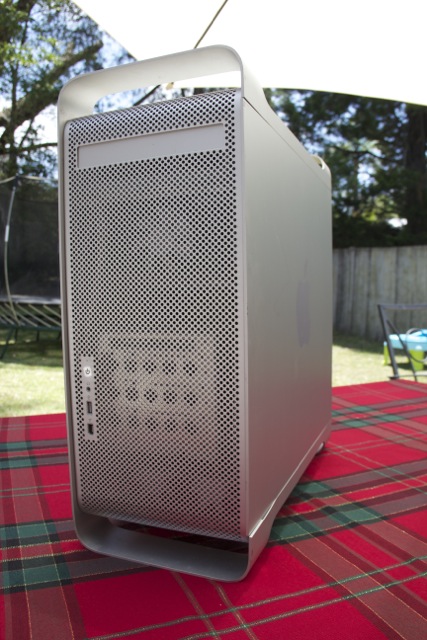
Here is the outside nothing has changed really. USB/Firewire and Front audio are non-functional.
FINAL_4166.jpg


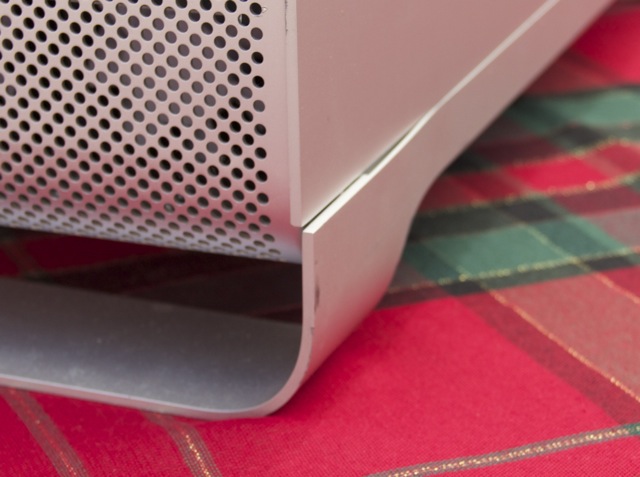
The case has minimal damage, the only serious damage is where the foot got slightly bent. I would fix it if I knew how, but am not worried, it adds character
FINAL_4167.jpg


Here is the back, you can see the obvious modification to make the rear IO visible. Note the panel to the left of the fans is original it hides the WIFI antenna, which at this time is not connected.
FINAL_4170.jpg


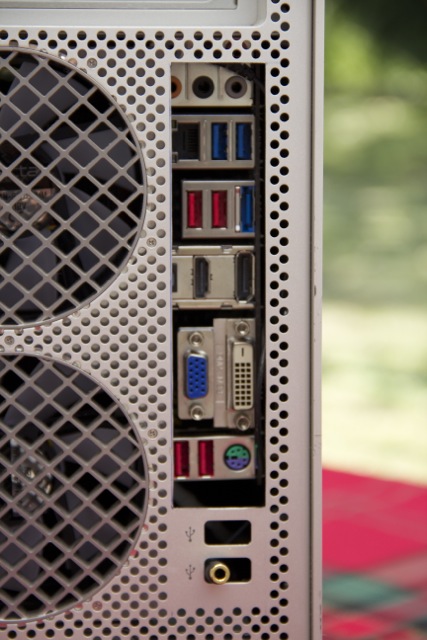
And a closeup. as you can see I have been conservative with the cutting, there are a few ports which are not accessible the main one is the Audio Port. I have installed a short extension cable, you can see it poking out at the bottom.
FINAL_4171.jpg


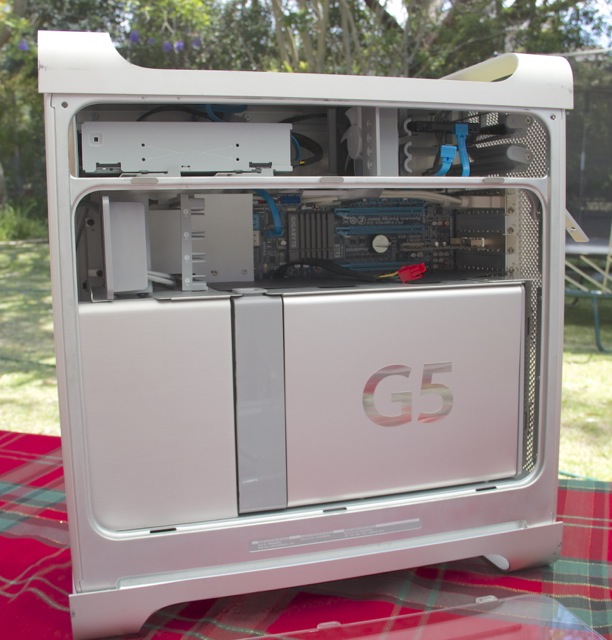
Now the inside of the machine. I have kept it looking as original as possible. The main difference is the cover on the left, which I cut from an old computer case I had lying around, the finish is almost identical. The cover on the right is original as are most of the other components.
FINAL_4175.jpg


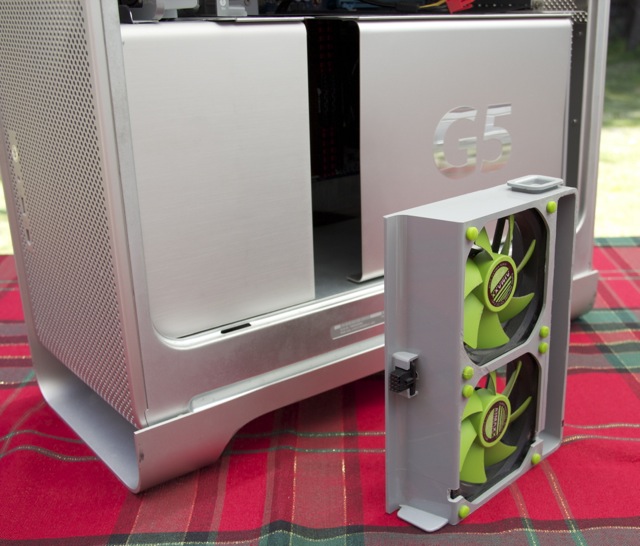
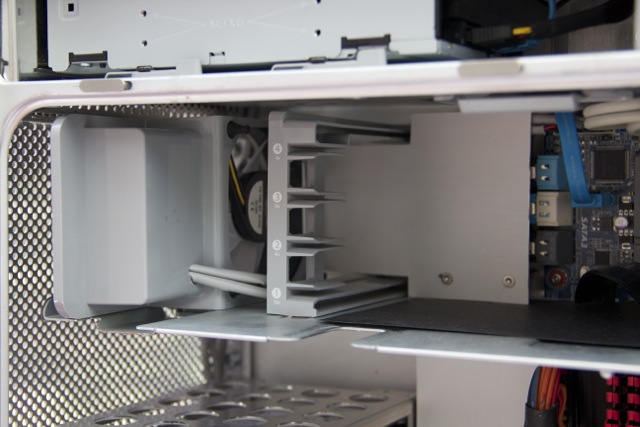
The CPU fan unit can be removed, it was trimmed from the original, and mounted with new fans, but all the mounting and connector is original.
FINAL_4178.jpg


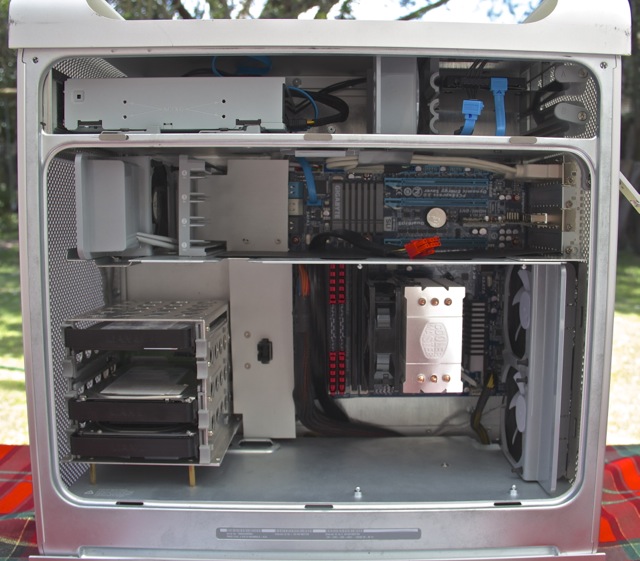
Removing the two covers we get a real look at the inside, where you can plainly see the new 3.5" HDD Drive Bay. The PSU has been installed into the original apple enclosure in the base of the computer
FINAL_4183.jpg


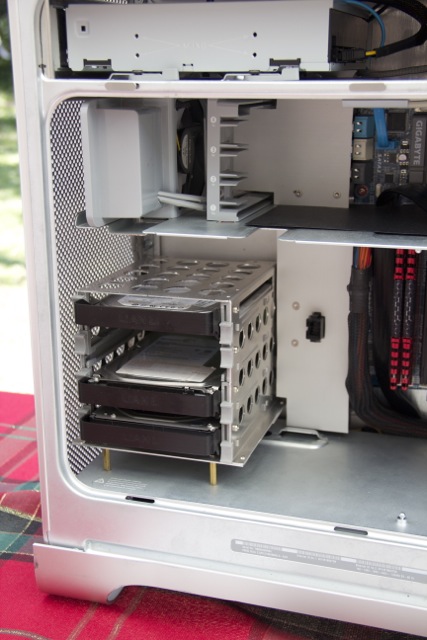
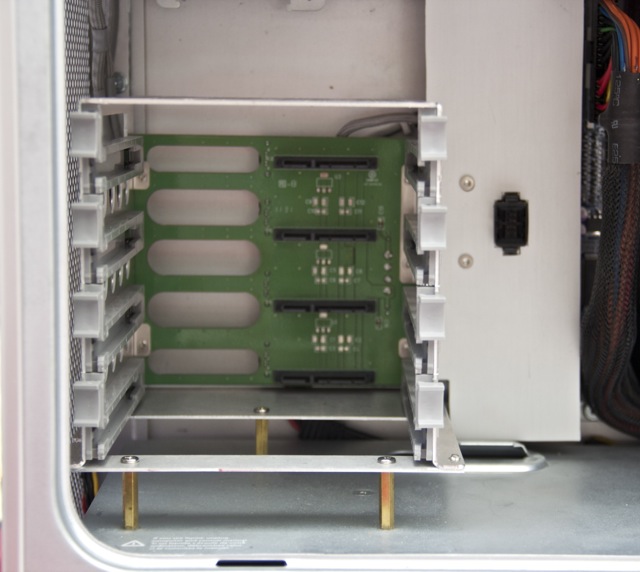
A closeup of the Drive bay. This is a Lian Li drive bay that I converted and installed. This is a tool-less design you screw the rails to the drives then the drives just slide in...
FINAL_4184.jpg


...and mate with the connectors at the back of the chassis. To the right is the Fan connector, and a cover hiding SATA cables that go under the motherboard. This cover also hides a central fan power distribution box.
FINAL_4185.jpg


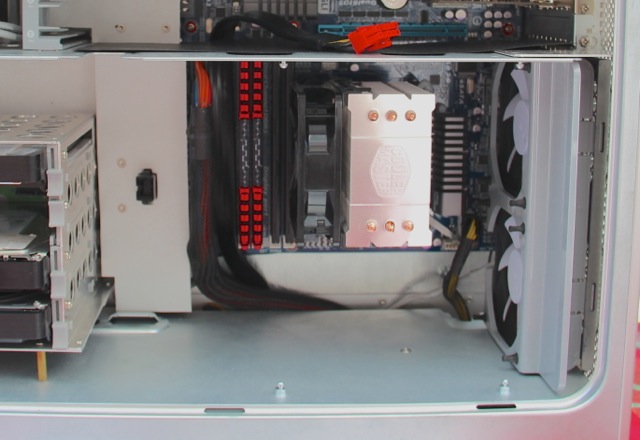
The motherboard, nothing too much to say, the fans on the right are mounted into the original frame. The divider between CPU and PCI slots has been trimmed for the new motherboard
FINAL_4187.jpg


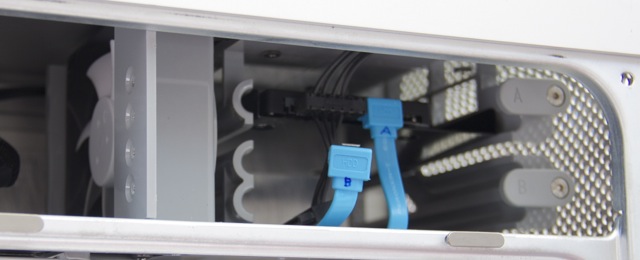
Speaker is connected and beeps on start-up. The cover doesn't hide very much the SATA cables loop back and go straight under the motherboard, so are quite short. The SATA cable on the right is for the optical drive
FINAL_4188.jpg


The original optical drives are fully available. I have my boot SSD installed here. In total I can accommodate 6 x 3.5 hard drives.
FINAL_4189.jpg


Hope you like the pictures.

This is the end of he build. There will always be more to-do, but at this time I have a functional computer that meets my needs, in time I may make small changes. Any questions or suggestions let me know...

KiwiSinceBirth
 
Yes, it certainly sounds like you've caught the bug. Welcome Aboard! I'm looking forward to your build as I have done two G5 mods using trays but am planning a third with similar goals as yours.

Chaos
 
Tear Down

Tear down is mostly unremarkable and went something like this:
  • Remove all components sitting above the motherboard
  • Remove the front io connector, it sat above the MB
  • Remove the MB
  • Remove the air ducting under the MB
  • Remove the plate that the CPU is screwed into.
  • Remove the rear wifi cover, and antenna
  • Remove the rear CPU exhaust fan mounts
  • Remove optical drive
  • Remove the lower drive bay
  • Remove the HDD fan
  • Remove the latching mechanism
  • Remove the optical drive tray
  • Remove the upper drive bay
  • Remove the fan that forces air under the MB

I removed the existing motherboard standoffs, but only the tall ones that where the new motherboard will be placed. I specifically kept the 4 tall motherboard standoffs at the front that the PCI/CPU divider plate screw into. They won't interfere with the motherboard and will support the divider.

I removed the plate that sits under the G5 CPU's I kept all the short mounting points that are used to hold other elements of the chassis to, these will be used to attach the MB tray to.

Here is what the case looked like after disassembly (except for PSU)
IMG_0958.jpg

The Late 2005 model has some slight differences that I noted.

It has a rear panel that hides external antennas for WIFI etc.
IMG_0919.JPG

The front IO connector is different design to the one normally found,
IMG_0917.JPG

it connects to the MB via direct contact, rather than a cable.
IMG_1017.jpg

Internal CPU Fan mounting frame is different design.
IMG_0913.jpg

PSU is 1000w
IMG_0926.jpg

PSU connects to the MB via metal bars, not cables.
IMG_0924.jpg

The last picture showing the collection of parts, are ALL the parts I DONT intend to re-use. All other parts I intend to incorporate back into the case.
IMG_1015.jpg

Updates to follow;
 
Major Parts Purchased

The most important was the Powermac G5 (Late 2005) case itself. I purchased this off eBay fit $20 (not working) the freight was $30, so all up a $50 investment.

OCZ Fatal1ty 750W Modular PSU - To be built into the Apple PSU enclosure
http://www.newegg.com/Product/Product.aspx?Item=N82E16817341041
http://www.amazon.com/OCZ-Fatal1ty-Modular-Gaming-compatible/dp/B003JZCF2O

Lian Li EX-H34B 4 Bay Hot Swap HDD Enclosure
http://www.amazon.com/LianLi-EX-H34B-Black-SATA-Filter/dp/B0057BRGM2/

(2x) Fractal Design Silent Series 60mm Fans
(2x) Fractal Design Silent Series 80mm Fans
(2x) Fractal Design Silent Series 92mm Fans
[http://www.fractal-design.com/?view=product&category=4&prod=77]

(2x) AiMaxx eNVicooler 92mm Case Fans
http://www.aimaxx.com/en/catalog/envicooler-9

Cooler Master Hyper TX3 EVO - CPU Cooler
http://www.newegg.com/Product/Product.aspx?Item=N82E16835103064&Tpk=Cooler%20Master%20Hyper%20TX3
http://www.amazon.com/Cooler-Master-Hyper-TX3-RR-910-HTX3-G1/dp/B0028Y4S9K/

Aluminum Sheet 34cm x 29cm - This will serve as the motherboard tray
http://www.hobbyparts.com.au/store/partslist/sheetaluminium/Sheetaluminium/all/1/1.5/

Existing Components

Gigabyte GA-Z68MX-UD2H
Intel Core i5 2500k
(4x) Corsair 4GB 1600MHZ DDR3 RAM
OCZ Vertex 3 256GB SSD
Seagate 2TB HDD
Dell 27" Ultrasharp 2711 TFT
Belkin Bluetooth 2.1+EDR USB Dongle
aGent V5 HD USB Camera
Apple Wired Apple Keyboard with Numeric keys
Apple Bluetooth Magic Trackpad
Microsoft Optical Mouse (in Apple Gray)

I am buying a new Pioneer Bluray drive as part if a general upgrade, and an considering a discrete graphic card, but this is a separate topic. I wont mention all the many small components screws, etc. that we're purchased, will detail these as I go, except to say I used all M3 screws where I could

I did purchase a Dremel as part of this project, and am now a lot more confident with it.
 
WOW! Your pictures are fascinating! Is the machine a Quad G5? I have one personally, but have never seen one taken apart. I have disassembled four other G5's but they were all older model duals, and did NOT look like yours. Its very rare to see one of these taken apart. Your posts do not disappoint. Please keep posting!

Oh, and I assume you mean Sir Jony Ive, am I correct?

chaos
 
Is the machine a Quad G5?
No it is a Dual core, but it looks like the motherboard was designed to be used as a Quad.

Its very rare to see one of these taken apart. Your posts do not disappoint. Please keep posting!
When I got the computer it was quite bare no RAM, HDD, or power cord, so no way of actually plugging it in. I took it apart over the course of a few days, and in my excitement didn't take any photos of the process. I can only take photos of the parts, (CPU and MB below), if there is anything else you want let me know.

Oh, and I assume you mean Sir Jony Ive, am I correct?
Yes you are. I was looking for a title for the post and came across a Wired article so decided to include the reference.

IMG_1025.jpgIMG_1024.jpgIMG_1023.jpgIMG_1021.jpgIMG_1022.jpgIMG_1029.jpgIMG_1028.jpgIMG_1027.jpgIMG_1026.jpg
 
First Design Layout Pics

First to recap, I have included a picture of the case (during teardown) with the original unmodified structural components screwed in place.

IMG_0914.jpg

The following are the first pictures of the layout that I am intending. They show the placement of the drive bay in the computer, and the surrounding components.

You can see the other mod that I have done is to shorten the CPU Fan mount, and move the fans from the left side to the right side of the mount. This mod is needed to create the space for the drive bay. The cardboard is where the (oversize) MB tray will go.

This was the first time I put this together in this way, up to this point I wasn't sure it would all fit correctly. It did fit, JUST. I will cover this all latter

The “Plan” is to draw air in the front of the computer, through the HDD enclosure, then force it (with fans) thru the CPU cooler, before it is sucked (with fans) out of the rear of the case.

IMG_0960.jpgIMG_0961.jpgIMG_0967.jpg
 
ATX PSU Conversion to fit Apple PSU Enclosure

Credit to this part of the build goes to:
http://www.insanelymac.com/forum/topic/274997-project-g5-unlocked/

The technique is to purchase an ATX PSU, with 120mm top mounted fan. A standard ATX PSU is 86mm high, so if you remove the fan (25mm high) then the theory is that it would be < 60mm high, (assume a few mm of fan clearance). The height of apple PSU enclosure, is about 60mm so it should be possible to build an ATX PSU into the Apple enclosure with the top mounted fan removed.

The main issues are mechanical and cooling

Mechanical

Apart from the size of the PSU, there are mechanical considerations, mainly the large bulk of cables that exit the PSU, this must fit into the new case, and be routed appropriately.

I went with a modular as I thought there would be less cable clutter. That I would have the flexibility with only installing the cables I needed. The problem is that on the outside of the case this is true, but on the inside of the case there can be just as many cables. The PSU I choose use short internal cables to join the main PSU board to a separate board that had the modular connectors. Short cables are hard to work with.

Cooling

By removing the top mounted fan, and replacing with side mounded fans changes the airflow and how the components are laid out to take advantage of the airflow.

The intent is to suck air into the case using the existing 60mm (replaced) fans, so that it travels over the PSU components and passes out at the rear of the case. This is a more efficient design as air should flow at a constant rate across ALL the components.

In the ATX design a 90 degree turn is required between entry and exit, meaning that air flow will not consistent. Air will naturally take the path of least resistance (distance), so may travel at different speeds, and not reach all the components.

Even though the 60mm fans will produce less airflow but my hope is that it is sufficient to cool the PSU. Unfortunately there is no right answer you can only do your best and see what happens.

Two important points up front are:

  • First choose a PSU with a high efficiency rating. Efficiency is measured as a percentage, i.e. percentage of input power converted to output power. e.g. 85% means that 15% of the total energy used is turned into heat. The more efficient a PSU the less heat is generated to start with;
  • Secondly get a PSU that has a much higher power rating than you need. Higher power rated PSU's as well as having higher rated components, have much better heat sinks to let the heat be dissipated away, thus require less forced airflow from fans when used on lower power consuming computers.
I choose the OCZ Fatal1ty 750w, for all of the above reasons, also to have enough future power capacity needs as upgrading to higher capacity PSU in the future is not an easy task.

Apple PSU Disassembly

This was fairly simple procedure.

  • After opening the case unplug the fans from the mainboard and remove fans from the rubber standoffs .
  • Cut the two AC wires from the main board
  • Remove all the screws securing the main board
  • The main board can then be removed
  • Finally remove the power connector from the rear if the case, I intend to reuse this, but need it out if the case.
Will reuse rubber standoffs for mounting new fans, so these don't need to be removed.

Here are some pictures of the disassembled case
IMG_0942.jpgIMG_0936.jpgIMG_0935.jpgIMG_0934.jpg

ATX PSU Disassembly

First Open the ATX PSU, (warranty void at this point), and cut the cable leading to the fan leaving enough cable length near main board, will need to solder to this latter.

Cut the AC power cables that are attached to the board again leaving enough length to solder to latter.

Unscrew all the screws attaching the main and modular board to the case and remove the PSU from its case. All the plastic insulation needs to be kept.

The naked PSU
IMG_0928.jpgIMG_0929.jpgIMG_0930.jpgIMG_0931.jpgIMG_0932.jpg

Orientation.

One of the crucial factors in the conversion is the orientation or the PSU in the apple case. I choose to mount it 180 degrees to its normal orientation with 240v connector (where it use to be) facing to the front of the case.

This makes sense for a couple of reasons, firstly as i will be mounting the PSU at the front of the case (near fans) all the power cables face to the back making them easier to route to the MB and other components.

Secondly the alignment keeps the airflow similar to before, the location of the fans is in the same place as the external air vent on a normal case, so the internal heatsints are aligned lengthways so air can flow easily over the components, and is not blocked or constricted.

There was a hole in the apple case that I covered with tape to prevent air from escaping, thus increase airflow over the PSU.

IMG_0943.jpgIMG_0945.jpgIMG_0946.jpg

Prepare the ATX case.

We will use the bottom of the ATX case, and it mounting holes as a frame for the PSU main board and attach it to the apple case.

I opted to only use three of the four standoffs as the existing mounting holes for the screws holding the apple PSU to the G5 case are slightly raised. Shortening the frame allowed PSU to be mounted closer to the fan ports and leave more room in the apple case for power cables.

The ATX PSU case had standoffs that are exposed to the outside of the ATX case. I decided to use these standoffs to secure the ATX frame to the apple PSU housing, by drilling through the apple housing and screwing to these standoffs from the outside.

I had to use very short countersunk screws to do this because the standoffs are quite short, and not much room for screws from both sides.

By the time I had finished this I realised that I didn’t actually need the ATX case (just the standoffs), but the case adds additional strength, and I had spent some time with a hacksaw (dont have dremel yet) and file, so didn’t want to throw this away.

the modular board will be hidden inside the apple PSU enclosure. I needed to twist it 90 degrees, so that it pointed up, and could be fixed to the bottom of the case.

This took some time, first had to remove all the existing cable restraints (and dollops of glue), and flex the cables into position.

The existing standoffs were facing in the wrong direction (up) so had to be removed. They were soldered to the circuit board, so had to use a soldering iron to push them free. Once free they could be reversed and attached to the bottom of the case. I actually mounted them to the ATX frame, not to the apple PSU

IMG_0941.jpgIMG_0948.jpgIMG_0949.jpgIMG_0950.jpgIMG_0951.jpgIMG_0952.jpgIMG_0953.jpgIMG_0954.jpg

Fans

I purchases 2 x Fractal Design Silent series 60mm fans, but any 60 mm fan should do. It was fairly simple to install these fans to the existing case, cutting the normal connectors, and soldering to the cable coming from the PSU board, and shrink wrapping into a single cable.

Turns out the original 120mm fan was attached to the board via a small socket, so I drilled a hole to pass this cable to the outside of the case as these fans had the cable exposed on the outside

IMG_0933.jpg

240V wiring

I will to reuse the existing apple 240v socket, (it is not the standard design) so removed all the shielding and all existing components, except the earth lead which can be reused.

I then desoldered the components from the socket on the OCZ PSU and soldered then to the apple socket, this was a real chore. Then soldered new 240v cables to the socket, ran them to a connector to join them to the cables from the PSU main board. I didn't want to desolder the cables from the PSU board, as I thought it would be difficult, and could possibly damage components on the board.

Finally it was just a matter of wrapping the power socket in electrical insulation tape. Not as beautiful as the apple shield, but functional.

IMG_0971.jpgIMG_0976.jpgIMG_0977.jpgIMG_0998.jpg

Power Cable

The computer didn't come with an external power cable so I ordered the right plug, that fits the socket. I wired my own cable from an old Steam Iron power cable. Its outer insulation is made of braded cloth (similar to paracord) so looks a bit retro.

IMG_1050.jpg

At this time I connected the New PSU to a machine, and ran it for a day, just to be sure.

Success...
 
I'll be following this mod :)
I to had the briljant idea as so many have, to use an old mac G5 case.
And since you got exactly the same Front panel IO as i have. I'm curious to see how you handle this.
As for PSU i won't mod that, my skills are not in that great when it comes too electronics.

I am also not sure what to do with the back make my own, with old pc parts (which is currently the plan)
Or order a motherboard backplate from moutian mods. Here are some of my planning ideas.
I used an old mATX board as mockup. It will fit an full ATX when done.


IMAG0830.jpgIMAG0837.jpgIMAG0833.jpg
 
And since you got exactly the same Front panel IO as i have. I'm curious to see how you handle this.
At present I have soldered four wires to the board, and have run these to connectors for the power switch and power led. I will post photos latter.

As for PSU i won't mod that, my skills are not in that great when it comes too electronics.
Agreed I wouldn't suggest anyone undertake this lightly, especially when 240v are concerned. However it really only involved modification of two wires for the fan, and two wires for the 240. The hardest part was removing the components from the existing power socket.

I am also not sure what to do with the back make my own, with old pc parts (which is currently the plan) Or order a motherboard back-plate from moutian mods. Here are some of my planning ideas.
I considered this approach when I was doing my initial planning. Of your options I was leaning towards the mountain mods (or Lian Li alternative) simply because, it came with a complete back-plate to cover up the large holes left by the rear fans.

I used an old mATX board as mockup. It will fit an full ATX when done.
I spend a lot of time, just thinking about component placement before I came up with my design. That one of the things I like about these forums is everyone has these own skills and ideas, which leads to very unique designs. One of my skills is electronics but I had never used a dremel in my life.:)
 
Status
Not open for further replies.
Back
Top