- Joined
- Oct 3, 2012
- Messages
- 122
- Motherboard
- GA-Z68MX-UD2H-B3 OSX10.6.8 & 10.9.2
- CPU
- i5 [email protected]
- Graphics
- ASUS EN210 Silent DI 1GD3/V2 LP 1024MB
- Mac
- Classic Mac
- Mobile Phone
Hello fellow Power Mac modders,
When it came to me that my venerable eMac was getting long on its teeth i began to think of what to do. I wanted to stay with OSX but new Apple-hardware was just too expensive for me... So, after some talk with colleagues i decided to go down Hackin´Tosh alley. Since i still use some PPC applications, which make Rosetta necessary, i based my system on Sandy-Bridge architecture.
Although Sandy-Brigde is an old hat by now i still want to share my experiences and i hope these will be of some use to others. Also, i drew a lot of inspiration from these boards and want to give something in return. This shall be something like a work-log. I´ll continue writing when i´ve got the time.")
My big thanks go to Going Bald, who helped my choosing the right components and kept me from a stupid mistake. Totenkopf4 from the Snow Leopard Board and to David from The Laserhive. David, apart from supplying the custom-parts for this build, also gave me a lot of help and advice!!
 (Uups, mouse batteries almost empty...)
First my list of components:
• GA-Z68MX-UD2H-B3
• i5 [email protected]
• Corsair Memory Vengeance 8 GB
• ASUS EN210 Silent DI 1GD3/V2 LP 1024 MB
• Scythe Big Shuriken 2 Rev.B
• Antec EarthWatts EA430
• Mushkin Chronos 2,5" SSD 120 GB
• Western Digital WD5000AAKX 500GB
• Hitachi-LG GS31N
• SATA Slimline ALL-in-One Cable - Serial ATA-Cable - Internal Powerfeed (Two Prong)
• Serial ATA / SAS Extension Cable - Serial ATA 150/300 - 50cm
• Noctua NF-P12 PWM 120 mm Case-Fan
• Corsair CC800D-USB3KIT Upgrade Kit
• Silverstone Tek 19 Pin USB3.0 Adapter Cable - External to Internal
• Bitfenix 24-Pin ATX Extension Cable - 30cm - blue
• Bitfenix 4-Pin ATX 12V Extension Cable - 45cm - blue
• Case: Power Mac G4 533 MHz & Apple USB keyboard (M2452)
 There go the old innards!
The goal of this build was to keep as many original parts as feasible and modify only as needed... well, i ended up modifying almost everything.
First i started fitting the PSU, being the easiest component to fit, or so i thought... I started looking for for a power supply that drew in air in the back and blew it out i the front, just like the original Apple PSU. In doing so i wanted to keep the old plastic casing in the back (at least the right side). I found a suitable PSU from Antec: http://www.amazon.com/dp/B002VLYJRG/
But comparing model numbers in detail on the Antec site, i found that you only could get this model: http://www.amazon.com/dp/B007DBJ4OW/
The fan on this model is on the side of the case, also the position of the switch and plug assembly was different. Since i didn´t want to drill ventilation wholes on the side (where the PSU would draw only the exhaust of the case fan), i opted for some ventilation from above.

Below, the back of the case. The green marker shows where the case had to be cut, in order for the PSU to fit. Also, the old Apple I/O shield is already gone.

The PSU in place.

Also preparations for cutting to fit a custom backplate and inner shield on the door.

I decided, like others, to keep the plastic latch/insulation board below the mobo and reversed the locking spring on the case. just the spring by itself resulted in to much tension for my taste, so i used a bend paperclip to extend it a bit. To the very right of the case you can see the bolt i used to hold the spring on the case. The paperclip rests in a little notch i filed into the the locking-lever.


Below you can see the custom new back-plate and inner shield i ordered from The Laserhive. After i drilled out the rivets that held the old parts, it was a simple matter attaching the new parts with screws that simply go through the holes left by the rivets.
 Countersinking the holes makes the screws heads nice and flush.
The plastic latch/ mobo tray. Had to drill new holes for the stand-offs of the mobo and dremel out the space needed for the backplate of the cpu-cooler and i also took away some of the notches and hooks which were in the way when reversing the locking mechanism. I also wanted to add some color. I went with a metallic red. First i applied a coat of primer, then a black base-coat (metallics look better on black or bare metal...).
On the left you can see part of the new I/O shield which i ordered as a set with the back-plate. The Laser Hive also provides a handy template that will show you were you drill new holes in the door for the stand-offs of mATX boards. For me, when drilling, i seemed to have slipped a bit and two of the stand-offs would not match the mobo. No sweat, i just filed them out to fit.
When i got the time, and everything else is done, i want to go back and paint all of the insides of the case black...


Testfitting went fine, or so i thought... While the RAM just cleared the drive bay, i later discovered that the bulge of the 24-Pin ATX cable would not. Bummer nobody manufactures a 90° plug to have it bent sideways... So i decided to cut most of the PSU-Panel back to the width of the PSU. I also modified the drive-bay.


Once the drive-bay was cut to the right dimensions i went ahead and installed the corsair usb-frontpanel and then the slimline dvd-drive above it. It took some trying out to find the right position so everything would fit with the custom acrylic front-plate. This i had also made by The Laserhive. They already had a template for it, so no extra measuring was necessary. I bent the u-shaped bracket on the left side of I/O panel from a pice aluminum strip. On the right side i used a lip that already was on the I/O panel, i just bent it 90° to the back.


And the whole assembly installed with the front-plate in place.

Next i took care of the power-switch-assembly. I reused the ribbon cable and did a little soldering. First i marked the pins. Pin 7 is common ground.


As you can see i got rid of the control-chip. As far as i know it does serve no purpose anymore and i did not know how it would react to my alterations. I put in new lines were i did not have a direct connection to the ribbon cable. I used the former programming-button as reset because it is a little recessed and hard to press by mistake. Thus i connected current to pin 2 of the ribbon cable. The LED works, the only thing necessary was a connection to common ground. When i was done i hid the cable in a blue sleeve, that was it.
I found my write-up of the pins on the switch-panel:
Common Ground Pin 7
Power Switch + Pin 9
Reset Pin 2
Power LED Pin 4


Finally, everything installed.

I had to take the casing of one RAM off because it would not clear the Shuriken... Also nice to see, the cable "bulge" of the ATX-connector.

A whole bunch of cabling in the former drive assy... I have no firewire-card yet, so the connection-cable for the fw-port in the front-panel found its home here too.

The two custom back-panels in all their glory. I choose black and white. Got word from The Laserhive that they offer the inner shield made of aluminum now, tempting...


The one thing that gave me headaches was the plastics of the case. When i ordered the G4 on eBay it said "former use as servers"... Seems that some idiot decided to clean the case... using steel wool or something. Took me weeks to polish the panels, using sanding-paper (600, 1000, 2000 and finally 3000 grade) and polish. Well, it looks ok now, but i am still not contend, guess i will never get the shine of the pristine plastics back...
 Just an example of what the whole case looked like....
I had to install OSX a few times to find the correct settings for me.
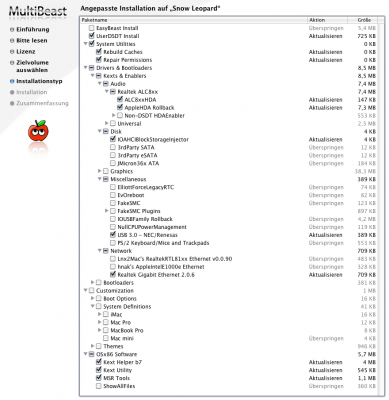
Used MultiBeast for 10.6 and DSDT for the F13 BIOS. After updating to 10.6.8 i ran MultiBeast again and installed DSDT again, as this seemed to be the only way to get sound (HDA Rollback+ALC8XX Kexts). Also, i lost ethernet in the process, installed stock Realtek Ethernet and connection was enabled again.
Here is my MultiBeast set-up:
View attachment 69210
In BIOS i set "Onboard VGA" to "Enable If No Ext PEG", speeds up boot times (Now takes about 35sec from power-on to desktop). Also enabled "Quick Boot".
nVidia EN210 is working, full resolution, open cl enabled. Only switching reolutions does not work, gives me a blue screen - have to reset. This happens, for example, when i play Diablo 2 using Wineskin and try to open a bigger window.
Used this enabler & tool:
http://www.osx86.net/view/2587-nvenabler.htm
Installed CUDA from the nVidia site.
As the Apple M2452 keyboard does not have all the function keys of the later USB-keyboards, looking for a solution, i found this:
http://pqrs.org/macosx/keyremap4macbook/
I used it to reassign some of my F-Keys, volume +/-, mute, iTunes start/play/pause, forward, reverse and forward delete now all work.

All in all it was fun to do! I still consider it a works in progress.
Things i still want/need to do:
• USB 3.0 still does not work correctly. Ports are recognized, but seem to work with USB 2.0 speeds only... (Anybody any ideas?)

• Sleep is not working for me. The machine goes to sleep, only to power right back on and then i loose all USB connectivity (on-board as well as front-panel). (???)
• Find a way to silence the WD-Drive´s audible humm...
• Install fw-card. (Done 30.08.2013)
• Once sleep works, find a way to make a pulsing power-button.
• Illumination on the apples in the case and the keyboard.
• Nice finnish to the insides of the case.
When it came to me that my venerable eMac was getting long on its teeth i began to think of what to do. I wanted to stay with OSX but new Apple-hardware was just too expensive for me... So, after some talk with colleagues i decided to go down Hackin´Tosh alley. Since i still use some PPC applications, which make Rosetta necessary, i based my system on Sandy-Bridge architecture.
Although Sandy-Brigde is an old hat by now i still want to share my experiences and i hope these will be of some use to others. Also, i drew a lot of inspiration from these boards and want to give something in return. This shall be something like a work-log. I´ll continue writing when i´ve got the time.
My big thanks go to Going Bald, who helped my choosing the right components and kept me from a stupid mistake. Totenkopf4 from the Snow Leopard Board and to David from The Laserhive. David, apart from supplying the custom-parts for this build, also gave me a lot of help and advice!!
(Uups, mouse batteries almost empty...)First my list of components:
• GA-Z68MX-UD2H-B3
• i5 [email protected]
• Corsair Memory Vengeance 8 GB
• ASUS EN210 Silent DI 1GD3/V2 LP 1024 MB
• Scythe Big Shuriken 2 Rev.B
• Antec EarthWatts EA430
• Mushkin Chronos 2,5" SSD 120 GB
• Western Digital WD5000AAKX 500GB
• Hitachi-LG GS31N
• SATA Slimline ALL-in-One Cable - Serial ATA-Cable - Internal Powerfeed (Two Prong)
• Serial ATA / SAS Extension Cable - Serial ATA 150/300 - 50cm
• Noctua NF-P12 PWM 120 mm Case-Fan
• Corsair CC800D-USB3KIT Upgrade Kit
• Silverstone Tek 19 Pin USB3.0 Adapter Cable - External to Internal
• Bitfenix 24-Pin ATX Extension Cable - 30cm - blue
• Bitfenix 4-Pin ATX 12V Extension Cable - 45cm - blue
• Case: Power Mac G4 533 MHz & Apple USB keyboard (M2452)
There go the old innards! The goal of this build was to keep as many original parts as feasible and modify only as needed... well, i ended up modifying almost everything.
First i started fitting the PSU, being the easiest component to fit, or so i thought... I started looking for for a power supply that drew in air in the back and blew it out i the front, just like the original Apple PSU. In doing so i wanted to keep the old plastic casing in the back (at least the right side). I found a suitable PSU from Antec: http://www.amazon.com/dp/B002VLYJRG/
But comparing model numbers in detail on the Antec site, i found that you only could get this model: http://www.amazon.com/dp/B007DBJ4OW/
The fan on this model is on the side of the case, also the position of the switch and plug assembly was different. Since i didn´t want to drill ventilation wholes on the side (where the PSU would draw only the exhaust of the case fan), i opted for some ventilation from above.
Below, the back of the case. The green marker shows where the case had to be cut, in order for the PSU to fit. Also, the old Apple I/O shield is already gone.
The PSU in place.
Also preparations for cutting to fit a custom backplate and inner shield on the door.
I decided, like others, to keep the plastic latch/insulation board below the mobo and reversed the locking spring on the case. just the spring by itself resulted in to much tension for my taste, so i used a bend paperclip to extend it a bit. To the very right of the case you can see the bolt i used to hold the spring on the case. The paperclip rests in a little notch i filed into the the locking-lever.
Below you can see the custom new back-plate and inner shield i ordered from The Laserhive. After i drilled out the rivets that held the old parts, it was a simple matter attaching the new parts with screws that simply go through the holes left by the rivets.
Countersinking the holes makes the screws heads nice and flush.The plastic latch/ mobo tray. Had to drill new holes for the stand-offs of the mobo and dremel out the space needed for the backplate of the cpu-cooler and i also took away some of the notches and hooks which were in the way when reversing the locking mechanism. I also wanted to add some color. I went with a metallic red. First i applied a coat of primer, then a black base-coat (metallics look better on black or bare metal...).
On the left you can see part of the new I/O shield which i ordered as a set with the back-plate. The Laser Hive also provides a handy template that will show you were you drill new holes in the door for the stand-offs of mATX boards. For me, when drilling, i seemed to have slipped a bit and two of the stand-offs would not match the mobo. No sweat, i just filed them out to fit.
When i got the time, and everything else is done, i want to go back and paint all of the insides of the case black...
Testfitting went fine, or so i thought... While the RAM just cleared the drive bay, i later discovered that the bulge of the 24-Pin ATX cable would not. Bummer nobody manufactures a 90° plug to have it bent sideways... So i decided to cut most of the PSU-Panel back to the width of the PSU. I also modified the drive-bay.
Once the drive-bay was cut to the right dimensions i went ahead and installed the corsair usb-frontpanel and then the slimline dvd-drive above it. It took some trying out to find the right position so everything would fit with the custom acrylic front-plate. This i had also made by The Laserhive. They already had a template for it, so no extra measuring was necessary. I bent the u-shaped bracket on the left side of I/O panel from a pice aluminum strip. On the right side i used a lip that already was on the I/O panel, i just bent it 90° to the back.
And the whole assembly installed with the front-plate in place.
Next i took care of the power-switch-assembly. I reused the ribbon cable and did a little soldering. First i marked the pins. Pin 7 is common ground.
As you can see i got rid of the control-chip. As far as i know it does serve no purpose anymore and i did not know how it would react to my alterations. I put in new lines were i did not have a direct connection to the ribbon cable. I used the former programming-button as reset because it is a little recessed and hard to press by mistake. Thus i connected current to pin 2 of the ribbon cable. The LED works, the only thing necessary was a connection to common ground. When i was done i hid the cable in a blue sleeve, that was it.
I found my write-up of the pins on the switch-panel:
Common Ground Pin 7
Power Switch + Pin 9
Reset Pin 2
Power LED Pin 4
Finally, everything installed.
I had to take the casing of one RAM off because it would not clear the Shuriken... Also nice to see, the cable "bulge" of the ATX-connector.
A whole bunch of cabling in the former drive assy... I have no firewire-card yet, so the connection-cable for the fw-port in the front-panel found its home here too.
The two custom back-panels in all their glory. I choose black and white. Got word from The Laserhive that they offer the inner shield made of aluminum now, tempting...
The one thing that gave me headaches was the plastics of the case. When i ordered the G4 on eBay it said "former use as servers"... Seems that some idiot decided to clean the case... using steel wool or something. Took me weeks to polish the panels, using sanding-paper (600, 1000, 2000 and finally 3000 grade) and polish. Well, it looks ok now, but i am still not contend, guess i will never get the shine of the pristine plastics back...
Just an example of what the whole case looked like....I had to install OSX a few times to find the correct settings for me.
Used MultiBeast for 10.6 and DSDT for the F13 BIOS. After updating to 10.6.8 i ran MultiBeast again and installed DSDT again, as this seemed to be the only way to get sound (HDA Rollback+ALC8XX Kexts). Also, i lost ethernet in the process, installed stock Realtek Ethernet and connection was enabled again.
Here is my MultiBeast set-up:
View attachment 69210
In BIOS i set "Onboard VGA" to "Enable If No Ext PEG", speeds up boot times (Now takes about 35sec from power-on to desktop). Also enabled "Quick Boot".
nVidia EN210 is working, full resolution, open cl enabled. Only switching reolutions does not work, gives me a blue screen - have to reset. This happens, for example, when i play Diablo 2 using Wineskin and try to open a bigger window.
Used this enabler & tool:
http://www.osx86.net/view/2587-nvenabler.htm
Installed CUDA from the nVidia site.
As the Apple M2452 keyboard does not have all the function keys of the later USB-keyboards, looking for a solution, i found this:
http://pqrs.org/macosx/keyremap4macbook/
I used it to reassign some of my F-Keys, volume +/-, mute, iTunes start/play/pause, forward, reverse and forward delete now all work.
All in all it was fun to do! I still consider it a works in progress.
Things i still want/need to do:
• USB 3.0 still does not work correctly. Ports are recognized, but seem to work with USB 2.0 speeds only... (Anybody any ideas?)
• Sleep is not working for me. The machine goes to sleep, only to power right back on and then i loose all USB connectivity (on-board as well as front-panel). (???)
• Find a way to silence the WD-Drive´s audible humm...
• Install fw-card. (Done 30.08.2013)
• Once sleep works, find a way to make a pulsing power-button.
• Illumination on the apples in the case and the keyboard.
• Nice finnish to the insides of the case.