Contribute
Register

Seeking advice on repairing small crack in G4 outer case

Status
Not open for further replies.
Joined
Apr 26, 2012
Messages
74
Motherboard
Z68ma-D2H-B3 UEFI U1C Bios
CPU
i5 2500k
Graphics
Gigabyte GTX 970 Mini
Mac
  1. 0
Classic Mac
  1. iBook
  2. iMac
  3. Power Mac
  4. PowerBook
Mobile Phone
  1. iOS
Hello! Long time lurker here on cube mods. I finally went ahead and purchased a cube after weeks of watching eBay listings.The cube finally came and it was damaged in shipping. Very minor I would say but it's still a crack and I am seeking advice on how to prevent it from spreading and getting worse. After looking at all of these case mods I'll be pulling inspiration from multiple but I will be following more closely the French G4 cube mod featured here: http://forums.bit-tech.net/showthread.php?t=227181

and the top will ressemble this:
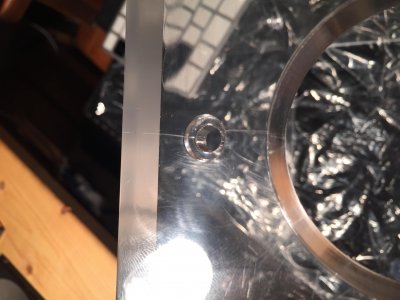
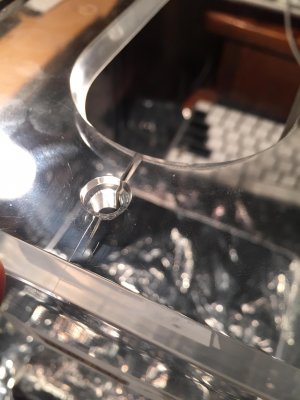
3600203.jpg
Though here's mine:
YbG1CUXh.jpg

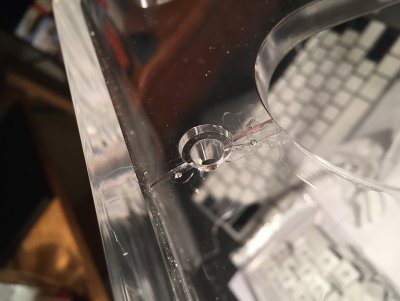
So, I will be painting and cutting the outer case so aesthetics on crack repair aren't a priority. Though, my concern is that if I take to cutting the thick plastic (polycarbonate? Acrylic? What is the cube made of?) that the crack will spread or it will break or shatter beyond repair. It's over one of the bolts that secures the inner casing to the outer so it's important that it stay intact.

Reading a bit online about crack repair I've read that I should do a 'stop drill' on the crack to stop it from spreading. Then I'll have a hole there... So, I was thinking about filling it with an epoxy and sanding it down. Would that hold up and not be brittle? Or would I need to reinforce the back with fiberglass? Another idea was to use a body filler, Bondo glass has fiberglass in it already or use another body filler and sanding that down. I read about taking a dremel over the crack and then filling that in essentially replacing the stress crack with a cut which relieves the pressure. There are many tutorials on repairing car bumpers, boats, and motorcycle plastic cracks. There seems to be a wealth of information and many options so I'm a bit lost.


Really, I'm looking for a good solution that will fill the crack and make it stronger so that it won't get worse. It needs to accept paint once it has been prepped and sanded down. Also be able to withstand brief vibration when the top is being cut. I haven't had any experience repairing cracks and it seems that I have a few options but before I commit to drilling/sanding/repairing I was looking for some feedback! Or.... should I not even bother and hope it'll be okay? it's running close to the thick walls but I don't want to fear for its longevity. I think I'll need to open the crack up either way to fill it, so here are my options:

  • Drill/epoxy
  • Epoxy putty stick for plastic
  • Drill/body filler/fiberglass on inside
  • Drill/fiberglass bondo
  • Super glue
  • Ignore it and hope it won't get worse
  • Other plastic-specific products I'm not aware of

Thanks!!
 
Looking at it further and disassembling the whole thing I noticed stress cracks that run on both sides of the acrylic. These are hairline stress fractures from the aluminum inner case moving in transit. Now that these are here it weakens the plastic so if I cut up to them I'm afraid that they'll actually cause a break like in my first picture.
I ran across a product called MagicEzy Hairline Fix. For plastics I would need this and a primer they also sell. It seems really promising but a bit pricey ($50) to do it and I'm unsure of the results.
More pictures to illustrate what I'm seeing.
2015-02-13 16.15.41.jpg
2015-02-13 16.14.45.jpg
2015-02-13 16.14.26.jpg
2015-02-13 16.14.09.jpg
 

Attachments

  • 2015-02-13 16.47.26.jpg
    2015-02-13 16.47.26.jpg
    515.9 KB · Views: 198
  • 2015-02-13 16.46.26.jpg
    2015-02-13 16.46.26.jpg
    489.9 KB · Views: 229
Just my 2c, leave them as is. I've got 2 modded cubes here and both are sporting hairline cracks at the top mount bolts. Virtually undetectable and haven't worsened in over a year that I've had them. Any sort of fix would likely only add to the visibility of the defect.

There's far less weight hanging inside now too than there was with the Apple G4 hardware. Also not anywhere near the heat that used to present itself inside.


Cheers!
 
Thanks for your thoughts ersterhernd.
I have decided that I won't leave it as is and that I will try something on the polycarbonate called solvent welding:
http://en.wikipedia.org/wiki/Plastic_welding#Solvent_welding

Through my research I found this article about others complaining about similar cracks that appeared and apple played it off as lines left over from injection molding.

http://news.cnet.com/2100-1001-246329.html

Taken from an arstechnica archive describing the cracks:
Capture d'écran 2015-02-14 10.26.53.png
Source: http://archive.arstechnica.com/reviews/4q00/g4cube_cd/g4-cube-3.html

Instead of filling it with something (i.e. epoxy) I will inject a solvent into the crack and as it spreads through capillary action it will briefly soften/melt the polycarbonate and then fuse together again as one effectively fixing the weakness.

I chose to use Weld-On #4 which is a watery solvent that dries in minutes and increases in strength as it dries up to a week. It says it's for acrylic but the data sheet says that it will work with polycarbonate (and others)
41kwPb6e4AL._SX342_.jpg

I may drill a few indentations at the start of the crack on the inside of the plastic housing and use that as a reservoir for applying the solvent, which will then seep into the crack. I did notice some more of these cracks around the cutouts where the dvd drive goes and on the other side. I may put a minuscule amount of the solvent in these as well, cause why not.

I chose this method because it's bonding the poly to itself, because it's a watery substance that'll seep into the crack, it will be clear when it dries, and it strengthens over time. I do plan on sanding the entire surface to accept paint so slight imperfections that may be possible from this won't be an issue and if there are it'll be on the inside mainly.
My goal is to prevent the cracks from spreading or cracking all of the way through and I think this will be the best method to achieve this and also have some piece of mind.

Here's a PDF on joining polycarbonate that I found helpful in making my decision and seeing what my options were.

http://www.iapd.org/dwp_test/pdf/joining_polycarbonate.pdf

I'll keep updating with my results when the Weld-on arrives, which may help others concerned (or not) about these hairline cracks. Even possibly on the polycarbonate macbooks/imacs!

As ersterhernd mentioned, it probably really won't be a problem in the long run and it's largely cosmetic but since I will be refinishing and modding the plastic housing it is important that the cracks don't worsen when I eventually take a jigsaw to the outside. The excessive vibration worries me and if it does break I'll now have a substance on hand to fix it! :p

-JRDN
 
This will be interesting to watch.

Good on ya for stepping out and trying something new!


Cheers!
 
I'm back again with my results! Largely, it worked out the way that I wanted and I got the results that I was looking for with some caveats.

If I were to do it again I would do a few things different because applying this stuff is a pain.
It dries incredibly fast so my 'reservoir' method didn't quite wick the solvent into the cracks. I put it on and it pretty much dried instantly despite claiming having a longer cure time than weld-on #3.

The applicator bottle was incredibly hard to use as I only needed a small drop of it. It took some time to get the hang of it and still then I had some accidents with the fluid dripping out of the needle too quickly and landing on the shell which it then dries immediately.


If doing this again I would use a small brush to apply it instead of the needle. I had to accept the fact that it's not going to flow into the crack like a river but it will flood out like a flood plain. So I put a drop on and spread it out.
2015-02-27 17.52.51.jpg
I began by using an x-acto knife and using it as a drill to put some holes along the cracks

2015-02-27 18.08.20.jpg2015-02-27 18.12.29.jpg
The other smaller cracks got holes as well on the outside and the inside

2015-02-27 18.07.56.jpg
Before: Here's the main crack I want to get fixed and the deeper holes on the inside

2015-02-27 19.10.07.jpg2015-02-27 19.19.31.jpg
After: Here's after I applied the solvent to the inside. You can see where it wicked into the crack and left some bubbles fusing them together.

2015-02-27 19.19.44.jpg

2015-02-27 19.07.18.jpg2015-02-27 18.56.21.jpg

I got a bit over-zealous and started trying it on the outside only trying to make it into the hole and have it fill in the crack. It dried so fast that was useless so I kept going and each time it layered up a bit.

2015-02-27 19.20.52.jpg
On the inside I got several drops here's one I tried to wipe off instantly with no success.

I'm not entirely happy with the results to the outside of the case.

A few things I learned and it someone else is to repeat this

  • Not to use the applicator bottle+needle. You'll either let out too much and it won't come off or not at all and you'll try to overcompensate and still mess it up.
  • Brush instead would be easier.
  • Holes unnecessary on the outside and didn't serve a purpose. On the inside it got farther into the crack so that was helpful.
  • Don't apply multiple thin layers as they'll develop very small micro cracks as they both dry at different rates.
  • PRACTICE on some scrap acrylic/lexan. Seriously.

Overall, the appearance looks worse in the photos than it actually is. There is some very slight texture and it looks like a fancy textured glass now. Not entirely desirable
The main crack turned out well and it has been filled in from the inside. I should have stopped there and let the others just be.

I wouldn't recommend this as it's distracting for someone keeping the case as-is. For me, I will be sanding and painting over this anyway so the appearance isn't crucial.
I set out to fill the cracks and increase their strength and prevent them from spreading. I would say I accomplished this and I can now take a jig saw to the case and have some piece of mind. The solvent gets to 80% strength after 72 hours and full strength after 1 week.

I'm curious as to what the holes I drilled and the solvent will look like after sanding. I'll pop back in after a week and after some sanding and see how it looks!

-JRDN
 

Attachments

  • 2015-02-27 19.17.35.jpg
    2015-02-27 19.17.35.jpg
    374.6 KB · Views: 263
Status
Not open for further replies.
Back
Top