
- Joined
- Dec 16, 2010
- Messages
- 8
- Motherboard
- Zotac Z77 ITX Wifi
- CPU
- i5 3570K
- Graphics
- HD 4000
- Mac
- Classic Mac
- Mobile Phone
Hi,
Thought I'd share my latest Hackintosh build with everyone. A lot of time and effort has gone into this and it is now finished.
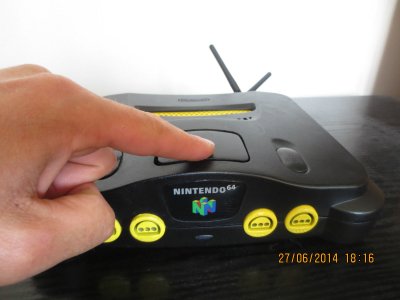
Basically I have stripped down an old Nintendo64 and built a high spec computer inside the case. The 4 controller ports are still active on the front by means of 2x dual N64 controller to USB PCBs which I have mounted and connected internally. This means that you can still play all of those timeless classics with 3 of your mates by using an emulator. Project64 emulator allows you to play many games in 1080p HD quality meaning the games are even better than you remember them. There are 4x N64 controllers although 1 of them is a bit dodgy.
The computer itself is currently running OSX 10.9 Mavericks, which is the Apple operating system, these PCs are often nicknamed 'Hackintosh' for obvious reasons. Everything works flawlessly including sleep/wake, HDMI audio etc. However I have noticed that USB storage devices such as hard drives are not recognised in the USB 3.0 ports, however they work fine in the USB 2.0 slots. Probably an easy fix for someone wishing to pursue this problem. I have had Windows 7 installed on here in a dual boot configuration which works well. There is a custom boot loader screen shown in the pictures, and it gives you the option of selecting a different cartridge if you have other Operating systems loaded. I manually created the cartridge graphics for Mac, Windows and Linux OSes and also one for booting from a CD.
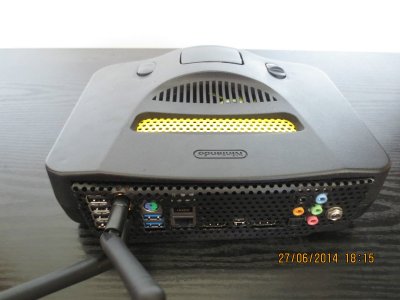
I have installed 2 extra USB 3.0 ports which are hidden under the old 'expansion bay'. To open, 1-touch press on the top pops the catch open and it hinges on the springs hidden underneath to open automatically. I used two tiny bin push-pop catches for this mechanism.
The original switches are still present and are both functional; The old reset switch is now the power button which also sleeps/wakes the computer. The old power button is now a 3-way switch which controls the 4x small case fans. In 1 position the fans are off, another the fans are always on full and the 3rd position enables a voltage changing circuit to control the speed of the fans from anywhere between off and full power. There is a small knob on the rear panel to adjust the speed.
This computer is silent. The only moving parts it has is the fans and the main fan is not audible. The case fans can get quite noisy if they are on full speed but this is never really required as the heat doesn't really ever become a problem.
I have replaced the original red power LED with a slow changing rainbow LED. This slowly fades in and out of all of the colours of the rainbow and looks pretty cool. I've connected this up to the +12V rail from the PSU directly behind it.
I've painted it in black and yellow, I got this colour scheme idea from the CPU fan I purchased to fit inside. I sprayed it myself and although it isn't perfect, I'm happy with the finish,
The main board is a Zotac Z77 ITX wifi, more information here ;- http://www.zotac.com/products/mainb...er/DESC/amount/10/section/specifications.html
CPU is an intel i5 3570K and is a quad core 3.4Ghz Ivy bridge processor. More info here ;- http://ark.intel.com/products/65520
RAM is 2x 2GB Kingston Hyper X (4GB total) running at a blistering 1867 Mhz
HDD is a 64 GB SSD and is lightning quick. I will upload the specs of this very soon...
PSU is a 160 Watt pico PSU which I have physically modified in order to fit into the case and also comes with a passive (silent) external 12V power brick.
Wifi is on-board via a mini PCI-e card, and bluetooth is supported by a tiny USB dongle plugged into the back panel.
Pictures to follow....
Pictures attached")
Attached are my DSDT, multi beast configuration, AppleIntelFramebufferCapri.kext and custom boot loader theme. I hope they may be of some use to someone else.
The AppleIntelFramebufferCapri.kext I patched myself as the European version of this board is slightly different from the US one.
Thought I'd share my latest Hackintosh build with everyone. A lot of time and effort has gone into this and it is now finished.
Basically I have stripped down an old Nintendo64 and built a high spec computer inside the case. The 4 controller ports are still active on the front by means of 2x dual N64 controller to USB PCBs which I have mounted and connected internally. This means that you can still play all of those timeless classics with 3 of your mates by using an emulator. Project64 emulator allows you to play many games in 1080p HD quality meaning the games are even better than you remember them. There are 4x N64 controllers although 1 of them is a bit dodgy.
The computer itself is currently running OSX 10.9 Mavericks, which is the Apple operating system, these PCs are often nicknamed 'Hackintosh' for obvious reasons. Everything works flawlessly including sleep/wake, HDMI audio etc. However I have noticed that USB storage devices such as hard drives are not recognised in the USB 3.0 ports, however they work fine in the USB 2.0 slots. Probably an easy fix for someone wishing to pursue this problem. I have had Windows 7 installed on here in a dual boot configuration which works well. There is a custom boot loader screen shown in the pictures, and it gives you the option of selecting a different cartridge if you have other Operating systems loaded. I manually created the cartridge graphics for Mac, Windows and Linux OSes and also one for booting from a CD.
I have installed 2 extra USB 3.0 ports which are hidden under the old 'expansion bay'. To open, 1-touch press on the top pops the catch open and it hinges on the springs hidden underneath to open automatically. I used two tiny bin push-pop catches for this mechanism.
The original switches are still present and are both functional; The old reset switch is now the power button which also sleeps/wakes the computer. The old power button is now a 3-way switch which controls the 4x small case fans. In 1 position the fans are off, another the fans are always on full and the 3rd position enables a voltage changing circuit to control the speed of the fans from anywhere between off and full power. There is a small knob on the rear panel to adjust the speed.
This computer is silent. The only moving parts it has is the fans and the main fan is not audible. The case fans can get quite noisy if they are on full speed but this is never really required as the heat doesn't really ever become a problem.
I have replaced the original red power LED with a slow changing rainbow LED. This slowly fades in and out of all of the colours of the rainbow and looks pretty cool. I've connected this up to the +12V rail from the PSU directly behind it.
I've painted it in black and yellow, I got this colour scheme idea from the CPU fan I purchased to fit inside. I sprayed it myself and although it isn't perfect, I'm happy with the finish,
The main board is a Zotac Z77 ITX wifi, more information here ;- http://www.zotac.com/products/mainb...er/DESC/amount/10/section/specifications.html
CPU is an intel i5 3570K and is a quad core 3.4Ghz Ivy bridge processor. More info here ;- http://ark.intel.com/products/65520
RAM is 2x 2GB Kingston Hyper X (4GB total) running at a blistering 1867 Mhz
HDD is a 64 GB SSD and is lightning quick. I will upload the specs of this very soon...
PSU is a 160 Watt pico PSU which I have physically modified in order to fit into the case and also comes with a passive (silent) external 12V power brick.
Wifi is on-board via a mini PCI-e card, and bluetooth is supported by a tiny USB dongle plugged into the back panel.
Pictures to follow....
Pictures attached
Attached are my DSDT, multi beast configuration, AppleIntelFramebufferCapri.kext and custom boot loader theme. I hope they may be of some use to someone else.
The AppleIntelFramebufferCapri.kext I patched myself as the European version of this board is slightly different from the US one.
Attachments
-
 $_58.jpg186.5 KB · Views: 1,860
 -
 $_59.jpg185.2 KB · Views: 1,928
 -
 $_60.jpg262.4 KB · Views: 3,874
 -
 $_61.jpg348.5 KB · Views: 2,175
 -
 $_63.jpg229.2 KB · Views: 2,578
 -
 $_64.jpg425.4 KB · Views: 2,132
 -
 $_65.jpg32.8 KB · Views: 1,887
 -
 $_14.jpg194.7 KB · Views: 1,683
 -
 $_57.jpg171.9 KB · Views: 2,138
 -
Files.zip5.1 MB · Views: 266