
- Joined
- Feb 12, 2013
- Messages
- 81
- Motherboard
- Ivy Bridge Powermac G4 mod
- CPU
- i5-3330
- Graphics
- GTX650 Ti
- Mac
- Classic Mac
- Mobile Phone
[BUILDING] The HiRise mod
(OK the name is pretty lame but it's temporary. Please send me some ideas!)
I had set my eye on HiRise for a long time but I had to consider other aspects of the build first. After planning many other details I went on and ordered one and also begun selecting carefully all the other parts.
My goal for this project is to make something that could have possibly come out of a factory but actually doesn’t. Thing is, there are many great computers and many of them are Macs but the perfect computer doesn't really exist. So I thought why not give it a shot.
There are some red lines I don't want to cross though. In fact they are the same as in my second project, the OSXBOX 360. So, once again, we must end up with a computer with an internal PSU, a discrete GPU and as low power / low noise as possible. The difference is that this project is a high-end aiming one and I'll try to use the best available hardware.
So, first things first. The HiRise case doesn't need any introduction, I'll let the pictures speak for themselves:
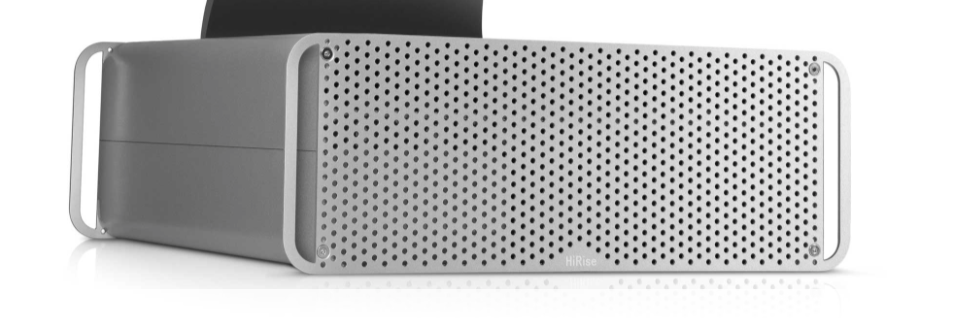
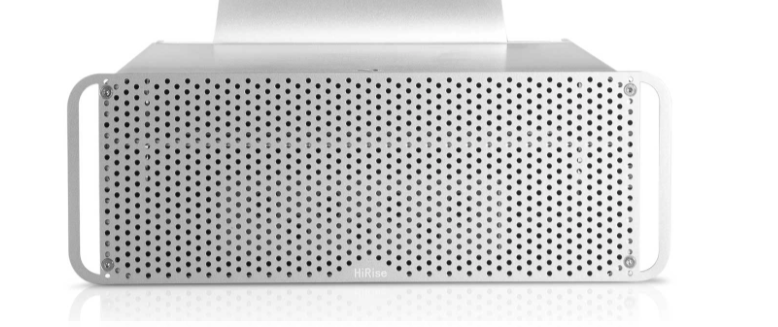

 I find it so beautiful that I don't want to modify anything in the aesthetics (but we'll see about that later). Even before purchasing the (steep priced) case I made some rough estimations of how i would fit everything in there:
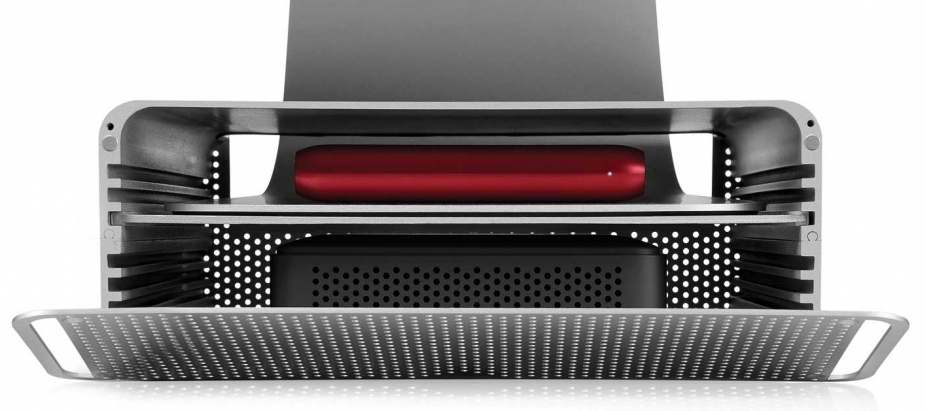
 See that blue colored PSU? It's a Flex-ATX PSU, maybe the smallest retail PSU you can find. And you know what? It's way too large and I had to find another way around. The obvious solution for something even smaller is to use a picoPSU:
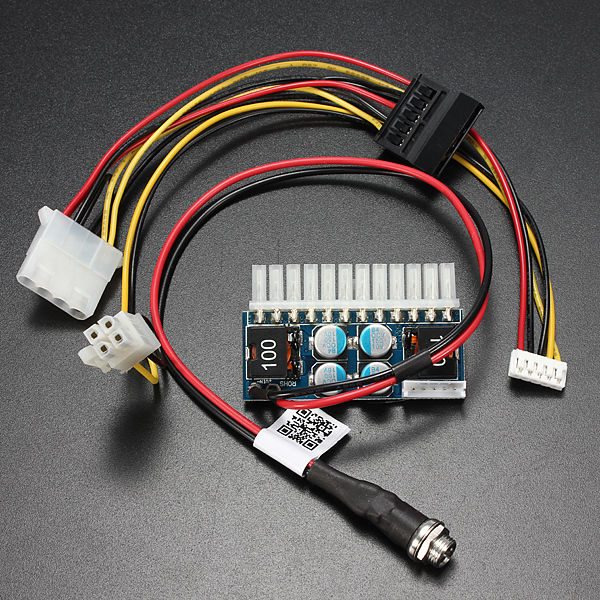 These are essentially tiny PCBs which hook on the motherboard and seem to be ideal, but there is a catch; they accept only DC in. And since I don't want to use an external power brick, I must feed it with a decent AC-DC adapter. After a LOT of searching I finally found the N2POWER XL-160-1, a good quality open frame AC-DC adapter with the smallest possible volume (127x76x32mm):
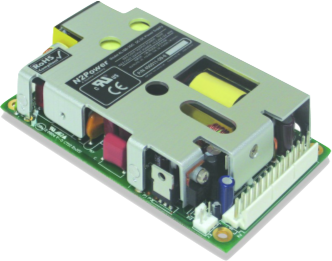 Now about the specs: the adapter takes the 220v current and converts it to 12v to feed the picoPSU. Both the picoPSU and the adapter are rated for 160 watts, which I believe will be enough for my system (I'm hoping I won't even hit 100w at full load).
Next was the motherboard. I chose to go with Gigabyte because I have already build two other hackintoshes on these boards and they work almost flawlessly. Gigabyte has in stock quit a few Haswell options in the size I'm interested. Some of them are mini-ITX boards and then there are also some thin mini ITX. Although thin mini-ITX seems very tempting because it uses up less height and has already a 19v DC in (eliminating the need for a picoPSU), I didn't choose it, mainly because of the PCIe restriction: it only has an underpowered 4x slot. I am planning to use a discrete GPU so 4x is a no go*.
(*) Performance-wise, when using PCIe rev 3.0, the bandwidth difference between 4x and 16x isn’t that important, assuming you use an entry level GPU (don’t get me wrong, a beastly 780Ti would be severely bottlenecked but that kind of GPU is out of the question in my build anyway). But what is indeed unacceptable is that those thin mini-ITX boards only deliver up to 25w through the PCIe, whereas the normal mini-ITX slots can deliver a healthy maximum of 75w. Nvidia Maxwell, is that a smile?
So, from the standard mini-ITX options I choose to go with GA-B85N. Long story short, I had to exclude all the others for the following reasons:
GA-Z87N & GA-H87N & GA-Q87N: they don’t have a mSATA slot
GA-B81N: the mSATA slot is only 3Gb/s
GA-Z85N: we have a winner!
So, to make it clear, all of the above boards do have ONE mini-PCI express slot, but the “87s” use it for a half-sized wifi card. The B81N and B85N have two slots, the second being a mSATA one, but the B85Ns’ slot is faster (6Gb/s) and besides that, this board has more USB 3.0 ports and a more compatible ALC898 audio chip.
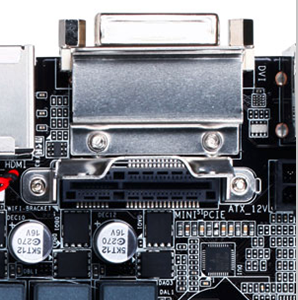
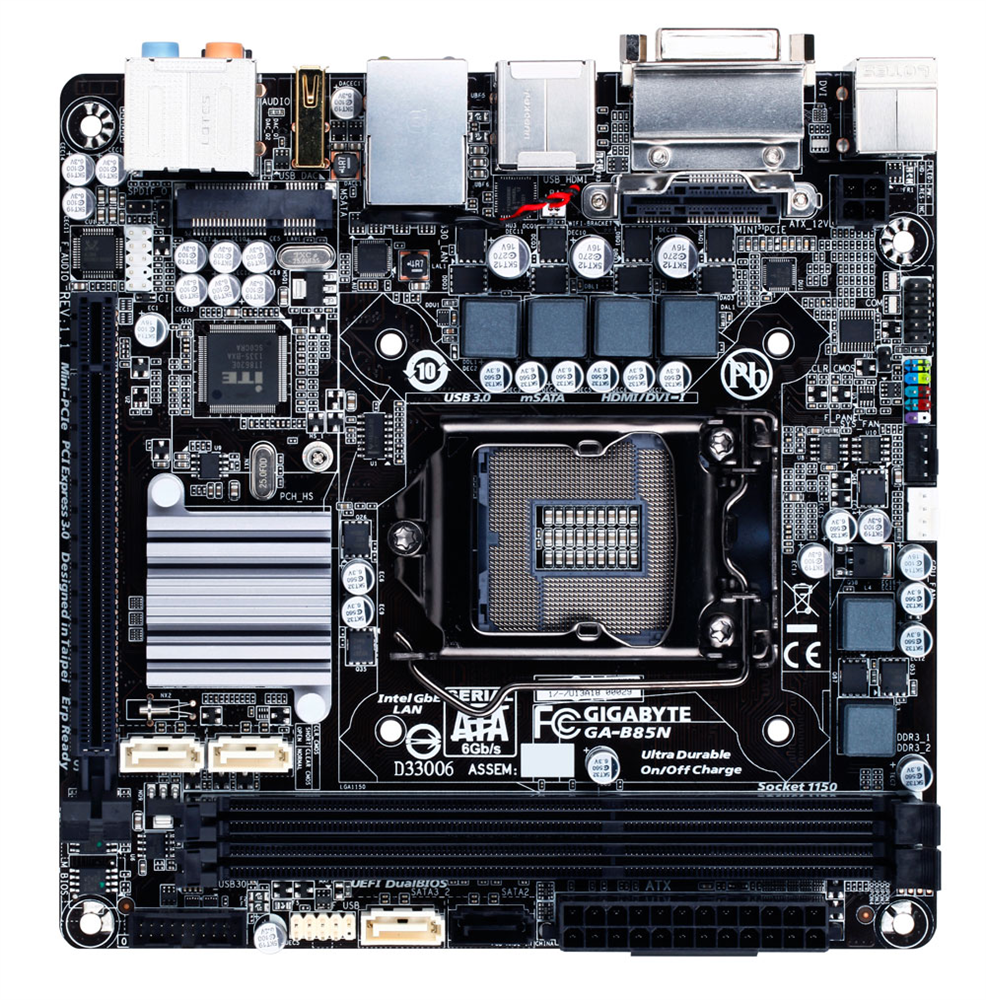 And now a very important detail! You see that mSATA slot? It’s full size of course. But here’s the thing: Those few boards with two mini-PCIe slots (meant for mSATA and wireless cards) usually have one full-size slot and one half-size slot. mini-ITX is already too cramped to accommodate two full sized slots, right? But the wireless solutions used in recent Macs are full sized, so the half-sized slot is useless. Except that in this case the second mini-PCI slot isn’t laid flat on the board, instead it’s vertical, meaning you don’t have any length restrictions and you can use any original apple wifi mini card! How cool is that Gigabyte?!

That is all so far! I have ordered the parts above and it will take a while to ship from China")
Accepting comments and suggestions!
(OK the name is pretty lame but it's temporary. Please send me some ideas!)
I had set my eye on HiRise for a long time but I had to consider other aspects of the build first. After planning many other details I went on and ordered one and also begun selecting carefully all the other parts.
My goal for this project is to make something that could have possibly come out of a factory but actually doesn’t. Thing is, there are many great computers and many of them are Macs but the perfect computer doesn't really exist. So I thought why not give it a shot.
There are some red lines I don't want to cross though. In fact they are the same as in my second project, the OSXBOX 360. So, once again, we must end up with a computer with an internal PSU, a discrete GPU and as low power / low noise as possible. The difference is that this project is a high-end aiming one and I'll try to use the best available hardware.
So, first things first. The HiRise case doesn't need any introduction, I'll let the pictures speak for themselves:
Next was the motherboard. I chose to go with Gigabyte because I have already build two other hackintoshes on these boards and they work almost flawlessly. Gigabyte has in stock quit a few Haswell options in the size I'm interested. Some of them are mini-ITX boards and then there are also some thin mini ITX. Although thin mini-ITX seems very tempting because it uses up less height and has already a 19v DC in (eliminating the need for a picoPSU), I didn't choose it, mainly because of the PCIe restriction: it only has an underpowered 4x slot. I am planning to use a discrete GPU so 4x is a no go*.
(*) Performance-wise, when using PCIe rev 3.0, the bandwidth difference between 4x and 16x isn’t that important, assuming you use an entry level GPU (don’t get me wrong, a beastly 780Ti would be severely bottlenecked but that kind of GPU is out of the question in my build anyway). But what is indeed unacceptable is that those thin mini-ITX boards only deliver up to 25w through the PCIe, whereas the normal mini-ITX slots can deliver a healthy maximum of 75w. Nvidia Maxwell, is that a smile?
So, from the standard mini-ITX options I choose to go with GA-B85N. Long story short, I had to exclude all the others for the following reasons:
GA-Z87N & GA-H87N & GA-Q87N: they don’t have a mSATA slot
GA-B81N: the mSATA slot is only 3Gb/s
GA-Z85N: we have a winner!
So, to make it clear, all of the above boards do have ONE mini-PCI express slot, but the “87s” use it for a half-sized wifi card. The B81N and B85N have two slots, the second being a mSATA one, but the B85Ns’ slot is faster (6Gb/s) and besides that, this board has more USB 3.0 ports and a more compatible ALC898 audio chip.
That is all so far! I have ordered the parts above and it will take a while to ship from China
Accepting comments and suggestions!


