
- Joined
- Feb 20, 2011
- Messages
- 195
- Motherboard
- Asus Maximus Hero XI Z390
- CPU
- i9-9900K
- Graphics
- RX 560
- Classic Mac
- Mobile Phone
Hi,
Here are the steps for a working Mountain Lion install on a Gigabyte ga-z77x-ud3h / i5-3570k / HD4000
I chose this board for its DisplayPort connector which allows the integrated graphics to drive displays up to 2560 x 1440, whereas all the HDMI and DVI versions only go to 1920 x 1080 video.
It's also supposed to be good for overclocking, equipped with an all-digital power section with 9 phases.
Runs very fast, quiet and cool, but built-in sound with the Via chip and the extra USB 3.0 ports aren't supported, and the intel-controlled USB 3.0 ports are a little whimsical in OS-X (but that seems to be a generalized issue).
Within those constraints, this seems to be an excellent mainboard.
It's important to start with as simple a HW configuration as possible to get a basic working system first:
- VGA monitors are problematic, so use DVI or HDMI
- don't plug in any separate graphics card
- connect only one hard drive and use the Sata0 connector
- don't put in any PCI cards or other unneeded peripherals: only mouse, keyboard and the installer usb-stick
1) Buy Mountain Lion (10.8.2 or newer), download Unibeast and Multibeast and prepare a 8GB USB-stick installer as outlined here: http://www.tonymacx86.com/61-unibeast-install-os-x-mountain-lion-any-supported-intel-based-pc.html
2) If your mainboard has an older bios, download the latest one here: http://www.gigabyte.com/products/product-page.aspx?pid=4153#bios.
Unzip the bios and copy it onto a FAT-formatted usb-stick, then it can be flashed with the built-in Qflash utility of the mb, without needing Windows.
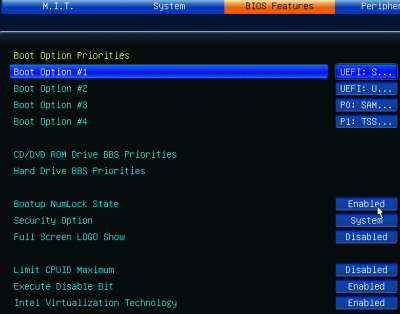
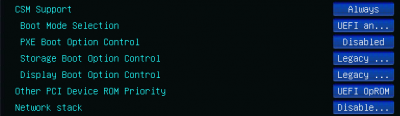
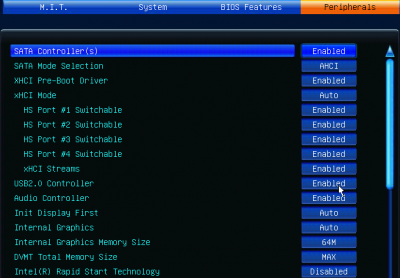
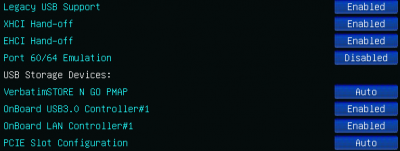
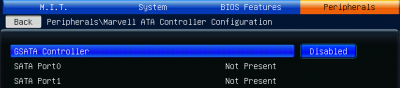
3) enter bios setup, select load "optimized defaults" in the "save & exit" section, then modify the settings as per the attached screenshots.
Essential is to set the internal graphics memory to 64 MB.
4) follow the Mountain Lion install instructions on the previous link ( http://www.tonymacx86.com/61-unibeast-install-os-x-mountain-lion-any-supported-intel-based-pc.html )
During boot, press F12 and select to boot off the USB-Stick.
Note that on the backpanel connectors, only the two USB 3.0 connectors below the ethernet plug will work (for keyboard, mouse and USB-Stick). You may need to use USB 2.0 plugs accessible on front panel plugs via the internal connectors to get a functioning keyboard/mouse.
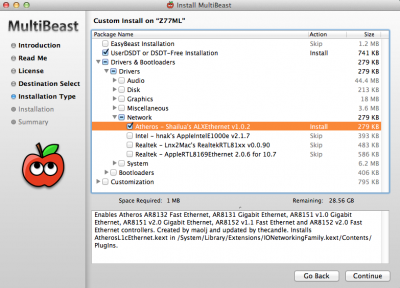
To minimize errors, when running Multibeast 5 it's best to start with minimal settings as on the attached screenshot and select only:
- "User DSDT / DSDT-free"
- Atheros Ethernet
To avoid having to do complete reinstalls if the MB settings don't work, use SuperDuper or Carbon Copy Cloner to clone the installation before running MultiBeast. Partition the hard drive into two equal partitions and clone the installation onto the second one. Then run MB on the first partition, and if the settings don't work, reboot into the second partition and clone it back onto the first one.
To experiment different /extra/org.chameleon.Boot.plist configurations, if some changes you made don't work (such as your scrambled screen), you can usually still get back into the installed system by adding the boot option -x -F -f (type these while the bootloader progress bar is advancing, then hit enter)
Once everything works properly, first clone the boot partition so you can revert if something goes off during further experimentation. Then if the eSata ports on the rear panel or HWMonitor are needed, one could at a later stage re-rerun Multibeast and add:
- 3rd party esata
- FakeSMC Plugs for Motherboard & HWMonitor Application
I had to add a graphics mode entry to /extra/org.chameleon.Boot.plist otherwise the screen comes up scrambled after the second reboot, so the settings look like this -- it doesn't seem to matter which resolution one adds (navigate to the "extra" folder in the root directory and open the file org.chameleon.Boot.plist to edit):
<key>EthernetBuiltIn</key>
<string>Yes</string>
<key>GenerateCStates</key>
<string>Yes</string>
<key>GeneratePStates</key>
<string>Yes</string>
<key>GraphicsEnabler</key>
<string>Yes</string>
<key>Graphics Mode</key>
<string>1920x1080x32</string>
<key>Kernel</key>
<string>mach_kernel</string>
<key>Kernel Flags</key>
<string>darkwake=0</string>
<key>Legacy Logo</key>
<string>Yes</string>
<key>Timeout</key>
<string>2</string>
<key>UseKernelCache</key>
<string>Yes</string>
If in doubt about the Bios settings, in the attachments is a copy of my Bios settings -- if you uncompress the zip and copy the file onto a FAT-formatted usb-stick, you can load it into your Bios if it is the same F17 version on the GA-Z77X-UD3H rev. 1.0, that way it would be sure to have identical settings to those that work on my machine. (After entering Bios, in the "Save & Exit" section -> Load Profiles -> Select File from HDD/USB)
Toleda has published an excellent guide for enabling HDMI audio and it works fine for this board: http://www.tonymacx86.com/hdmi-audio/84936-easy-guide-ml-hdmi-audio-hd4000-7-series-mb.html
To resume the steps:
1) download the HD4000-3_7_series_hdmi_audio_dsdt_editing_kit.zip and MaciASL Native DSDT/AML IDE & Compiler from the above link
2) boot your mac without any dsdt in the extra folder
3) launch MaciASL, click on "Patch" and open the file "ami_clean_compile.txt" from the HD4000-3_7_series_hdmi_audio_dsdt_editing_kit
4) click apply and wait a few seconds
5) close the patch dialog and click "compile". There shouldn't be any errors (warnings are ok).
6) click on "Patch" again and this time open "hdmi_audio_ami_efi_hd4000.txt" click "Apply" and wait a few seconds
7) close the patch dialog and click "compile". If there are still no errors, save the compiled DSDT.aml to the desktop and install it with Multibeast using the "DSDT-free/UserDSDT" option without selecting any audio drivers or Voodoo patches.
For trouble-shooting read the detailed instructions in Toleda's post.
Here are the steps for a working Mountain Lion install on a Gigabyte ga-z77x-ud3h / i5-3570k / HD4000
I chose this board for its DisplayPort connector which allows the integrated graphics to drive displays up to 2560 x 1440, whereas all the HDMI and DVI versions only go to 1920 x 1080 video.
It's also supposed to be good for overclocking, equipped with an all-digital power section with 9 phases.
Runs very fast, quiet and cool, but built-in sound with the Via chip and the extra USB 3.0 ports aren't supported, and the intel-controlled USB 3.0 ports are a little whimsical in OS-X (but that seems to be a generalized issue).
Within those constraints, this seems to be an excellent mainboard.
It's important to start with as simple a HW configuration as possible to get a basic working system first:
- VGA monitors are problematic, so use DVI or HDMI
- don't plug in any separate graphics card
- connect only one hard drive and use the Sata0 connector
- don't put in any PCI cards or other unneeded peripherals: only mouse, keyboard and the installer usb-stick
1) Buy Mountain Lion (10.8.2 or newer), download Unibeast and Multibeast and prepare a 8GB USB-stick installer as outlined here: http://www.tonymacx86.com/61-unibeast-install-os-x-mountain-lion-any-supported-intel-based-pc.html
2) If your mainboard has an older bios, download the latest one here: http://www.gigabyte.com/products/product-page.aspx?pid=4153#bios.
Unzip the bios and copy it onto a FAT-formatted usb-stick, then it can be flashed with the built-in Qflash utility of the mb, without needing Windows.
3) enter bios setup, select load "optimized defaults" in the "save & exit" section, then modify the settings as per the attached screenshots.
Essential is to set the internal graphics memory to 64 MB.
4) follow the Mountain Lion install instructions on the previous link ( http://www.tonymacx86.com/61-unibeast-install-os-x-mountain-lion-any-supported-intel-based-pc.html )
During boot, press F12 and select to boot off the USB-Stick.
Note that on the backpanel connectors, only the two USB 3.0 connectors below the ethernet plug will work (for keyboard, mouse and USB-Stick). You may need to use USB 2.0 plugs accessible on front panel plugs via the internal connectors to get a functioning keyboard/mouse.
To minimize errors, when running Multibeast 5 it's best to start with minimal settings as on the attached screenshot and select only:
- "User DSDT / DSDT-free"
- Atheros Ethernet
To avoid having to do complete reinstalls if the MB settings don't work, use SuperDuper or Carbon Copy Cloner to clone the installation before running MultiBeast. Partition the hard drive into two equal partitions and clone the installation onto the second one. Then run MB on the first partition, and if the settings don't work, reboot into the second partition and clone it back onto the first one.
To experiment different /extra/org.chameleon.Boot.plist configurations, if some changes you made don't work (such as your scrambled screen), you can usually still get back into the installed system by adding the boot option -x -F -f (type these while the bootloader progress bar is advancing, then hit enter)
Once everything works properly, first clone the boot partition so you can revert if something goes off during further experimentation. Then if the eSata ports on the rear panel or HWMonitor are needed, one could at a later stage re-rerun Multibeast and add:
- 3rd party esata
- FakeSMC Plugs for Motherboard & HWMonitor Application
I had to add a graphics mode entry to /extra/org.chameleon.Boot.plist otherwise the screen comes up scrambled after the second reboot, so the settings look like this -- it doesn't seem to matter which resolution one adds (navigate to the "extra" folder in the root directory and open the file org.chameleon.Boot.plist to edit):
<key>EthernetBuiltIn</key>
<string>Yes</string>
<key>GenerateCStates</key>
<string>Yes</string>
<key>GeneratePStates</key>
<string>Yes</string>
<key>GraphicsEnabler</key>
<string>Yes</string>
<key>Graphics Mode</key>
<string>1920x1080x32</string>
<key>Kernel</key>
<string>mach_kernel</string>
<key>Kernel Flags</key>
<string>darkwake=0</string>
<key>Legacy Logo</key>
<string>Yes</string>
<key>Timeout</key>
<string>2</string>
<key>UseKernelCache</key>
<string>Yes</string>
If in doubt about the Bios settings, in the attachments is a copy of my Bios settings -- if you uncompress the zip and copy the file onto a FAT-formatted usb-stick, you can load it into your Bios if it is the same F17 version on the GA-Z77X-UD3H rev. 1.0, that way it would be sure to have identical settings to those that work on my machine. (After entering Bios, in the "Save & Exit" section -> Load Profiles -> Select File from HDD/USB)
Toleda has published an excellent guide for enabling HDMI audio and it works fine for this board: http://www.tonymacx86.com/hdmi-audio/84936-easy-guide-ml-hdmi-audio-hd4000-7-series-mb.html
To resume the steps:
1) download the HD4000-3_7_series_hdmi_audio_dsdt_editing_kit.zip and MaciASL Native DSDT/AML IDE & Compiler from the above link
2) boot your mac without any dsdt in the extra folder
3) launch MaciASL, click on "Patch" and open the file "ami_clean_compile.txt" from the HD4000-3_7_series_hdmi_audio_dsdt_editing_kit
4) click apply and wait a few seconds
5) close the patch dialog and click "compile". There shouldn't be any errors (warnings are ok).
6) click on "Patch" again and this time open "hdmi_audio_ami_efi_hd4000.txt" click "Apply" and wait a few seconds
7) close the patch dialog and click "compile". If there are still no errors, save the compiled DSDT.aml to the desktop and install it with Multibeast using the "DSDT-free/UserDSDT" option without selecting any audio drivers or Voodoo patches.
For trouble-shooting read the detailed instructions in Toleda's post.
Attachments
-
 BiosFeatures1.png35.3 KB · Views: 4,388
 -
 BiosFeatures2.png16.9 KB · Views: 2,082
 -
 Peripherals1.png55.7 KB · Views: 9,367
 -
 Peripherals2.png18.4 KB · Views: 1,972
 -
 intel-Smart-Connect.png15.7 KB · Views: 1,839
 -
 Marvell-eSata.png17.8 KB · Views: 1,849
 -
ga-z77x-ud3h-F17.zip634 bytes · Views: 892
-
 MB.PNG138.2 KB · Views: 2,577
")