
- Joined
- Sep 21, 2010
- Messages
- 13,411
- Motherboard
- HP 17" 17-by3053cl
- CPU
- i5-1035G1
- Graphics
- Intel UHD Graphics, 1920x1080
- Mac
- Classic Mac
- Mobile Phone
Stork's Thunderbolt Build: i5-3570K | GA-Z77X-UP5-TH | GTX 760
Components
Gigabyte Z77X-UP5-TH Motherboard with Thunderbolt and Intel Integrated Graphics - Discontinued
Gigabyte || Newegg
Intel Core i5-3570K Processor Unlocked for Overclocking and HD4000 Capable - Discontinued
Amazon || Newegg
Thermaltake Water2.0 Performer Sealed Water Processor Cooler - Amazon || Newegg
Corsair Vengeance Low Profile (Black) 8GB (2x4GB) DDR3 1600 Memory - Amazon || Newegg
SanDisk Extreme 120GB SATA III 2.5-Inch Solid State Drive SDSSDX-120G-G25 - Amazon
EVGA GeForce GTX 650 Ti SSC 1024MB GDDR5 (01G-P4-3652-KR) - Amazon || Newegg
Rosewill Wireless N Dual Band Adapter IEEE 802.11a/b/g/n PCI Express Up to 450Mbps Data (RNWD-N9003PCe) - Amazon || Newegg
OCZ ModXStream Pro 700W Modular Power Supply - Amazon || Newegg
NZXT H2 Silent White Computer Case - Amazon || Newegg
GELID Solutions FN-SX12-10 120mm Silent Case Fans - Replacing the two radiator fans on the Thermaltake cooler - Amazon || Newegg
Apple Thunderbolt to Firewire 800 Adapter - Amazon || Newegg
Thunderbolt (miniDisplayPort) to DVI Monitor Adapter - Amazon || Monoprice
Already Owned
IOGEAR 4-Port Dual View Dual-Link DVI KVMP Switch with Audio GCS1644 - Amazon || Newegg
The following are connected to the IOGear KVM DVI Switch:
Dell UltraSharp U2711 27-inch Widescreen Monitor - Max Resolution 2560 x 1440 - Amazon
HP ZR24W 24" IPS Monitor with DVI, HDMI, DisplayPort and Sub-D Connectors and USB Hub (out of production; replaced by the HP ZR2440W Monitor) - Amazon
Logitech Wireless Solar Keyboard K750 for Mac - Silver (920-003472) - Amazon
Comments
Table of Contents
The Build
The Build
This build is about three technologies - Gigabyte 7 series motherboard with Thunderbolt v1.0, Intel Ivy Bridge processor with HD4000 and the NZXT H2 Silent Case. I eventually upgraded to EVGA GTX 650 Ti after initial installation in Mavericks proved out the HD4600 viability. Then, I swapped out the GTX 650 Ti for an EVGA GTX 760. The GTX 760 is Metal compatible which Mojave requires, and Nvidia never released drivers for Mojave, whereas the GTX 760 is supported by Apple's native drivers. Finally, I like to name my builds, so this build is called Thunderball after the James Bond movie of the same name.
An excellent article on the state-of-the-art of Thunderbolt v1.0 as on the first implementation in Gigabyte motherboards is Everything You Need To Know About Thunderbolt, dated June 2012.
Since I've been a long time Macintosh user, I have FireWire 400 and 800 peripherals. Initially, after installing Mountain Lion, I tested the Thunderbolt to FireWire 800 with an Other World Computing Mercury Elite Pro USB 2.0 + FireWire 400 + FireWire800 + eSATA external drive case in which was a 1TB Western Digital Black HDD. This worked like a champ and seem to be as fast as a FireWire 800 interface can get. (I'll leave the testing to others. If it works and meets expectations, it's good enough for me.) USB 3.0 ports work with continue to work with Mojave.
Here is the back panel of the UP5H TH.
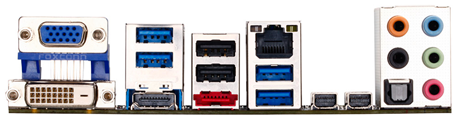
The two Thunderbolt connector ports on the rear panel have constraints as noted in the Gigabyte User Manual:
- 2 Thunderbolt ports (MDP1/MDP2) support for Mini-DisplayPort and Thunderbolt monitor(s), and supporting a maximum resolution of 2560x1600;
- When a monitor connected to the DVI-D port, the Thunderbolt MDP2 port (left Thunderbolt port on Rear Panel) can support Thunderbolt storage device(s) only;
- Each Thunderbolt port can be daisy chain around 3 Thunderbolt devices; <-- Default design limitation (see below)
- 2 DisplayPort monitors daisy chain in the same port must separate by one Thunderbolt device.
- Due to PC architecture I/O resources limitation, the amount of the Thunderbolt devices that can be used is dependent on the quantity of PCI Express and PCI devices be installed. If a PCI Express graphics card is installed, it is recommended that the BIOS Reserved IO for Thunderbolt parameter set to 40K or less.
I could not get any adapter to work in the Thunderbolt MDP1 port (right Thunderbolt port on Rear Panel as shown above). As I stated above, I was successful in using Thunderbolt MDP2 port with an Apple Thunderbolt to FireWire 800 Adapter to an external disk drive case, thus, validating the above 2nd bullet using the DVI motherboard connection for HD4000.
I was also successful in unplugging the motherboard DVI cable and using the Thunderbolt to DVI for my HD4000 display in the MDP2 port. But, neither the FireWire or DVI adapter would work in the MDP1 port. For now, this means I can only use MDP2 for my FireWire peripherals or my Monitor. So, the monitor goes back onto the DVI motherboard port. Update: I'm no longer using the on-board video. I'm using a graphics card.
Initially, I did try successfully to use the on-board video. Not surprising is how well Intel's Ivy Bridge Integrated Graphics, or HD4000, works - very well as a matter of fact. While according to Tom's Hardware web site's Graphics Cards Hierarchy Chart, the HD4000 is on a tier with nVidia 8600GT and AMD/ATI HD 3670, it seems as robust as my old 9800 GT Silent Cell. However, since I first built this system, I'll use an EVGA GTX 760 for Mojave. I'll show you how to set up HD4000 in the BIOS when I get into the installation below. For more information on using HD4000 (and HD3000 on Sandy Bridge motherboards) see this excellent primer on Intel Integrated Graphics: Intel HD Graphics 3000/4000 For Beginners.
Another item to note about the GA-Z77X-UP5-TH motherboard is the mSATA mounting on the motherboard. This mounting is strictly for a mSATA mini SSD device and can't be used as a miniPCI-e slot for, say, a wireless mini card. As of April, 2015, mSATA mini SSD drives are alternative to the 2.5 inch SSD freeing up disk drive mounts for those that need lots of disk drives. (Note that the the mSATA mounting is shared with the SATA2 5 port which can't be used with a mSATA SSD is installed.)
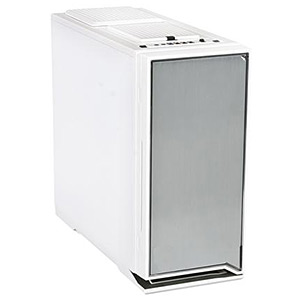
The NZXT H2 Silent Case has an OK reputation on the 'Net review sites including reviews at AnandTech.com and silentpcreview.com. It's solidly built, well designed for use and of a pleasing design, but is not the best case for silent running regardless of the case name, but good enough. I discovered this case by accident. I needed to make a trip to a close by Micro Center to pick up a processor, memory and a case. I originally wanted to get a Fractal Design Define R3, but they didn't have any in stock. (I learned later that the R3 had been discontinued and replaced by the R4.) So, after a quick review of silent cases that the Micro Center had in stock, I decided on the NZXT H2 case in white; I was getting tired of black cases as it was a pain to install components in the case without setting up special lighting so see into the black hole of the case. Needless to say, it was easy to install all my components with normal room lighting. Finally, this case has several attributes that make it worth your consideration:
- A sturdy font door that opens to the left (hinges on the left side);
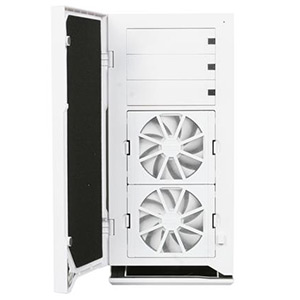
- Opening the front door reveals two fans which easily come out to access the hard drive removal trays;

- The front door also reveals access to three 5.25" drives bays and eight (!) 3.5"/2.5" removable screw less drive trays (for more drives than you would ever need/use);

- The case is designed to be an under the desk case since the power/reset buttons and external ports are located on the top, front of the case along with the microphone and headphone jacks, three USB 2.0 and one USB 3.0 connectors, and a fan controller switch with three settings;
- Also on top is an external SATA docking bay for a hard drive drive which is a real plus if you need to clone disks, etc., and toward the back is a mounting for a 140 mm fan underneath a magnetic cover (covers removed in picture below);
- Very good cable management slots and holes; and
- Fan filters on every fan opening.


I'm using the Thermaltake Water 2.0 Performer processor cooler which MacMan recommend. Although twice the cost of a good air processor cooler, it was easy to install. This cooler has no interference with finned memory and keeps the processor at 26-28 degrees C. I can't wait to see how well it performs if and when I try overclocking. However, the two fans, one on each side of the radiator, are noisy, and I replaced them with GELID Solutions FN-SX12-10 120mm Silent Case Fans to have a fairly silent case.
Later, I added the Rosewill wireless card that is a competitor to the TP-Link WDN-4800 dual band wireless card. Works as well as the TP-Link card, and wakes from all manners of sleep without a problem - ready when my BT Apple KB, Might Mouse and TrackPad wake from sleep. It's about $10 USD less expensive than the TP-Link wireless card. However, both go on sale when either Amazon or Newegg puts it on sale. I highly recommend the Rosewill dual band PCI-e 802.11b/g/n card.
Note: The Gigabyte WiFi/Bluetooth card will not work with Apple's OS X and may cause installation problems if you don't remove it.
The Installation
For installation of Catalina, see Post # here:
[Updated] Stork's Thunderbolt Build: i5-3570K | GA-Z77X-UP5-TH | GTX 760
You should be OK. (I'm not at Thunderball's location. Virus has me hunkering down at family location which we stopped to visit on the way North from snowbirding in Florida.) Update your kexts and Clover before you update, and you should be OK. Awesome and thank you. Stay healthy.
Preparation
 The Apple Mac App Store, iCloud, FaceTime and iMessage won't work unless you install with Ethernet; don't use WiFi for the installation of macOS as you have to reset several network plist files - PITA.Update the BIOS to the latest version; the current BIOS version is F12. See my http://www.tonymacx86.com/threads/how-to-update-your-gigabyte-motherboards-bios.131047/. (Optional) I updated to the F12j BIOS located at Tweaktown.com at the recommendation of several users in this thread. Here's the direct .zip Tweaktown download link. (Optional) If you want to install a M.2 NVMe SSD, you'll need an M.2 NVMe SSD adapter card. I recommend you install Sierra on a SATA SSD, then see the effort involved in installing an M.2 NVMe SSD in Post #899 (it needed a modified F12 BIOS which is provide in that post). Prepare the UniBeast USB thumb drive in accordance with the tonymacx86 Installation Guide for Mojave, Steps 1-2; Download and put the following on the UniBeast Installation USB thumb drive: Power down the computer. Put the UniBeast USB installation thumb drive in an USB 2 socket on the motherboard Back Panel if you're using a USB 2 thumb drive. If your USB thumb drive is a USB 3 drive, you can now use USB 3 port with UniBeast.
BIOS Set-up
Boot the computer into the BIOS and change the BIOS[/U] by doing the following (see the User Manual for more information): Load the Optimized Settings; If you're using memory supporting XMP, then set the XMP to Profile 1 to set the correct memory parameters (M.I.T. > Advanced Memory Settings); Check your BIOS for the settings that thelostswede showed in his article;In addition to thelostswede's BIOS setup, apply these BIOS settings to allow sleep/wake-up to operate properly, and USB ports to act correctly after wake-up (thanks to arehep - see his post here):XHCI Pre-Boot Driver = Enabled
XHCI Mode =Smart Auto -> Sleep/wake-up works better set to Auto
Internal CPU PLL Over-voltage = Disable
For the UniBeast installation of Mojave and running the MultiBeast for Mojave configuration, set the Boot Option #1 to the UniBeast USB drive (BIOS Features > Boot Options Priorities); (Optional) For HD4000, ensure the Internal Graphics is set to Enable and the Internal Graphics Memory Size to 32MB since Yosemite allocates the HD4000 memory size needed (Peripherals); and Save the BIOS settings and exit (F10) to boot into the UniBeast USB drive.Installation of macOS
At the Clover Boot screen, choose the UniBeast Installation thumb drive (External on left) to execute and follow the installation procedure in Steps 4 of the tonymacx86 Sierra Installation Guide referenced above. As the installation proceeds, it will reboot several times. Clover knows which partition (icon) to boot from so sit back and watch. It will take ~20 minutes. After the 2nd reboot, select your installation disk in the Clover Boot screen. On the last reboot, there won't be any automatic Clover selection - just click on disk icon onto which you just install Mojave. CAUTION! As you boot onto your Mojave Desktop, the macOS will ask you to log into iCloud. Don't do it yet...wait until after you install the MultiBeast configuration and reboot. Copy the hackintosh applications from the thumb drive to /Applications (you can create a Hackintosh folder in the /Applications folder, if you desire, as I did). Run MultiBeast for Mojave using the following configuration choices: Quick Start > UEFI Boot Mode Drivers > Audio > AppleALC (Optional) Drivers > Misc > FakeSMC Plugins (Optional) Drivers > Misc > FakeSMC HWMonitor Application Drivers > Network > Intel > AppleIntelE1000e <--- Use the latest version Drivers > USB > 7/8/9 Series USB Support Drivers > USB > USBInjectAll Drivers > USB > Remove XHCI USB Port Limit <--- Adds patch to remove XHCI USB Port Limit Build <--- To see your full configurationNote: the MultiBeast default System Definition is iMac14,2. I recommend you use the iMac14,2 SysDef for your installation and to get Mojave up and running. You can change it later if need be.
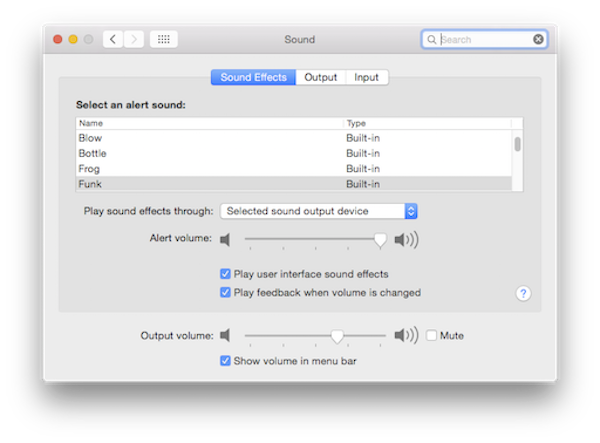
Install Reboot into the BIOS. Select your installation disk to be the boot disk > Note: Always pick the UEFI choice if there are two entries for the same drive. EXIT to Save the BIOS update and reboot. At the Clover Boot screen, select your High Sierra disk (should be the default).Starting with El Capitan (10.11), Apple has changed the default audio output settings from those of the previous OS X's. So, in the Sound Preference Pane, do the following:
Sound Effects: Check the box "Play feedback when volume has changed." This is a new option and was the default on Mavericks and earlier. You now need to turn it on to test your speaker volume.Now, audio works!
Creating a SSDT for USB 15 Port Usage - No longer Need config.plist Patches
Download the Hackintool as we're going to make a USB SSDT so we don't have to worry about having the latest USB Port Limit Remover patches in config.plist for every macOS update. Mount your EFI partition for Mojave drive. Run Hackintool Click on the "padlock" icon in the lower left hand corner of the Hackintool window; Click on the Bootloader menu button. It will highlight checked recommended DSDT patches for config.plist (EHC1 to EH01, EHC2 to EH02, PEGP to GFX0 and SAT0 to SATA); Apply the patches by clicking on the "check" icon (bottom of window, above the "headsoft" logo) and select your config.plist file and save the changes; Reboot back to the Desktop and run Hackintool; Click on the "padlock" icon in the lower left hand corner of the Hackintool window; Chick on the USB icon at the top (middle) of the Hackintool window and you'll see something like this: Plug, Eject and unplug a USB 2 device to each and every USB port on your computer, both Back Panel and Case front ports. Now, do the same using a USB 3 device; When you're done, it should look like the above Delete all the "white" ports by clicking one them (command click) and then clicking on the delete button at the bottom of the window (the icon with a "dash"); Count the Green ports left which should be 15; if not, choose one or two to delete (try them with your USB 2 and USB 3 devices, first); Click on the button shown to generate your USB files. Hackintool will place three files on your Desktop: SSDT-UIAC.aml, SSDT-EC.aml and USBPorts.kext. You only need to use either the SSDT-UIAC.aml or the USBPorts.kext, not both. I choose to use the SSDT-UIAC.aml which I put (drag and drop) into /EFI/.../CLOVER/ACPI/patched/ folder. (Update: I can't remember if I used the SSDT-EC.aml. I'm currently not at Thunderball's location, but will confirm whether I used SSDT-EC.aml or not. If Hackintool doesn't show and EC recommend change in it's USB Controller's window (top window in the Hackintool window) then I probably did not use it.) IMPORTANT: Remove the 15 port unlimited patches from the /EFI/.../CLOVER/config.plist file. Now reboot Use IORegister to confirm your successful limit to 15 or under USB assignments. Lastly, remove the SSDT and kext from your Desktop. I put them in my /Applications/Hackintosh/SSDT/ folder and deleted the kext. That's it!You're done!
Summary
Everything is working so far including sleep/wake-up and iMessage. If iMessage does not work for you, try P1LGRIM's quick tutorial in his build description or his full guide An iDiot's Guide To iMessage.
UPDATES TO THIS BUILD DESCRIPTION
July 31, 2019. Updated the post installation procedures with how to create a USB SSDT so as not to depend upon someone creating a config.plist patch to remove the 15 USB port limit for each update.
April 30, 2019. Update this build desription to relect a Mojave 10.14.4 fresh installation.
April 29, 2019. Updated to Mojave 10.14.4. See Post #1045 for upgrade procedures from High Sierra 10.13.6 to Mojave.
October 03 2018. Updated to High Sierra 10.13.6. I abandoned the Realtek ALC audio for the AppleALC kext method. See Post #972.
April 20, 2018. Upgraded to High Sierra 10.13.4 from Sierra 10.12.6. Lots of problems, but persistence pays off. See Post #943 for the procedure.
Sometime, 2017. Replaced the GTX 650 TI with a GTX 760 which works like a champ OOB. (I did this replacement awhile ago and forgot to update this OP.)
July 22, 2017. Updated to Sierra 10.12.6. See Post #909. Updated this post to reflect 10.12.6
May 15, 2017. Updated to Sierra 10.12.5. See Post #906. Updated this post to reflect 10.12.5.
April 23, 2017. I finally got around to documenting how I installed a Samsung 950 Pro M.2 NVMe SSD and PCIe x4 Adapter Card and installed Sierra 10.12.4 on it. See Post 899 for the procedures.
April 22, 2017. Updated to Sierra 10.12.4 without any problem.
May 18, 2016. Updated the installation procedures for a fresh installation of El Capitan 10.11.5 which showed the maturity of both the tonymacx86 UniBeast & MultiBeast tools and the 10.11.5.
October 03, 2015. Updated to El Capitan 10.11.0 successfully using the tonymacx86 Guide. See Post #746 for details. I will update this post as soon as time permits.
June 30, 2015. Updated to 10.10.4 successfully. See this post for my procedure.
May 01, 2015. Fresh installation of Yosemite 10.10.3. Up until this time, Yosemite has been too fresh.
However, I will still continue to use Mavericks 10.9.5 on Thunderball as my production OS X until 10.10.4 to see how many more bugs are corrected. Frankly, I just don't like the Yosemite GUI. YMMV.September 19, 2014. Updated from Mavericks 10.9.4 to 10.9.5. Updated this original post to reflect a clean ("fresh") installation of Mavericks 10.9.5.
November 15, 2013. Fresh install of Mavericks 10.9.0 on a test partition, and using Migration Assistant as part of the fresh installation, I "migrated" my Mountain Lion 10.8.5 build. I chose everything in the Migration Assistant except for "Other Files." Everything is working so far including sleep/wake-up and iMessage.
September 14, 2013. Updated to 10.8.5 with the Combo Update following the procedures in Post #466.
August 15, 2013. Remove the "darkwake=0" in Mountain Lion 10.8.4 /Extra/org.chameleon.Boot.plist file with TextEdit to make all forms of Sleep/Wake-up work as it should.
June 12, 2013. Updated to Mountain Lion 10.8.4 using the Combo Update and the procedures outline in Post #408.
April 20, 2013. Updated the MultiBeast configuration screen snapshots for a fresh (completely new) installation and removed the fresh install MultiBeast configurations for previous versions of Mountain Lion. The updates from Mountain Lion 10.8.1 onward can be found in later posts in this thread.
April 15, 2013. Updated the BIOS settings to include arehep's sleep/wake-up BIOS settings (Post #368).
April 6, 2013. Added the Roswill wireless card that is a competitor to the TP-Link WDN-4800 dual band wireless card. Works as well as the TP-Link card, and wakes from all manners of sleep without a problem - ready went my BT Apple KB, Might Mouse and TrackPad wake from sleep.
March 15, 2013. Updated to Mountain Lion 10.8.3; see Post #217 for how to do it.
January 16, 2013. Added the Tom's Hardware site's article on everything You Need To Know About Thunderbolt, dated June 2012.
January 13, 2013. Use the motherboards USB 3 connectors #2 or #3, not #1, for a case's Front Panel USB 3 connection. The #2/3 connectors provide both USB 2/3 functionality to the Front Panel USB 3 ports. The #1 does not and provides iffy USB 3 only support. (Long story, shortened.)
November 14, 2012. I updated my configuration with an EVGA GTX 650 Ti using the tonymax86 Guide: http://www.tonymacx86.com/os-x-updates/79108-macbook-air-macbook-pro-update-2-0-a.html. (See Post #32 for more information.) I also added the following to the /Extra/org.chameleon.Boot.plst file:
<key>GraphicsEnabler</key>
<string>No</string>
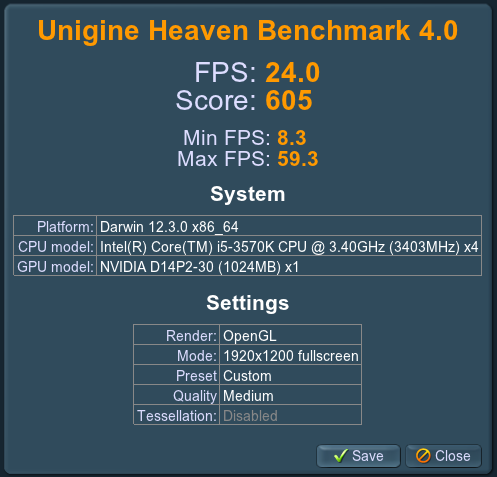
Unigine's Heaven 4.0 in 10.8.3 (Updated)
Last edited:
.JPG")
