- Joined
- Feb 5, 2011
- Messages
- 227
- Motherboard
- Asus X79 Rampage IV Extreme
- CPU
- i7-3930K
- Graphics
- GTX 680
- Mac
- Classic Mac
- Mobile Phone
Asus X79 Rampage IV Extreme | Core i7-3930k | ASUS GTX 680 2GB
6 Cores at 4.2Ghz
Mountain Lion 10.9.2
by MK500 and shilohh
6 Cores at 4.2Ghz
Mountain Lion 10.9.2
by MK500 and shilohh
Huge thanks to tonymacx86, MacMan, Hexa, and mitchellk without whom this machine would never have been built.
Special thanks to Shilohh for his DSDT & SSDT work, support on the NVidia side of things, and countless hours spent supporting users on this thread.
This beast has been rock solid for 6 years as of September 2018 as a daily workhorse.
If you would like to use an AMD HD 7xxx GPU, please use this guide instead.
Also see Shilohh's excellent build guide here: i7-4930K - Asus Rampage IV Extreme - 32GB RAM - GTX 770 4GB


If you would like to use an AMD HD 7xxx GPU, please use this guide instead.
Also see Shilohh's excellent build guide here: i7-4930K - Asus Rampage IV Extreme - 32GB RAM - GTX 770 4GB


More high-resolution photos here:
Photos | New Build Photo Log
Apple OS X Mavericks @ Mac App Store
Mac App Store - OS X Mavericks
Donation to TonyMacX86.
https://www.paypal.com/cgi-bin/webscr?cmd=_s-xclick&hosted_button_id=CC3JC8VG8ETHQ
ASUS Rampage IV Extreme LGA 2011 Intel X79 SATA 6Gb/s USB 3.0 Extended ATX Intel Motherboard
http://www.amazon.com/Rampage-IV-Extreme-Extended-Motherboard/dp/B0061XSBZ6
http://www.newegg.com/Product/Product.aspx?Item=N82E16813131802
Intel Core i7-3930K Sandy Bridge-E 3.2GHz (3.8GHz Turbo) LGA 2011 130W Six-Core Desktop Processor
http://www.amazon.com/dp/B00603QXPM/
http://www.newegg.com/Product/Product.aspx?Item=N82E16819116492
ASUS GTX680-DC2O-2GD5 GeForce GTX 680 2GB 256-bit GDDR5 PCI Express 3.0 x16 HDCP Ready SLI Support Video Card
http://www.amazon.com/dp/B007ZT2E1C/
http://www.newegg.com/Product/Product.aspx?Item=N82E16814121635
G.SKILL Ripjaws Z Series 32GB (8 x 4GB) 240-Pin DDR3 SDRAM DDR3 2133 (PC3 17000) Desktop Memory Model F3-17000CL11Q2-32GBZL
http://www.newegg.com/Product/Product.aspx?Item=N82E16820231502
OWC 120GB Mercury Accelsior™ PCI Express Solid State Drive (700+MB/s Read/Write) for Boot
OWC SSDPHW2R120 120GB Mercury Accelsior PCI Express... in stock at OWC
Pair of Western Digital 1TB Velociraptors (340MB/s Read/Write) for User Directories
http://www.amazon.com/Velociraptor-WD1000DHTZ-SATA-Hard-Drive/dp/B007VPGJIY
http://www.newegg.com/Product/Product.aspx?Item=N82E16822236243
Antec P280 Case
http://www.amazon.com/dp/B005X3E5BO/
http://www.newegg.com/Product/Product.aspx?Item=N82E16811129179
Noctua NH-D14 SE2011 140mm and 120mm SSO CPU Cooler
http://www.amazon.com/dp/B00631QFG8/
http://www.newegg.com/Product/Product.aspx?Item=N82E16835608024
Noctua NF-P12-1300 120mm Case Fan (quantity: 2)
http://www.amazon.com/dp/B000YSONMO/
http://www.newegg.com/Product/Product.aspx?Item=N82E16835608004
Antec High Current Pro Platinum 1000W
http://www.amazon.com/dp/B007F9X9OI/
Pair of Monoprice 27" 2560x1440 Monitors
http://www.monoprice.com/products/p...11307&cs_id=1130703&p_id=10489&seq=1&format=2
Displayport Cable for Second Monitor
http://www.amazon.com/dp/B0014BQQI4/
Already Owned
Pioneer SATA DVD
Evoluent Mouse Friendly Keyboard
Evoluent VerticalMouse, Vertical Mouse, ergonomic mouse, ergonomic computer mouse, computer mouse, optical mouse, carpal tunnel syndrome, repetitive stress disorder, RSI
Evoluent VerticalMouse 4
http://www.amazon.com/dp/B0042R6FNI/
AZIO Bluetooth Dongle
http://www.newegg.com/Product/Product.aspx?Item=N82E16833340012
Comments:
The goal of this system is a powerful 6-core with moderate over-clock (for reliability) and similar noise level to a Mac Pro. I'm going to separate out the over-clock details to the post just below this one.
This machine is extremely quiet (Mac Pro level) and stable. I run 4.2Ghz (click here for overclock info). Idle temperature is under 40C at 24C room temperature. Under moderate load it runs in the 50s. Under Prime95 (for testing) it will run high 60s.
Everything working including: Audio, Video (accelerated), Sleep, USB 2 ports, USB 3 ports, SATA ports, eSATA hotswap ports, Intel Ethernet, iStat Sensors, Power Management.
Not working: On-motherboard bluetooth seems to be flaky (works intermittently). I replaced with cheap AZIO dongle.
Installation Steps
1) Choose and install your BIOS.
Use BIOS 4206 for Sandy Bridge-E CPUs:
Core i7-3820
Core i7-3930K
Core i7-3960X
Core i7-3970X
Use Newest BIOS for Ivy-Bridge-E CPUs:
Core i7-4820K
Core i7-4930K
Core i7-4960X
WARNING: There can be problems getting the newer Ivy-Bridge-E CPUs to work properly. If you are doing a new build; it is recommended you stick with one of the Sandy Bridge-E CPUs instead. The 3930K is highly recommended and within 5% of the speed of the newer 4930K. This post will be updated as we find workarounds for the Ivy-Bridge-E issues.
Photos | BIOS Settings
(I have Secure Boot set to Windows because I dual-boot 8.1...it doesn't seem to cause me any problems)
2) Prepare USB stick using UniBeast 3.0.1 and OS X Mavericks 10.9.2 (updated via app store). PLEASE name your USB stick "USB". If you are unfamiliar with UniBeast, follow the steps in "STEP 2: Create a Bootable USB Drive Using UniBeast" here:
tonymacx86 Blog: UniBeast: Install OS X Mavericks on Any Supported Intel-based PC
3) Connect your USB thumb drive to the USB port above the white one on the motherboard. Ensure the hard drive you will install to is connected to one of the 6 SATA ports on the Intel bus (NOT the two far left red ASMedia ports). Or use a PCI SSD like mine.

4) Power on your computer and hold F8. Select the USB stick and type the following when the Chimera screen comes up (just start typing and the box will appear):

Code:
PCIRootUID=0 npci=0x2000 GraphicsEnabler=No -vRead Shilohh's Description of Boot Flags for more information on the boot flags we have chosen to use.
5) Format your hard drive GUID and install the OS as usual. Move your mouse from time to time so your screen doesn't go to sleep.


6) On reboot, hold F8. Select the USB stick and when the Chimera screen comes up select your newly installed Mavericks disk. Then type the following:
Code:
PCIRootUID=0 npci=0x2000 GraphicsEnabler=No -vNOTE: For some video cards you may need to remove GraphicsEnabler=No. If your machine is booting up to gray screen; try this.
7) Go through the normal OS X first time setup steps (user account, etc.).
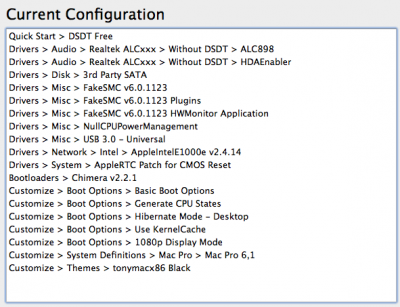
8) Install MultiBeast - Mavericks 6.2.1 as seen in image below. If you have an SSD that requires TRIM support, then check the appropriate option under TRIM.
NOTE: For some video cards you may need to UNCHECK GraphicsEnabler=No. If your machine is booting up to gray screen; try this.
9) Now open your /Extra/org.chameleon.Boot.plist file using TextEdit and make it look like this -- the key change is npci=0x2000:
org.chameleon.Boot.plist
Code:
<?xml version="1.0" encoding="UTF-8"?>
<!DOCTYPE plist PUBLIC "-//Apple//DTD PLIST 1.0//EN" "http://www.apple.com/DTDs/PropertyList-1.0.dtd">
<plist version="1.0">
<dict>
    <key>EthernetBuiltIn</key>
    <string>Yes</string>
    <key>GraphicsEnabler</key>
    <string>No</string>
    <key>IGPEnabler</key>
    <string>Yes</string>
    <key>Kernel</key>
    <string>mach_kernel</string>
    <key>Kernel Flags</key>
    <string>npci=0x2000 PCIRootUID=0</string>
    <key>Legacy Logo</key>
    <string>Yes</string>
    <key>Timeout</key>
    <string>2</string>
        <key>GenerateCStates</key>
        <string>Yes</string>
        <key>GeneratePStates</key>
        <string>Yes</string>
        <key>UseKernelCache</key>
        <string>No</string>
        <key>Graphics Mode</key>
        <string>”2560x1440x32"</string>
</dict>
</plist>
Set your Graphics Mode to the actual resolution of your monitor. For example; 1080p would be "1920x1080x32".
10) You are ready for your first boot. Go to Apple -> Restart... and hold F8 to select your newly installed drive. You can unplug your Unibeast USB stick now.
Congratulations on your new Hackintosh! Shilohh created some awesome bootloader themes just for you; instructions are in the Read Me included in the zip: View attachment Asus_Rampage_IV_Extreme_Themes.zip
With Mavericks; it is VERY IMPORTANT to create your own DSDT. I was unable to use most of my USB ports until I did so. Follow Shilohh's excellent instructions and you will be done in 5 minutes.
For full SpeedStep support, you should go to shilohh's SpeedStep thread next.
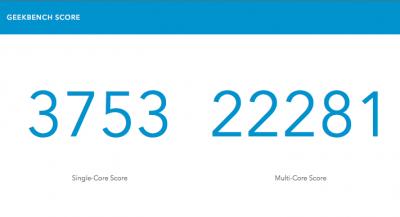
Performance at 4.2Ghz

Audio Working

Boot Drive Disk Performance

Data Drive Performance (2-Disk OS X Stripe)

HIGHLIGHTED THREAD POSTS:
Applying Thermal Compound
Overclocking Safely
Alternate Ethernet Driver (Recommended)
How To Locate Home Directory on Striped Disk Pair
SATA Performance and the ASM1061
Upgrade Procedure
If You Want To Use Intel RAID Mode (For Windows)
Windows 7 Dual Boot Procedure
PunkNugget on CUDA for 3D/Video/Graphics Apps and NVidia Card Selection
What is this EBIOS read error?
Shilohh's Description of Boot Flags
OTHER USEFUL THREADS FOR RAMPAGE IV EXTREME:
i7-4930K - Asus Rampage IV Extreme - 32GB RAM - GTX 770 4GB
Shilohh's New DSDT Thread
Shilohh's New SSDT (Speedstep) Thread
How To Tell If Your Graphics Are Accelerated
FAQ:
Q: Can I use a hard drive or SSD drive instead of a USB stick for UniBeast.
A: I wouldn't do so for this motherboard. I thought I would use an SSD for UniBeast to speed testing (when I was trying things over and over). Unfortunately, depending on what devices I had connected I would get spinning beach balls. Stick with a fast USB stick as instructed in UniBeast instructions.
EDIT LOG:
2012-04-28 : Added my thank you's and donation link...oops!
2012-04-28 : Added heading at top with components.
2012-04-28 : Added BIOS section.
2012-04-28 : Added GPU Cooler.
2012-04-28 : Added cinebench and data drive performance.
2012-04-28 : Added link to many photos of build.
2012-04-29 : Centered and edited the title for clarity.
2012-05-09 : Updated disk speed test graphs using diglloyd tester
2012-05-14 : Updated bluetooth status and added AZIO dongle.
2012-05-14 : Noted change with MultiBeast 4.4.1
2012-05-15 : Confirmed audio working with MultiBeast 4.4.1.
2012-05-15 : Added audio screenshots.
2012-05-25 : Added potential sleep solution.
2012-05-26 : Major update for Unibeast 1.3, MultiBeast 4.5.2, and 10.7.4
2012-05-27 : Fixed instructions for audio with more reliable version.
2012-05-27 : Added FAQ above EDIT LOG.
2012-06-10 : Corrected Accelsior speed numbers. Adjusted quantity of fans/hard drives.
2012-06-10 : Added "Highlighted Thread Posts" section. Fixed MultiBeast version typo.
2012-06-17 : Added optional smbios.plist tweak for processor name display.
2012-09-11 : Fixed 898 audio kext download link.
2012-10-11 : Added comment at top about focus of this build (Lion with ATI).
2012-10-24 : Added link to ggeorge's new thread for Mountain Lion with NVidia.
2013-03-15 : Major update for UniBeast Mountain Lion 1.7.0, MultiBeast - Mountain Lion 5.2.1, and 10.8.3
2013-03-15 : Added additional screenshots for security settings and kextbeast.
2013-03-15 : Updated broken links caused by forum update.
2013-03-15 : Added link to shilohh's excellent DSDT editing thread.
2013-03-15 : Added NVidia specific steps.
2013-03-16 : Added upgrade procedure link.
2013-03-16 : Updated title of build to include 10.8.3.
2013-03-17 : Added link to BIOS settings in appropriate section.
2013-03-17 : Added SATA: RAID mode link.
2013-03-17 : Added NVidia specific DSDT from Shilohh.
2013-03-18 : Added additional pictures and further refined process.
2013-03-20 : Adjustments to boot parameters for NVidia users based on testing with GTX680
2013-03-22 : Added additional images to build process and links to GTX680.
2013-03-22 : Fixed a couple typos.
2013-03-24 : After extensive testing updated BIOS to 3602 with new DSDTs provided by shilohh.
2013-03-28 : Added link for AMD 7xxx users.
2013-03-30 : Updated for sleep. Adjusted text regarding ATI for clarity.
2013-09-01 : Added shilohh's cool new bootloader themes.
2013-09-15 : Updated "stable since" to 1.5 years. Put in 10.8.5 warning.
2013-09-29 : Major update for 10.8.5 with Unibeast 2.1.1 and MultiBeast 5.5.2
2013-10-01 : Added Shilohh's Description of Boot Flags to highlighted posts and main guide.
2013-10-07 : Added VT-d BIOS notes and GraphicsEnabler notes based on user feedback.
2013-11-05 : Changed link to shilohh's new DSDT guide and added link to alternate Ethernet driver.
2014-03-09 : Updated "daily workhorse" date at top.
2014-03-09 : Updated for Mavericks 10.9.2 (Power Management! Yay!!!)
2014-03-10 : Updated BIOS notes for Sandy Bridge-E vs. Ivy Bridge-E
2014-03-12 : Fixed DSDT instructions.
2014-03-16 : Added shilohh's SpeedStep thread links.
2014-03-16 : Added Ivy-Bridge warning.
2014-04-19 : Added links to Shilohh's new build guide.
2015-03-15 : Updated "daily workhorse" date at top.
2016-12-01 : Fixed embedded images.
2016-12-01 : Updated "daily workhorse" date at top.
2017-12-11 : Updated "daily workhorse" date at top.
2017-12-11 : Fixed broken images.
2018-09-04 : Updated "daily workhorse" date at top.
Last edited:


