
- Joined
- Sep 18, 2011
- Messages
- 492
- Motherboard
- Gigabyte GA-X99-UD4
- CPU
- i7-5820K
- Graphics
- GTX 1080 Ti
- Mac
- Classic Mac
- Mobile Phone
*Now Updated 4/08/2016*
Here is a full install guide using Unibeast / Clover to install OS X El Capitan 10.11.x on your custom built Haswell E X99 Computer! I made this guide from using instructions gathered from other members on the TonyMac forums. Clover / El Capitan works really good on this system, even better than Yosemite using clover!
What's working:
Full CPU performance, Ethernet, GTX 970, USB, Drives, Audio, Everything!!!! 100% on 10.11.2!!!! (It also appears this guide works 100% on 10.11.4 including audio confirmed by tonymacx86 member: jtreminio)
The build:
GIGABYTE GA-X99-UD4 (Motherboard)
Intel Core i7 5820k Haswell E Processor (Cpu)
16GB Corsair Vengence DDR4 2400 RAM (Memory)
EVGA GTX 970 SSC 4GB (Graphics Card)
Sandisk Extreme ii 120GB SSD (El Capitan drive)
Samsung 840 Evo 120GB SSD (Windows Drive for dual boot)
(3) Western Digital Caviar Black 1 TB (Hard Drives)
Old Maxtor 500gb Drive (still works)
Antec DF-85 (Computer Case)
EVGA SuperNOVA 750 B2 (Power Supply)
Cooler Master Hyper 212 Evo (Cpu Cooler)
Samsung CD / DVD-RW Burner With LightScribe (for when I rarely need a cd/dvd drive)
Requirements for this install:
An empty flash drive for Unibeast + an already working copy of OS X as you most likely need to edit your unibeast drive during this install. I recommend 2-3 flash drives and put unibeast on each with 1 slight difference on each drive if you don't have 24/7 access to a mac. Put 1 drive with el capitan and clover. Another drive with clover set to boot el capitan, with a slight variation. The last drive with Chimera bootloader / yosemite to save the day. Just in case you have to reinstall and can't boot from your osx install anymore. (I explain this later in the guide. Please read the whole guide before attempting to install).
Highly Recommended for this install:
USB Audio Device (I have bought a Sarbent USB Audio Device for 7.99 to enable audio on this build) for audio just in case onboard audio goes out (it can fairly easily if you change anything)
Pre installation requirements:
Go into bios, use "load optimized defaults" , enable EHCI hand off
Save.
Thats it.
Bios settings not required, but recommended for this install:
go into bios under frequency settings set "cpu boost 5820k to 4.3 ghz"
set memory settings xmp memory profile to "profile 1" or "profile 2" (depending on your memory speed)
this will overclock your cpu and memory, you may or may not want to do that. i reccommend it. computer definetly runs better smoother and much faster with overclocking. It's automatic and the motherboard takes care of all the voltage settings. Use 4.3ghz for your cpu and profile 1 or profile 2 depending on the speed of your memory. I use profile 1 because I am using 2400mhz memory.
Installation (Unibeast):
Use the tonymacx86 method to install "El Capitan" to a USB Flash Drive using Unibeast. You will need to make an account on tonymacx86 to be able to download Unibeast. It is required for this install!
Here is the link to the guide to make the unibeast flash drive:
http://www.tonymacx86.com/el-capita...-el-capitan-any-supported-intel-based-pc.html
Step 1.
Install unibeast / El Capitan To flash Drive using the guide from step 1-2 (don't need step 3 as I already walked you through that)
Step 2.
After installing Unibeast / El capitan flash drive you will need to get "EFI Mount 2 and Clover Configurator". Get Clover Configurator from the Downloads section > Community Software @ Tonymacx86.com Link: http://www.tonymacx86.com/downloads.php?do=cat&id=10 (must be logged in to view this page)
Get EFI Mount 2 from Bob Roche's youtube video description, the link is right after "Download All Files", its called YosemiteCloverFiles.zip:
(this is not the same efi mount as the one hosted by tonymacx86, this tells you which drive is which, which is very helpful) (bob roche's zip file does have a version of clover configurator, but tonymacx86 has a newer, better version. Use tonymac's!)
Step 3
Copy EFI Mounter 2 / Clover Configurator to Your Applications. Open EFI Mounter and mount the EFI Partition for your newly created Unibeast USB Drive, Select the disk number pertaining to the name of your USB Drive. Once that is mounted you can open the disk, go to folder EFI > Clover and don't do anything, keep the window open.
Step 4
Now go to this link: http://www.tonymacx86.com/threads/good-news-for-x99-10-11-haswell-e-el-capitan.178425/page-4 check the first post is a post by member "LokiCat", download all the files he has supplied in his post. You need them right now.
(Next step is optional, only required if you use more than 2 pci-e devices, but I'd still recommend it)
Go to this link: http://www.tonymacx86.com/threads/good-news-for-x99-10-11-haswell-e-el-capitan.178425/page-21 and click on the link in the 1st post by "encierro" download Test2.efi from that link, you will need to use it to boot clover if you use more than 2 pci-e devices (I do)
Step 5
Copy config.plist from lokicat's files to the EFI > Clover folder on your USB Drive and overwrite it. Copy all the kexts from kexts.zip from lokicat's files to folders EFI > Clover > kexts > 10.10 and 10.11 on your usb (copy kexts to both folders, delete existing kexts in there first). Last copy lokicat's ssdt.aml to EFI > Clover > ACPI > patched
Make sure these files are in your /EFI/ClOVER/drivers64UEFI folder on the usb drive:
Test2.efi (optional, required if using more than 2 pci-e cards)
OsxAptioFix2Drv-64.efi (if this doesn't work use OsxAptioFixDrv-64.efi)
EmuVariableUefi-64.efi
HFSPlus.efi
OsxFatBinaryDrv-64.efi
FSInject-64.efi
If something is not present then use Clover Configurator, click on "Install Drivers" at the bottom of the side menu. Anything greyed out is installed, anything in white is not. Just click on the drivers you need. Uninstall VBoxHFS and install HFSPlus UEFI, as you won't want VboxHFS, and HFSPlus might be the only one you don't have (aside from Test2.efi which you can only get from the link I posted).
Step 6
Now use Clover Configurator app to open Config.plist go to boot section and untick nvda_drv=1 and tick nv_disable=1, Go to GUI section change "Scan" section to "Auto=Yes" set theme to "tonymacx86" (best clover theme imo) go to SMBIOS section and click the magic wand icon, select the Imac icon, then from the dropdown menu select Mac Pro 6,1, generate serials using shake buttons. Then press OK. Now Save Config.plist.
Now you can reboot.
Your ready to install El Capitan!!!!
Step 8
Boot El capitan installer from the usb drive and follow step 4 of the tonymacx86 guide to see how to partition your drive and install mac OS X.
http://www.tonymacx86.com/el-capita...-el-capitan-any-supported-intel-based-pc.html
After it is installed, this is where things get tricky, I'll explain this now:
You may be lucky so just reboot from usb and try to boot your new El Capitan installation (If it boots just skip this part)
If it does not boot, most likeley the file that is preventing OS X to boot is either a lack of OsxAptioFix2Drv or OsxAptioFixDrv. You'll need one of these depending on what system you are using, but you cannot use both at the same time. Mine boots with OsxAptioFix2Drv but does not boot with OsxAptioFixDrv, but your system might be the other way around.
The easiest way to get OsxAptioFix2Drv or OsxAptioFixDrv file is to mount the efi partition with a working copy of clover, and open config.plist with Clover configurator. Go all the way down to "install drivers" on the sidemenu. Either OsxAptioFix2Drv or OsxAptioFixDrv will be grey (meaning it is installed) if it won't boot at any time, just unclick the one that is installed and install the other one.
If you have problems booting clover from clover usb drives (I had many) and need to edit your settings, make 1 more flash drive with unibeast and install Chimera / Yosemite to it. My guide on that here: http://www.tonymacx86.com/yosemite-...mite-10-10-x-full-temp-guide-100-working.html After installing El Capitan, you risk not being able to boot it at all if something goes wrong. You would need to go to another mac to edit your usb drive and try to make it bootable, or have another version of osx installed with a separate bootloader. In a lot of cases but that may not be very easy. Having a chimera / yosemite usb drive as backup is great, since you can always reinstall yosemite if worse comes to worst. Then you can edit your usb drives from yosemite, re install el capitan and try again. The chimera / yosemite drive always boots and installs, it's reliable.
I hope you get El Capitan to boot from usb using my guide, every computer setup is slightly different so it might take some trial and error. Once you have it booting, its time for the next step!!!!
Installing Nvidia Graphics (Web Drivers)
Now that you have booted into OS X you need to get the Nvidia web drivers for 10.11.2. So just go to this link:
http://www.nvidia.com/download/driverResults.aspx/96651/en-us
Download the drivers and before installation do this:
Mount your EFI Partition (with efi mount 2) from your USB Flash Drive, And open Config.Plist with Clover Configurator (You will need to redownload both of those to your el capitan install probably) now go to the boot section and untick nv_disable=1 and tick nvda_drv=1
now save, and install web drivers and reboot from USB!
Now you should have a fully working El capitan install, minus audio! Before doing that lets get Clover installed to your system drive so you no longer need your usb stick!
Post Install (Get clover to boot from system drive):
Download the official clover bootloader from here: http://sourceforge.net/projects/cloverefiboot/ (this gives you the newest one, currently 3330, unibeast usb only has 3320)
Download the tonymacx86 clover theme: http://www.tonymacx86.com/bootloaders/128018-tonymacx86-clover-theme.html
Now install clover as pictured in the guide from Lokicat http://www.tonymacx86.com/el-capita...od-news-x99-10-11-haswell-e-el-capitan-4.html except I use OsxAptioFix2Drv-64 and EmuVariableUefi-64 only. If OsxAptioFix2Drv-64 doesn't boot then use OsxAptioFixDrv-64
Copy all of loki cat's files from that post to the efi partition of your system drive (including his config.plist, and his ssdt) config goes in the efi/clover folder and ssdt goes in efi/clover/acpi/patched
Copy Test2.efi from the link in the 1st post @ http://www.tonymacx86.com/el-capita...d-news-x99-10-11-haswell-e-el-capitan-21.html to /EFI/ClOVER/drivers64UEFI folder if you use more than 2 pci-e devices (I do)
Copy the tonymacx86 clover theme (whole folder) to efi/clover/themes
You want to now change the a few things in his config.plist using clover configurator: If your overclocking go to cpu section, change frequency to 4,300 if you followed my overclocking guide, this will display correct cpu speed. Go to GUI section change "Scan" section to "Auto=Yes" set theme to "tonymacx86" (best clover theme imo). If you have any drives you want to hide from bootloader screen enter their names in the "hide volume" section. (use the + sign to add each drive you want to hide) Check "enabled" box under "Mouse" section (to use a mouse in clover)
Next go to SMBIOS section and click the magic wand. Click on the mac pro icon, change the mac pro version to MacPro 6,1. Use shake buttons to generate a unique serial (it was already a 6,1 in the config.plist, but he said not to use his serial, this gives you your own unique serial). Now you can save config.plist, but don't reboot yet. In order to use mac pro 6.1 you need to do 1 more step:
Patch AppleGraphicsControl.kext by applying fix #4 in the following post (otherwise it will boot to a black or white screen with 6,1 definition):
http://www.tonymacx86.com/graphics/...ver-install-loading-problems.html#post1016777
Last, Make sure these files are in your /EFI/ClOVER/drivers64UEFI folder on the installation drive:
Test2.efi (optional, required if using more than 2 pci-e cards)
OsxAptioFix2Drv-64.efi (if this doesn't work use OsxAptioFixDrv-64.efi)
EmuVariableUefi-64.efi
HFSPlus.efi
OsxFatBinaryDrv-64.efi
FSInject-64.efi
If something is not present then use Clover Configurator, click on "Install Drivers" at the bottom of the side menu. Anything greyed out is installed, anything in white is not. Just click on the drivers you need. Uninstall VBoxHFS and install HFSPlus UEFI, as you won't want VboxHFS, and HFSPlus might be the only one you don't have (aside from Test2.efi which you can only get from the link I posted).
El Capitan is now bootable from system drive!!! Reboot and cross your fingers!!!
If you are dual booting with Windows (like me) here is how to do it using clover
Open config.plist in clover configurator. Go to boot section, change the drop down menu that says "Legacy" under it to "LegacyBiosDefault"
Go to Install drivers section on bottom left, and add the "NTFS" driver.
You can now boot all bootable windows drives!
Last is audio (I now have 100% working!)
1. Copy My attatched AppleHDA.Kext (in zip file) to /system/library/extensions/ (This is the kext from the original mavericks 10.9.5 installer)
2. Download Multibeast for Mavericks Here: http://www.tonymacx86.com/downloads.php?do=file&id=255
3. Install Realtek ALC 1150 audio from that version of multibeast (Check "optional EFI installed bootloader support" to install audio without installing Chimera)
4. Download Toleda's ssdt from here: https://github.com/toleda/audio_ALCInjection/blob/master/ssdt_hdef/ssdt_hdef-1-x99_alza.zip and copy it to /Clover/ACPI/Patched in your efi partition. if an ssdt is already present rename it to ssdt-1.aml if there is no ssdt then just call it ssdt.aml. if there is already an ssdt.aml and ssdt-1.aml name it to ssdt-2.aml (leave no spaces between ssdt's) (it is explained in the guide file downloaded from that link)
5. Restart
6. Use audio_alc_x99-hda-100_patch.command (In zip file attatched) (efi partition may need to be mounted, idk if mine was).
7. Restart
8. Audio works now (Really works!)
Guide Thanks to Toleda! (My version is his guide, just showing how I did it in simpler language)
Notes
Now system should be fully working with graphics, internet, and audio! Lokicat has confirmed my USB 3.0 is working (before I thought it didn't work), so usb is good!
Post install things to do:
1. Go to Applications > Utilities > Terminal enter 'sudo trimforce enable' this will enable Trim if using an SSD Drive (Highly recommended, SSD only)
2. Use Carbon Copy Cloner to back up your OS X Install. Partition the drive you installed El Capitan into 2 partitions, now use carbon copy cloner to clone your working drive to the second empty partition. That way If you ever mess up your system drive, you always have a clean bootable backup (which you can always update once you get everything installed how you like). You won't need to copy the boot loader to that partition, as clover is installed to the efi partition, and will boot either partition (if it's the same drive). If you want to clone it to a separate drive make sure its going to be the only thing on that drive and you will need to copy the efi partition manually. (Just use EFI mounter 2, mount efi partition of system drive, copy the efi folder to desktop, mount efi partition of backup, paste, done). I highly recommend Carbon Copy Cloner. It saves a lot of time!
How To Optimize OS X!
Go to system Preferences > Mission Control, untick all check boxes. turn dashboard off (may require log out / log back in)
Go to system preferences > Security & Privacy, Under General > untick all check boxes (may require clicking lock at bottom left of box), fill in bubble on allow apps downloaded from anywhere (now system boots to desktop and auto logs in without needing password) Under Privacy tab > Untick enable location services
Go To system preferences > spotlight, untick all check boxes in search results tab, then go to privacy tab, drag all drives into that tab. This will turn spotlight off, so you can't search, but will make computer faster. If you want to keep search function, don't do this, but if you want faster computer. Turn it all off!
Go to system preferences > notifications, untick everything, then go to notification panel on the top right of screen, and click the grey box at the bottom. Drag any apps with the red coicon next to them to the green icon section. That will turn off all notifications for apps (speeds up computer a bit)
Go To System Preferences > Energy Saver, turn display off after: Never (drag bar all the way to right) untick all check boxes, especially untick put hard drives to sleep
Go to System Preferences > Bluetooth, turn bluetooth off (unless you need it then turn bluetooth on)
Go to System Preferences > App Store, untick automatically check for updates
Thats about the extent of it,
Good luck!!!!
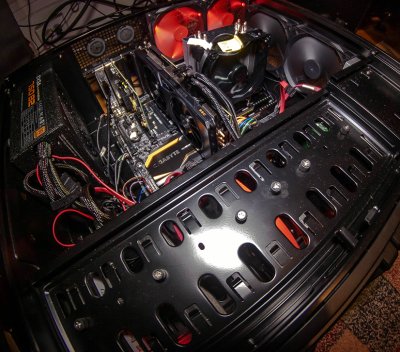
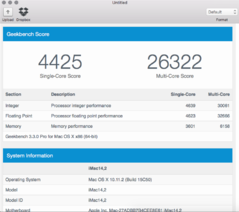
(Also attached photo's of my computer build / El Capitan Geekbench Score)
*Bonus*
Link to install 10.11.4 courtesy of Tonymacx86 member: Sunman
http://www.tonymacx86.com/el-capitan-desktop-support/189325-success-ga-x99-ud4-5820k-10-11-4-a.html
Here is a full install guide using Unibeast / Clover to install OS X El Capitan 10.11.x on your custom built Haswell E X99 Computer! I made this guide from using instructions gathered from other members on the TonyMac forums. Clover / El Capitan works really good on this system, even better than Yosemite using clover!
What's working:
Full CPU performance, Ethernet, GTX 970, USB, Drives, Audio, Everything!!!! 100% on 10.11.2!!!! (It also appears this guide works 100% on 10.11.4 including audio confirmed by tonymacx86 member: jtreminio)
The build:
GIGABYTE GA-X99-UD4 (Motherboard)
Intel Core i7 5820k Haswell E Processor (Cpu)
16GB Corsair Vengence DDR4 2400 RAM (Memory)
EVGA GTX 970 SSC 4GB (Graphics Card)
Sandisk Extreme ii 120GB SSD (El Capitan drive)
Samsung 840 Evo 120GB SSD (Windows Drive for dual boot)
(3) Western Digital Caviar Black 1 TB (Hard Drives)
Old Maxtor 500gb Drive (still works)
Antec DF-85 (Computer Case)
EVGA SuperNOVA 750 B2 (Power Supply)
Cooler Master Hyper 212 Evo (Cpu Cooler)
Samsung CD / DVD-RW Burner With LightScribe (for when I rarely need a cd/dvd drive)
Requirements for this install:
An empty flash drive for Unibeast + an already working copy of OS X as you most likely need to edit your unibeast drive during this install. I recommend 2-3 flash drives and put unibeast on each with 1 slight difference on each drive if you don't have 24/7 access to a mac. Put 1 drive with el capitan and clover. Another drive with clover set to boot el capitan, with a slight variation. The last drive with Chimera bootloader / yosemite to save the day. Just in case you have to reinstall and can't boot from your osx install anymore. (I explain this later in the guide. Please read the whole guide before attempting to install).
Highly Recommended for this install:
USB Audio Device (I have bought a Sarbent USB Audio Device for 7.99 to enable audio on this build) for audio just in case onboard audio goes out (it can fairly easily if you change anything)
Pre installation requirements:
Go into bios, use "load optimized defaults" , enable EHCI hand off
Save.
Thats it.
Bios settings not required, but recommended for this install:
go into bios under frequency settings set "cpu boost 5820k to 4.3 ghz"
set memory settings xmp memory profile to "profile 1" or "profile 2" (depending on your memory speed)
this will overclock your cpu and memory, you may or may not want to do that. i reccommend it. computer definetly runs better smoother and much faster with overclocking. It's automatic and the motherboard takes care of all the voltage settings. Use 4.3ghz for your cpu and profile 1 or profile 2 depending on the speed of your memory. I use profile 1 because I am using 2400mhz memory.
Installation (Unibeast):
Use the tonymacx86 method to install "El Capitan" to a USB Flash Drive using Unibeast. You will need to make an account on tonymacx86 to be able to download Unibeast. It is required for this install!
Here is the link to the guide to make the unibeast flash drive:
http://www.tonymacx86.com/el-capita...-el-capitan-any-supported-intel-based-pc.html
Step 1.
Install unibeast / El Capitan To flash Drive using the guide from step 1-2 (don't need step 3 as I already walked you through that)
Step 2.
After installing Unibeast / El capitan flash drive you will need to get "EFI Mount 2 and Clover Configurator". Get Clover Configurator from the Downloads section > Community Software @ Tonymacx86.com Link: http://www.tonymacx86.com/downloads.php?do=cat&id=10 (must be logged in to view this page)
Get EFI Mount 2 from Bob Roche's youtube video description, the link is right after "Download All Files", its called YosemiteCloverFiles.zip:
Step 3
Copy EFI Mounter 2 / Clover Configurator to Your Applications. Open EFI Mounter and mount the EFI Partition for your newly created Unibeast USB Drive, Select the disk number pertaining to the name of your USB Drive. Once that is mounted you can open the disk, go to folder EFI > Clover and don't do anything, keep the window open.
Step 4
Now go to this link: http://www.tonymacx86.com/threads/good-news-for-x99-10-11-haswell-e-el-capitan.178425/page-4 check the first post is a post by member "LokiCat", download all the files he has supplied in his post. You need them right now.
(Next step is optional, only required if you use more than 2 pci-e devices, but I'd still recommend it)
Go to this link: http://www.tonymacx86.com/threads/good-news-for-x99-10-11-haswell-e-el-capitan.178425/page-21 and click on the link in the 1st post by "encierro" download Test2.efi from that link, you will need to use it to boot clover if you use more than 2 pci-e devices (I do)
Step 5
Copy config.plist from lokicat's files to the EFI > Clover folder on your USB Drive and overwrite it. Copy all the kexts from kexts.zip from lokicat's files to folders EFI > Clover > kexts > 10.10 and 10.11 on your usb (copy kexts to both folders, delete existing kexts in there first). Last copy lokicat's ssdt.aml to EFI > Clover > ACPI > patched
Make sure these files are in your /EFI/ClOVER/drivers64UEFI folder on the usb drive:
Test2.efi (optional, required if using more than 2 pci-e cards)
OsxAptioFix2Drv-64.efi (if this doesn't work use OsxAptioFixDrv-64.efi)
EmuVariableUefi-64.efi
HFSPlus.efi
OsxFatBinaryDrv-64.efi
FSInject-64.efi
If something is not present then use Clover Configurator, click on "Install Drivers" at the bottom of the side menu. Anything greyed out is installed, anything in white is not. Just click on the drivers you need. Uninstall VBoxHFS and install HFSPlus UEFI, as you won't want VboxHFS, and HFSPlus might be the only one you don't have (aside from Test2.efi which you can only get from the link I posted).
Step 6
Now use Clover Configurator app to open Config.plist go to boot section and untick nvda_drv=1 and tick nv_disable=1, Go to GUI section change "Scan" section to "Auto=Yes" set theme to "tonymacx86" (best clover theme imo) go to SMBIOS section and click the magic wand icon, select the Imac icon, then from the dropdown menu select Mac Pro 6,1, generate serials using shake buttons. Then press OK. Now Save Config.plist.
Now you can reboot.
Your ready to install El Capitan!!!!
Step 8
Boot El capitan installer from the usb drive and follow step 4 of the tonymacx86 guide to see how to partition your drive and install mac OS X.
http://www.tonymacx86.com/el-capita...-el-capitan-any-supported-intel-based-pc.html
After it is installed, this is where things get tricky, I'll explain this now:
You may be lucky so just reboot from usb and try to boot your new El Capitan installation (If it boots just skip this part)
If it does not boot, most likeley the file that is preventing OS X to boot is either a lack of OsxAptioFix2Drv or OsxAptioFixDrv. You'll need one of these depending on what system you are using, but you cannot use both at the same time. Mine boots with OsxAptioFix2Drv but does not boot with OsxAptioFixDrv, but your system might be the other way around.
The easiest way to get OsxAptioFix2Drv or OsxAptioFixDrv file is to mount the efi partition with a working copy of clover, and open config.plist with Clover configurator. Go all the way down to "install drivers" on the sidemenu. Either OsxAptioFix2Drv or OsxAptioFixDrv will be grey (meaning it is installed) if it won't boot at any time, just unclick the one that is installed and install the other one.
If you have problems booting clover from clover usb drives (I had many) and need to edit your settings, make 1 more flash drive with unibeast and install Chimera / Yosemite to it. My guide on that here: http://www.tonymacx86.com/yosemite-...mite-10-10-x-full-temp-guide-100-working.html After installing El Capitan, you risk not being able to boot it at all if something goes wrong. You would need to go to another mac to edit your usb drive and try to make it bootable, or have another version of osx installed with a separate bootloader. In a lot of cases but that may not be very easy. Having a chimera / yosemite usb drive as backup is great, since you can always reinstall yosemite if worse comes to worst. Then you can edit your usb drives from yosemite, re install el capitan and try again. The chimera / yosemite drive always boots and installs, it's reliable.
I hope you get El Capitan to boot from usb using my guide, every computer setup is slightly different so it might take some trial and error. Once you have it booting, its time for the next step!!!!
Installing Nvidia Graphics (Web Drivers)
Now that you have booted into OS X you need to get the Nvidia web drivers for 10.11.2. So just go to this link:
http://www.nvidia.com/download/driverResults.aspx/96651/en-us
Download the drivers and before installation do this:
Mount your EFI Partition (with efi mount 2) from your USB Flash Drive, And open Config.Plist with Clover Configurator (You will need to redownload both of those to your el capitan install probably) now go to the boot section and untick nv_disable=1 and tick nvda_drv=1
now save, and install web drivers and reboot from USB!
Now you should have a fully working El capitan install, minus audio! Before doing that lets get Clover installed to your system drive so you no longer need your usb stick!
Post Install (Get clover to boot from system drive):
Download the official clover bootloader from here: http://sourceforge.net/projects/cloverefiboot/ (this gives you the newest one, currently 3330, unibeast usb only has 3320)
Download the tonymacx86 clover theme: http://www.tonymacx86.com/bootloaders/128018-tonymacx86-clover-theme.html
Now install clover as pictured in the guide from Lokicat http://www.tonymacx86.com/el-capita...od-news-x99-10-11-haswell-e-el-capitan-4.html except I use OsxAptioFix2Drv-64 and EmuVariableUefi-64 only. If OsxAptioFix2Drv-64 doesn't boot then use OsxAptioFixDrv-64
Copy all of loki cat's files from that post to the efi partition of your system drive (including his config.plist, and his ssdt) config goes in the efi/clover folder and ssdt goes in efi/clover/acpi/patched
Copy Test2.efi from the link in the 1st post @ http://www.tonymacx86.com/el-capita...d-news-x99-10-11-haswell-e-el-capitan-21.html to /EFI/ClOVER/drivers64UEFI folder if you use more than 2 pci-e devices (I do)
Copy the tonymacx86 clover theme (whole folder) to efi/clover/themes
You want to now change the a few things in his config.plist using clover configurator: If your overclocking go to cpu section, change frequency to 4,300 if you followed my overclocking guide, this will display correct cpu speed. Go to GUI section change "Scan" section to "Auto=Yes" set theme to "tonymacx86" (best clover theme imo). If you have any drives you want to hide from bootloader screen enter their names in the "hide volume" section. (use the + sign to add each drive you want to hide) Check "enabled" box under "Mouse" section (to use a mouse in clover)
Next go to SMBIOS section and click the magic wand. Click on the mac pro icon, change the mac pro version to MacPro 6,1. Use shake buttons to generate a unique serial (it was already a 6,1 in the config.plist, but he said not to use his serial, this gives you your own unique serial). Now you can save config.plist, but don't reboot yet. In order to use mac pro 6.1 you need to do 1 more step:
Patch AppleGraphicsControl.kext by applying fix #4 in the following post (otherwise it will boot to a black or white screen with 6,1 definition):
http://www.tonymacx86.com/graphics/...ver-install-loading-problems.html#post1016777
Last, Make sure these files are in your /EFI/ClOVER/drivers64UEFI folder on the installation drive:
Test2.efi (optional, required if using more than 2 pci-e cards)
OsxAptioFix2Drv-64.efi (if this doesn't work use OsxAptioFixDrv-64.efi)
EmuVariableUefi-64.efi
HFSPlus.efi
OsxFatBinaryDrv-64.efi
FSInject-64.efi
If something is not present then use Clover Configurator, click on "Install Drivers" at the bottom of the side menu. Anything greyed out is installed, anything in white is not. Just click on the drivers you need. Uninstall VBoxHFS and install HFSPlus UEFI, as you won't want VboxHFS, and HFSPlus might be the only one you don't have (aside from Test2.efi which you can only get from the link I posted).
El Capitan is now bootable from system drive!!! Reboot and cross your fingers!!!
If you are dual booting with Windows (like me) here is how to do it using clover
Open config.plist in clover configurator. Go to boot section, change the drop down menu that says "Legacy" under it to "LegacyBiosDefault"
Go to Install drivers section on bottom left, and add the "NTFS" driver.
You can now boot all bootable windows drives!
Last is audio (I now have 100% working!)
1. Copy My attatched AppleHDA.Kext (in zip file) to /system/library/extensions/ (This is the kext from the original mavericks 10.9.5 installer)
2. Download Multibeast for Mavericks Here: http://www.tonymacx86.com/downloads.php?do=file&id=255
3. Install Realtek ALC 1150 audio from that version of multibeast (Check "optional EFI installed bootloader support" to install audio without installing Chimera)
4. Download Toleda's ssdt from here: https://github.com/toleda/audio_ALCInjection/blob/master/ssdt_hdef/ssdt_hdef-1-x99_alza.zip and copy it to /Clover/ACPI/Patched in your efi partition. if an ssdt is already present rename it to ssdt-1.aml if there is no ssdt then just call it ssdt.aml. if there is already an ssdt.aml and ssdt-1.aml name it to ssdt-2.aml (leave no spaces between ssdt's) (it is explained in the guide file downloaded from that link)
5. Restart
6. Use audio_alc_x99-hda-100_patch.command (In zip file attatched) (efi partition may need to be mounted, idk if mine was).
7. Restart
8. Audio works now (Really works!)
Guide Thanks to Toleda! (My version is his guide, just showing how I did it in simpler language)
Notes
Now system should be fully working with graphics, internet, and audio! Lokicat has confirmed my USB 3.0 is working (before I thought it didn't work), so usb is good!
Post install things to do:
1. Go to Applications > Utilities > Terminal enter 'sudo trimforce enable' this will enable Trim if using an SSD Drive (Highly recommended, SSD only)
2. Use Carbon Copy Cloner to back up your OS X Install. Partition the drive you installed El Capitan into 2 partitions, now use carbon copy cloner to clone your working drive to the second empty partition. That way If you ever mess up your system drive, you always have a clean bootable backup (which you can always update once you get everything installed how you like). You won't need to copy the boot loader to that partition, as clover is installed to the efi partition, and will boot either partition (if it's the same drive). If you want to clone it to a separate drive make sure its going to be the only thing on that drive and you will need to copy the efi partition manually. (Just use EFI mounter 2, mount efi partition of system drive, copy the efi folder to desktop, mount efi partition of backup, paste, done). I highly recommend Carbon Copy Cloner. It saves a lot of time!
How To Optimize OS X!
Go to system Preferences > Mission Control, untick all check boxes. turn dashboard off (may require log out / log back in)
Go to system preferences > Security & Privacy, Under General > untick all check boxes (may require clicking lock at bottom left of box), fill in bubble on allow apps downloaded from anywhere (now system boots to desktop and auto logs in without needing password) Under Privacy tab > Untick enable location services
Go To system preferences > spotlight, untick all check boxes in search results tab, then go to privacy tab, drag all drives into that tab. This will turn spotlight off, so you can't search, but will make computer faster. If you want to keep search function, don't do this, but if you want faster computer. Turn it all off!
Go to system preferences > notifications, untick everything, then go to notification panel on the top right of screen, and click the grey box at the bottom. Drag any apps with the red coicon next to them to the green icon section. That will turn off all notifications for apps (speeds up computer a bit)
Go To System Preferences > Energy Saver, turn display off after: Never (drag bar all the way to right) untick all check boxes, especially untick put hard drives to sleep
Go to System Preferences > Bluetooth, turn bluetooth off (unless you need it then turn bluetooth on)
Go to System Preferences > App Store, untick automatically check for updates
Thats about the extent of it,
Good luck!!!!
(Also attached photo's of my computer build / El Capitan Geekbench Score)
*Bonus*
Link to install 10.11.4 courtesy of Tonymacx86 member: Sunman
http://www.tonymacx86.com/el-capitan-desktop-support/189325-success-ga-x99-ud4-5820k-10-11-4-a.html
Attachments
Last edited: