
- Joined
- May 27, 2012
- Messages
- 759
- Motherboard
- DQ77KB
- CPU
- i7-3770S
- Graphics
- HD4000
- Mac
- Mobile Phone
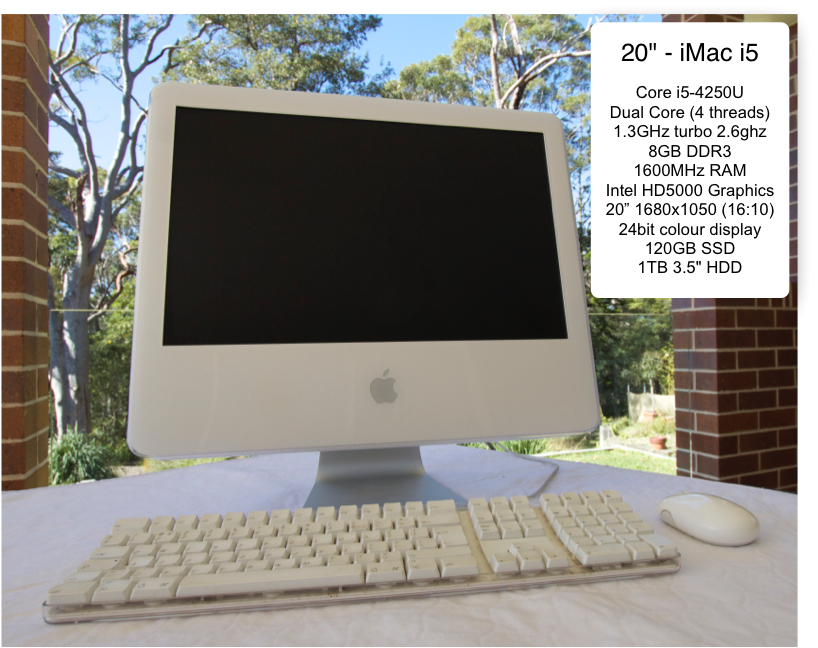
Kiwi's 20" iMac i5
Introduction
This build started almost a year ago when I purchased a working Apple iMac G5/1.8 20-Inch (A1076). This was the first iMac to have a G5 processor, and the direct successor to the iconic lampshade iMac.
It is also notable as being the only iMac where you remove the back of the machine to gain internal access, all subsequent iMac’s required you to remove the front cover and LCD to gain access to the components.
This project upgrades the machine to a NUC D54250WYK with a Haswell i5-4250U with HD5000 graphics. The other components include The 8GB Ram, WIFI, a 120GB SSD, and a 1TB 3.5” HDD. The LCD is 20" 1680x1050 16:10 aspect ratio with 24 bit colour.
The Haswell NUC was required for this build. It can be powered from 12 volts, ant In terms of thickness it just fits, I don’t think the previous generation would fit.
My key goals were to preserve as much as possible the original components and retain as much as possible the native functionality. With some exceptions I think I have achieved my goals, overall I think the results are worth it.
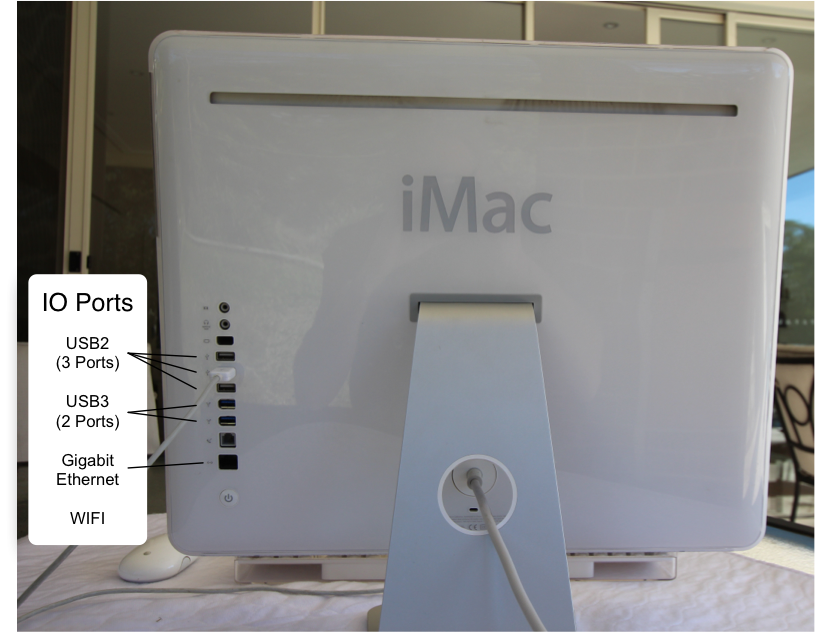
Here is the picture from the rear
KEY FEATURES ARE:
LCD Conversion
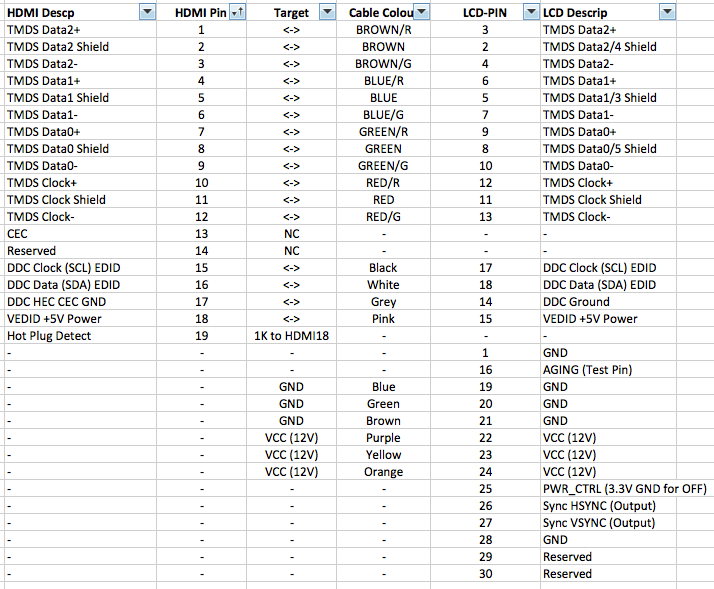
One of the critical challanges in this type of project is the conversion of the LCD screen for use by a normal computer port. Thankfully the LCD in this model use a TDMS interface making it possible to simply re-wire. The bad news was that the connector used was very different to the iMac G4, so the Dremel Junkie DVI method would not work.
Here is the connector on the motherboard, it is a push fit connector rather than use pins
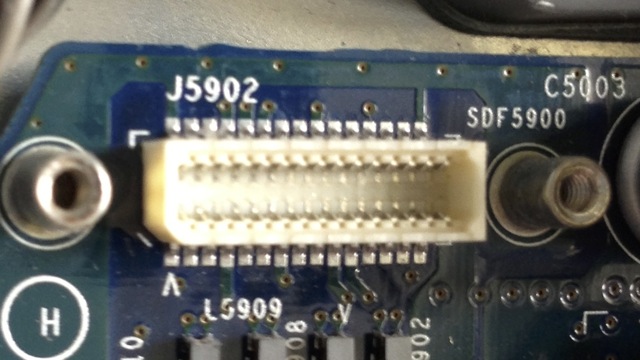
Removing the back of the connector revealed
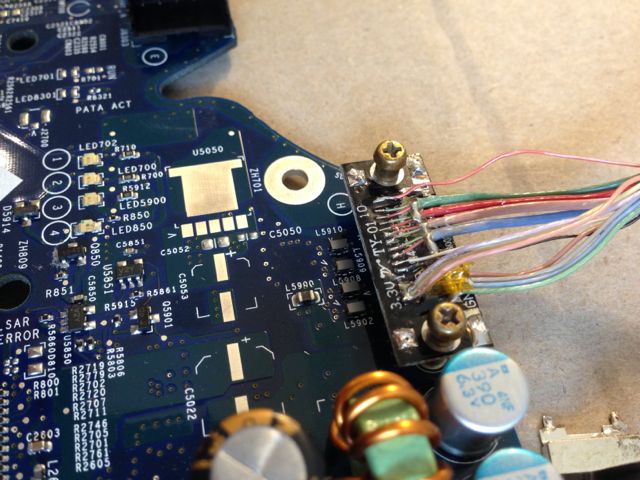
The solution came about in the form of a female HDMI connector, designed for soldering to
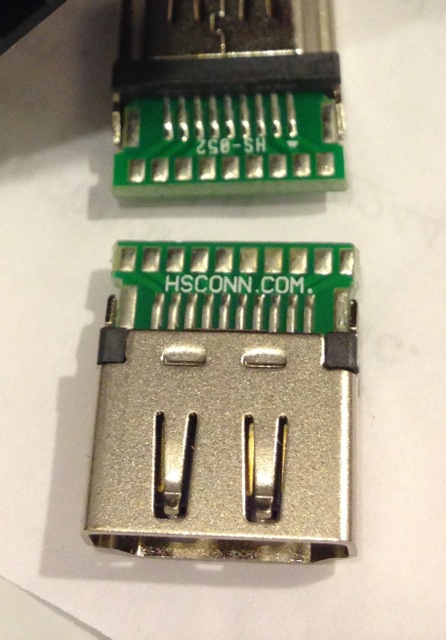
Thus with a bit of time and patience with a soldering iron
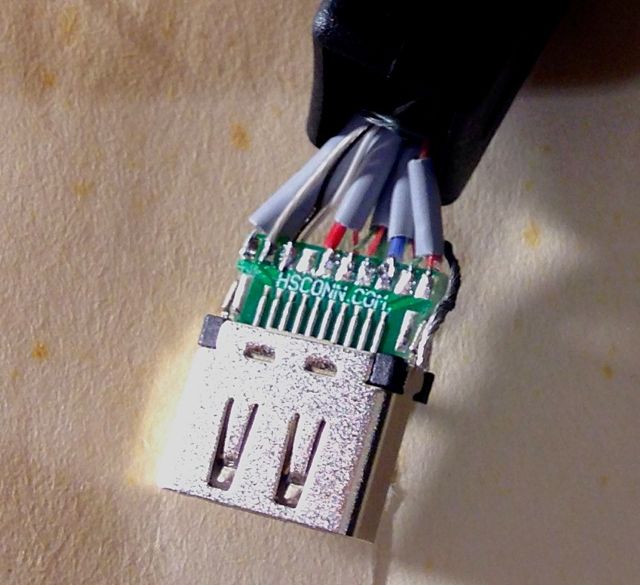
And here is the wiring guide
Here is a picture from first power on of the screen.
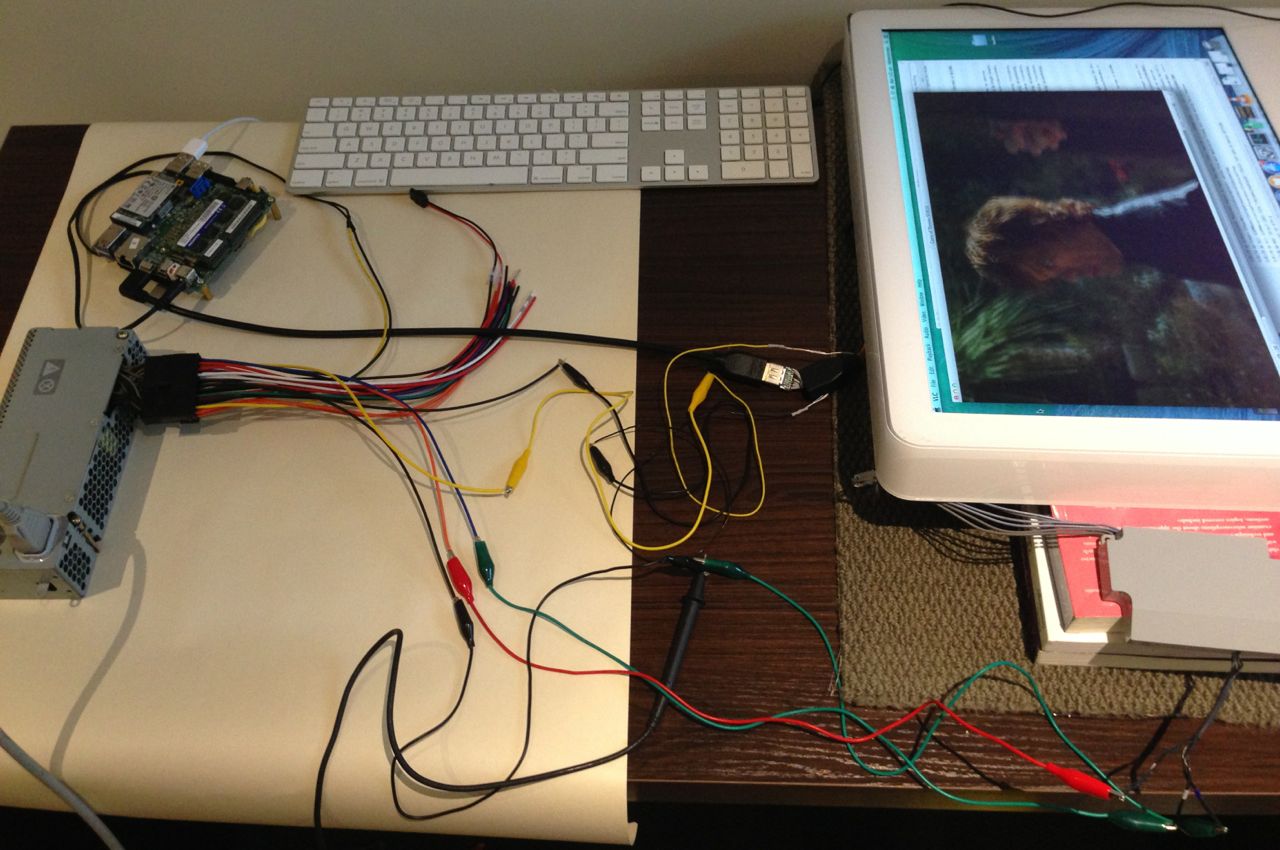
Success.
Original ATX PSU Usage
Here is the iMac’s PSU
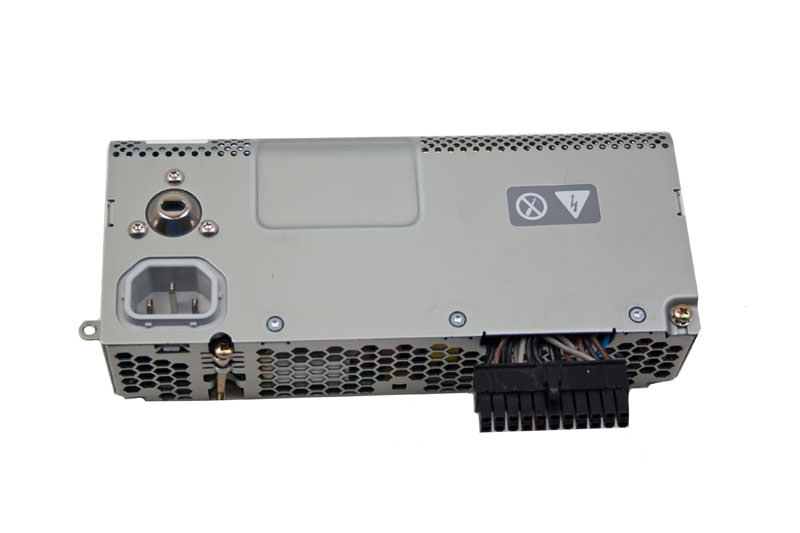
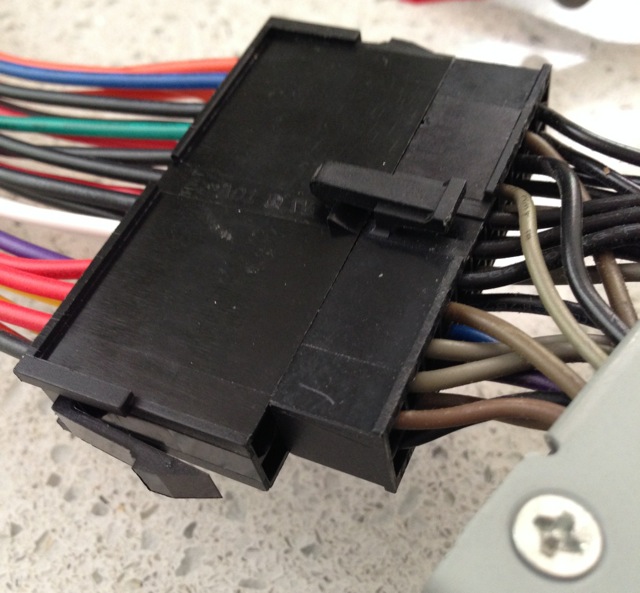
One of the key features of this build was the re-use of the original PSU. The original PSU is basically a ATX PSU, with almost identical Molex connector just with 22 (not 24 pins) and a slightly different pinout.
The pinout can be found here
http://jimwarholic.com/2010/03/measuring-imac-g5-power-supply-voltages-at-connector-plug-pinouts.php
Reusing the original PSU gives me all the normal voltages that are needed, and there is no need for a PICO PSU found in many of the iMac conversions i have read.
I used the socket end of an ATX extension cable, the last two pins were removed, this provided the perfect way to connect to the PSU, keeping the ability to swap the PSU as necessary.
One of the reasons I waited for the Haswell NUC is it runs off a 12V DC power source (previous generations required 19V). The NUC can be fed directly from the ATX PSU, so no need for specific 19V PSU.
The other huge advantage of the native ATX PSU is it provides the necessary 24V required for the LCD backlight inverter. This greatly simplified the build as didn’t need an DC up converter.
There is one problem however. Because the NUC is powered from a single DC power input (not ATX), the power input needs to be turned on before the NUC can start, basically I need a way of switching on the ATX PSU, before the NUC can start.
One possibility is to provide a seperate power switch for the PSU, wire the PSU so it is turned on all the time and rely on the user to switch off at the wall. Neither of these options is desirable, they compromise the simplicity of an all in one computer.
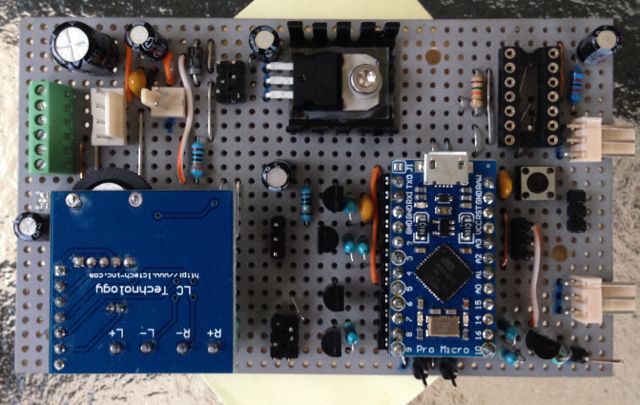
The solution was a custom SMC controller
SMC Controller
The System Management Controller, plays an active role in co-ordinating the functions of the computer, primarily to manage the power states including the LCD backlight control.
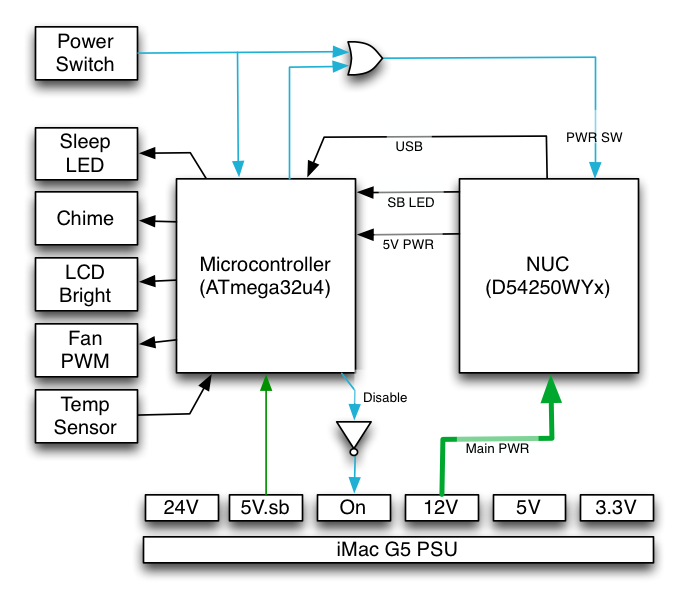
Here are the highlights:
- The SMC is powered from the 5V Standby Power so is always on.
- Monitors the pressing of the iMac main power button.
- It controls the ATX PSU so can turns it on and off when needed.
- Detects the power state of the NUC by monitoring the NUC’s front panel LED.
- Controls the front panel LED for status, and sleep pulsing effect.
- Controls the LCD backlight, is able to turn on and off, and adjust brightness.
- Controls internal fan speeds, based on temperature sensors inside the case.
- Fail safe design, a reboot of the SMC leaves computer fully operational
The SMC software implements a state machine that controls the operation of he computer
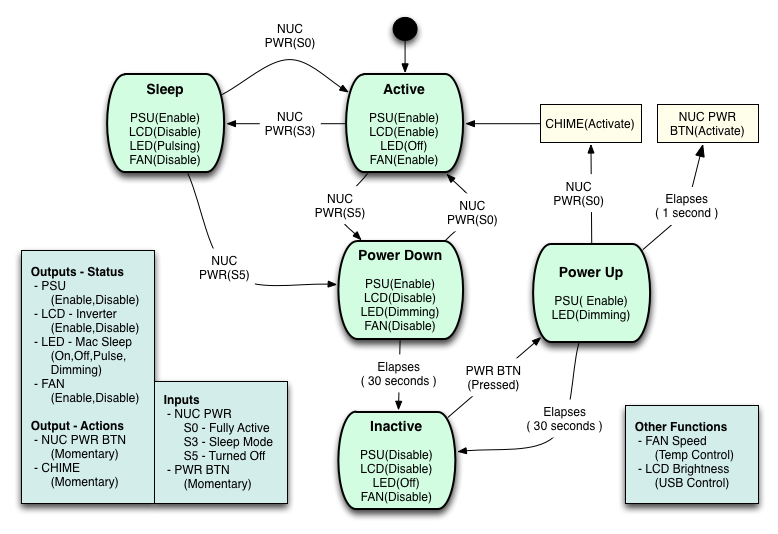
The real trick here is that when the computer is plugged in power but not turned on, the ATX PSU is turned off. The SMC is running of standby power and can detect the user pressing the main power switch. It then turns the ATX PSU on, waits 1/2 a second, then simulates the pressing of the NUCS power button, thus allowing the NUC to start.
Because the SMC is controlling the LCD backlight inverter another trick is to delay the turn of inverter a few seconds after initial startup, so that those annoying BIOS startup messages (still displayed) are hidden from the user.
The SMC is based on an Arduino “Leonardo” comparable micro controller, that I chose for small size and its capabilities.

An here is the Constructed SMC board, the constructed board integrates other functions such as the main audio amplifier, to drive the main speakers.
And here it is installed in the iMac
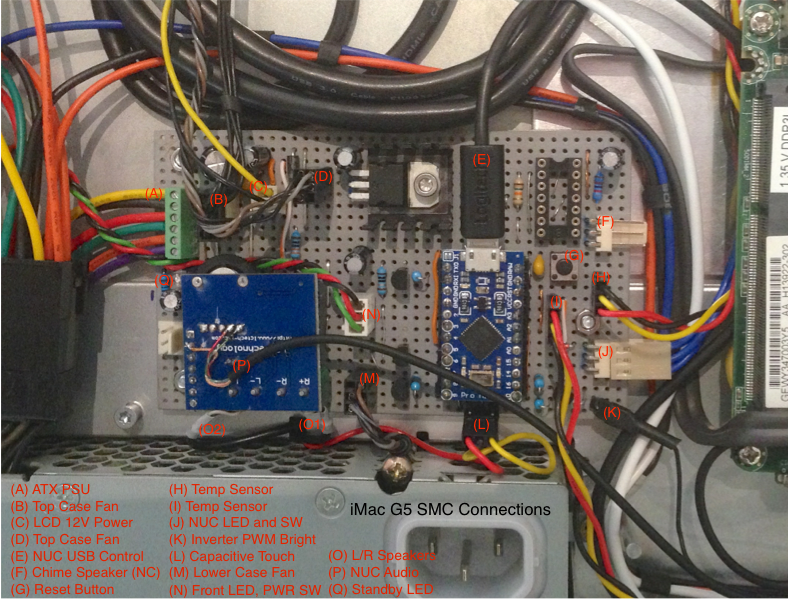
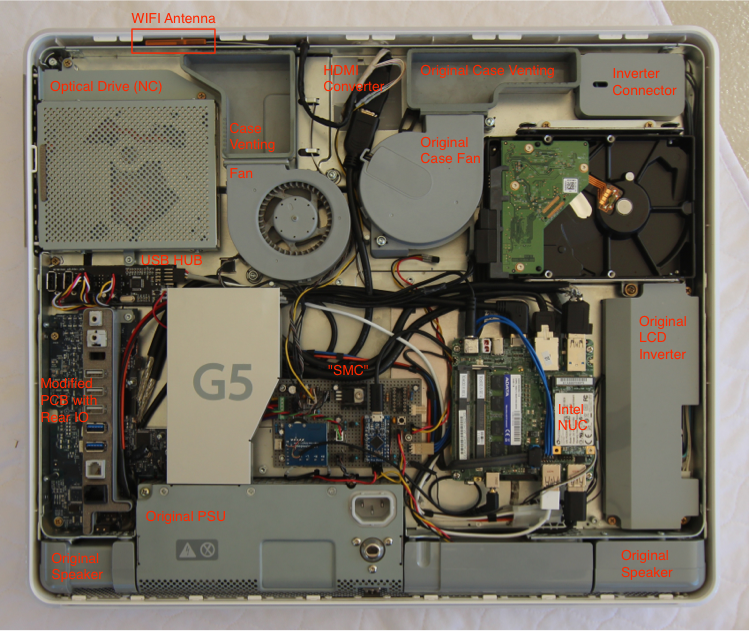
And the back of the computer fully assembled
Brightness Control
With any iMac conversion control of the LCD brightness (inverter) is of importance. In most recent build the use of external control such as simple potentiometer, or capacitive touch up down controls. I wanted something a bit more authentic.
I came up with this solution

It is a application that runs in OSX that allows the brightness to be set, it graphically looks identical to the volume menu bar item (for consistency). So how does this work?
The arduino has a USB port with a serial interface for programming the divice and general purpose IO. The menu bar application uses this to send commands to the firmware that I wrote, to allow the brightness to be controlled.
As well as controlling brightness this application also detects the display sleep condition, sending commands to disable/enable the backlight inverter, thus when the display goes to sleep, the backlight is turned off.
This feature is especially important since the backlight consumes more power than the computer itself, but more importantly by shutting off the backlight extends it's life. I am not aware of another iMac conversion that provides this function.
Thanks goes to MacTester for helping develop and test this feature.
I use the serial interface for monitoring and controlling many of the functions of the SMC. Many of the operational parameters, like temperature to fan speed ratios, screen brightness limits, etc, are stored in EEPROM, thus I can change the bahaviour without have to compile and flash new firmware.
FINAL RESULTS
Short Video
Here is a short video showing the startup and operation of the computer.
[video=youtube;rQsx8UPUHIo]https://www.youtube.com/watch?v=rQsx8UPUHIo[/video]
Notice that during startup there are no annoying BIOS messages displayed
Also note that during the reflashing of the SMC the fans (and LCD) come on fully, this is the failsafe design.
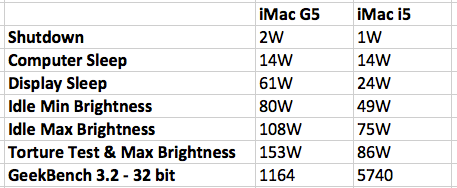
Power & Performance
Here are the power used (before and after)
Omissions / Improvements
Things that didn’t work out:
- Chime - I choose the ISD1820 round recorder based on other threads I had read, and included it in my design, including the SMC design and build. In latter testing I discovered that really it wasn't fit for purpose, the quality of the recorded sound didn't meet my expectations, so I chose not to include it.
- Optical Drive - Just needs to be wired up to a USB adapter, but I hardly remember the last time I needed an optical drive so no big deal for me.
- Internal Bluetooth - not a priority, as have an external dongle I can use
- Displayport on Rear - could be done, finding an appropriate extension cable is the issue, but again I have no real need for it at this time.
The main resource for this build is the detailed build thread itself. What I have written above is just a summary of the Key design aspects of the computer. However rather than read the entire thing, (it is quite lengthy), I have compiled a table of contents so you can get further details and pictures on any subject that may interest you.
http://www.tonymacx86.com/imac-mods/107859-kiwis-next-project-imac-g5.html#post657664 - Part 1 - Introduction & Goals
http://www.tonymacx86.com/imac-mods/107859-kiwis-next-project-imac-g5.html#post657970 - Part 2&3 - Power Supply & Management
http://www.tonymacx86.com/imac-mods/107859-kiwis-next-project-imac-g5-3.html#post661004 - Part 4 - LCD Inverter Pinout
http://www.tonymacx86.com/imac-mods/107859-kiwis-next-project-imac-g5-3.html#post666896 - Part 5 - Architecture Revised
http://www.tonymacx86.com/imac-mods/107859-kiwis-next-project-imac-g5-4.html#post681755 - Part 6 - iMac Fan Pinout Details
http://www.tonymacx86.com/imac-mods/107859-kiwis-next-project-imac-g5-4.html#post681759 - Part 7 - Micro-controller Selection
http://www.tonymacx86.com/imac-mods/107859-kiwis-next-project-imac-g5-4.html#post681780 - Part 8a - Case Fan Speed Controller
http://www.tonymacx86.com/imac-mods/107859-kiwis-next-project-imac-g5-4.html#post696930 - Part 8b - Screen Brightness Control
http://www.tonymacx86.com/imac-mods/107859-kiwis-next-project-imac-g5-7.html#post761888 - Part 9 - iMac G5 Disassembly Pictorial
http://www.tonymacx86.com/imac-mods/107859-kiwis-next-project-imac-g5-7.html#post763190 - Part 10 - LCD Conversion to HDMI
http://www.tonymacx86.com/imac-mods/107859-kiwis-next-project-imac-g5-8.html#post763627 - Part 11 - SUCCESS. iMac LCD conversion
http://www.tonymacx86.com/imac-mods/107859-kiwis-next-project-imac-g5-9.html#post764179 - Part 11a - LCD Wiring Connection Guide
http://www.tonymacx86.com/imac-mods/107859-kiwis-next-project-imac-g5-10.html#post766724 - Part 12 - SMC Micro-controller Board
http://www.tonymacx86.com/imac-mods/107859-kiwis-next-project-imac-g5-12.html#post770755 - Part 13 - Main Arduino Software
http://www.tonymacx86.com/imac-mods/107859-kiwis-next-project-imac-g5-12.html#post771148 - Part 13a - SMC Board Complete
http://www.tonymacx86.com/imac-mods/107859-kiwis-next-project-imac-g5-13.html#post773673 - Part 14a - SMC Troubles and Fixes
http://www.tonymacx86.com/imac-mods/107859-kiwis-next-project-imac-g5-13.html#post776138 - Part 14b - SMC Troubles and Fixes - Part II
http://www.tonymacx86.com/imac-mods/107859-kiwis-next-project-imac-g5-14.html#post780880 - Part 15 - First Working Assembly
http://www.tonymacx86.com/imac-mods/107859-kiwis-next-project-imac-g5-16.html#post812078 - Part 16 - SMC State Machine Fix
http://www.tonymacx86.com/imac-mods/107859-kiwis-next-project-imac-g5-16.html#post812441 - Part 17 - Wiring of Front Panel Switch and LED
http://www.tonymacx86.com/imac-mods/107859-kiwis-next-project-imac-g5-16.html#post812450 - Part 18 - Brightness Menu Code Change
http://www.tonymacx86.com/imac-mods/107859-kiwis-next-project-imac-g5-18.html#post843293 - Part 19 - Rear IO Port Conversion
http://www.tonymacx86.com/imac-mods/107859-kiwis-next-project-imac-g5-18.html#post844215 - Part 19a - Updated SMC Board Design (Rev1.1)
http://www.tonymacx86.com/imac-mods/107859-kiwis-next-project-imac-g5-19.html#post845122 - Part 20 - Temp Input Sensors
http://www.tonymacx86.com/imac-mods/107859-kiwis-next-project-imac-g5-19.html#post847398 - Part 21 - Capacitive touch input
http://www.tonymacx86.com/imac-mods/107859-kiwis-next-project-imac-g5-19.html#post849256 - Part 22 - Breathing LED
Also I have a github account that I can post all the final build schematics, and code if requested.
https://github.com/kiwisincebirth/iMacG5
Also thanks to all the support for forum member, including WonkeyDonkey for his work on the NUC software build (http://www.tonymacx86.com/mavericks...e-intel-haswell-nuc-core-i5-d54250wyk-v2.html), and MacTester for his software expertise helping to get the Brightness menu code working, along with all the other forum members who worked iMac builds that provided inspiration and assistance.
Hope you enjoy this build
Kiwi

